The Data Flow Interface
|
How to: |
|
Reference: |
The Data Flow interface consists of:
- The workspace, where you build your data flows to extract and move data from data source objects to data target objects. Arrows connect the objects and support the flow.
- Three tabs under the workspace, Data Flow, Process Flow, and Text View, which provide different views of the flow.
- The Flow tab in the ribbon, which enables you to set data flow properties, run flows, and arrange flow objects. The same tab is active when you create process flows.
- The navigation
pane, where you choose and store flow components. It has six folders:
- The Application Directories folder provides access to flows, procedures, and reports that can be generated from a flow. It also provides access to synonyms that describe data. You can use them as data sources or data targets in your flow.
- The Adapters folder allows you to add and configure adapters.
- The Resource Management folder is used with Resource Analyzer and Resource Governor.
- The Workspace folder allows you to configure the server.
As shown in the following image, when you create a new flow, the Data Flow tab opens by default, with an SQL object in the workspace to anchor the flow. By default, the Synonyms button in the navigation pane is active and ready for you to add data source objects. You can change this from the Options dialog box by clearing the Automatically switch filters check box on the General page. The Flow tab is also active.
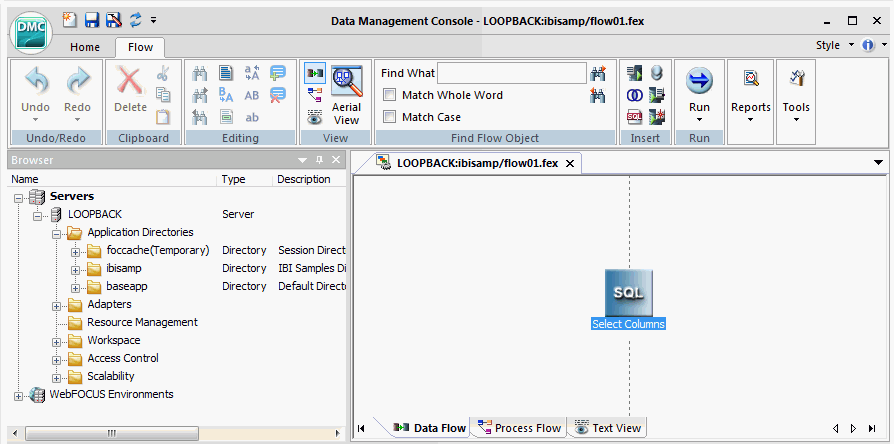
You can add data source objects and data target objects, and use the SQL object to establish rules for extracting and moving data between them.
For more information on the Data Flow Interface, see Working in the Data Management Console.
Reference: Navigation Pane: Procedures
On the Home tab, in the Filter group, clicking Procedures shows saved flows, procedures, and user functions. You can add flows and procedures to a process flow by dragging them from the navigation pane into the workspace.
If
you right-click a flow or a
procedure, or highlight one and press the Menu key  ,
a shortcut menu opens.
,
a shortcut menu opens.
The following options are available:
- Open
-
Adds the flow or procedure to the workspace. A flow opens in the flow editor, while a procedure opens in the text editor.
- Edit as Text
-
Opens a text view of the flow in the workspace. This option is only available for flows.
Note: If you change the text behind the flow, those manual changes will be lost if you edit and re-save the flow in the DMC.
- Submit
-
Submits the flow to the server. This option is only available for a flow. Log information is written to the DataMigrator Log.
- Run
-
Runs the flow or stored procedure immediately. Log information appears in the console log window.
- Run Advanced
-
Has the following options:
- Submit with E-Mail
-
Submits the flow or stored procedure to run in the background. The Submit flow dialog box opens.
The following options are available:
- Run at a specified date and time. Allows you to schedule a procedure to run at a specified date and time.
- Do not wait for completion. Allows you to continue your work as you wait for the submitted flow or stored procedure to complete. When this option is selected, an additional check box appears which allows you to specify that the flow or procedure should be run at a specified date and time.
- Submit changing defaults. Runs a procedure with a prompt to override default values for variables in a procedure or flow, then run it.
- Submit with Limits. This option is only available for DataMigrator flows, not stored procedures. Allows you to specify the start and end of the loading records.
- Report Name. The optional report name.
- Schedule Status. Determines if there is a schedule and if so, whether the schedule is active or inactive.
- ETLLOG. Sends the log to ETLLOG and the output to disk.
- EDAPRINT. Sends the log to EDAPRINT.
- E-Mail. Sends the log and output as an email attachment, if the email notification settings On Completion or On Failure are requested.
- Send HTML output as inline message. When selected, if any stored procedures called by the flow generate an output, the message is included as message text, instead
of as an attachment.
Note: This option for a flow schedule works in conjunction with the Merge formatted output into log option that is available for a Scheduler Special Service. The following considerations should be taken into account:
- When the Send HTML output as inline message and Merge formatted output into log options are selected, the submitted flow emails the attached ETLLOG file and the HTML output is embedded into the body of the email.
- When the Send HTML output as inline message and Merge formatted output into log options are not selected, the submitted flow emails the attached ETLLOG file and the HTML output is embedded into the attached ETLLOG file
- E-mail Notification Condition. Allows
you to specify conditions for sending email. The options are:
- E-Mail On Start
-
Sends an email when the procedure begins.
- E-Mail On Completion
-
Sends an email when the procedure completes.
- E-Mail On Failure
-
Only used if the procedure fails.
- Mail To
-
Is the field where you enter the email address that the message is being sent to.
On Completion or Failure, the email message will contain attachments of the log and output from the procedure, if there are any.
- Run Stress
-
Generates a script for scalability testing. For more information, see the Server Administration manual for UNIX, Windows, OpenVMS, IBM i, and z/OS.
- Schedule and E-mail
-
Has the following options:
- Manage. Allows
the schedule and email notification settings for a flow or stored
procedure to be changed without opening the flow.
For more information about Scheduler options, see Schedule Attribute Pane. For more information on email notifications, see How to Set the Flow Email Notification Properties.
- Scheduler Agents. This report runs for the user whose ID value is stored in the sched_scan_id of a Scheduler. The Scheduler must be active to run the Scheduler Agents report.
- Scheduled Events. Opens a window that shows all jobs scheduled to run during a specified time range. The Scheduler must be active to run the Scheduler Events report.
- Manage. Allows
the schedule and email notification settings for a flow or stored
procedure to be changed without opening the flow.
- Logs
-
Has the following options:
- Last Log. Shows the last log available for the selected flow or stored procedure.
- Last Output. Shows the last output, if any, for the selected flow.
- Log and Statistics. Opens
the Log and Statistics dialog box that enables you to view a log
or statistics report. The following options are available.
- Report Type
-
Allows you to select either a log or statistics report.
- Report Range
-
Allows you to select to view the last report, all the reports, or a report specified within a select time range.
- Completion Status
-
Allows you to view the log for all flows, all completed flows, all flows completed successfully, or all completed flows that contained errors.
- Run by
-
Allows you to view reports for all flows, including those initiated by the scheduler or submitted by the user. This includes flows initiated from the DMC, WC, and CMRUN.
- Application or Flow Name
-
Allows you to specify a specific application, flow, or procedure to run the report on.
- Analysis Reports
-
Has the following options:
- Impact Analysis. Opens a report that shows every flow or stored procedure that calls the selected flow.
- Dependencies Analysis. Opens a report that shows all synonyms used by the selected data flow and all flows and procedures used by the selected process flow.
- Data Lineage. Opens a report that shows the name of each field used in the procedure, how it is used, its synonym name, and the name of the table and column in the underlying database.
- Flow Report
-
Provides a summary of the attributes of the flow. This option is only available for flows.
- Download
-
Allows you to download the selected file to the Downloads directory in your system.
- Cut, Copy, Delete, Rename
-
Cuts, copies, deletes, or renames the flow or stored procedure.
- Privileges
-
This option is only available if the server is started with security enabled. For more information, see Manage Privileges Dialog Box.
- Source Control
-
This option only appears if you have a source management program configured on your machine. It has the following options:
- Add/Check In
-
Adds or checks files into source management.
- Check Out
-
Checks files out of source management.
- Undo Check Out
-
Cancels a check out.
- History
-
Provides the source management history of a file.
- Properties
-
Opens a Properties dialog box of the selected flow or stored procedure.
Procedure: How to Manage Scheduled Flows
- Right-click Application Directories or
an individual application directory, point to Schedule
and E-mail, and then click Scheduler Agents.
The Scheduler Agents for window opens, as shown in the following image.
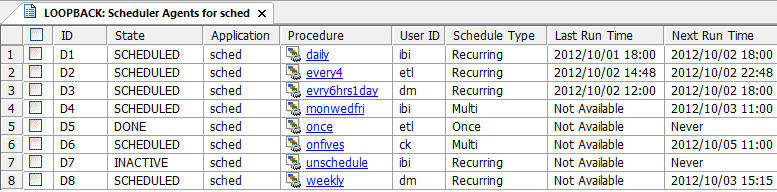
- Select or clear the check boxes for any flow you want to make active or inactive.
- On the Report tab, from the Tools group, click Activate Selected or Deactivate Selected.
Reference: Navigation Pane: Synonyms
On the Home tab, in the Filter group, click Synonyms to show synonyms that describe the data. You can use them as data sources or data targets in your flow. The synonym type is listed after its name. The type of synonyms available will depend on the adapters that are configured on your server.
If you right-click a
synonym, or highlight one and click the Menu key ,
the following options are made available:
- Open
-
Opens the synonym in the workspace. The file, segments, and columns appear on the left, and their attributes and values appear on the right.
- Edit as Text
-
Places the synonym code in the workspace where it can be edited.
- Edit Access File as Text
-
Places a relational synonym Access File in the workspace where it can be edited. This option is not available for FOCUS files.
- Sample Data
-
Shows a sample of the data associated with the synonym.
- Data Profiling
-
Provides the data characteristics of the selected synonym columns. The following options are available:
- Statistics
-
Provides a data profile of each column of the selected synonym. For more information, see How to View a Data Profiling Report.
- Count
-
Shows a count of the number of rows in the selected source table. For a multi-segment synonym, it shows the count for each segment.
- Key Analysis
-
Analyzes the data source to find out which columns or combination of columns are unique and could potentially be used as key columns.
- Analysis Reports
-
The following options are available:
- Impact Analysis
-
Allows you to assess the impact of a change to the synonym on this server and any subservers that use it. Lists all flows, stored procedures, or reports using the synonym. For data flows, it will indicate whether the synonym is used as a source or a target. Flows and stored procedures are referred to generically as procedures.
- Dependencies Analysis
-
For a synonym that contains a cluster join or multiple tables, all synonyms directly referenced by the selected synonym will be shown.
- Metadata Management
-
The following options are available:
- Create Cluster Synonym
-
Opens a new synonym in the Synonym Editor with a reference to the selected synonym. References to additional synonyms can be added to create a cluster synonym comprising multiple tables.
- Refresh
-
Refreshes the selected synonym. Updates the synonym from the database with changed field information while preserving its old title, description, usage, DEFINE field, and DBA information.
- Refresh Synonym
-
Refreshes the selected synonym. Updates the synonym from the database with changed field information while preserving its old title, description, usage, DEFINE field, and DBA information.
- Data Management
-
The following options are available:
- Recreate DBMS Table
-
Deletes the data and recreates the underlying DBMS table of the synonym.
Synonyms created in Release 7.7.04 or later include information about database indexes.
-
Note: Use caution when using this command if the database table was created using the data description language of a particular RDBMS. Some attributes of relational database tables, including the column order and database constraints, are not reflected in the synonym, and therefore, cannot be recreated.
- Delete ALL Data
-
Deletes the data from a table or file described by a synonym. This is useful to clear a synonym that will be used as a data target.
- Drop Table
-
Drops the underlying table from the database or deletes a file from the disk.
- Insert Sample Data
-
Loads the synonym with sample records (for relational and flat file synonyms). You will be prompted for the number of sample records to load into the table.
-
Note: If you are inserting sample data into a flat file, the synonym must contain a DATASET statement indicating where to put the data.
- Show/Modify Data
-
Allows you to view and edit data in a database table.
- Quick Copy
-
Creates a simple data flow that selects all rows and columns from a source table. For more information on this option, see Creating a Quick Copy.
- Impact Analysis
-
Allows you to assess the impact of a change to the synonym on this server and any subservers that use it. Lists all flows, stored procedures, or reports using the synonym. For data flows, it will indicate whether the synonym is used as a source or a target. Flows and stored procedures are referred to generically as procedures.
- Dependencies Analysis
-
For a synonym that contains a cluster join or multiple tables, all synonyms directly referenced by the selected synonym will be shown.
- Download
-
Allows you to download the selected file to the default Downloads directory in your system. When a synonym is selected, a shortcut menu allows you to select either Master File or Access File. These are the two files that comprise a synonym.
- Source Control
-
This option only appears if you have a source management program configured on your PC. It has the following options:
- Add/Check In
-
Adds or checks files into source management.
- Check Out
-
Checks files out of source management.
- Undo Check Out
-
Cancels a check out.
- History
-
Provides the source management history of a file.
For more information regarding source management programs, see Source Management.
- Cut, Copy, Delete, Rename
-
Cuts, copies, deletes, or renames the synonym.
- Privileges
-
This option is only available if the server is started with security enabled. For more information, see Manage Privileges Dialog Box.
- Properties
-
Opens a Properties dialog box of the selected synonym.
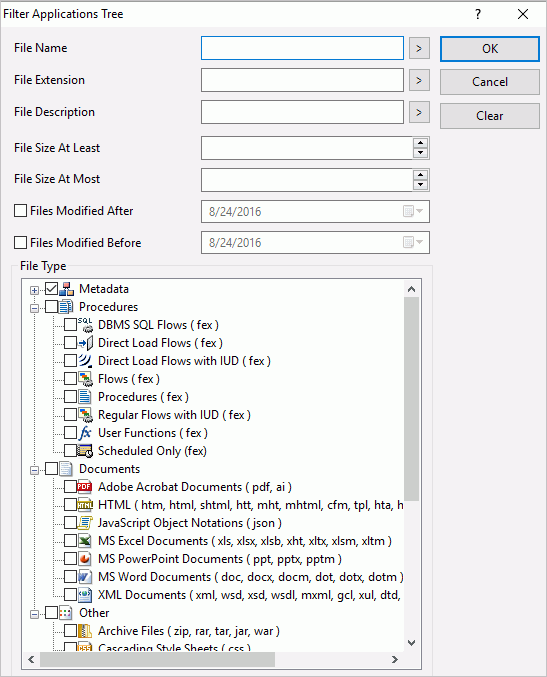
Reference: Advanced Filter
The Advanced Filter gives you finer control over the file types that appear in the navigation pane. For example, you could specify that you only want to see synonyms for the MS SQL Server tables. It also lets you restrict display to files with specified names (using wildcards) or descriptions, files modified in a specific time period, or those of a specified size.
On the Home tab, from the Filter group, click Advanced. The Filter Applications Tree dialog box opens, as shown in the following image.
| WebFOCUS | |
|
Feedback |