Managing XML Metadata
|
Topics: |
When the server accesses a data source, it needs to know how to interpret the data that it finds. For each data source the server will access, you create a synonym that describes the structure of the data source and the server mapping of the XML data types.
Creating Synonyms
|
How to: |
|
Reference: |
Synonyms define unique names (or aliases) for each XML data structure that is accessible from a server. Synonyms are useful because they hide the location and identity of the underlying data source from client applications. They also provide support for extended metadata features of the server such as virtual fields and additional security mechanisms.
Using synonyms allows an object to be moved or renamed while enabling client applications to continue functioning without modification. The only modification required is a redefinition of the synonym on the server. The result of creating a synonym is a Master File and Access File based on a given XML document.
Procedure: How to Create a Synonym
- From the
Web Console sidebar, click Applications or Connect to Data.
The Applications page opens.
- If you started from the Applications page, right-click an application folder, point to New,
and click Synonym on the context menu.
The Connect to Data page opens.
- On the Configured list, click the down arrow next to a
connection for the configured adapter, or right-click a connection.
Depending on the type of adapter you chose, one of the following options appears on the context menu.
- Show DBMS objects. This opens the page for selecting synonym objects and properties.
- Create metadata objects. This opens the page for selecting synonym objects and properties.
- Show files. This opens a file picker. After you choose a file of the correct type, the page for selecting synonym objects and properties opens.
- Show local files. This opens a file picker. After you choose a file of the correct type, the page for selecting synonym objects and properties opens.
- Show topics. This opens the page for selecting synonym objects and properties for topics within the Kafka environment.
- Enter values for the parameters required by the adapter as described in the chapter for your adapter.
- After entering
the parameter values, click the highlighted button on the ribbon.
The button may be labeled Next, Create Synonym, Create Base Synonyms, Create Cluster Synonym, or Update Base Synonyms.
The synonym creation process for most adapters has been consolidated so that you can enter all necessary parameters on one page. However, for some adapters such as LDAP, you must click Next buttons until you get to a page that has a Create Synonym button.
The synonym is created and added under the specified application directory.
Note: When creating a synonym, if you choose the Validate check box (where available), the server adjusts special characters and checks for reserved words. For more information, see Validation for Special Characters and Reserved Words.
Reference: Synonym Creation Parameters for XML
The following list describes the parameters for which you will need to supply values, and related tasks you will need to complete in order to create a synonym for the adapter. These options may appear on multiple panes. To advance from pane to pane, click the buttons provided, ending with the Create Synonym button, which generates the synonym based on your entries.
You can create a synonym based on either an XML document or an XML schema, which can either be on your local file system or at a URL, as shown in the following image:
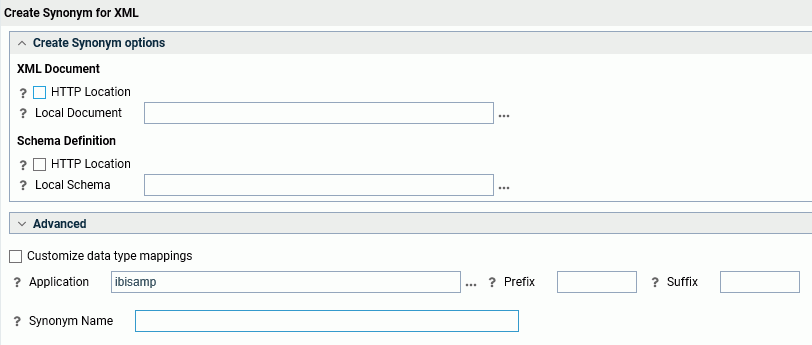
- If you want to base the synonym on an XML document, enter the required parameters in the XML Document section.
- If you want to base the synonym on an XML schema, enter the required parameters in the Schema Definition section..
- HTTP Location
-
Enables you to select a document instance from a URL. This selection requires a Base Location, Document Name, and Document Extension. These fields become available if you select the HTTP Location check box. Enter the http address of a directory that contains the XML document you are using to create the synonym. (This functionality is not available when the XML document is a local file.) The URL must start with http:// or https://.
- Local Document
-
Defines the location of the document instance. Enter a physical path or application directory and the XML document name, or click the ellipsis (...) to navigate to the document.
- Document Name
-
Enter the name of the XML document.
- Document Extension
-
Enter the document extension. The default is xml.
Advanced Section
Synonym field names processing options
- Validate
-
Select the Validate check box if you wish to convert all special characters to underscores and perform a name check to prevent the use of reserved names. (This is accomplished by adding numbers to the names.) This parameter ensures that names adhere to specifications. See Validation for Special Characters and Reserved Words for more information.
When the Validate option is cleared, only the following characters are converted to underscores: '-'; ' '; ' \'; '/'; ','; '$'. No checking is performed for names.
- Make unique
-
Select the Make unique check box if you wish to set the scope for field and group names to the entire synonym. This ensures that no duplicate names are used, even in different segments of the synonym. When this option is unchecked, the scope is the segment.
- Synonym Name
-
Indicates the name that will be assigned to the synonym. To assign a different name, replace the displayed value.
- Write
-
When using a schema file (.xsd), this option includes more information in the synonym Access File. The additional information reflects CHOICE and SEQUENCE definitions of complex XML data types and is used in XML MODIFY.
- Position
-
Defines the XPATH to the element subtree on which the synonym will be based.
- Application
-
Select an application directory. The default value is baseapp.
- Prefix/Suffix
-
If you have tables with identical table names, assign a prefix or a suffix to distinguish them. For example, if you have identically named human resources and payroll tables, assign the prefix HR to distinguish the synonyms for the human resources tables. Note that the resulting synonym name cannot exceed 64 characters.
If all tables and views have unique names, leave the prefix and suffix fields blank.
Once you have entered the parameters, click Create Synonym on the ribbon.
Example: Creating a Synonym for the empxml xsd
empxml.xsd
<?xml version="1.0" encoding="UTF-8"?>
<xsd:schema xmlns:xsd="http://www.w3.org/2001/XMLSchema" xmlns:tns="http://example.org/employee/" targetNamespace="http://example.org/employee/">
    <xsd:simpleType name="genderIdentifiers">
        <xsd:restriction base="xsd:string">
            <xsd:enumeration value="male"/>
            <xsd:enumeration value="female"/>
        </xsd:restriction>
    </xsd:simpleType>
    <xsd:simpleType name="socialSecurityNumber">
        <xsd:restriction base="xsd:string">
                <xsd:pattern value="\d{3}\-\d{2}\-\d{4}"/>
                </xsd:restriction>
    </xsd:simpleType>
    <xsd:complexType name="annotatedAge">
        <xsd:simpleContent>
            <xsd:extension base="xsd:unsignedShort"/>
        </xsd:simpleContent>
    </xsd:complexType>
    <xsd:complexType name="Person">
        <xsd:sequence>
            <xsd:element name="name" type="xsd:string"/>
            <xsd:element name="sex" type="tns:genderIdentifiers"/>
            <xsd:element name="age" type="tns:annotatedAge"/>
        </xsd:sequence>
    </xsd:complexType>
    <xsd:complexType name="Employee">
        <xsd:complexContent>
            <xsd:extension base="tns:Person">
                <xsd:sequence>
                    <xsd:element name="ssnum" type="tns:socialSecurityNumber"/>
                    <xsd:element name="salary" type="xsd:double"/>
                </xsd:sequence>
            </xsd:extension>
        </xsd:complexContent>
    </xsd:complexType>
    <xsd:element name="employee" type="tns:Employee"/>
</xsd:schema>
To generate a synonym from the empxml xsd, enter the location of the xsd file on the Create Synonym pane of the Web Console or the Data Management Console or click the ellipsis to navigate to the xsd file on your local file system, as shown in the following image.
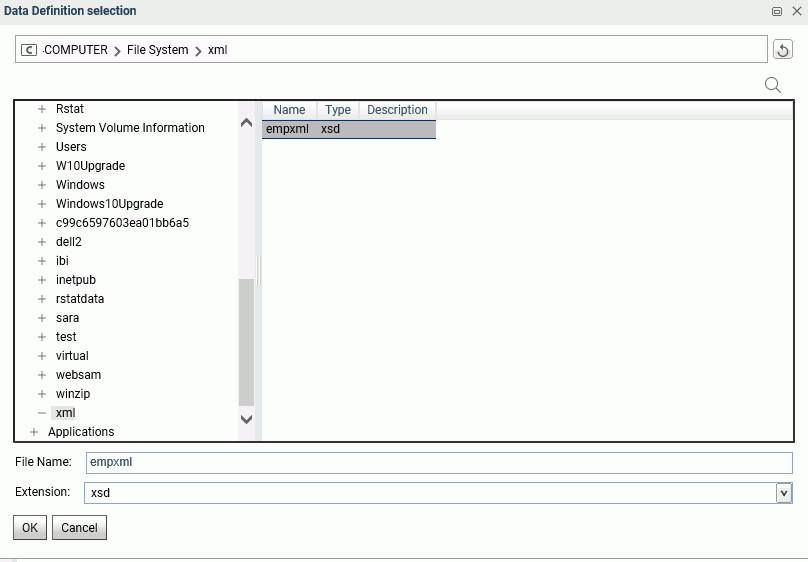
In this case, the .xsd file is on the file system at:
c:\xml\empxml.xsd
- Click Next.
- Select empxml in the Name field.
- Click Create Synonym on the ribbon. The synonym is created and added under the specified application directory (ibisamp is the default).
- Open the ibisamp application folder in the navigation pane, right-click the empxml synonym, and choose Edit as Text to view the generated Master File.
- Right-click the empxml synonym and choose Edit Access File as Text to view the corresponding Access File.
Generated Master File empxml.mas
FILENAME=EMPXML, SUFFIX=XML     , $
  SEGMENT=EMPLOYEE, SEGTYPE=S0, $
    FIELDNAME=EMPLOYEE, ALIAS=employee, USAGE=A1, ACTUAL=A1, ACCESS_PROPERTY=(INTERNAL), $
    FIELDNAME=NAME, ALIAS=name, USAGE=A10, ACTUAL=A10,
      REFERENCE=EMPLOYEE, PROPERTY=ELEMENT,  $
    FIELDNAME=SEX, ALIAS=sex, USAGE=A10, ACTUAL=A10,
      ACCEPT='male' OR 'female',
      REFERENCE=EMPLOYEE, PROPERTY=ELEMENT,  $
    FIELDNAME=AGE, ALIAS=age, USAGE=I5, ACTUAL=A5,
      REFERENCE=EMPLOYEE, PROPERTY=ELEMENT,  $
    FIELDNAME=SSNUM, ALIAS=ssnum, USAGE=A10, ACTUAL=A10,
      REFERENCE=EMPLOYEE, PROPERTY=ELEMENT,  $
    FIELDNAME=SALARY, ALIAS=salary, USAGE=E24.16, ACTUAL=A24,
      REFERENCE=EMPLOYEE, PROPERTY=ELEMENT,  $
Generated Access File empxml.acx
SEGNAME=EMPLOYEE,
   TARGETNS=http://example.org/employee/,
   LOCATION=C:\xml\empxml.xsd, $
  ID=tns,
    NS=http://example.org/employee/,
    ELEMFORM=unqualified,
    ATTRFORM=unqualified, $
   FIELD=EMPLOYEE,
     TYPE=Employee,
     NS_ID=tns, $
   FIELD=SEX,
     TYPE=genderIdentifiers,
     NS_ID=tns, $
   FIELD=AGE,
     TYPE=annotatedAge,
     NS_ID=tns, $
   FIELD=SSNUM,
     TYPE=socialSecurityNumber,
     NS_ID=tns, $
Syntax: How to Create Synonyms From Schema Subsets
If you want to create a synonym from a large XML schema, you can improve performance by using a subset based on a given position in the hierarchy. This creates a smaller synonym from a subtree (child element) of the XML root.
The syntax is:
CREATE SYNONYM child_element FOR schema.xsd
DBMS XML
AT app_dir
PARMS POSITION=/parent_element/child_element
DROP
END
where:
- child_element
-
Is the subtree from which the synonym is created.
- schema.xsd
-
Is the schema on which the synonym is based.
- app_dir
-
Is the application directory where the synonym is created.
- PARMS POSITION
-
Indicates the position in the schema hierarchy.
- parent_element
-
Is the parent element located at the top-level of the schema hierarchy.
In the following example, the synonym is created for the chapter subtree. The chapter is a child of the book element, which is located at the top-level of the xmlbook schema hierarchy:
CREATE SYNONYM chapter FOR xmlbook.xsd
DBMS XML
AT baseapp
PARMS POSITION=/book/chapter
DROP
END
XPATH=/book is added to the Access File to indicate the position of chapter (the root segment in the synonym) in the schema hierarchy.
When issuing TABLE requests or writing XML based on the synonym, the actual path of the node is required. Since chapter is not the root node in the original schema, the path from the top of the schema to chapter is /book/chapter.
When writing XML files based on the synonym, the chapter element will be wrapped inside the book element, as in <book><chapter>...</chapter></book>.
When reporting on an XML file based on the synonym, you should overlook book since chapter is right under book.
Reference: Managing Synonyms
Once you have created a synonym, you can right-click the synonym name in the Adapter navigation pane of either the Web Console or the Data Management Console to access the available options.
For a list of options, see Synonym Management Options
Accessing XML Documents From a Relational DBMS XML Data Type
|
How to: |
XML documents might be stored in any fields or columns in any data source. Reporting from such documents is supported by defining their structure as subtrees attached to a parent segment which describes the original data.
The synonym creation process must be run against the data in the DBMS and against the XML document. The two Master Files must then be combined to make the XML Master File a child of the Master File created against the DBMS. A FILEDEF is not needed in this instance.
Procedure: How to Access XML Data From an RDBMS Using Web Console or Data Management Console Tools
- Using the Web Console or the Data Management Console Create Synonym facility, generate a synonym for an RDBMS data source that contains a column of XML data. Regardless of the data type used to contain the XML data in the native data source, it will be mapped as a TX column in the Master File synonym. (For example, for Db2 Version 9, the XML data type is mapped to TX; for many RDBMS, the CLOB data type is mapped to TX.)
- Open the generated Master File in the Synonym Editor.
The Master File appears in the right pane in Text View. For example,
the Master File for a Progress data source might look as follows:
FILE=XMLPRO1 ,SUFFIX=SQLPRO ,$
SEGNAME=XMLPRO1 ,SEGTYPE=S0 ,$
FIELD=FLD1 ,FLD1 ,A2   ,A2 ,MISSING=ON ,$
FIELD=FLD2 ,FLD2 ,TX50 ,TX ,MISSING=ON ,$
FIELD=FLD3 ,FLD3 ,TX50 ,TX ,MISSING=ON ,$
Notice that this example has two TX columns, each of which contains different data and requires a separate segment declaration in the Master File.
- From the DMC, click a column described as TX. The pop-up
menu contains the Map External XML option.
The Map External XML option reads the XML data directly and creates the structure. The resulting Master File contains the definition of the XML data, represented as a new segment called SEGSUF=XML, which appears in the Text View pane following the original RDBMS segment. The Master File might look like the following:
FILE=XMLPRO1    ,SUFFIX=SQLPRO ,$
SEGNAME=XMLPRO1 ,SEGTYPE=S0    ,$
FIELD=FLD1 ,FLD1 ,A2   ,A2  ,MISSING=ON ,$
FIELD=FLD2 ,FLD2 ,TX50 ,TX  ,MISSING=ON ,$
FIELD=FLD3 ,FLD33,TX50 ,TX  ,MISSING=ON ,$
SEGMENT=ORDER, SEGTYPE=S0,POSITION=FLD2,PARENT=XMLPRO1,SEGSUF=XML, $
  FIELDNAME=ORDER, ALIAS='Order', USAGE=A1, ACTUAL=A1, $
  FIELDNAME=KEY, ALIAS='key', USAGE=A10, ACTUAL=A10, $
  FIELDNAME=CUSTOMER, ALIAS='Customer', USAGE=A10, ACTUAL=A10, $
  FIELDNAME=STATUS, ALIAS='Status', USAGE=A10, ACTUAL=A10, $
  FIELDNAME=TOTALPRICE, ALIAS='TotalPrice', USAGE=A10, ACTUAL=A10, $
  FIELDNAME=DATE, ALIAS='Date', USAGE=A10, ACTUAL=A10, $
  FIELDNAME=PRIORITY, ALIAS='Priority', USAGE=A10, ACTUAL=A10, $
  FIELDNAME=CLERK, ALIAS='Clerk', USAGE=A10, ACTUAL=A10, $
  FIELDNAME=SHIPPRIORITY,ALIAS='ShipPriority',USAGE=A10,ACTUAL=A10,$
  FIELDNAME=COMMENT, ALIAS='Comment', USAGE=A10, ACTUAL=A10, $
SEGMENT=PORDER, SEGTYPE=S0,POSITION=FLD3,PARENT=XMLPRO1,SEGSUF=XML $
    FIELDNAME=PORDER, ALIAS='Order', USAGE=A1, ACTUAL=A1, $
    FIELDNAME=KEY, ALIAS='key', USAGE=A10, ACTUAL=A10, $
    FIELDNAME=CUSTOMER, ALIAS='Customer', USAGE=A10, ACTUAL=A10, $
    FIELDNAME=ADDRESS, ALIAS='Address', USAGE=A10, ACTUAL=A10, $
    FIELDNAME=STATE, ALIAS='State', USAGE=A10, ACTUAL=A10, $
Tip: If you have a TX column that contains multiple XML formats (for example, a name field and an address field), you can choose Map External XML multiple times to create a separate SEGSUF=XML segment for each format.
- From the Synonym Editor's File menu, save the updated Master File.
Procedure: How to Access XML Data From an RDBMS Manually
Suppose that you have a table in an RDBMS with one or more columns storing XML data. In order to report from the XML data, following these steps:
- Create the Master File for the relational data
source using the format for that DBMS.
FILE=XMLPRO1 ,SUFFIX=SQLPRO ,$
SEGNAME=XMLPRO1 ,SEGTYPE=S0 ,$
FIELD=FLD1 ,FLD1 ,A2   ,A2 ,MISSING=ON ,$
FIELD=FLD2 ,FLD2 ,TX50 ,TX ,MISSING=ON ,$
FIELD=FLD3 ,FLD3 ,TX50 ,TX ,MISSING=ON ,$
- Create a Master File for the XML document in the column of the RDBMS table. If there are two XML documents with different formats, you must create a Master File for each one.
- Manually combine the Master Files. On each root segment
for the XML Master File, add three fields: position, parent and
segsuf. The POSITION keyword identifies the field containing the
XML document. The PARENT field describes the original data source.
The field SEGSUF defines the root segment of an XML document representing
sub-tree. The total length of all fields in the Master File must
not exceed the FOCUS limitation of 32k. If it does, the query will
fail.
FILENAME=BASEAPP/ORDER, SUFFIX=XML    , $
 SEGMENT=ORDER, SEGTYPE=S0, $
  FIELDNAME=ORDER, ALIAS='Order', USAGE=A1, ACTUAL=A1, $
  FIELDNAME=KEY, ALIAS='key', USAGE=A10, ACTUAL=A10, $
  FIELDNAME=CUSTOMER, ALIAS='Customer', USAGE=A10, ACTUAL=A10, $
  FIELDNAME=STATUS, ALIAS='Status', USAGE=A10, ACTUAL=A10, $
  FIELDNAME=TOTALPRICE, ALIAS='TotalPrice', USAGE=A10, ACTUAL=A10, $
  FIELDNAME=DATE, ALIAS='Date', USAGE=A10, ACTUAL=A10, $
  FIELDNAME=PRIORITY, ALIAS='Priority', USAGE=A10, ACTUAL=A10, $
  FIELDNAME=CLERK, ALIAS='Clerk', USAGE=A10, ACTUAL=A10, $
  FIELDNAME=SHIPPRIORITY,ALIAS='ShipPriority',USAGE=A10,ACTUAL=A10,$
  FIELDNAME=COMMENT, ALIAS='Comment', USAGE=A10, ACTUAL=A10, $
FILENAME=BASEAPP/PORDER, SUFFIX=XML     , $
 SEGMENT=PORDER, SEGTYPE=S0, $
  FIELDNAME=PORDER, ALIAS='POrder', USAGE=A1, ACTUAL=A1, $
  FIELDNAME=KEY, ALIAS='key', USAGE=A10, ACTUAL=A10, $
  FIELDNAME=CUSTOMER, ALIAS='Customer', USAGE=A10, ACTUAL=A10, $
  FIELDNAME=ADDRESS, ALIAS='Address', USAGE=A10, ACTUAL=A10, $
  FIELDNAME=STATE, ALIAS='State', USAGE=A10, ACTUAL=A10, $
Combined Master file:
FILE=XMLPRO1    ,SUFFIX=SQLPRO ,$
SEGNAME=XMLPRO1 ,SEGTYPE=S0    ,$
FIELD=FLD1 ,FLD1 ,A2   ,A2  ,MISSING=ON ,$
FIELD=FLD2 ,FLD2 ,TX50 ,TX  ,MISSING=ON ,$
FIELD=FLD3 ,FLD33,TX50 ,TX  ,MISSING=ON ,$
SEGMENT=ORDER, SEGTYPE=S0,POSITION=FLD2,PARENT=XMLPRO1,SEGSUF=XML, $
  FIELDNAME=ORDER, ALIAS='Order', USAGE=A1, ACTUAL=A1, $
  FIELDNAME=KEY, ALIAS='key', USAGE=A10, ACTUAL=A10, $
  FIELDNAME=CUSTOMER, ALIAS='Customer', USAGE=A10, ACTUAL=A10, $
  FIELDNAME=STATUS, ALIAS='Status', USAGE=A10, ACTUAL=A10, $
  FIELDNAME=TOTALPRICE, ALIAS='TotalPrice', USAGE=A10, ACTUAL=A10, $
  FIELDNAME=DATE, ALIAS='Date', USAGE=A10, ACTUAL=A10, $
  FIELDNAME=PRIORITY, ALIAS='Priority', USAGE=A10, ACTUAL=A10, $
  FIELDNAME=CLERK, ALIAS='Clerk', USAGE=A10, ACTUAL=A10, $
  FIELDNAME=SHIPPRIORITY,ALIAS='ShipPriority',USAGE=A10,ACTUAL=A10,$
  FIELDNAME=COMMENT, ALIAS='Comment', USAGE=A10, ACTUAL=A10, $
SEGMENT=PORDER, SEGTYPE=S0,POSITION=FLD3,PARENT=XMLPRO1,SEGSUF=XML $
  FIELDNAME=PORDER, ALIAS='Order', USAGE=A1, ACTUAL=A1, $
  FIELDNAME=KEY, ALIAS='key', USAGE=A10, ACTUAL=A10, $
  FIELDNAME=CUSTOMER, ALIAS='Customer', USAGE=A10, ACTUAL=A10, $
  FIELDNAME=ADDRESS, ALIAS='Address', USAGE=A10, ACTUAL=A10, $
  FIELDNAME=STATE, ALIAS='State', USAGE=A10, ACTUAL=A10, $
Using Static Joins
You can describe various views of the same physical XML document using Master Files and Access Files.
- In the Master File, you use REFERENCE attributes in field definitions to reflect physical relationships between tags in XML document hierarchies and PARENT attributes, which establish logical hierarchical relationships.
- In the Access File, you use the KEYFLD and IXFLD attributes to identify the XML tags that act as primary/foreign keys in the XML document hierarchies, which establish the logical join relationships. The parent field (foreign key) defined in KEYFLD supplies the value for cross-referencing. The descendant field (primary key) defined in IXFLD contains the corresponding value.
The adapter implements join matching values at run time.
You can use static Joins to create join relationships between hierarchically unrelated integral schema ComplexType definitions using any combination of data nodes.
Any XML tags belonging to these definitions can be used to create join pairs. In addition, you can multiply instances of the same physical segment to reflect logical join relationships as needed.
Note: Static (embedded) Joins are not directly supported by the Create Synonym facility. To take advantage of this feature, after a synonym is generated you must modify its Master and Access Files. The Data Management Console Synonym Editor is the recommended tool for such modifications since it provides an easily identifiable segments hierarchy with drag and drop capability and a visual calculator for KEYFLD/IXFLD modifications. Using the Data Management Console, you can quickly add all duplicate segments to the Master File, then delete any unneeded segments.
In some cases, schemas (such as those produced by Microsoft tools and reflecting relationships between the original MS SQL Server database tables) contain proper XML constraints (unique/key/keyref) for describing joins. You can use this information to modify the Master File:
- The elements unique and key define the primary key for the element (segment).
- The element keyref defines the foreign key for the element (segment).
For an illustration of such a schema, see Modifying Master and Access Files Produced From Schema Exported by an SQL Server.
Example: Modifying Master and Access Files Produced From Schema Exported by an SQL Server
Suppose that two links exist in the schema defined in the file GetAllEmployeesFullDS.xml between the elements Employee and EmployeeTL (segments EMPLOYEE and EMPLOYEETL in the Master File). Two variations follow:
Defines EmployeeTL --> Employee joined by EId/EId pair
In this example, segment EMPLOYEE becomes the child of segment EMPLOYEETL in the Master File, and the Access File describes the foreign and primary keys as follows:
<xs:unique name="Constraint1" msdata:PrimaryKey="true">
   <xs:selector xpath=".//Employee" />
   <xs:field xpath="EId" />
</xs:unique>

<xs:keyref name="EmployeeTl_Employee_EId_EId" refer="Constraint1"
msdata:ConstraintOnly="true">
   <xs:selector xpath=".//EmployeeTl" />
   <xs:field xpath="EId" />
</xs:keyref>
Access File
SEGNAME=EMPLOYEE, KEYFLD=EID, IXFLD=EID, $
Defines Employee --> EmployeeTL joined relationship by TLInformation/EtId pair
In this example, segment EMPLOYEETL becomes the child of segment EMPLOYEE in the Master File, and the Access File describes the foreign and primary keys as follows:
<xs:unique name="EmployeeTl_Constraint1"
msdata:ConstraintName="Constraint1" msdata:PrimaryKey="true">
   <xs:selector xpath=".//EmployeeTl" />
   <xs:field xpath="EtId" />
</xs:unique>

<xs:keyref name="Employee_EmployeeTl_EtId_TLInformation"
refer="EmployeeTl_Constraint1" msdata:ConstraintOnly="true">
   <xs:selector xpath=".//Employee" />
   <xs:field xpath="TLInformation" />
</xs:keyref>
Access File
SEGNAME=EMPLOYEETL, KEYFLD=TLINFORMATION, IXFLD=ETID, $
Example: Sample Join Structures: Original and Modified
This example illustrates an original structure without a static join and the modifications made to reflect the use of static Joins.
Original Structure Without Static Joins
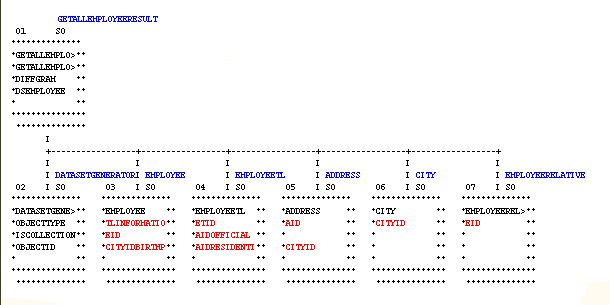
In this native structure all child segments have a common parent; the root segment GETALLEMPLOYEERESULTS.
In the corresponding Master File generated as part of the synonym, the PARENT attribute of each segment declaration describes the logical relationships among segments, while the REFERENCE attribute for each field provides information about the physical parent/child relationships among the elements in the file.
Generated Master File
FILENAME=GETALLEMPLOYEEFULLDS, SUFFIX=XML,
  DATASET=C:\Users\yn05149\apps\xml\GetAllEmployeesFullDS.xml, $
$
  SEGMENT=GETALLEMPLOYEESRESULT, SEGTYPE=S0, $
    FIELDNAME=GETALLEMPLOYEESRESULT, ALIAS=GetAllEmployeesResponse, USAGE=A1,
      ACTUAL=A1, ACCESS_PROPERTY=(INTERNAL), $
    FIELDNAME=GETALLEMPLOYEESRESULT1, ALIAS=GetAllEmployeesResult, USAGE=A1,
      ACTUAL=A1, ACCESS_PROPERTY=(INTERNAL),
      REFERENCE=GETALLEMPLOYEESRESULT, PROPERTY=ELEMENT,  $
    FIELDNAME=DIFFGRAM, ALIAS=diffgram, USAGE=A1, ACTUAL=A1,
      ACCESS_PROPERTY=(INTERNAL),
      REFERENCE=GETALLEMPLOYEESRESULT1, PROPERTY=ELEMENT,  $
    FIELDNAME=DSEMPLOYEE, ALIAS=DSEmployee, USAGE=A1, ACTUAL=A1,
      ACCESS_PROPERTY=(INTERNAL),
      REFERENCE=DIFFGRAM, PROPERTY=ELEMENT,  $
$
  SEGMENT=DATASETGENERATOR, SEGTYPE=S0, PARENT=GETALLEMPLOYEESRESULT, $
    FIELDNAME=DATASETGENERATOR, ALIAS=DataSetGenerator, USAGE=A1, ACTUAL=A1,
      ACCESS_PROPERTY=(INTERNAL),
      REFERENCE=DSEMPLOYEE, PROPERTY=ELEMENT,  $
    FIELDNAME=OBJECTTYPE, ALIAS=ObjectType, USAGE=A30, ACTUAL=A30,
      REFERENCE=DATASETGENERATOR, PROPERTY=ELEMENT,  $
    FIELDNAME=ISCOLLECTION, ALIAS=IsCollection, USAGE=A5, ACTUAL=A5,
      REFERENCE=DATASETGENERATOR, PROPERTY=ELEMENT,  $
    FIELDNAME=OBJECTID, ALIAS=ObjectId, USAGE=I11, ACTUAL=A11,
      REFERENCE=DATASETGENERATOR, PROPERTY=ELEMENT,  $
$
  SEGMENT=EMPLOYEE, SEGTYPE=S0, PARENT=GETALLEMPLOYEESRESULT, $
    FIELDNAME=EMPLOYEE, ALIAS=Employee, USAGE=A1, ACTUAL=A1,
      ACCESS_PROPERTY=(INTERNAL),
      REFERENCE=DSEMPLOYEE, PROPERTY=ELEMENT,  $
    FIELDNAME=EID, ALIAS=EId, USAGE=I11, ACTUAL=A11,
      REFERENCE=EMPLOYEE, PROPERTY=ELEMENT,  $
    FIELDNAME=CITYIDBIRTHPLACE, ALIAS=CityIdBirthplace, USAGE=I11, ACTUAL=A11,
      REFERENCE=EMPLOYEE, PROPERTY=ELEMENT,  $
    FIELDNAME=TLID, ALIAS=TlId, USAGE=I11, ACTUAL=A11,
      REFERENCE=EMPLOYEE, PROPERTY=ELEMENT,  $
    FIELDNAME=EFIRSTNAME, ALIAS=EFirstname, USAGE=A30, ACTUAL=A30,
      REFERENCE=EMPLOYEE, PROPERTY=ELEMENT,  $
    FIELDNAME=ENAME, ALIAS=EName, USAGE=A30, ACTUAL=A30,
      REFERENCE=EMPLOYEE, PROPERTY=ELEMENT,  $
    FIELDNAME=EBIRTHDATE, ALIAS=EBirthdate, USAGE=HYYMDm, ACTUAL=A35,
      REFERENCE=EMPLOYEE, PROPERTY=ELEMENT,  $
    FIELDNAME=IEID, ALIAS=IeId, USAGE=I11, ACTUAL=A11,
      REFERENCE=EMPLOYEE, PROPERTY=ELEMENT,  $
    FIELDNAME=TLINFORMATION, ALIAS=TLInformation, USAGE=I11, ACTUAL=A11,
      REFERENCE=EMPLOYEE, PROPERTY=ELEMENT,  $
$
SEGMENT=EMPLOYEETL, SEGTYPE=S0, PARENT=GETALLEMPLOYEESRESULT, $
FIELDNAME=EMPLOYEETL, ALIAS=EmployeeTl, USAGE=A1, ACTUAL=A1,
ACCESS_PROPERTY=(INTERNAL),
REFERENCE=GETALLEMPLOYEESRESULT.DSEMPLOYEE, PROPERTY=ELEMENT, $
FIELDNAME=ETID, ALIAS=EtId, USAGE=I11, ACTUAL=A11,
REFERENCE=EMPLOYEETL, PROPERTY=ELEMENT, $
FIELDNAME=EID, ALIAS=EId, USAGE=I11, ACTUAL=A11,
REFERENCE=EMPLOYEETL, PROPERTY=ELEMENT, $
FIELDNAME=AIDOFFICIAL, ALIAS=AIdOfficial, USAGE=I11, ACTUAL=A11,
REFERENCE=EMPLOYEETL, PROPERTY=ELEMENT, $
FIELDNAME=AIDRESIDENTIAL, ALIAS=AIdResidential, USAGE=I11, ACTUAL=A11,
REFERENCE=EMPLOYEETL, PROPERTY=ELEMENT, $
FIELDNAME=DEPID, ALIAS=DepId, USAGE=I11, ACTUAL=A11,
REFERENCE=EMPLOYEETL, PROPERTY=ELEMENT, $
$ SEGNAME=ADDRESS, SEGTYPE=S0, PARENT=GETALLEMPLOYEESRESULT, $
FIELDNAME=ADDRESS, ALIAS=Address, USAGE=A1, ACTUAL=A1,
PROPERTY=ELEMENT, REFERENCE=GETALLEMPLOYEESRESULT.DSEMPLOYEE,
ACCESS_PROPERTY=(INTERNAL), $
FIELDNAME=AID, ALIAS=AId, USAGE=I11, ACTUAL=A11,
PROPERTY=ELEMENT, REFERENCE=ADDRESS, $
FIELDNAME=CITYID, ALIAS=CityId, USAGE=I11, ACTUAL=A11,
PROPERTY=ELEMENT, REFERENCE=ADDRESS, $
FIELDNAME=AADDRESS, ALIAS=AAddress, USAGE=A30, ACTUAL=A30,
PROPERTY=ELEMENT, REFERENCE=ADDRESS, $
FIELDNAME=AADDRESSNMBR, ALIAS=AAddressNmbr, USAGE=A30, ACTUAL=A30,
PROPERTY=ELEMENT, REFERENCE=ADDRESS, $
FIELDNAME=ATEL1, ALIAS=ATel1, USAGE=A30, ACTUAL=A30,
PROPERTY=ELEMENT, REFERENCE=ADDRESS, $
FIELDNAME=ATEL2, ALIAS=ATel2, USAGE=A30, ACTUAL=A30,
PROPERTY=ELEMENT, REFERENCE=ADDRESS, $
$ SEGNAME=CITY, SEGTYPE=S0, PARENT=GETALLEMPLOYEESRESULT, $
FIELDNAME=CITY, ALIAS=City, USAGE=A1, ACTUAL=A1, PROPERTY=ELEMENT,
REFERENCE=GETALLEMPLOYEESRESULT.DSEMPLOYEE, ACCESS_PROPERTY=(INTERNAL), $
FIELDNAME=CITYID, ALIAS=CityId, USAGE=I11, ACTUAL=A11,
PROPERTY=ELEMENT, REFERENCE=CITY, $
FIELDNAME=COUNTRYID, ALIAS=CountryId, USAGE=I11, ACTUAL=A11,
PROPERTY=ELEMENT, REFERENCE=CITY, $
FIELDNAME=CITYNAME, ALIAS=CityName, USAGE=A30, ACTUAL=A30,
PROPERTY=ELEMENT, REFERENCE=CITY, $
FIELDNAME=CITYPOSTALCODE, ALIAS=CityPostalcode, USAGE=A30, ACTUAL=A30,
PROPERTY=ELEMENT, REFERENCE=CITY, $
$ SEGNAME=EMPLOYEERELATIVE, SEGTYPE=S0, PARENT=GETALLEMPLOYEESRESULT, $
FIELDNAME=EMPLOYEERELATIVE, ALIAS=EmployeeRelative, USAGE=A1, ACTUAL=A1,
PROPERTY=ELEMENT,
REFERENCE=GETALLEMPLOYEESRESULT.DSEMPLOYEE, ACCESS_PROPERTY=(INTERNAL), $
FIELDNAME=ERID, ALIAS=ErId, USAGE=I11, ACTUAL=A11,
PROPERTY=ELEMENT, REFERENCE=EMPLOYEERELATIVE, $
FIELDNAME=EID, ALIAS=EId, USAGE=I11, ACTUAL=A11,
PROPERTY=ELEMENT, REFERENCE=EMPLOYEERELATIVE, $
FIELDNAME=CITYIDBIRTHPLACE, ALIAS=CityIdBirthplace, USAGE=I11, ACTUAL=A11,
PROPERTY=ELEMENT, REFERENCE=EMPLOYEERELATIVE, $
FIELDNAME=TLID, ALIAS=TlId, USAGE=I11, ACTUAL=A11,
PROPERTY=ELEMENT, REFERENCE=EMPLOYEERELATIVE, $
FIELDNAME=ERLRELATIONSHIP, ALIAS=ErLRelationship, USAGE=A30, ACTUAL=A30,
PROPERTY=ELEMENT, REFERENCE=EMPLOYEERELATIVE, $
FIELDNAME=ERNAME, ALIAS=ErName, USAGE=A30, ACTUAL=A30,
PROPERTY=ELEMENT, REFERENCE=EMPLOYEERELATIVE, $
FIELDNAME=ERFIRSTNAME, ALIAS=ErFirstname, USAGE=A30, ACTUAL=A30,
PROPERTY=ELEMENT, REFERENCE=EMPLOYEERELATIVE, $
$
Generated Access File. When you create a synonym, the generated Access File stores entity abbreviations but does not contain other content. However, you can open and edit this file to make any required modifications, as will be illustrated shortly in the structure that defines static Joins.
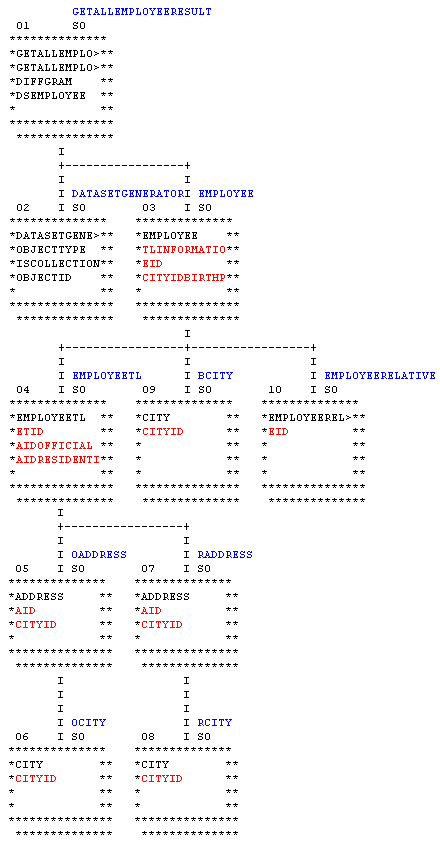
Modified Structure With Static Joins
In the modified structure, the original two-level organization is replaced by a five-level structure in which some instances of the same physical segments (CITY and ADDRESS) have been multiplied to reflect the new logical Join relationships.
Modified Master File
In the corresponding Master File, parent/child relationships have been manually expanded and rearranged and references have been revised to provide accurate pointers through the new hierarchy.
As you look at this Master File, keep the following information in mind:
- The REFERENCE attributes in the field definitions
reflect the physical relationships between elements in XML document
hierarchies and the segment level PARENT attributes, which establish
logical hierarchical relationships. Notice that for segments that
have been added or whose positions in the hierarchy have changed,
the REFERENCE attribute in the Master File now generally consists
of two parts:
segment.fieldname
As a rule, the adapter attempts to resolve each reference in the current segment. If that cannot be accomplished, it searches for the first occurrence of the REFERENCE in the parent chain. (This is illustrated by the REFERENCE attributes in SEGMENT EMPLOYEETL.) Qualified (two-part) references force the direct resolution in the specified segment. (This is illustrated by the REFERENCE attributes in SEGMENT EMPLOYEERELATIVE.) Both notations are correct and produce the same result in this example.
- The ALIAS attribute in the Master File maps to the element name in the native xml schema so it cannot be changed. However, since the FIELDNAME is always associated with the ALIAS, the field name can be changed without jeopardizing the reference.
- The REFERENCE attribute points to the field name, hence, if field name is changed all references to it should be changed accordingly.
FILENAME=GETALLEMPLOYEEFULLDS, SUFFIX=XML,
  DATASET=C:\Users\yn05149\apps\xml\GetAllEmployeesFullDS.xml, $
$
 SEGMENT=GETALLEMPLOYEESRESULT, SEGTYPE=S0, $
    FIELDNAME=GETALLEMPLOYEESRESULT, ALIAS=GetAllEmployeesResponse, USAGE=A1,
      ACTUAL=A1, ACCESS_PROPERTY=(INTERNAL), $
    FIELDNAME=GETALLEMPLOYEESRESULT1, ALIAS=GetAllEmployeesResult, USAGE=A1,
      ACTUAL=A1, ACCESS_PROPERTY=(INTERNAL),
      REFERENCE=GETALLEMPLOYEESRESULT, PROPERTY=ELEMENT,  $
    FIELDNAME=DIFFGRAM, ALIAS=diffgram, USAGE=A1, ACTUAL=A1,
      ACCESS_PROPERTY=(INTERNAL),
      REFERENCE=GETALLEMPLOYEESRESULT1, PROPERTY=ELEMENT,  $
    FIELDNAME=DSEMPLOYEE, ALIAS=DSEmployee, USAGE=A1, ACTUAL=A1,
      ACCESS_PROPERTY=(INTERNAL),
      REFERENCE=DIFFGRAM, PROPERTY=ELEMENT,  $
$
SEGMENT=DATASETGENERATOR, SEGTYPE=S0, PARENT=GETALLEMPLOYEESRESULT, $
FIELDNAME=DATASETGENERATOR, ALIAS=DataSetGenerator, USAGE=A1, ACTUAL=A1,
ACCESS_PROPERTY=(INTERNAL),
REFERENCE=DSEMPLOYEE, PROPERTY=ELEMENT, $
FIELDNAME=OBJECTTYPE, ALIAS=ObjectType, USAGE=A30, ACTUAL=A30,
REFERENCE=DATASETGENERATOR, PROPERTY=ELEMENT, $
FIELDNAME=ISCOLLECTION, ALIAS=IsCollection, USAGE=A5, ACTUAL=A5,
REFERENCE=DATASETGENERATOR, PROPERTY=ELEMENT, $
FIELDNAME=OBJECTID, ALIAS=ObjectId, USAGE=I11, ACTUAL=A11,
REFERENCE=DATASETGENERATOR, PROPERTY=ELEMENT, $
$ SEGMENT=EMPLOYEE, SEGTYPE=S0, PARENT=GETALLEMPLOYEESRESULT, $
FIELDNAME=EMPLOYEE, ALIAS=Employee, USAGE=A1, ACTUAL=A1,
ACCESS_PROPERTY=(INTERNAL),
REFERENCE=DSEMPLOYEE, PROPERTY=ELEMENT, $
FIELDNAME=EID, ALIAS=EId, USAGE=I11, ACTUAL=A11,
REFERENCE=EMPLOYEE, PROPERTY=ELEMENT, $
FIELDNAME=CITYIDBIRTHPLACE, ALIAS=CityIdBirthplace, USAGE=I11, ACTUAL=A11,
REFERENCE=EMPLOYEE, PROPERTY=ELEMENT, $
FIELDNAME=TLID, ALIAS=TlId, USAGE=I11, ACTUAL=A11,
REFERENCE=EMPLOYEE, PROPERTY=ELEMENT, $
FIELDNAME=EFIRSTNAME, ALIAS=EFirstname, USAGE=A30, ACTUAL=A30,
REFERENCE=EMPLOYEE, PROPERTY=ELEMENT, $
FIELDNAME=ENAME, ALIAS=EName, USAGE=A30, ACTUAL=A30,
REFERENCE=EMPLOYEE, PROPERTY=ELEMENT, $
FIELDNAME=EBIRTHDATE, ALIAS=EBirthdate, USAGE=HYYMDm, ACTUAL=A35,
REFERENCE=EMPLOYEE, PROPERTY=ELEMENT, $
FIELDNAME=IEID, ALIAS=IeId, USAGE=I11, ACTUAL=A11,
REFERENCE=EMPLOYEE, PROPERTY=ELEMENT, $
FIELDNAME=TLINFORMATION, ALIAS=TLInformation, USAGE=I11, ACTUAL=A11,
REFERENCE=EMPLOYEE, PROPERTY=ELEMENT, $
$ SEGMENT=EMPLOYEETL, SEGTYPE=S0, PARENT=EMPLOYEE, $
FIELDNAME=EMPLOYEETL, ALIAS=EmployeeTl, USAGE=A1, ACTUAL=A1,
ACCESS_PROPERTY=(INTERNAL),
REFERENCE=GETALLEMPLOYEESRESULT.DSEMPLOYEE, PROPERTY=ELEMENT, $
FIELDNAME=ETID, ALIAS=EtId, USAGE=I11, ACTUAL=A11,
REFERENCE=EMPLOYEETL, PROPERTY=ELEMENT, $
FIELDNAME=EID, ALIAS=EId, USAGE=I11, ACTUAL=A11,
REFERENCE=EMPLOYEETL, PROPERTY=ELEMENT, $
FIELDNAME=AIDOFFICIAL, ALIAS=AIdOfficial, USAGE=I11, ACTUAL=A11,
REFERENCE=EMPLOYEETL, PROPERTY=ELEMENT, $
FIELDNAME=AIDRESIDENTIAL, ALIAS=AIdResidential, USAGE=I11, ACTUAL=A11,
REFERENCE=EMPLOYEETL, PROPERTY=ELEMENT, $
FIELDNAME=DEPID, ALIAS=DepId, USAGE=I11, ACTUAL=A11,
REFERENCE=EMPLOYEETL, PROPERTY=ELEMENT, $
$ SEGNAME=OADDRESS, SEGTYPE=S0, PARENT=EMPLOYEETL, $
FIELDNAME=ADDRESS, ALIAS=Address, USAGE=A1, ACTUAL=A1,
PROPERTY=ELEMENT, REFERENCE=GETALLEMPLOYEESRESULT.DSEMPLOYEE,
ACCESS_PROPERTY=(INTERNAL), $
FIELDNAME=AID, ALIAS=AId, USAGE=I11, ACTUAL=A11,
PROPERTY=ELEMENT, REFERENCE=OADDRESS.ADDRESS, $
FIELDNAME=CITYID, ALIAS=CityId, USAGE=I11, ACTUAL=A11,
PROPERTY=ELEMENT, REFERENCE=OADDRESS.ADDRESS, $
FIELDNAME=AADDRESS, ALIAS=AAddress, USAGE=A30, ACTUAL=A30,
PROPERTY=ELEMENT, REFERENCE=OADDRESS.ADDRESS, $
FIELDNAME=AADDRESSNMBR, ALIAS=AAddressNmbr, USAGE=A30, ACTUAL=A30,
PROPERTY=ELEMENT, REFERENCE=OADDRESS.ADDRESS, $
FIELDNAME=ATEL1, ALIAS=ATel1, USAGE=A30, ACTUAL=A30,
PROPERTY=ELEMENT, REFERENCE=OADDRESS.ADDRESS, $
FIELDNAME=ATEL2, ALIAS=ATel2, USAGE=A30, ACTUAL=A30,
PROPERTY=ELEMENT, REFERENCE=OADDRESS.ADDRESS, $
$ SEGNAME=OCITY, SEGTYPE=S0, PARENT=OADDRESS, $
FIELDNAME=CITY, ALIAS=City, USAGE=A1, ACTUAL=A1, PROPERTY=ELEMENT,
REFERENCE=GETALLEMPLOYEESRESULT.DSEMPLOYEE, ACCESS_PROPERTY=(INTERNAL), $
FIELDNAME=CITYID, ALIAS=CityId, USAGE=I11, ACTUAL=A11,
PROPERTY=ELEMENT, REFERENCE=OCITY.CITY, $
FIELDNAME=COUNTRYID, ALIAS=CountryId, USAGE=I11, ACTUAL=A11,
PROPERTY=ELEMENT, REFERENCE=OCITY.CITY, $
FIELDNAME=CITYNAME, ALIAS=CityName, USAGE=A30, ACTUAL=A30,
PROPERTY=ELEMENT, REFERENCE=OCITY.CITY, $
FIELDNAME=CITYPOSTALCODE, ALIAS=CityPostalcode, USAGE=A30, ACTUAL=A30,
PROPERTY=ELEMENT, REFERENCE=OCITY.CITY, $
$ SEGNAME=RADDRESS, SEGTYPE=S0, PARENT=EMPLOYEETL, $
FIELDNAME=ADDRESS, ALIAS=Address, USAGE=A1, ACTUAL=A1,
PROPERTY=ELEMENT, REFERENCE=GETALLEMPLOYEESRESULT.DSEMPLOYEE,
ACCESS_PROPERTY=(INTERNAL), $
FIELDNAME=AID, ALIAS=AId, USAGE=I11, ACTUAL=A11,
PROPERTY=ELEMENT, REFERENCE=RADDRESS.ADDRESS, $
FIELDNAME=CITYID, ALIAS=CityId, USAGE=I11, ACTUAL=A11,
PROPERTY=ELEMENT, REFERENCE=RADDRESS.ADDRESS, $
FIELDNAME=AADDRESS, ALIAS=AAddress, USAGE=A30, ACTUAL=A30,
PROPERTY=ELEMENT, REFERENCE=RADDRESS.ADDRESS, $
FIELDNAME=AADDRESSNMBR, ALIAS=AAddressNmbr, USAGE=A30, ACTUAL=A30,
PROPERTY=ELEMENT, REFERENCE=RADDRESS.ADDRESS, $
FIELDNAME=ATEL1, ALIAS=ATel1, USAGE=A30, ACTUAL=A30,
PROPERTY=ELEMENT, REFERENCE=RADDRESS.ADDRESS, $
FIELDNAME=ATEL2, ALIAS=ATel2, USAGE=A30, ACTUAL=A30,
PROPERTY=ELEMENT, REFERENCE=OADDRESS.ADDRESS, $
$ SEGNAME=RCITY, SEGTYPE=S0, PARENT=RADDRESS, $
FIELDNAME=CITY, ALIAS=City, USAGE=A1, ACTUAL=A1, PROPERTY=ELEMENT,
REFERENCE=GETALLEMPLOYEESRESULT.DSEMPLOYEE, ACCESS_PROPERTY=(INTERNAL), $
FIELDNAME=CITYID, ALIAS=CityId, USAGE=I11, ACTUAL=A11,
PROPERTY=ELEMENT, REFERENCE=RCITY.CITY, $
FIELDNAME=COUNTRYID, ALIAS=CountryId, USAGE=I11, ACTUAL=A11,
PROPERTY=ELEMENT, REFERENCE=RCITY.CITY, $
FIELDNAME=CITYNAME, ALIAS=CityName, USAGE=A30, ACTUAL=A30,
PROPERTY=ELEMENT, REFERENCE=RCITY.CITY, $
FIELDNAME=CITYPOSTALCODE, ALIAS=CityPostalcode, USAGE=A30, ACTUAL=A30,
PROPERTY=ELEMENT, REFERENCE=RCITY.CITY, $
$ SEGNAME=BCITY, SEGTYPE=S0, PARENT=EMPLOYEE, $
FIELDNAME=CITY, ALIAS=City, USAGE=A1, ACTUAL=A1, PROPERTY=ELEMENT,
REFERENCE=GETALLEMPLOYEESRESULT.DSEMPLOYEE, ACCESS_PROPERTY=(INTERNAL), $
FIELDNAME=CITYID, ALIAS=CityId, USAGE=I11, ACTUAL=A11,
PROPERTY=ELEMENT, REFERENCE=BCITY.CITY, $
FIELDNAME=COUNTRYID, ALIAS=CountryId, USAGE=I11, ACTUAL=A11,
PROPERTY=ELEMENT, REFERENCE=BCITY.CITY, $
FIELDNAME=CITYNAME, ALIAS=CityName, USAGE=A30, ACTUAL=A30,
PROPERTY=ELEMENT, REFERENCE=BCITY.CITY, $
FIELDNAME=CITYPOSTALCODE, ALIAS=CityPostalcode, USAGE=A30, ACTUAL=A30,
PROPERTY=ELEMENT, REFERENCE=BCITY.CITY, $
$ SEGNAME=EMPLOYEERELATIVE, SEGTYPE=S0, PARENT=EMPLOYEE, $
FIELDNAME=EMPLOYEERELATIVE, ALIAS=EmployeeRelative, USAGE=A1, ACTUAL=A1,
PROPERTY=ELEMENT,
REFERENCE=GETALLEMPLOYEESRESULT.DSEMPLOYEE, ACCESS_PROPERTY=(INTERNAL), $
FIELDNAME=ERID, ALIAS=ErId, USAGE=I11, ACTUAL=A11,
PROPERTY=ELEMENT, REFERENCE=EMPLOYEERELATIVE.EMPLOYEERELATIVE, $
FIELDNAME=EID, ALIAS=EId, USAGE=I11, ACTUAL=A11,
PROPERTY=ELEMENT, REFERENCE=EMPLOYEERELATIVE.EMPLOYEERELATIVE, $
FIELDNAME=CITYIDBIRTHPLACE, ALIAS=CityIdBirthplace, USAGE=I11, ACTUAL=A11,
PROPERTY=ELEMENT, REFERENCE=EMPLOYEERELATIVE.EMPLOYEERELATIVE, $
FIELDNAME=TLID, ALIAS=TlId, USAGE=I11, ACTUAL=A11,
PROPERTY=ELEMENT, REFERENCE=EMPLOYEERELATIVE.EMPLOYEERELATIVE, $
FIELDNAME=ERLRELATIONSHIP, ALIAS=ErLRelationship, USAGE=A30, ACTUAL=A30,
PROPERTY=ELEMENT, REFERENCE=EMPLOYEERELATIVE.EMPLOYEERELATIVE, $
FIELDNAME=ERNAME, ALIAS=ErName, USAGE=A30, ACTUAL=A30,
PROPERTY=ELEMENT, REFERENCE=EMPLOYEERELATIVE.EMPLOYEERELATIVE, $
FIELDNAME=ERFIRSTNAME, ALIAS=ErFirstname, USAGE=A30, ACTUAL=A30,
PROPERTY=ELEMENT, REFERENCE=EMPLOYEERELATIVE.EMPLOYEERELATIVE, $
$Modified Access File
The modified Access File shows which keys are used in the logical structure of the Join:
- The parent field (foreign key) defined in KEYFLD supplies the value for cross-referencing.
- The descendant field (primary key) defined in IXFLD contains the corresponding value.
SEGNAME=EMPLOYEETL,       KEYFLD=TLINFORMATION,    IXFLD=ETID,    $
SEGNAME=OADDRESS,         KEYFLD=AIDOFFICIAL,      IXFLD=AID,     $
SEGNAME=OCITY,            KEYFLD=CITYID,           IXFLD=CITYID,  $
SEGNAME=RADDRESS,         KEYFLD=AIDRESIDENTIAL,   IXFLD=AID,     $
SEGNAME=RCITY,            KEYFLD=CITYID,           IXFLD=CITYID,  $
SEGNAME=BCITY,            KEYFLD=CITYIDBIRTHPLACE, IXFLD=CITYID,  $
SEGNAME=EMPLOYEERELATIVE, KEYFLD=EID,              IXFLD=EID,     $
Data Type Support
|
How to: |
The Create Synonym process uses an XSD or XML document as the source for creating the synonym.
If you try to perform arithmetic operations (-, +, >, <) on fields that are numbers or dates in the XML document but are mapped as ALPHA in the Master File, you may not get the expected results since the arithmetic operations are performed on string literals. To override this problem you may modify the USAGE attribute of a field as described in the following sections.
Note: The data type defined in the ACTUAL attribute of a field must remain as ALPHA.
In order to change the default setting you must issue the SET VARCHAR command.
The following table lists how the server maps XSD data types in a Master File. You can change some of these mapping defaults, as described in Changing the Length of Character Strings and Content reference to: Changing the Precision and Scale of Numeric Columns.
|
XSD Data Type |
USAGE Attribute |
ACTUAL Attribute |
|---|---|---|
|
decimal |
P20.3 |
A20 |
|
integer |
P33 |
A33 |
|
nonPositiveInteger |
33 |
A33 |
|
negativeInteger |
P33 |
A33 |
|
boolean |
A5 |
A5 |
|
long |
P20 |
A20 |
|
int |
I11 |
A11 |
|
short |
I6 |
A6 |
|
byte |
I4 |
A4 |
|
nonNegativeInteger |
P32 |
A32 |
|
unsignedLong |
P20 |
A20 |
|
unsignedInt |
P10 |
A10 |
|
unsignedShort |
I5 |
A5 |
|
unsignedByte |
I4 |
A4 |
|
positiveInteger |
P32 |
A32 |
|
double |
D20.2 |
A20 |
|
float |
F15.2 |
A15 |
|
dateTime |
HYYMDm |
A27 |
|
time |
HHISsm |
A15 |
|
date |
YYMD |
A10 |
|
gYearMonth |
HYYM |
A8 |
|
gYear |
HYY |
A5 |
|
gMonthDay |
HMD |
A6 |
|
gDay |
HD |
A3 |
|
gMonth |
HM |
A4 |
|
string |
A30 |
A30 |
|
normalizedString |
A30 |
A30 |
|
token |
A30 |
A30 |
|
Name |
A30 |
A30 |
|
NMTOKEN |
A30 |
A30 |
|
ID |
A30 |
A30 |
|
hexBinary |
A30 |
A30 |
|
language |
A30 |
A30 |
|
anyURI |
A30 |
A30 |
|
QName |
A30 |
A30 |
Syntax: How to Set the Actual and Usage Attributes
ENGINE XML SET VARCHAR {ON|OFF}
The ACTUAL and USAGE attributes of each field in the Master File is set arbitrarily to A10. You can override this setting using the SET FIELDLENGTH command
ENGINE XML SET FIELDLENGTH nnn
where:
- nnn
-
Is the length assigned to actual and usage attributes of all fields in the Master File during the create synonym process. The maximum length is 3000.
Changing the Length of Character Strings
|
How to: |
By default, when the Adapter for XML creates a synonym, it maps all fields defined as string in the XML schema to 10-byte fixed-length alphanumeric in the Master File. You can change the length (the variability and the number of bytes) using the SET VARCHAR and SET LENGTH commands.
Syntax: How to Switch Between Variable and Fixed-length Strings
By default, when the Adapter for XML creates a synonym, it maps all fields defined as string in the XML schema to fixed-length alphanumeric in the Master File. You can change this default to variable length using the SET VARCHAR command
ENGINE XML SET VARCHAR {ON|OFF}where:
- XML
-
Indicates the adapter. You can omit this value if you previously issued the SET SQLENGINE command.
- ON
-
Maps all fields defined as string in the XML schema to variable-length alphanumeric (AnV) in the Master File's USAGE and ACTUAL attributes.
- OFF
-
Maps all fields defined as string in the XML schema to fixed-length alphanumeric (A) in the Master File's USAGE and ACTUAL attributes. This is the default.
Syntax: How to Change String Length
By default, when the Adapter for XML creates a synonym, it maps all fields defined as string in the XML schema to 10-byte alphanumeric in the Master File. You can change this default length using the SET FIELDLENGTH command
ENGINE XML XML SET FIELDLENGTH length
where:
- XML
-
Indicates the adapter. You can omit this value if you previously issued the SET SQLENGINE command.
- length
-
Is the length, in bytes, assigned to the ACTUAL and USAGE attributes of all fields defined in the XML schema as string. The maximum length is 3000.
Changing the Precision and Scale of Numeric Columns
You can alter the length and scale of numeric columns returned by a SELECT request to the server by creating different specifications in your login profile or in a stored procedure. The conversion settings are reflected in the Master File in the USAGE and ACTUAL formats of the fields generated by CREATE SYNONYM. This affects how the fields are processed and formatted by the server.
Tip: You can change this setting manually or from the Web Console.
For more information, see Override the Default Precision and Scale.
Conversion
The data in an XML document may reflect dates or numeric values, however, all the fields in a Master File synonym are set to the ALPHA data type.
Numeric Values
In order to enable arithmetic operations on numeric fields, the data type specified in the USAGE attribute of a numeric field needs to be modified, depending on the data in the XML document, to one of the following data types: Integer (I), Double Float (D) or Decimal (P). If the data type is modified to Double Float or Decimal, use scale and precision as necessary to describe the data in the XML document .
Furthermore, it is recommended that the length of the ALPHA data type specified in the ACTUAL attribute of the numeric field be modified to reflect the maximum length of the data in the XML document.
Dates in XML
In order to enable arithmetic operations on dates, the data type specified in the USAGE attribute of a date field needs to be modified, depending on the date format used in the XML document, to one of the following data types: YYMD, MDYY or DMYY.
Furthermore, the length of the ALPHA data type specified in the ACTUAL attribute of the date field needs to be modified to 10.
- Once you have set the data type in the Master File to one of the date data types, you must make sure that in each of the XML documents from which you report the date format is the same as the one you defined in the Master File. If the data types differ, an error will result.
- The date format in the answer set is not derived from the date format used in the XML document and is always set to YYYY/MM/DD.
Example: Using Dates in XML
|
If in the XML document you have the following format: |
Then use USAGE= |
|---|---|
|
1996-01-30 |
YYMD |
|
01-30-1996 |
MDYY |
|
30-01-1996 |
DMYY |
| WebFOCUS | |
|
Feedback |