Creating Schedules
A schedule allows you to specify when to run a report, the format in which to create the output, and how it will be distributed.
About the Basic Scheduling Tool
|
Topics: |
The Basic Scheduling tool provides the ability to create a schedule for a procedure (FEX) when right-clicking a report procedure (FEX) from the portal. The WebFOCUS Client security authorization model controls whether users are authorized to access the application content stored in the Repository and the Scheduling tools.
To create a new schedule for a report procedure (FEX), navigate to the Resources tree and expand a domain to display your folders and report procedures (FEX). Right-click the report procedure (FEX) you want to schedule, point to Schedule, and then select the method to distribute the report procedure (FEX). You can distribute the report procedure (FEX) by Email, Printer, or Repository.
Basic Scheduling Tool Quick Access Toolbar
The Quick Access Toolbar, located at the top of the Basic Scheduling tool, is always visible no matter which options are selected. It provides access to the most commonly used functions. From the Quick Access Toolbar, you can select the ReportCaster button to access the New Distribution List, Save, Save As, Delete, and Close options. You can also access the Save, Run, and Help options from the toolbar.
Run options are available for selection from the Run drop-down list.
Note: The schedule must be saved for Run options to be available or enabled.
The Run options you can select include: Run with default traces, Run with no traces, Run with Schedule traces, and Run with Schedule and Report traces, as shown in the following image.
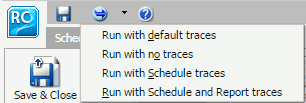
- If you have the Session Traces privilege, you will have the Run with Traces options in the schedule tools. If you are not authorized to run with traces, these options will not display.
- Online help is available by clicking the online help icon
 .
.
Basic Scheduling Tool Ribbon
The Basic Scheduling tool ribbon partitions the scheduling options into the following categories:
-
Actions
The Actions portion of the ribbon is shown in the following image.

- Save & Close. Saves and closes the schedule.
- Delete. Deletes the schedule and closes the Scheduling tool.
-
Show
The Show portion of the ribbon is shown in the following image.
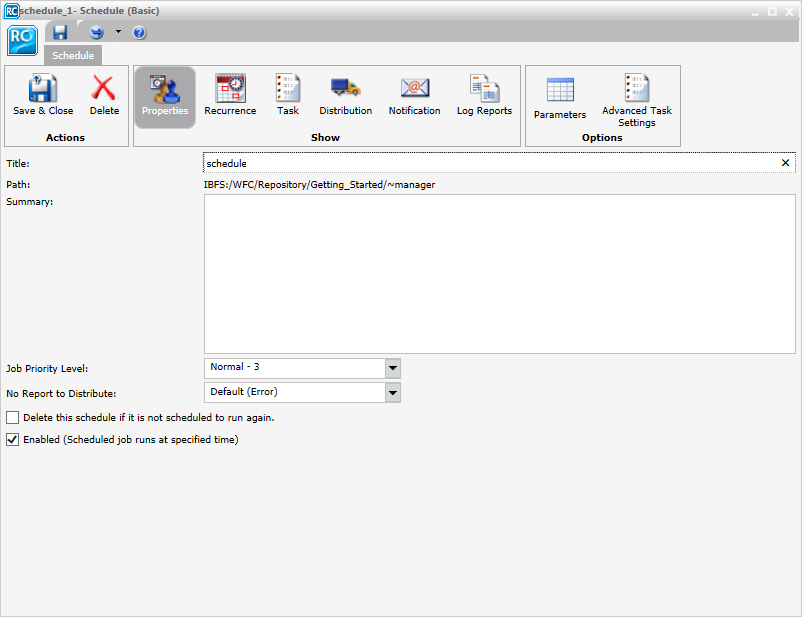
- Properties. Provides a Title, Path where the schedule will be created or was opened from, Summary, Job Priority Level, No Report to Distribute, and other settings for the schedule. The Delete this schedule if it is not scheduled to run again check box specifies to delete the schedule if, after it is run, it is not scheduled to run again. The Enabled (Scheduled job runs at specified time) check box specifies to run the schedule as specified by the Recurrence settings within the schedule. The No Report to Distribute drop-down list box specifies whether to process a No Report to Distribute result as an Error or a Warning.
- Recurrence. Provides run-time intervals for distribution and repeat options.
- Distribution. Provides options to specify the recipients or location to which the report will be distributed.
- Task. Provides information on the report procedure (FEX) that is being scheduled.
- Notification. Provides the options to set up notification of the schedule status.
- Log Reports. Shows the Number of Jobs and the Log Report for individual jobs.
-
Options
The Options portion of the ribbon is shown in the following image.
- Parameters. Specifies values for parameters that are required at run time by the report procedure (FEX) being scheduled.
- Advanced Task Settings. Allows you to input the report language and additional FOC Errors to be processed as warnings.
Creating a Schedule in the Basic Scheduling Tool
|
How to: |
This section provides the overall procedure to create a new schedule for a report procedure (FEX). Some steps in the procedure contain details on the associated options, while other steps direct you to a separate section that contains detailed descriptions of the options and additional information, such as tips in making a selection.
To save a schedule, the required information in the Properties, Recurrence, Distribution, and Notification tabs must be provided. If required schedule information is missing when you save the schedule, a message will display informing you of the schedule information that needs to be entered.
Procedure: How to Create a Schedule
- Open the
Basic Scheduling tool, as described earlier in this section. The Basic Schedule Distribution tab appears. For
more information, see About
the Basic Scheduling tool.
In the Distribution tab, you can adjust your distribution preferences for your schedule. The options available will change depending on whether you have selected Email, Printer, or Repository distribution. For more information, see Distribution options in the Basic Scheduling Tool.
- In the Properties
tab, you can edit the name for the schedule in the Title box.
This is a required field and a default name is provided.
- Type a descriptive
summary in the Summary box.
Note: This is an optional field.
- Select a
Job Priority Level.
Normal - 3 Job Priority Level is the default.
- Check the Delete this schedule if it is not scheduled to run again check box if you do not want this schedule to be stored in the Repository if it will not run again as specified in the Schedule recurrence settings.
- Leave the Enabled (Scheduled job runs at specified time) check box checked if you want scheduled jobs to run as specified in the recurrence settings.
- Select the
Recurrence tab and make the following selections.
- From the Settings radio button list, select a time interval
that the schedule will use to run the report procedure (FEX).
You can set the interval to Run Once, Minutes, Hourly, Daily, Weekly, Monthly, Yearly, or at Custom intervals.
- From the Start Schedule options, select the date (from the
drop-down calendar) and time you want the schedule to begin running.
Note: To change the time setting, select either the hour or minutes and use the arrows to increase or decrease the value.
- If applicable to the Run Interval selection, from the End Schedule options, select the date and time you want the schedule to stop running.
- If applicable to the Run Interval selection, from the Advanced settings,
click the Repeat schedule every: check box
to enable custom intervals.
Note: This option is disabled for the Run Once, Minutes, and Hourly settings options.
- From the Settings radio button list, select a time interval
that the schedule will use to run the report procedure (FEX).
- Select the Task tab. The Path, Procedure, Server Name, and Save Report As fields are populated according to the report procedure (FEX) you selected to schedule. For a description of the Task tab, see About Tasks in the Basic Scheduling Tool.
- Select the Notification tab
and specify whether or not you want to send a notification when
the schedule runs and under what conditions to send it. The notification
options are:
- Never. ReportCaster will not send a notification of the schedule status under any circumstances. This is the default value.
- Always. Send a notification each time the schedule runs.
- On Error. Only send a notification when there is an error running the schedule.
For more information, see Notification Options.
- In the Log Reports tab, you can view logs and manage log reports for the schedule.
- To save
the schedule, click Save & Close on the ribbon.
Note: You can optionally click Save on the toolbar to remain in the Scheduling tool.
The Save dialog box appears. - Select the
folder that will contain the schedule.Note:
- You must be authorized to create content in this folder.
- The default location for saving a schedule is dependent upon your privileges. If you can create content in the folder where the Scheduling tool is launched, the Save dialog will be positioned in that folder. If you are not allowed to create content in that folder, the Save dialog will be positioned in the My Content folder located under that folder. If a My Content folder is not available, the Save dialog will be positioned in the first writable folder found.
- Enter a
name for the schedule and click Save.Note:
- The maximum length of a title value for a file is 256 characters.
- If the title of your file has the same name as an existing file in the folder, you will receive a message asking if you wish to replace the file.
About Tasks in the Basic Scheduling Tool
|
Topics: |
When you access the Basic Scheduling tool, the information for the Task tab options is predefined with the selected report procedure (FEX) information. You can complete the available task options, such as specifying parameter values, as well as select whether or not to burst the report.
Note: You can use parameters (amper variables) when specifying a value in the Save Report As field of a schedule. These parameters can be system variables, such as &YYMD or any amper variable for which a value is returned by the Reporting Server when the scheduled procedure is executed. To use the dot file extension separator after a variable, terminate the variable with the '|' character, for example, &YYMD|.htm. Similarly, to use the ampersand character itself, follow the ampersand with the '|' character (for example, Smith&|Jones). If a value for a parameter specified in a schedule is not returned by the Reporting Server when the procedure executes, the schedule will fail with a "No report to distribute" error. If the scheduled task is burst, you can also use the '%BURST' symbol to include the burst value in the Save Report As field.
Task Options in the Basic Scheduling Tool
The options available when you select the Task tab are:
- Path. Shows the report path in the Repository or on the Reporting Server.
- Procedure. The name of the procedure you are scheduling.
- Server Name. The Reporting Server to which the report procedure (FEX) will be submitted.
- Execution ID. The user ID running the report procedure (FEX) on the Reporting Server.
-
Alert. Specifies
how to reactivate the alert or to deactivate the alert condition
when it is triggered. Click Alert to specify
the alert options.
Select one of the following options from the Alert Options dialog box.
- Automatically Reset. After the alert is triggered, reactivate the alert when the condition is no longer true. The system will keep checking the condition after the alert has been triggered. As soon as the condition is no longer true, it will reactivate the alert. This is the default value.
- Continue After Alert. After the alert is triggered, reactivate the alert immediately.
- Deactivate Schedule After Alert. Deactivate the schedule after the alert is triggered.
-
Delay. Restart
the alert after a specified period. You can specify to restart the
alert after a maximum of 99 hour(s), day(s), week(s), month(s),
or year(s).
Caution: Be sure that you set the schedule interval to a time period greater than the time it takes to run the scheduled procedure. When the schedule interval is less than the time it takes to run the procedure and the Delay option is selected, an alert schedule will distribute (based on the Distribution that you selected) more frequently than expected. For email distribution, this can result in unnecessary distribution of emails which can impact the business or operational goals of the alert report distribution.
- Burst Report. If you want to burst the report, select the Burst Report check box. The burst feature enables you to instruct the Reporting Server to create the report in sections so that they can be distributed separately.
-
Override the Format Specified in the Procedure. Select
this check box to display the list of report formats and indicate a format other than the one specified
in the procedure.
Note: When editing an existing schedule, if the Override the Format Specified in the Procedure check box was selected, the list of formats will display. If you now clear the Override the Format Specified in the Procedure check box, the list of formats does not display. Conversely, if the Override the Format Specified in the Procedure check box was not selected, the list of formats will not display. If you now select the Override the Format Specified in the Procedure check box, the list of formats displays.
- Save Report As. Allows you to specify a different name for the report, which defaults to the name of the report that you selected to schedule.
Specifying Parameter Values
|
Topics: |
|
How to: |
|
Reference: |
You can customize a report and control its execution with parameters. When scheduling a report procedure (FEX), the schedule task Parameters section allows you to supply a value for parameters referenced in the report procedure or add a parameter to the schedule by creating a new parameter and specifying the parameter name and value.
Procedure: How to Specify Parameter Values
If the scheduled procedure contains parameters for which values must be supplied at run time, these parameters are displayed in the parameters section of the scheduling tool.
In the Basic Scheduling tool, click the Parameters tab to open the Task Parameters dialog box, shown in the following image.
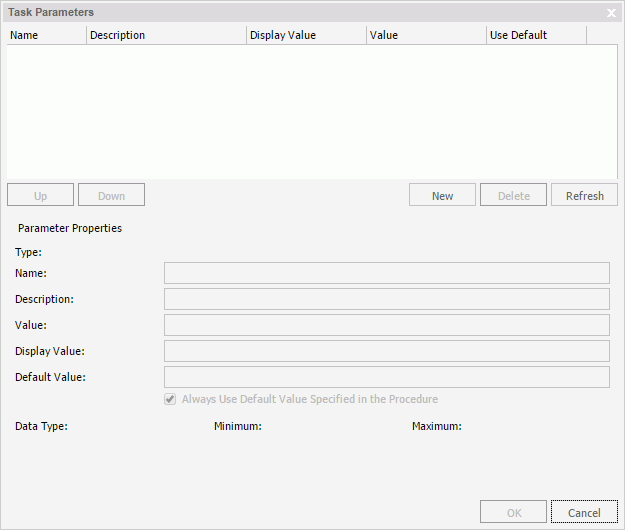
Parameters may have default values and may have values that can be selected from a static or dynamic list. For more information about selecting parameters in the Scheduling Task Parameters dialog box, see the examples provided in this chapter.
Reference: Considerations When Specifying Parameter Values
The following are considerations when specifying parameter values for a procedure:
- The maximum number of characters for each individual parameter value is 3200. You can store multiple values for a single parameter. Multiple values for a parameter are stored as one entry, which must not exceed the 3200 maximum character limit.
- ReportCaster displays the description for the parameter when it is specified in the procedure. Otherwise, ReportCaster displays the parameter name.
-
ReportCaster displays default variable values,
as well as static or dynamic single-select and multiselect lists.
Note:
- The No Selection option is displayed for dynamic multi-select lists. When selected, this option does not perform any data selection test on that field.
- ReportCaster does not support using the -HTMLFORM command to create a dynamic selectable list of parameter values.
-
ReportCaster displays global variables that are used in FILTERS defined in Master Files and referenced by a procedure. For example, if a Master File contains
FILENAME=CAR,SUFFIX=FOC
VARIABLE NAME=&&COUNTRY1, USAGE=A10, DEFAULT=ENGLAND,$
FILTER FILTER1=COUNTRY EQ '&&COUNTRY1'; $
and the procedure being scheduled contains
WHERE FILTER1
then ReportCaster displays COUNTRY1 in the Parameters window.
- ReportCaster does not prompt for the value of its internal variables that are set by the Distribution Server at schedule execution time. For example, &DSTOWNER is the user ID of the schedule owner. If this parameter is referenced in a scheduled procedure, the value will be available because the Distribution Server sets the value to the owner of the schedule at schedule execution time. However, the scheduling tool will not prompt for this value in the Task Parameters dialog box.
- Once a parameter is stored for a schedule, ReportCaster will continue to display that parameter in the Parameter list and submit the parameter to the Reporting Server when the schedule is run even if the parameter is removed from the underlying report. To remove the parameter from the schedule information, edit the schedule and delete the parameter. For information on how to delete a parameter from a schedule, see Deleting a Parameter.
- A parameter value that contains special characters should not be used in a schedule setting that refers to an output file name, since file names cannot contain special characters. Examples of affected schedule settings include the Save Report As value, the Report Name value for single-file FTP distribution, and the Zip File Name.
- A FEX can be coded to set the Display Value for any value. For example, if a value is named ENGLAND, the Display Value can be set to display as England.
Example: Adding a Static Single-Select List of Parameter Values
The following image shows an example of a static parameter list for the CATEGORY parameter created in WebFOCUS InfoAssist.

The following image shows the Task Parameters dialog box displaying the CATEGORY parameter. The CATEGORY parameter has been encoded to only use the values Coffee, Food, or Gifts. InfoAssist, the content developer tool in WebFOCUS Business User Edition, does not allow you to set default values. Therefore, the Use Default column will always be blank.

To supply a value for a single-select parameter, select the Value field drop-down list box and choose a value. Your selected value will be shown in the value column. You can select only one value for a static single-select parameter.
Example: Adding a Dynamic Single-Select List of Parameter Values
The following image shows an example of a dynamic single-select parameter list for the Product parameter. This filter is created in InfoAssist.

The following image shows the Task Parameters dialog box displaying the PRODUCT parameter. To change a parameter value, click the PRODUCT parameter in the table and change the parameter value using the Value field drop-down list in the Parameter Properties section.

Example: Adding a Dynamic Multiselect List of Parameter Values
The following image shows an example of a dynamic multiselect parameter list for the PRODUCT parameter. This filter is created in InfoAssist.

The following image shows the PRODUCT parameter selected in the Task Parameters table.

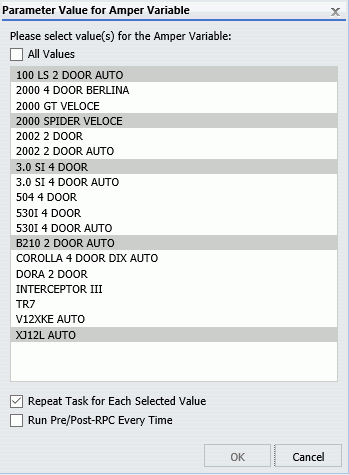
In the Parameter Properties section, click the Value button to display the Parameter Value for Amper Variable dialog box, as shown in the following image.

The All Values check box is selected by default. If the All Values check box is cleared, you can select a single value, or you can select multiple values by holding down the Ctrl key.
Using Parameter Values to Burst Active Dashboards and Compound Reports
|
Topics: |
|
How to: |
In addition to the ability to distribute sections of a single report to individual users using standard bursting, you can distribute sections of reports by using a filter with a static or dynamic multi-select parameter.
Active dashboards, which are compound reports that contain active reports, and reports that use an Excel format output, can be burst by using the parameter values saved in these reports. You can also burst Excel reports that contain a table of contents. You can burst these reports using a field other than the first BY field.
The Repeat Task for Each Selected Value check box must be selected in order to burst each parameter separately. In the Basic Scheduling tool, the Repeat Task for Each Selected Value check box is found in the Parameter Value for Amper Variable dialog box, as shown in the following image.
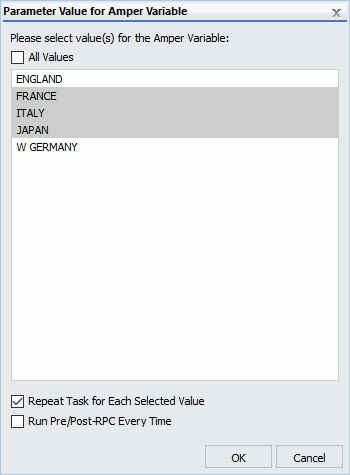
- This check box is cleared by default.
- The Repeat Task for Each Selected Value check box only displays for static or dynamic multiselect parameters.
- At least one parameter value must be selected.
- If the All Values check box is selected, the term _FOC_NULL appears in the Value field of the Task Parameters dialog box. The server then performs a WFDescribe at run time to generate the list of values for the parameter.
- The Repeat Task for Selected Parameter Value feature can only be applied to one parameter at a time.
- If the Burst Report check box within the Task tab of the Basic Scheduling tool is selected first, then the Repeat Task for Each Selected Value check box will be disabled and cannot be selected. The two bursting methods cannot be combined in one schedule.
- If the Repeat Task for Each Selected Value check box is selected on the Parameter Value dialog box, then the Burst Report check box within the Task tab of the Basic Scheduling tool becomes the Burst Report by Parameterized Report Filter check box. This check box will now be automatically selected and cannot be cleared unless the Repeat Task for Each Selected Value check box is cleared.
The values you choose are shown in the Task Parameters dialog box and placed between square brackets in the Value column to indicate their selection, as shown in the following image.
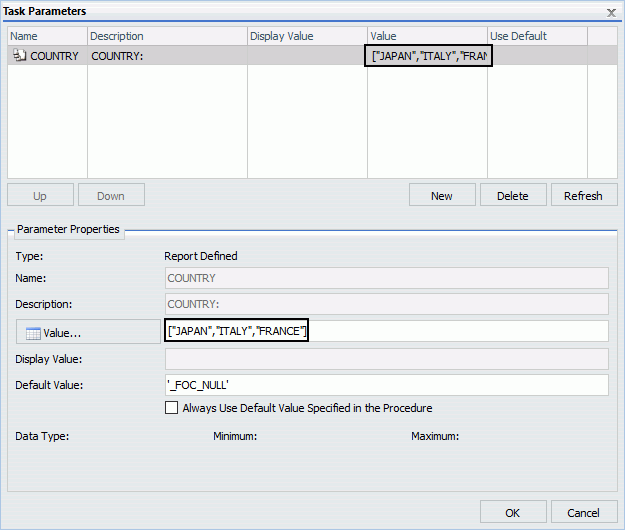
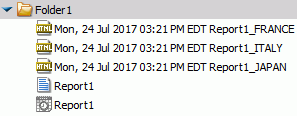
Once the schedule is run, the Distribution Server repeats the execution of the task for each parameter selected. For example, since the parameter values Japan, Italy, and France are selected, and the Repeat Task for Each Selected Parameter check box is selected, the schedule bursts the report information into three separate reports. Each report shows information related to one of the three selected parameters, as shown in the following image.
Running Pre and Post-Processing Procedures for Each Parameter Value
Selecting the Repeat Task for Each Selected Value check box allows you to select the Run Pre/Post-RPC Every Time check box, as shown in the following image.
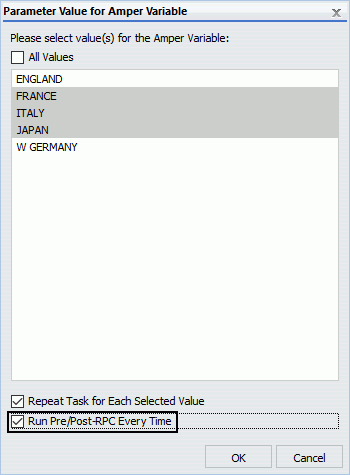
The Run Pre/Post-RPC Every Time check box enables the Distribution Server to run pre-processing and post-processing procedures with each task repetition.
For example, if three parameter values are selected, and the Run Pre/Post-RPC Every Time check box is selected, pre-processing procedures run before each selected value, and post-processing procedures run after each selected value.
If you do not select this check box, pre-processing procedures execute only once before the first task is executed, and post-processing procedures execute only once after the last task is executed. This check box is cleared by default.
Note: The Run Pre/Post-RPC Every Time check box cannot be selected unless the Repeat Task for Each Selected Value check box is selected first.
Procedure: How to Burst a Filtered Active Dashboard or Excel Compound Report Using the Basic Scheduling Tool
- Create an active dashboard or Excel compound report that contains at least one static or dynamic multiselect parameter. For more information, see Creating Reports.
- Right-click the report, point to Schedule, and select a distribution method to begin a new basic schedule.
- In the
Options group, click
Parameters.
The Task Parameters dialog box opens.
- Choose
the parameter you wish to edit.
Once the parameter is chosen, the Parameter Properties section is populated with information about the selected parameter.
- In the
Parameters Properties section, click the
Value button.
Note: For the Value button to be able to be selected, the chosen parameter must be a multiselect parameter.
The Parameter Value for Amper Variable dialog box opens.
- Choose the values that you want the schedule to burst. While holding the Ctrl key, use your mouse to select more than one value. To choose all values, select the All Values check box.
- Select the Repeat Task for Each Selected Value check box.
- Optionally, select the Run Pre/Post-RPC Every Time check box. For more information, see Running Pre and Post-Processing Procedures for Each Parameter Value.
- Click
OK.
The selected parameter values now appear in square brackets in the Task Parameters dialog box in the Value column, as shown in the following image.

- Click OK.
- Input all other necessary options and settings for your schedule, then save the schedule. For more information, see Creating a Schedule in the Basic Scheduling Tool.
- Run
the schedule.
When the schedule is run, it distributes a report for every burst parameter that you selected, as shown in the following image.

Bursting an Active Dashboard or Excel Compound Report That Contains Filtered and Unfiltered Reports
When you create an active dashboard or Excel compound report that contain filtered and unfiltered reports, only the filtered reports can be configured for bursting.
The following image shows two reports created in InfoAssist on one dashboard. The report showing MODEL, CAR, COUNTRY, and DEALER COST data has a COUNTRY filter applied, which allows the user to filter report results by country. The report showing MODEL and RETAIL_COST data does not have a filter.
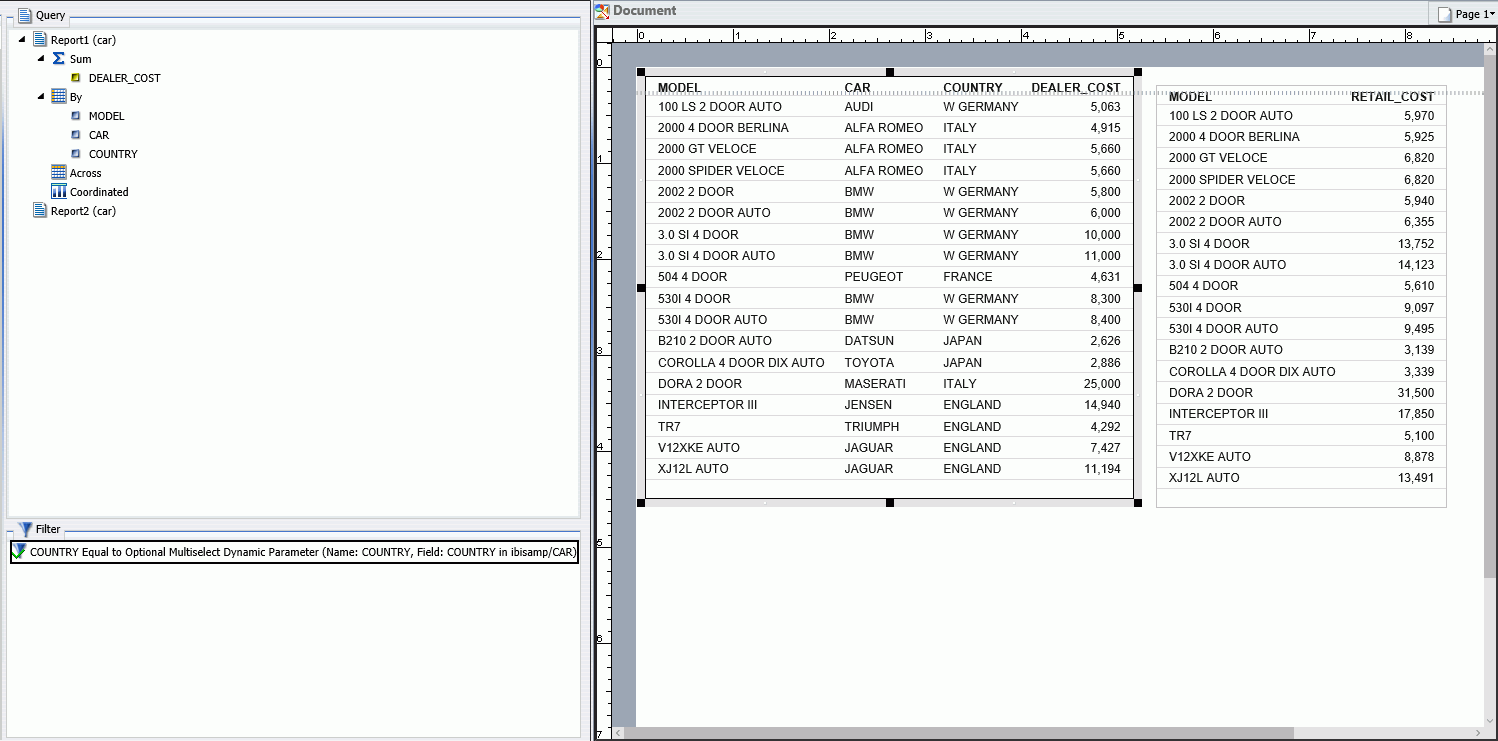
When you access Task Parameters for this compound report through the scheduling tool, any edits you make to the parameter will only apply to the filtered report. Meaning, you will only be able to assign values to a parameter in the filtered report. An example of this is shown in the following image, where you can see the values that were assigned to the COUNTRY parameter.
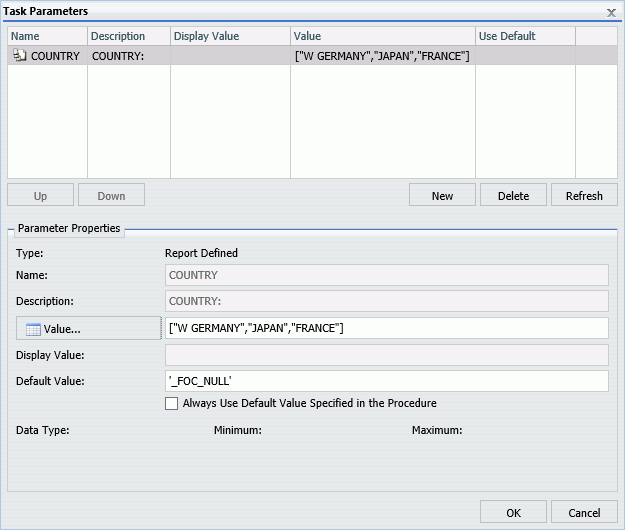
When you schedule a compound report to be burst, and the Repeat Task for Each Selected Value check box is selected, the reports that contain filters will burst based on the parameter values selected. In the following image, the compound report is distributed into three separate burst reports, which show filtered data about W GERMANY, FRANCE, and JAPAN, respectively.

For each burst report, the first chart shows data for the selected COUNTRY value.
The following image shows the W GERMANY burst compound report.
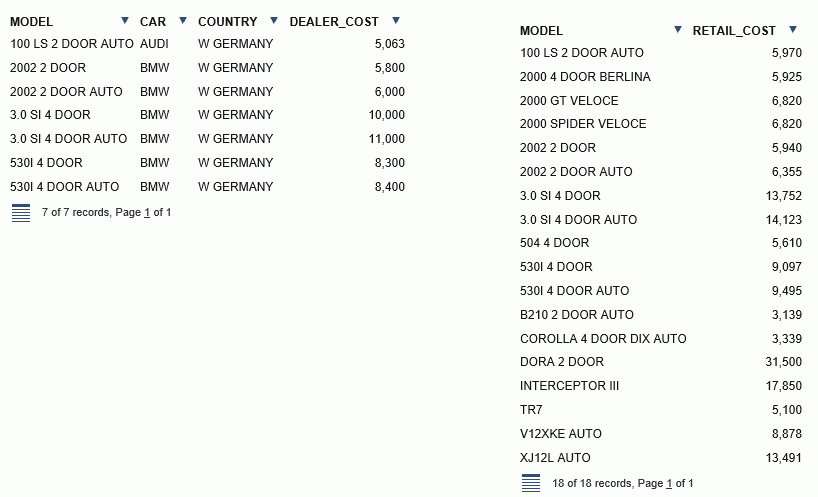
Because no filters have been applied to the second report, the results of the second report are the same for each burst compound report. Only the report that uses the COUNTRY filter changes.
Bursting an Active Dashboard or Excel Compound Report That Contains Only Filtered Reports
If you attempt to burst an active dashboard or Excel compound report that contains only filtered reports, all reports will be compatible with bursting.
The following images show two reports created in InfoAssist on one dashboard. Both reports use the same filter for the MODEL data.
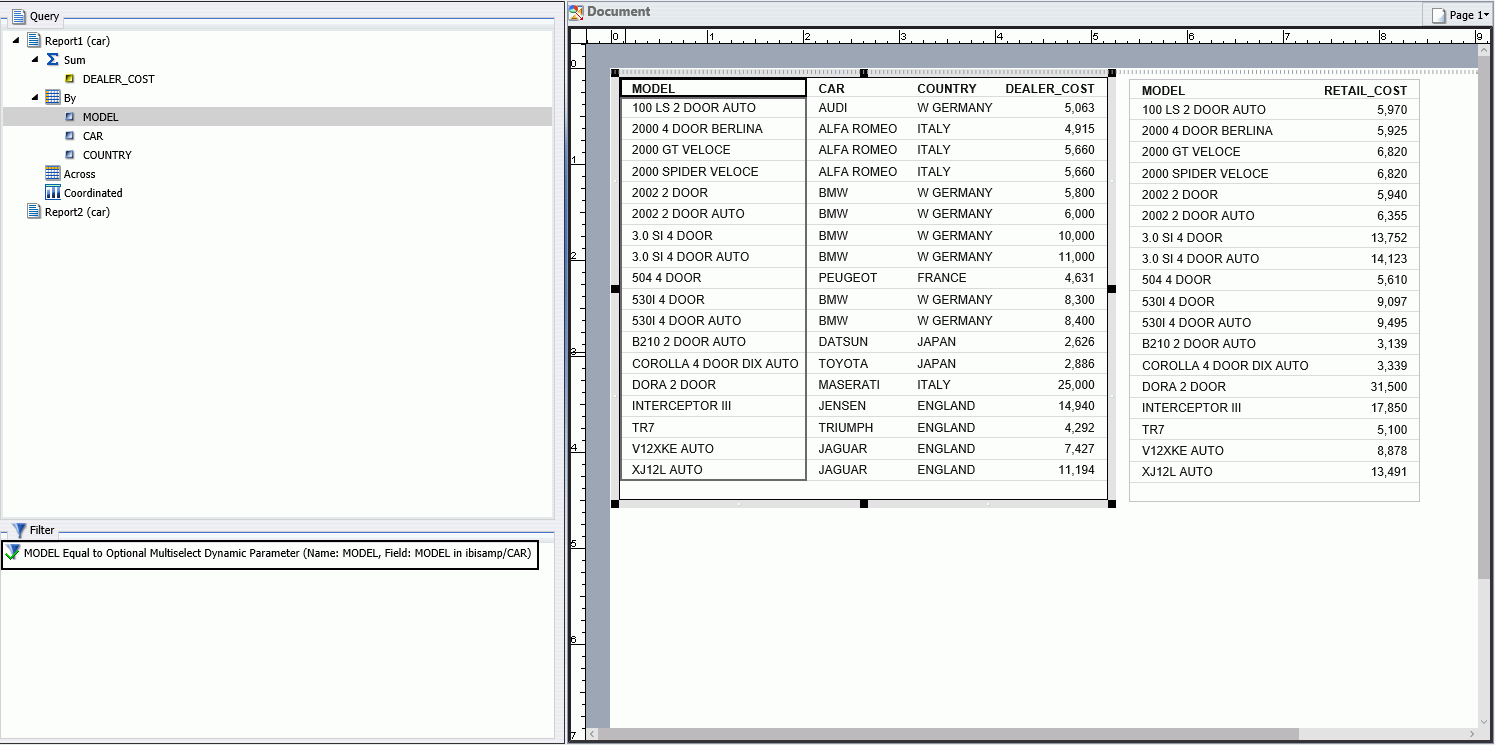
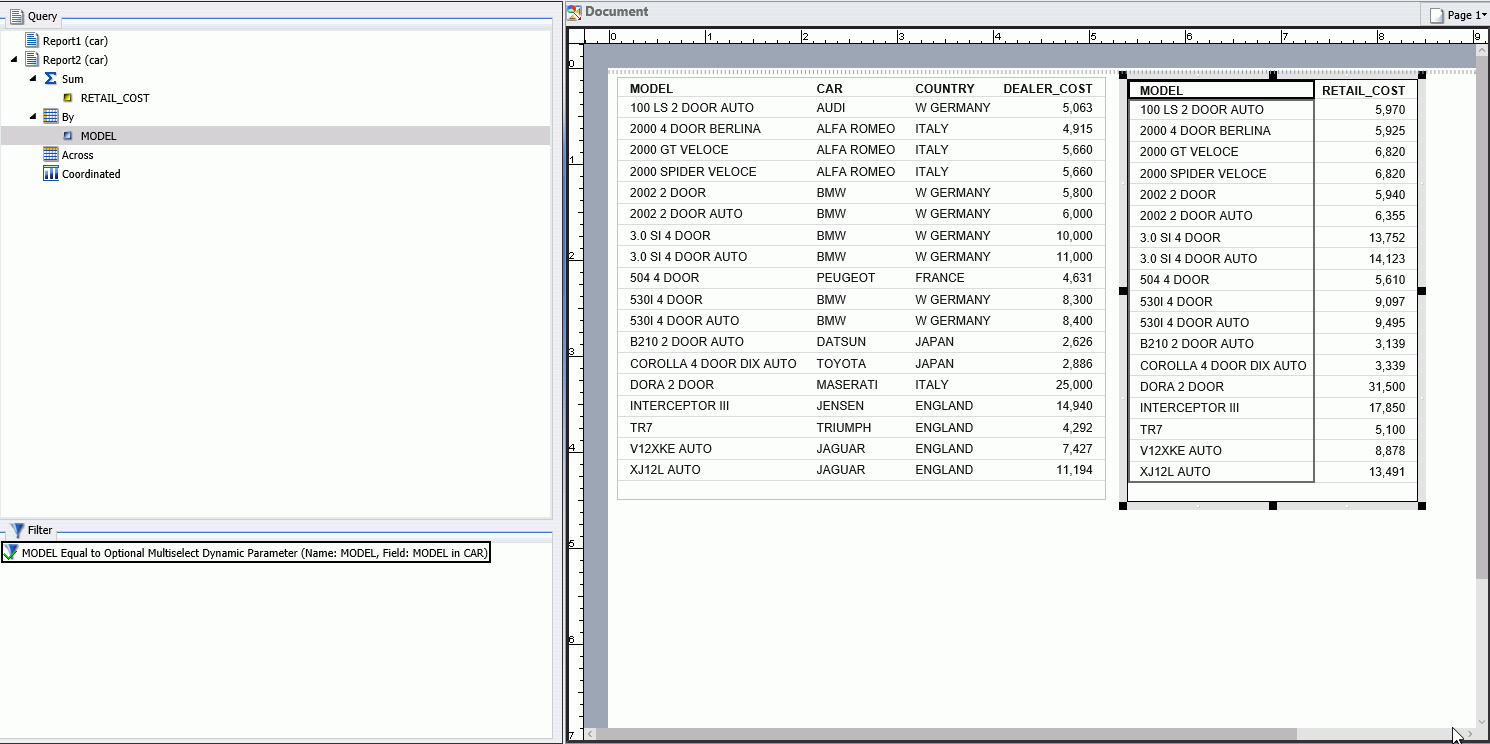
When Task Parameters are accessed through the Scheduling tool for this compound report, you can specify the MODEL values for both reports.
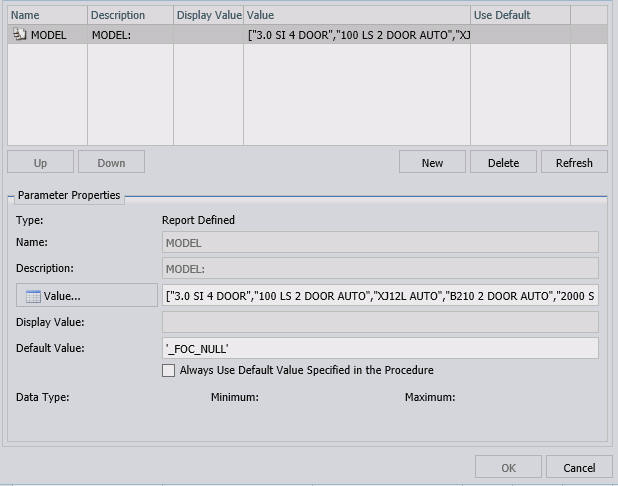
As shown in the following image, the MODEL parameter has the filter values 3.0 SI 4 DOOR, 100 LS 2 DOOR AUTO, XJ12L AUTO, B210 2 DOOR AUTO, and 2000 SPIDER VELOCE selected.
The selected values appear in brackets in the Task Parameters dialog box, as shown in the following image.
When you schedule a compound report to be burst, and the Repeat Task for Each Selected Value check box is selected, burst reports are created based on the parameter values selected. In the following image, the compound report is distributed and burst into five separate compound reports, which show filtered data about each selected car model.
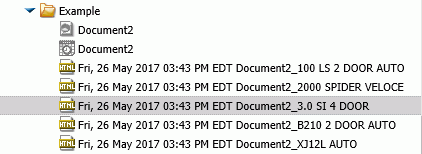
For each burst compound report, both reports show data for the selected car model. In the following image, the burst compound report showing information about the 3.0 SI 4 DOOR car model is selected. Both reports in the burst compound report only show information about the selected model.

Deleting a Parameter
It is important to verify that the parameters you delete when scheduling a report procedure (FEX) will be handled, as follows, so that the scheduled job will run successfully:
- A default value is specified in the report procedure (FEX) being scheduled.
- A value will be dynamically assigned to the parameter by the report procedure (FEX) processing when the scheduled job runs on the Reporting Server.
- The parameter will not be referenced when the report procedure (FEX) is processed by the Reporting Server.
To delete a parameter so that it is not stored with the schedule information, highlight the parameter in the parameter table you want to delete, and click the Delete button.
Creating a New Parameter
|
How to: |
If you need to have the schedule job send a parameter and value that is not defined in the report procedure being scheduled, you can create a new parameter in the Task Parameters dialog box. Parameters referenced during processing by the Reporting Server must be assigned a value for the scheduled job to run successfully. The schedule job log report will contain information when required parameter values were not provided.
Procedure: How to Create a New Parameter
You can create parameters for a task as follows:
- On the ribbon, click Parameters to open the Task Parameters dialog box. The Task Parameters dialog box is shown in
the following image.

- Click the New button
located above the Parameter Properties section.
The Task Parameter dialog box displays, as shown in the following image.
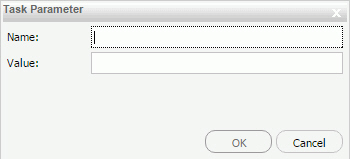
- Enter a value in the Name and Value boxes.
- Click OK.
The Name and Value boxes are populated in the Task Parameters dialog box Parameters table.
- If you would like to change the parameter value, select the parameter in the Parameters table and specify the values in the Description and Value fields located in the Parameter Properties section.
- Click OK when you have completed entering parameter settings for the task.
Advanced Task Settings
The Advanced Task Settings option in the Options group provides access to the Additional FOC Errors to be Processed as Warnings dialog box, where you can specify one or more FOCUS error message numbers, separated by a comma. If one of these FOCUS error numbers is encountered during schedule execution, ReportCaster will process it as a warning rather than an error. For example, if a FOC1517 error is generated by the procedure, add 1517 to the text box to convert this error to a warning. This means that if a report is produced, it will be distributed in spite of the FOCUS error number. It also means that this FOCUS error number will not trigger error notification if the schedule is configured to notify on error.
Note: When an accordion report is distributed through ReportCaster, an error may be generated. To prevent this, the error FOC 3330 (EXPANDBYROW: Not Supported with BORDER) can been added to the list of FOC Errors to be Processed as Warnings.
The following image shows the error FOC 3330 saved in the Additional FOC Errors to be Processed as Warnings dialog box.
Distribution Options in the Basic Scheduling Tool
|
Topics: |
The Distribution tab in the Basic Scheduling tool provides the options available for distributing the report output for the scheduled report procedure (FEX). You can distribute a report output using one of the following methods.
- Printer
- Repository
- Distribution methods can be limited globally (for all users) in ReportCaster configuration and for groups or individual users by security operations.
- Maps can be distributed to the Repository only. Maps distributed by email do not open correctly.
Using the Email Distribution Option in the Basic Scheduling Tool
|
How to: |
|
Reference: |
When you distribute a report through email, you can include the report in the body of the email (known as an inline email message) or send it as an attachment. Only the HTML, DHTML, WP, and DOC formats can be distributed as an inline email message.
Note: You must be authorized to distribute by email in order to create a schedule that uses Email distribution.
Distributing a report as an inline email message is particularly useful when the report is distributed to mobile devices or through email systems that do not support attachments.
You can also distribute a report to a fax machine, as explained later in this section. The following image shows the email distribution options in the Distribution tab of the Basic Scheduling tool when the email method is selected.
- The availability of the inline message option when you create a schedule depends on the Inline Report Distribution setting in the ReportCaster Configuration tool accessible from the ReportCaster Console.
- The display of a report that is distributed as an inline email message can be affected by settings and restrictions of your email server or email client.
- When
distributing HTML reports by email, the scheduled report (.fex)
must set a fully qualified FOCEXURL and FOCHTMLURL for the report
styling options defined below. These reference the JavaScript components
located on the web or application server where the Client is configured.
The Distribution Server will set a fully qualified FOCEXURL and
FOCHTMLURL for email distribution using the host name and port provided
at installation time. This can be overridden by setting these values
in the scheduled procedure. For example:
SET FOCEXURL='hostname:port/ibi_apps/'
SET FOCHTMLURL='hostname:port/ibi_apps/ibi_html'
Styling options include:
- Accordion reports
- Table of Contents (TOC) reports
- Peer Graphics/Data Visualization graphical reporting
- Multi-drill reports
- HFREEZE options
- In the Allowed Email Addresses and Domains dialog box in the ReportCaster Console, if the Restrict user input with this list check box has been selected, user input of email addresses is restricted to a list of allowed email domains and addresses.
Reference: Considerations When Sending a Report to Multiple Email Addresses
When you create a schedule that uses email distribution, you can type email addresses in the To field, as shown in the following image.
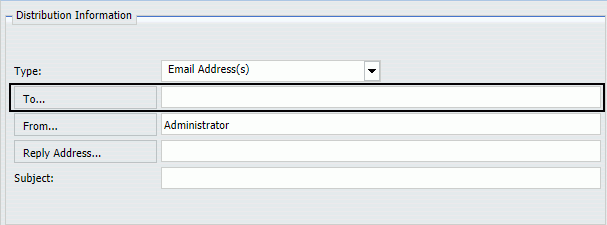
If you type multiple email addresses in the To field, you can use a semi-colon or comma symbol between each email address, to designate how the Distribution Server delivers information.
Example: Using a Comma to Separate Email Addresses in the To Field
If you use the comma symbol to separate email addresses, all email addresses are visible to every email recipient.
The following image shows the email addresses EmailA@ibi.com and EmailB@ibi.com separated by a comma.

The schedule will distribute a report named Sales_Metrics_YTD.htm to these email addresses. When you run the schedule, the log report states that one report named Sales_Metrics_YTD.htm has been distributed to both email addresses through a single email, as shown in the following image.

Example: Using a Semi-Colon to Separate Email Addresses in the To Field
If you use the semi-colon symbol to separate email addresses, each recipient only sees their own email address.
The following image shows the email addresses EmailA@ibi.com and EmailB@ibi.com separated by a semi-colon.

The schedule will distribute a report named Sales_Metrics_YTD.htm to these email addresses. When you run the schedule, the log report states that two reports named Sales_Metrics_YTD.htm have been distributed to EmailA@ibi.com and EmailB@ibi.com through separate emails, as shown in the following image.

Procedure: How to Use the Email Distribution Option
Note: You can use parameters (amper variables) when specifying values in the Email settings of a schedule. These parameters can be system variables, such as &YYMD, or any amper variable for which a value is returned by the Reporting Server when the scheduled procedure is executed. To use the dot file extension separator after a variable, terminate the variable with the '|' character (for example, &YYMD|.htm). Similarly, to use the ampersand character itself, follow the ampersand with the '|' character (for example, Smith&|Jones). If a value for a parameter specified in a schedule is not returned by the Reporting Server when the procedure executes, the schedule will fail with a "No report to distribute" error. If the scheduled task is burst, you can also use the '%BURST' symbol to include the burst value. If the Packet Email setting is Yes, the burst value will not be substituted in the Zip filename.
- Right-click
a report procedure (FEX), point to Schedule,
and then select Email.
The Basic Scheduling tool appears.
- Select the Distribution tab.
- From the Type drop-down list, select
the method you will use to provide the email addresses that will
receive the distribution. The options are Distribution List and Email Address(s). These options all show where the
report procedure (FEX) distributes To and From, the Reply Address, and
the Subject. Additionally, in the Email Information section, select
whether you would like to send all reports as attachments or send
a report as an inline message.
- Distribution List. The report will be sent to all email addresses in the selected email Distribution List.
-
Email Address(s). This
is the default method for supplying email addresses in the scheduling
tools. The default value of this field is the email address of the
user that is creating the schedule. You can specify multiple email
addresses in the Email Address(s) field. Separate each email address
with a comma (,) or a semicolon (;). The email addresses will appear
in the To line of a single email when the scheduled output is distributed.
Each individual email address can be a maximum of 130 characters,
according to the SMTP specification. The total maximum length of
this field is 800 characters.
Additionally, you can use group mail lists (defined on your mail server) with the Email Address(s) option. You can use group mail lists to distribute a report or notification to multiple recipients without having to maintain multiple email addresses in the Repository. The format of the group mail list depends on the mail server being used. For example, if you are using a Microsoft Exchange Server and your group mail list is defined as #group1, you would enter group1@listdomain in the Email Address(es) field. If the group mail list contains a space within its name, enclose the space with double quotation marks ('' ''). For more information, see your mail server administrator.
- In the To box, type the email address of the recipient.
- Optionally, click the
To button to open the Enter Email
Addresses dialog box and type an email address in the To, Cc, Bcc, and Reply
fields.
Note:
- You can create a schedule that bursts sections of a report to different email recipients. However, if you type an email address in the Cc or Bcc field, every section of a burst report will distribute to the same Cc or Bcc email address.
- If you type multiple email addresses in the Cc and Bcc fields, Cc and Bcc emails are always sent to each email address individually, regardless of whether a comma or semi-colon is used to separate addresses.
- In the From box, type any value (for example, the name of the person creating the schedule). ReportCaster does not require a value for this field, but your email system may require one.
- In the Reply
Address box, type a valid email address. If recipients reply to
the email, their messages will be sent to this address. If your
email system is unable to deliver the content, the undeliverable
output message is also returned to this address. ReportCaster requires this field.
Note: If a default Mail Reply Address was not provided in the ReportCaster Configuration tool, the default Reply Address used for this field is the email address of the user that is signed to WebFOCUS. ReportCaster obtains the email address of the user from the WebFOCUS security system.
- In the Subject box, type the text that you want to appear in the email subject line. ReportCaster may not require this information, but it may be needed by your email system. The value you entered in the schedule Title field is the default Subject value.
- Specify whether you want to send the report as an email attachment, or within the body of the email inline by selecting or clearing the Send all reports as attachments option. For more information, see Using the Email Distribution Option in the Basic Scheduling Tool.
- Optionally,
you can type a message to appear in the email body to replace the
default message, Please see attachment(s).
Note: You can also provide a custom default distribution message using the Email Distribution and Notification settings in the ReportCaster Configuration tool in the ReportCaster Console. This allows you to override the default message, Please see attachment(s), by enabling you to create a custom message specific to your organization. The message displays when creating a schedule using Email distribution. For more information, see ReportCaster Configuration.
- Optionally, specify a value for the Packet Email or accept
the default value. The Packet Email option is set to the default
value configured by the Manager. For a schedule that has a task
that is burst, you can decide how many emails to send to each recipient.
Options include:
- No. Sends each attachment in a separate email.
- Yes. Sends one email that contains all attachments.
- By Burst Values. Sends one email with multiple attachments for each burst value.
- Specify whether to send the report as a compressed (.zip)
file by selecting or clearing the Add Report to Zip File check box.
You have the option of converting your distributed report into a password-protected compressed file. By default, the Add Report to Zip File check box is not selected and the report will not be compressed.
- If the Add Report to Zip File check box is selected,
enter the name of the Zip file in the Zip File Name box.
Note: Support of Unicode characters in a Zip file name and content within a Zip file on Windows 7 and Windows 2008 Server R2 requires the following hotfix from Microsoft: http://support.microsoft.com/kb/2704299/en-us. Without this hotfix, file names are corrupted after you decompress a .zip file in Windows 7 or in Windows Server 2008 R2.
- Additionally, you can specify the minimum size (in KBs) a file must exceed before it is automatically added to a Zip file. The Zip minimum size is set to the default value configured by the administrator. To automatically zip an attachment that exceeds a certain size, set this value to the desired size.
- Select the Notification tab to specify whether to send an email notification of the schedule job status. If you select Always or On Error, then you have to specify the Reply Address, Subject, Brief Message To, and Full Message To.
- Next, select the Properties tab to specify the Title, Priority, whether a warning or error will display if there is no report to distribute, whether to delete the schedule if it will not run again, and whether the schedule is enabled to run. For more information, see About Properties in the Basic Scheduling Tool.
- Select the Recurrence tab to specify how often to run the schedule. If you want the schedule to run on the current day, set the Start Date and Start Time to values later than the current time. For more information, see About Recurrence in the Basic Scheduling Tool.
- Click Save & Close to save the schedule.
Using the Printer Distribution Option in the Basic Scheduling Tool
|
How to: |
The report formats that support printing are DOC, PDF (when you configure ReportCaster to enable PDF to print and the printer has the appropriate driver), PS, and WP.
- You must be authorized to distribute to a printer in order to create a schedule that uses Printer distribution.
- Problems may occur in printed output if the distributed reports contain UTF-8 characters.
- Since a Printer schedule will not work unless the report output format is a valid print format, ReportCaster always sets the format of a schedule with distribution to a printer to a valid format. If the default configuration of PDF as a valid print format is in place, the override format is set to PDF. Otherwise, the override format is set to DOC. You can change this format on the Task tab.
Procedure: How to Use the Printer Distribution Option
Note: You can use parameters (amper variables) when specifying a value for the Printer Name field of a schedule. These parameters can be system variables, such as &YYMD, or any amper variable for which a value is returned by the Reporting Server when the scheduled procedure is executed. To use the dot file extension separator after a variable, terminate the variable with the '|' character (for example, &YYMD|.htm). Similarly, to use the ampersand character itself, follow the ampersand with the '|' character (for example, Smith&|Jones). If a value for a parameter specified in a schedule is not returned by the Reporting Server when the procedure executes, the schedule will fail with a "No report to distribute" error. If the scheduled task is burst, you can also use the '%BURST' symbol to include the burst value.
- Right-click
a report procedure (FEX), point to Schedule,
and then select Printer.
The Basic Scheduling tool appears.
- Click the Distribution tab.
- From the
Type drop-down menu, select the method in which you will provide
the file names to distribute to the printer. The options are:
- Distribution List. The report will be sent to all printers in the selected Distribution List. To select a Distribution List, click the icon next to the Distribution List field.
-
Printer. Specify
the printer using the following format.
queue@printserver
where:
- queue
-
Is the name of the printer queue.
- printserver
-
Is the host name or IP address of the printer.
ReportCaster can differentiate between the printer queue and the printer host name or IP address due to the presence of the '@' separator. Although ReportCaster supports specifying only the host name or IP address of the printer, we recommend that you specify both the printer queue and host name or IP address when distributing ReportCaster output to a printer. The maximum length of this field is 800 characters.
- If you select Distribution List, click the Name button, which will display the Open dialog box to allow you to select a Distribution List. If you select Printer, specify the printer name in the Name field.
- Select the Notification tab to specify whether to send an email notification of the schedule job status. If you select Always or On Error, then you must specify the Reply Address, Subject, Brief Message To, and Full Message To.
- Select the Properties tab to specify the Title, Priority, whether a warning or error will display if there is no report to distribute, whether to delete the schedule if it will not run again, and whether the schedule is enabled to run. For more information, see About Properties in the Basic Scheduling Tool.
- Select the Recurrence tab to specify how often to run the schedule. If you want the schedule to run on the current day, set the Start Date and Start Time to values later than the current time. For more information, see About Recurrence in the Basic Scheduling Tool.
- Select Save & Close to save your changes.
Using the Repository Distribution Option in the Basic Scheduling Tool
|
How to: |
When distributing scheduled output to Repository in the Basic Scheduling tool, specify the Repository folder location to which to distribute the report output.
Note: You must be authorized to distribute to repository in order to create a schedule that uses Repository distribution.
The best practice for recurring and burst schedules is to create and specify a different folder location for each report being distributed for the same report procedure (FEX). This is important so the security access can be defined and managed at the folder level and when opting to burst the distributed report output because the burst value is assigned as the title value to each report section that is distributed. The title value is the value that displays in the Resources tree.
When the report output is distributed using the Repository distribution option, the Day, Date, and Time information is prepended to the Save Report As value specified in the schedule task information. For example, the Schedule for the Product Packaging & Price report is assigned the default Save Report As value 'Product_Packaging_Price.htm' (blanks and special characters are replaced with an underscore character).
The report output distributed to the Repository on Monday December 19, 2011 at 1:35pm EST is assigned the description: Mon, 19 Dec 2011 01:35 PM EST Product Packaging Price.
Procedure: How to Use the Repository Distribution Option
-
Right-click a report procedure (FEX), point to
Schedule, and then select Repository.
The Basic Scheduling tool displays in a new window.
- Enter or verify task information.
- Click
the
Distribution tab.
The Distribution Server adds Day, Date, and Time to the beginning of the Save Report As value specified in the Task tab.
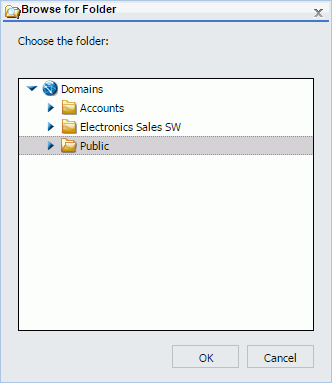
Verify that the folder location is the folder to which you want to distribute the report output. The folder location defaults to the same folder as the report procedure (FEX) being scheduled. Users can select a different folder to distribute the report output to by clicking the Folder Location button, which will display a dialog box of the Resources tree from which a folder location can be selected, as shown in the following image.
- Optionally, select the Do not add a timestamp to the filename check box if you want the report output to be overwritten with each distribution.
- Select the Notification tab to specify whether to send an email notification of the schedule job status. If you select Always or On Error, then you must specify the Reply Address, Subject, Brief Message To, and Full Message To.
- Select the Properties tab to specify the Title, Priority, summary, whether a warning or error will display if there is no report to distribute, whether to delete the schedule if it will not run again, and whether the schedule is enabled to run.
- Select the Recurrence tab to specify how often to run the schedule. If you want the schedule to run on the current day, set the Start Date and Start Time to values later than the current time.
- Select Save & Close to save your changes.
Notification Options in the Basic Scheduling Tool
|
Topics: |
The Notification tab in the Basic Scheduling tool, shown in the following image, provides the options to send a notification of the schedule status to specific email recipients.
- Notification will not work unless a mail server is configured. If a mail server is not configured, notification will fail and an error message will be recorded in the schedule job log.
- You can use parameters (amper variables) when specifying values for the Notification fields of a schedule. These parameters can be system variables, such as &YYMD, or any amper variable for which a value is returned by the Reporting Server when the scheduled procedure is executed. To use the dot file extension separator after a variable, terminate the variable with the '|' character (for example, &YYMD|.htm). Similarly, to use the ampersand character itself, follow the ampersand with the '|' character (for example, Smith&|Jones). If a value for a parameter specified in a schedule is not returned by the Reporting Server when the procedure executes, the schedule will fail with a "No report to distribute" error.
- Note: In the Allowed Email Addresses and Domains dialog box in the ReportCaster Console, if the Restrict user input with this list check box has been selected, user input of email addresses is restricted to a list of allowed email domains and addresses.
The notification options are:
- Never. ReportCaster will not send a notification of the schedule status under any circumstances. This is the default value.
- Always. The specified users are always notified when the schedule runs.
- On Error. The specified users are notified when errors are encountered while running the schedule. Information Builders recommends the use of the On Error notification option.
Setting On Error and Always Notification in the Basic Scheduling Tool
When you select the On Error or Always notification option, additional options become available.
The On Error and Always notification options are:
-
Reply Address. Type
the email address of the sender. If report recipients reply to the
report sender, then their messages are sent to this address. If your
email system is unable to deliver a report, then the undeliverable
report message is also returned to this address.
Note:
- If you are authenticating to the mail server with your user ID and password, then the reply address will be the email address associated with that user ID.
- If the mail server is configured with authentication and the Reply Address is configured in the ReportCaster Configuration tool, then the Reply Address field in the scheduling tools will be disabled. If a Reply Address is not configured, then the field is enabled to allow a Reply Address to be sent to the email server, however the actual Reply Address of the delivered email will be that of the authenticating account.
- Subject. Type the text you want to display in the subject line of the email notification. There is a limit of 255 alphanumeric characters. By default, this field contains the report name and date and time stamp.
-
Brief Message To. Type
the email address where you want a full notification sent. There
is no syntax error checking for this field.
Tip: Use the Brief Message To option when you are sending notification to devices that have limited memory, such as pagers and cell phones. If you want to notify multiple recipients, you can use group mail lists defined on your mail server provided that you append an at sign (@) followed by a valid domain.
- Full Message To. Type the email address to which you want a full notification sent. There is no syntax error checking for this field.
About Properties in the Basic Scheduling Tool
When you access the Basic Scheduling tool, the Title and Path Properties options are predefined for the selected report procedure (FEX). The following image displays the Properties tab in the Basic Scheduling tool.
The options within the Properties tab are:
-
Title. This allows you to provide a brief description of the purpose of the schedule. It is pre-populated with the title of the report procedure being scheduled when creating schedules with the Basic Scheduling tool. You can edit the title while creating the schedule or after saving the schedule from within the Schedule tools. You can also edit the title from the Properties option from the Resources tree after saving the schedule.
The title of the schedule is the default name assigned when saving the schedule. If the name value already exists in the selected tree folder, a message is displayed informing you that the name already exists. You can change the Title field in the Save dialog box, which when saved, will also update the Title field within the schedule information.
-
Path. This is the Repository path of the report procedure (FEX) you selected to schedule.
-
Summary. This allows you to insert a detailed description for the schedule. This is an optional field.
-
Job Priority Level. This specifies the priority the scheduled job will be given when processed by the Distribution Server. The default Job Priority Level is set to Normal - 3. However, you can use the drop-down list to set the priority level, as shown in the following image.

-
No Report to Distribute. This option is set to the default value configured by the Manager. To trigger error notification if no report is generated, set this value to Error. If you do not want to trigger notification when no report is generated, set this value to Warning.
-
Delete this schedule if it is not scheduled to run again. This check box allows you to specify that the schedule should be deleted after the scheduled job processing is completed if the schedule is not scheduled to run again. Selecting this option for schedules you will not utilize again is recommended as it will improve overall performance within the Resources tree listing folder contents and within the ReportCaster Explorer tool when listing schedules.
- Enabled (Scheduled job runs at specified time). This check box is selected by default to specify that the schedule should be evaluated by the Distribution Server when polling for scheduled jobs to run. If you do not want to distribute the schedule based on its NEXTRUNTIME value, clear this check box.
About Recurrence in the Basic Scheduling Tool
|
Topics: |
When you access the Basic Scheduling tool, the Recurrence tab options allow you to define how often to run the schedule. The following image displays the Recurrence tab in the Basic Scheduling tool.
Options that users must determine include frequency of distribution, start and end times, and Advanced interval settings. Select one of the following frequency of distribution settings:
- Run Once
- Minutes
- Hourly
- Daily
- Weekly
- Monthly
- Yearly
- Custom
You can assign start and end times by using the drop-down lists. When you click on the down arrow, a calendar will display that enables an authorized user to set the date for schedule distribution. Use the up and down arrows to set a specific time for schedule distribution. Alternatively, you can enter the time manually.
If the user has the privilege to set Advanced settings, check the Repeat schedule every check box to enable Advanced interval setting options. Set how often you want to repeat schedule distribution, when you want to stop distributing the schedule (Until Time), and the duration to distribute the schedule (Last For). Enter this information manually or use the up and down arrows to set parameters.
The Run Once Interval
The Run Once option sets the job to execute immediately. This is the default value. You can modify the date or time if you do not want the schedule to run immediately. You can specify the date and time you want the schedule to run using the Start Schedule options, as shown in the following image.
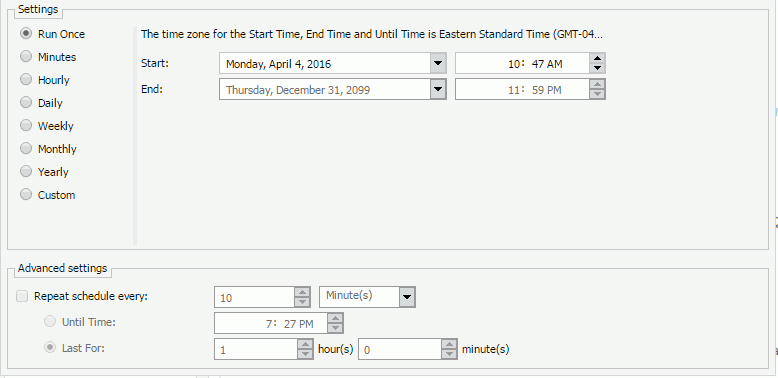
To select a date, choose a date from the drop-down date calendar. To select a time, select either the hour or minutes, and use the up and down arrows to increase or decrease the value. Alternatively, you can enter the time manually.
The Minutes Interval
The Minute(s) option sets the schedule to run every n minutes.
In the Every minute(s) field, type or select the minutes interval (1 to 59), check the days of the week on which you want to run the schedule, and select the Start and End date and time to define the time period in which the schedule will run. For example, the following image shows a schedule that will run every 30 minutes on Mondays beginning at noon May 16, 2012 and ending 6:00 PM October 30, 2012.
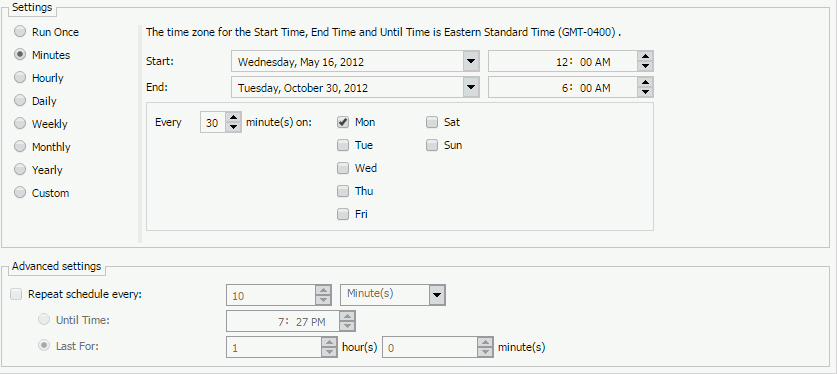
Tip: Selecting this option may affect system performance if you choose to run the schedule every 5 minutes or less. We recommend specifying a minimum of 30 minutes. The minute interval option is primarily for alert schedules.
The Hourly Interval
The Hourly option sets the schedule to run every n hours.
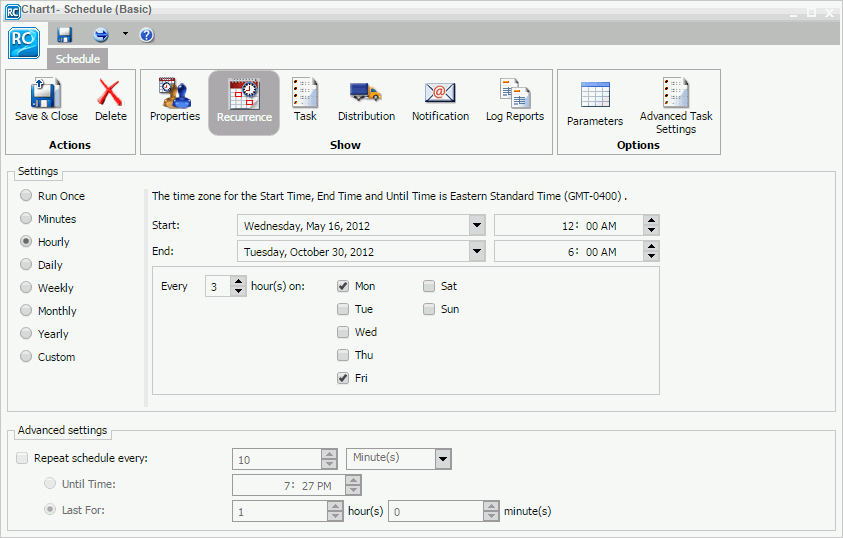
In the Every hour(s) field, type or select the hours interval (1 to 24), check the days of the week on which you want to run the schedule, and select the Start and End date and time to define the time period in which the schedule will run. For example, the schedule shown in the following image will run every three hours on Mondays and Fridays beginning at noon May 16, 2012 and ending 6:00 PM October 30, 2012.
The Daily Interval
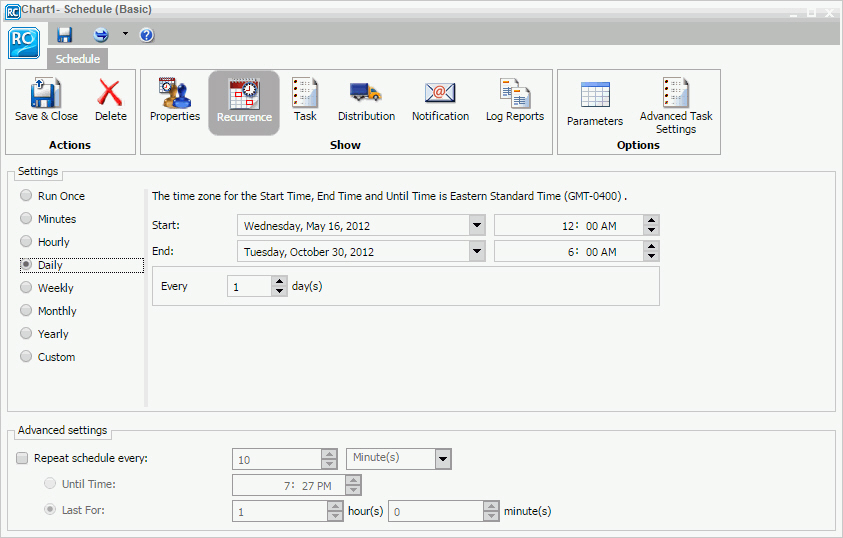
The Daily option in the Settings list sets the schedule to run every n days. In the Every day(s) field, type or select the days interval to run the schedule and select Start and End date and time to define the period in which the schedule will run. For example, the schedule shown in the following image will run every five days beginning at noon May 16, 2012 and ending 6:00 PM October 30, 2012.
You can also set a secondary run interval. For information about this setting, see Advanced Settings.
The Weekly Interval
The Weekly option in the Settings list sets the schedule to run every n weeks.
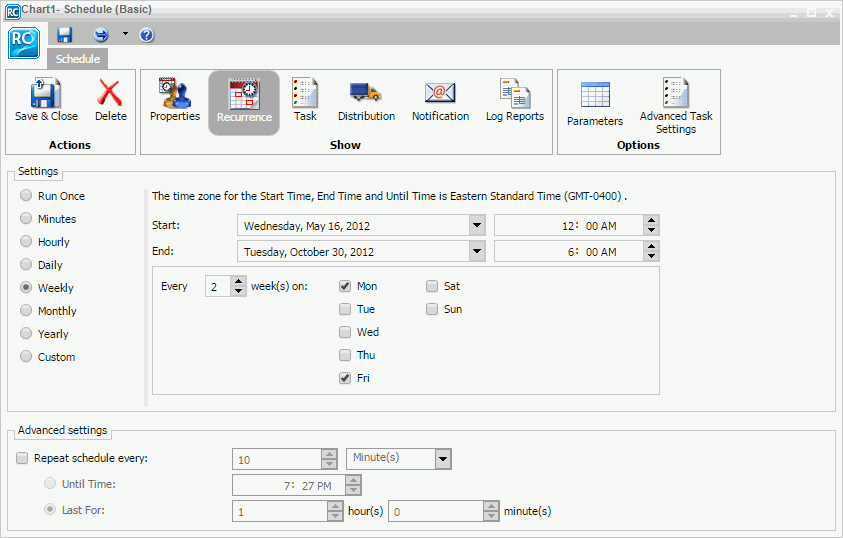
In the Every week(s) field, type or select the weekly interval to run the schedule, check the days of the week on which you want to run the schedule, and select the Start and End date and time to define the time period in which the schedule will run. The following image shows a schedule that will run every two weeks on both Monday and Friday beginning at noon May 16, 2012 and ending at 6:00pm on October 30, 2012.
Note: When selecting the Weekly interval, set the Start to the date of the first day (current or future) of the week you want the schedule to run. If you select the current date, then you must make sure that the Start time is later than the current time when you save the schedule. If the Start time is less than or equal to the current time, the calculation for the next run time results in the schedule not running on the current date.
You can also set a secondary run interval. For more information about this settings, see Advanced Settings.
The Monthly Interval
The Monthly option sets the schedule to run every n months. You can then refine the monthly interval with one of the following options. Note that these options are mutually exclusive.
- Every first, second, third, fourth, or last n day of the week (where n is Monday, Tuesday, Wednesday, Thursday, Friday, Saturday, or Sunday) every n months.
- Specific days every n months.
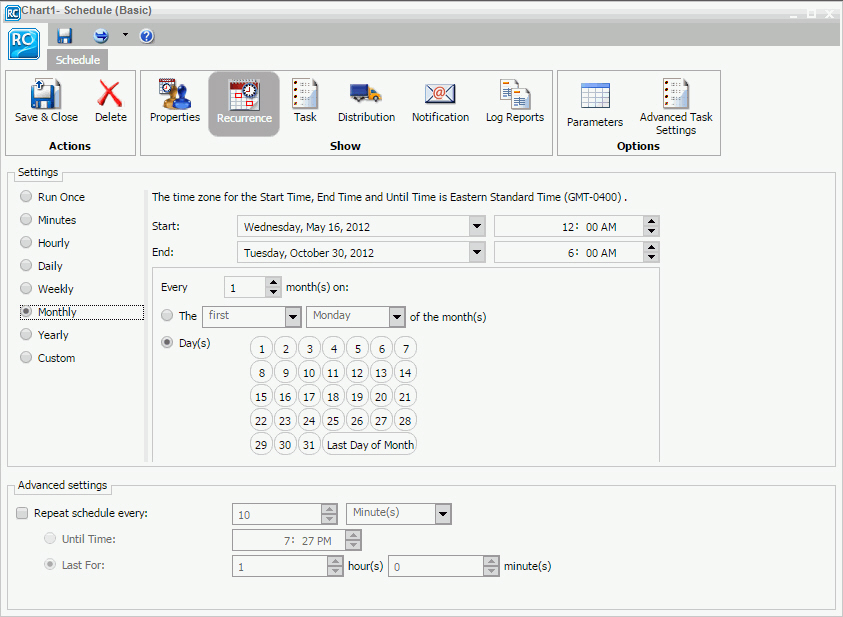
Additionally, select the Start and End date and time to define the time period in which the schedule will run. The following image shows a schedule set to run on the first Monday of every month beginning at noon May 16, 2012 and ending 6:00 PM October 30, 2012.
The following image shows a schedule set to run on the 2nd, 9th, 16th, 23rd, and 30th of every month, regardless of the day of the week on which those dates fall.
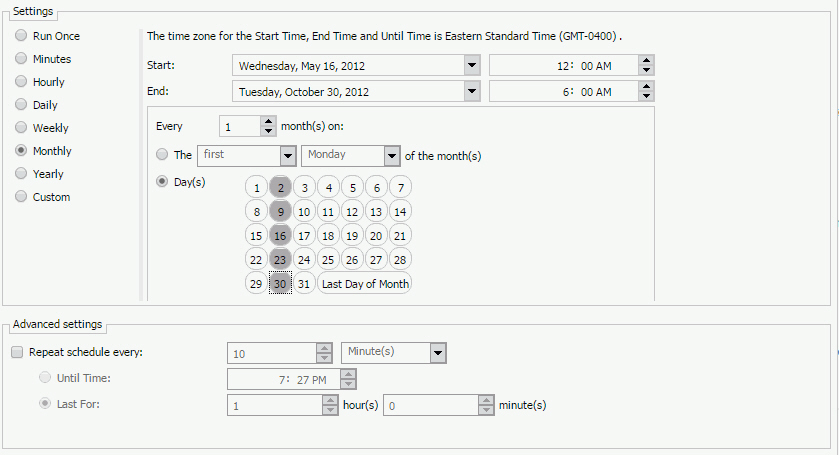
You can also select the Last Day of the Month option at the end of the calendar to run the schedule on the last day of the month.
Note: When selecting the Month(s) interval, set the Start date to the date of the first day (current or future) of the month you want the schedule to run. If you select the current date, then you must make sure that the Start time is later than the current time when you save the schedule. If the Start time is less than or equal to the current time, the calculation for the next run time results in the schedule not running on the current date.
You can also set a secondary run interval. For information about this setting, see Advanced Settings.
The Yearly Interval
The Yearly option sets the schedule to run every n years during a specific time period. The following image shows a schedule set to run every two years beginning at noon May 16, 2012 and ending 6:00 PM October 30, 2022.
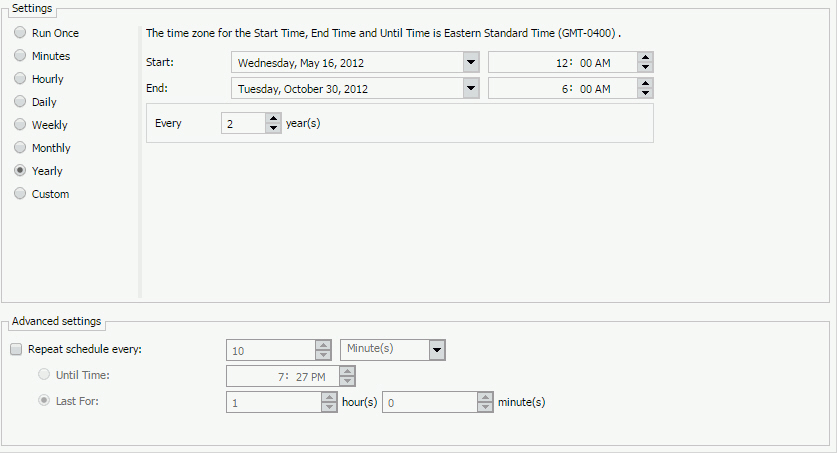
You can also set a secondary run interval. For information about this setting, see Advanced Settings.
The Custom Interval
The Custom option allows you to select a set of dates that do not follow a specific pattern. For example, if you want to run a quarterly report on a different day of each quarter, then you can use the Custom run interval to set the schedule to run on dates, such as March 3 (Saturday), June 4 (Monday), September 7 (Friday), and December 2 (Sunday).
The following image shows the Custom Run Interval options, which includes Start (initially set to the current date and time) and the End date and time options, the Custom calendar, and the Custom Date List node that appears in the right panel.
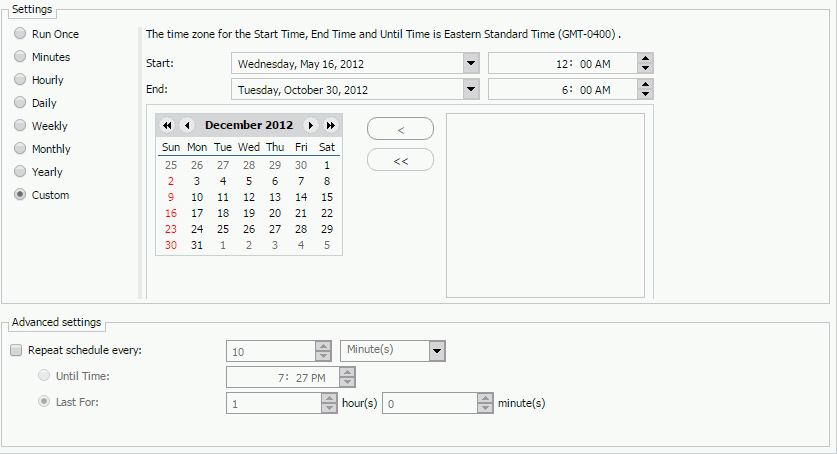
Define the time period in which the schedule will run by selecting the Start date and time and the End date and time. Select the specific days on which to run the schedule by clicking the day in the calendar. (Use the forward and back buttons at the top of the calendar to move through the months and years.) As you select a date, it appears in the Custom Date List. If it does not already exist, a folder for the year and month of the date you select is automatically created under the Custom Date List node. The following image shows an example of a selection of Custom dates in the calendar and the Custom Date List.
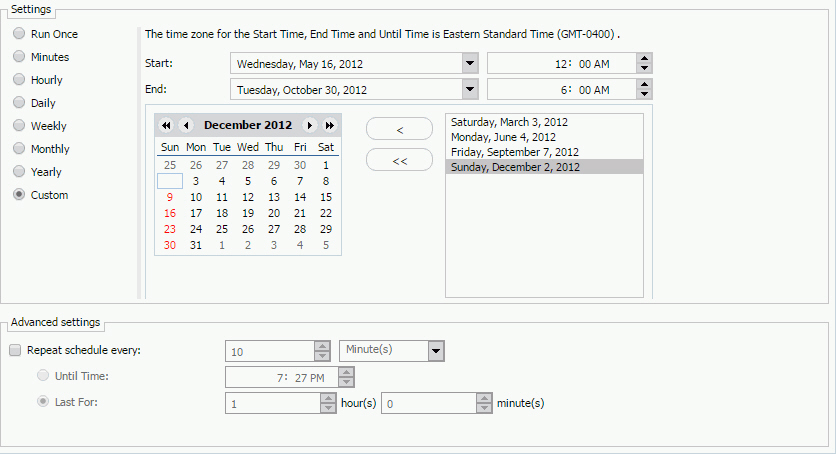
To remove a date from the list, click the date in the calendar. The date is no longer highlighted in the calendar and will not appear in the Custom Date List. You can optionally use the left single arrow to remove a date from the list. The double arrow button removes all defined lists.
You can also set secondary run interval. For information about this setting, see Advanced Settings.
Advanced Settings
The Advanced settings option enables you to create a secondary run interval within the day the schedule runs. You can apply the secondary run interval every n minutes or hours for a specified number of hours and minutes or until a specified time. This option is available for schedules that run every day(s), week(s), month(s), or year(s).
Note: When a schedule is saved, the hours setting is converted to minutes. When a schedule is edited, this value appears as minutes.
The secondary run interval will not be validated when the schedule is created. Instead, validation is performed every time the next run time of the schedule is calculated when running within the secondary run interval. The secondary run interval cannot exceed the next run time for the primary run interval. For example, a daily schedule cannot have a secondary run interval greater than Every 1 day(s). If you schedule a secondary run interval to run after the next primary run interval of the schedule, the secondary run interval is stopped and an error message appears. This error message is also written to the log file.
The Advanced settings section allows you to specify repeat options, as well as time intervals. The following image shows an example of set secondary run interval options.

The Apply secondary run interval options are:
- Repeat schedule every. Applies the secondary run interval every n minutes or hours (in this example, every 10 minutes) within the day the schedule runs.
- Until Time. The time up until which the secondary run interval will be applied. In this example, the schedule will rerun every 10 minutes until 4:10 PM when the Until Time option is selected.
- Last For. The duration, specified in hours and minutes, during which the secondary run interval will be applied. This option and the Until Time option are mutually exclusive.
Note: When a schedule is updated, the next run time is recalculated based only on the primary run interval. This means that if a schedule that includes a secondary run interval is updated before the secondary schedule is able to run, then the secondary run interval is ignored and the NEXTRUNTIME is calculated based on the primary interval.
For example, a schedule exists that is set to run daily at 2:00 PM with a secondary run interval of every 10 minutes from 2:00 PM to 3:00 PM. When the schedule runs at 2:00 PM, the NEXTRUNTIME resets to run at 2:10, which honors the secondary run interval. If this schedule is updated at 2:03 PM, the NEXTRUNTIME is recalculated to be 2:00 PM the next day, rather than 2:10 PM on the current day.
| WebFOCUS | |
|
Feedback |