Managing Users
|
Topics: |
The Users pane of the Security Center lists all users. The Search field in this tab allows you to search the name and description fields for users. Simple wildcard searches are supported. The full range of user management features is available only to Managers. Group Administrators can see the Security Center, but can use it only to assign existing users to groups. Basic Users, Advanced Users, and Developers cannot see the Security Center, nor can they create, update, or delete users or assign users to groups.
The toolbar above the User pane allows Managers to perform the following actions:
- Create, edit, or delete users.
- Import users.
- View when users last signed in.
Understanding Users
|
Topics: |
|
How to: |
Users are those individuals who have access to WebFOCUS Business User Edition. Managers and Group Administrators can assign users with similar responsibilities to one of the user type groups that are created automatically within a domain. This assignment allows users to take advantage of those features and content that supports their daily activities, but prevents them from using features or content that are beyond the range of their responsibilities and authority. The four user types are:
- Basic Users. Can view reports and content in the domains accessible to them. They can save deferred reports to their My Content folders, or copy parameters from a previously created report. They cannot share, publish, copy, or paste any folder or content. They can use Alert Assist to run Alerts and add Alerts to their Favorites view.
- Advanced Users.Can do everything that Basic Users can do, and can also create original reports, charts, and other content for their My Content folders. They can work with previously-created Reporting Objects in the InfoAssist Reporting Object tool to create reports, charts, or other content. They can share folders and the content they contain with everyone or with selected users or groups. They can also use Alert Assist to do everything that Basic Users can do, and can also create, edit, schedule, publish, and unpublish Alerts within their My Content folders, and add Alerts to their Favorites view.
- Developers. Can do everything that Advanced Users can do, and can view and publish content in their Hidden Folder. They can create Reporting Objects in the InfoAssist Reporting Object tool as well as use existing Reporting Objects to create reports, charts, or other content. They can also copy and paste folders and content from their domain to another domain, but they must be sure that the domain they target for this operation maintains the same metadata as that used to create the content they are copying. They can also use Alert Assist to create, edit, schedule, publish, and unpublish Alerts within any folder, and add Alerts to their Favorites view.
- Group Administrators. Can assign users to groups. They can also switch to Manager Mode and manage private resources. They can also use Alert Assist to copy, publish, or unpublish an Alert.
Each user in the repository is defined by a unique name and may also be assigned a description, an email address, and a password. The user must be placed in a group at account creation and assigned a status. By default, the user is placed in the EVERYONE group, which is the group of all users in the system, and assigned the Active status.
Any of these characteristics, except the unique user name, may be edited later by a Manager.
Understanding Managers
Managers have full access to the WebFOCUS Business User Edition and full control over its features, including Alert Assist and the InfoAssist Reporting Objects tool. They are assigned to the Managers group. Managers have full control over Alert Assist to create, view, edit, schedule, run, publish, and unpublish Alerts in any folder, and to add Alerts to the Favorites view.
Understanding User Name Requirements
Because user names are defined within the repository, they need to conform to the format rules and character limitations it imposes. If your installation supports external authentication, such as that provided by Microsoft Active Directory, user names also exist in an external repository, and must conform to the format rules defined in it.
The set of characters you can use to create user names is defined by the current character encoding setting established in the application server and the Client Code pages assigned to your NLS setting. For example, if the application server is configured to support UTF-8 encoding, and the NLS Setting is also configured to support the US Unicode (UTF) code page, you can use characters in the double-byte character set (DBCS) to create user names.
To support those installations that rely on external LDAP or Active Directory authentication, user names in WebFOCUS Business User Edition support all of the characters supported by the sAMAccountName standard. Note that the range of allowable characters for User Names in WebFOCUS Business User Edition is broader than the range for the sAMAccountName standard, and administrators must be careful to avoid including characters allowed by WebFOCUS Business User Edition but prohibited by the sAMAccountName standard in user names.
Given these considerations, when creating user names, take the following rules into account:
- User names may contain alphanumeric characters, spaces, and underscores.
- Depending upon the Client Code Page assigned to your NLS setting, user names can also include single-byte or double-byte NLS
characters.
Note: To prevent sign-in issues, and to conform to sAMAccountName best practices, replace characters that contain accents or other diacritical marks in user names with characters that exclude them. For example, convert Müller into Muller.
- The following characters are not supported in user names: “|;/*,?
Note: if your user names must conform to sAMAccountName standards, you must independently ensure that user names also exclude the following characters: [ ] : = + < > \
- It is recommended that you limit user names to 64 characters. Longer user names may cause problems during migration.
- Do not end user names with a period (.) .
If you support external authentication, avoid including characters in user names that your external authentication repository does not support. For more information about which characters to avoid, contact Customer Support Services.
Procedure: How to Create a User
Note: Only a Manager can create a user.
- In the Security Center, on the Users
& Groups tab, click the New User button
 .
.The New User dialog box opens, as shown in the following image.
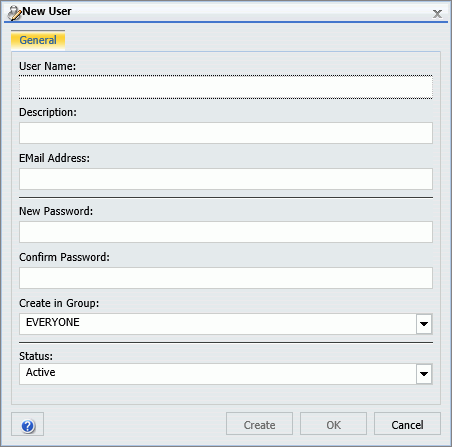
- Type the user name, and optionally, type the description, email address, password, and password confirmation, and if desired, select a group and a status for the user.
- When your input is complete:
- Click OK to create the user and close the New User dialog box.
- Click Create to create the user without closing the New User dialog box.
Use this button when you need to create additional users without delay. When you click this button, the New User dialog box clears, a new entry for the user appears in the Users pane of the Security Center, and you can return to the previous step to add the next user.
If you do not enter a description, the description defaults to the name. If you do not select a group and status for the user, the user will be created in the EVERYONE group and assigned the Active status, by default.
If you are creating a user that will be authenticated externally using AD or LDAP, and you want to synchronize user information with the authentication provider, leave the email and description fields blank.
Importing Users
|
Topics: |
|
How to: |
The Import User command automatically creates new user accounts by importing user information from a comma-separated values (.csv) text file and transferring those records to the user accounts database in the repository. This operation streamlines the creation of multiple user accounts by eliminating the necessity to open the New User dialog box, type, and save the details for each new user account, individually.
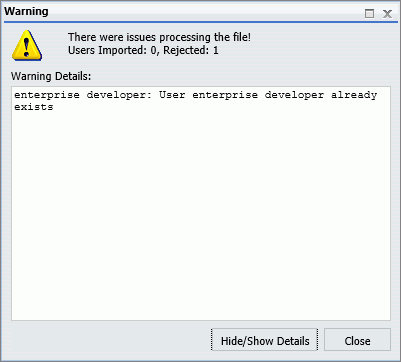
The import does not overwrite records of existing users, nor can you use it to delete existing user records. If a record in the user import file matches an existing user account, the import generates a message identifying the record that could not be imported, as shown in the following image.
Understanding User Import File Layout and Format Requirements
You can create a new user import file by typing user information into any text editor and saving it as a comma-separated values (.csv) file. If you are exporting user information from an external source, you can create a user import file by reorganizing and reformatting the exported information, as necessary, and then saving the exported user information in a .csv file. Regardless of the method you use, you must ensure that all user import files you create conform to the format and layout requirements described in this topic and that the information within those user records conforms to the requirements described in Understanding User Record Field Format Requirements.
The user import file must not contain a header or column heading line. The first line in the file must contain the first user record. From that point on, each line within the user import file contains the record for a single new user. Multiple user records must not be placed on the same line. Because the import will end when it encounters the first blank line, do not include any blank lines between user records.
User import files that contain only those NLS characters used in the U.S. English or Western Europe code page 137 require no special encoding. However, user import files containing NLS characters from other code pages require UTF-8 encoding, without a byte order mark (BOM). To encode a user import file for UTF-8, open it in a third-party editor, change the appropriate setting to specify that the file uses UTF-8 encoding, and save it with that value.
Each user record contains the following fields: user name, password, description, email address, user status, and groups, as shown in the following image.

Within a user record, each field is separated by a comma. If the value assigned to a field includes a comma, the value in that field must be enclosed within quotation marks ("). For example the following new user record contains a comma in the third field, the description field, and is enclosed in quotation marks ("):
testadv,password,"Getting Started, Advanced User",testadv@domain.com,ACTIVE,Getting_Started/AdvancedUsers
If a field in a user record contains no information, the record must still define a placeholder for the blank field by leaving two commas with no characters between them in the appropriate place in the record. For example, the following new user record omits the password typically found in the second field of a user entry:
testbas,,Getting Started Basic User,testbas@domain.com,ACTIVE,Getting_Started/BasicUsers
Understanding User Record Field Format Requirements
When creating a user record, ensure that the values you assign to individual fields conform to the following requirements:
- User Name. Names assigned to imported users are subject to the same restrictions on valid characters as those entered directly in the new user dialog box. For a detailed description of user names and the range of characters that you can include in them, see Understanding User Name Requirements.
- Password. You can assign a generic one-time password, such as password, to the password field, or you can assign one of the hashed passwords from the UOA_USERS table.
- Description. Leave this field blank if you have activated the Synchronize User Information setting, which is located on the External page of the Security tab of the Administration Console. Otherwise, type the full name of the user or a brief description in this field. The activation of the Synchronize User Information setting allows for automatic updates to the value in this field from an external authentication or authorization provider.
- Email Address. Leave this field blank if you have activated the Synchronize User Information setting, which is located on the External page of the Security tab of the Administration Console. Otherwise, type the email address for the new user. The activation of the Synchronize User Information setting allows for automatic updates to the value in this field from an external authentication or authorization provider.
- User Status. Type ACTIVE, INACTIVE, or MUSTCHANGE in this field to identify the initial status of the user when the new user account is created. Each of these values must be typed in uppercase characters. If you type ACTIVE, the user represented by the account can sign in and work within WebFOCUS Business User Edition as soon as the account is created. If you type INACTIVE, the user represented by the account can sign in and work with WebFOCUS Business User Edition only after a Manager has changed the status of that user account to Active. If you type MUSTCHANGE, the user represented by the account is prompted to change his or her one-time password the first time he or she signs in to WebFOCUS Business User Edition.
- Groups. Type the name of the group or groups to which the user is assigned. If you do not include a value in the group name field,
the user will be assigned to the EVERYONE group automatically. If you do include a group name, make sure that it matches the
spelling and capitalization of its corresponding existing group name exactly.
The format for a group name is the domain name, followed by a slash mark (/), and the group name. For example, the following new user record adds a user to the AdvancedUsers group of the Getting_Started domain, as shown in the last field in the record.
testadv,password,Getting Started Advanced User,testadv@domain.com,ACTIVE,Getting_Started/AdvancedUsers
You can include more than one group name in this field. If you choose to do so, separate each group name with a semi-colon. For example, the following new user record adds a user to the Developers group and to the GroupAdmin group within the Getting_Started domain, as shown in the last field in the record.
testdevgrp,password,Getting Started Dev-Grp Admin,testdevgrp@domain.com,ACTIVE,Getting_Started/Developers;Getting_Started/GroupAdmins
To prevent a user record from failing to load, any group that you identify in it must already be defined within WebFOCUS Business User Edition. You cannot use the import user operation to load new groups as well as users simultaneously.
Procedure: How to Import Users
Before you begin, ensure that all groups that are identified in the user import file already appear in the Groups pane of the Security Center, and create any groups or domains that do not appear.
- In the portal, on the Menu bar, click Administration, and then click Security Center.
- On the Users & Groups tab, click Import Users.
- In the Import Users dialog box, click Browse.
- In the Choose File to Upload dialog box, navigate to the .csv file that contains the users to import and double-click the entry, or click it, and then click Open.
- In the Import Users dialog box, ensure that the name of the file that contains user records for import appears in the File
to Import field, and if so, click Import.
The import operation creates new user accounts for the users specified in the file records, and assigns the new users to the groups specified in each record.
- If you receive a message stating that there were issues processing the file, click Hide/Show details, review the issues listed in Warning Details dialog box, and update the import user file text or layout to address them.
- When your updates are complete, save the revised user import file, close the Warning Details dialog box, and return to step 2 to run the import again.
- When the import is complete, click Close in the Import Users dialog box.
- Review the Users pane and the Users in Group pane to ensure that the full set of new users was imported, and that they were appropriately assigned to all groups.
Procedure: How to Edit User Details
Only a Manager can edit user details.
- In the portal, on the Menu bar, click Administration, and then click Security Center.
- On the Users & Groups tab, double-click a user, or
right-click the user and select Edit, or
click the user and then click the Edit User button
 . The Edit User
dialog box opens, as shown in the following image.
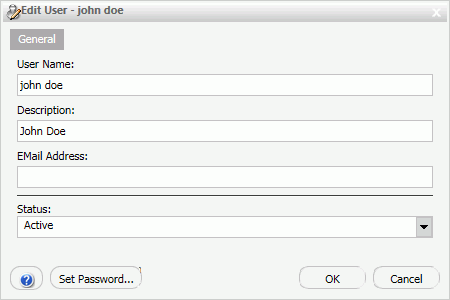
- If desired, type new information in the User Name, Description, or EMail Address field.
- To change the status of a user, select Active, Inactive,
or Must Change Password from the Status drop-down
list.
Note: If you select Must Change Password, users will be prompted to change their password when they attempt to sign in.
Procedure: How to Delete a User
Only a Manager can delete a user. The action of deleting a user also deletes that user's private content. Be sure to publish or share any private content assigned to that user if it supports ongoing activities.
- In the portal, on the Menu bar, click Administration, and then click Security Center.
- On the Users & Groups tab, right-click a user and
select Delete, or select the user and click
the Delete User button
 .
. A confirmation dialog box opens. Click Yes to delete the user.
Understanding the Group Membership Report
The Group Membership report lists all groups to which an individual user or selected group of users is currently assigned. The list entry for each group assignment identifies a Group Name, Group Description, User Name, and User Description, as shown in the following image.
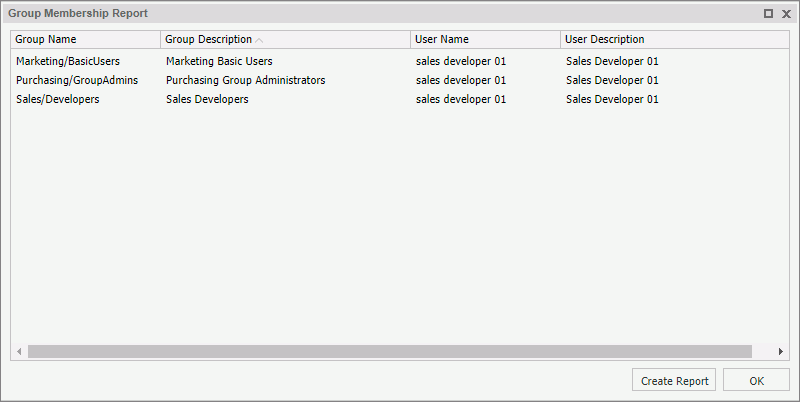
By default, the report lists entries in ascending order by Group Name. You can reorganize this default display by clicking column headings to sort the report entries in ascending or descending order based on the values in that column.
From this dialog box, you can also create an HTML version of the report, as shown in the following image.
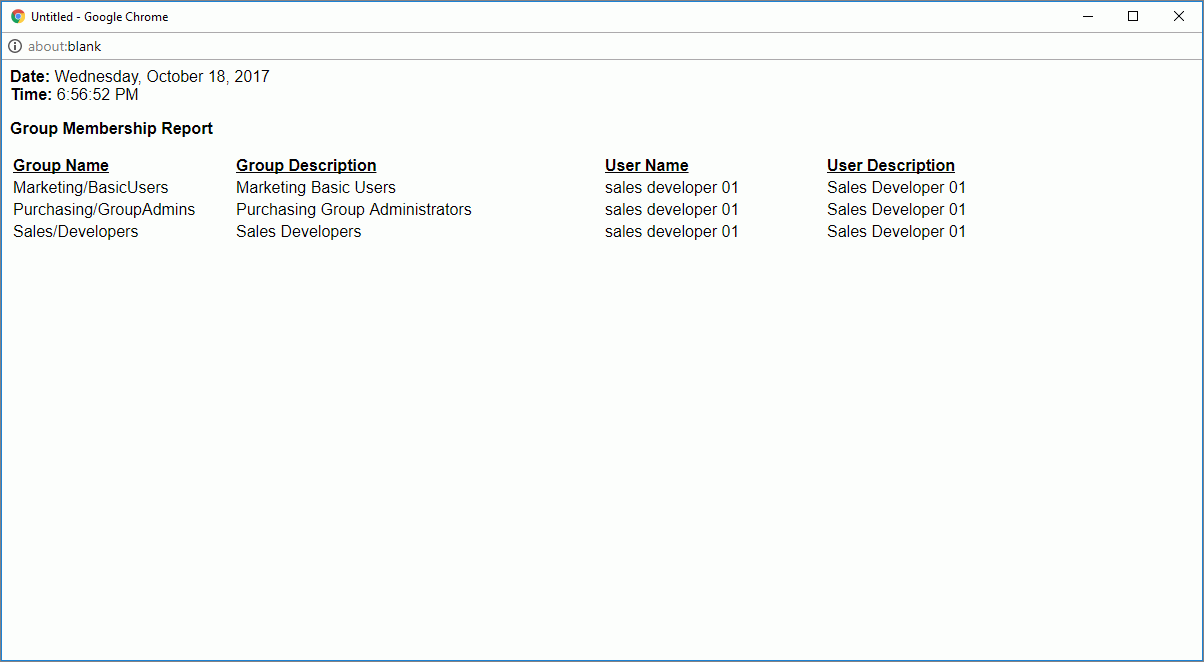
Using commands in your browser, you can save this version of the report or send it by email to an external reviewer.
The Date and Time that appear on the HTML version of the Group Membership report use the default, locale-sensitive time format (24 hours or 12 hours AM/PM) assigned to the machine on which WebFOCUS Business User Edition is installed. Therefore, if you select a different language when you sign in to WebFOCUS Business User Edition, dates and times continue to appear in the format used by the default locale of your machine instead of the format required by the language you selected.
For example, if you install WebFOCUS Business User Edition on a machine that runs on the Windows operating system, uses English as the default language, and uses a locale-sensitive time format of 12 hours AM/PM instead of 24 hours, WebFOCUS Business User Edition displays all times in the 12 hour AM/PM format. Even if you configure WebFOCUS Business User Edition to use the UNICODE code page and include the Japanese Locale in the Dynamic Language Switch settings, times on this report and throughout the user interface continue to use the 12 hour AM/PM format. You cannot change the time display to a 24-hour time format unless you also add Japanese to the Windows Language configuration and change to a 24-hour time format within the Windows Date and Time settings on the machine that runs WebFOCUS Business User Edition.
Procedure: How to Create a Group Membership Report
- In the Security Center, do one of the following:
- To base the report on an individual user, in the Users pane, right-click the entry of your selected user.
- To base the report on a group of adjacent users, in the Users pane, click the first user entry, hold down the Ctrl key, click on the final user entry, and then right-click your selection.
- To base the report on a group of non-adjacent users, in the Users pane, hold down the Ctrl key, click on all of the individual entries you want to include in the report, and then right-click any selected entry.
- When your selections are complete, in the shortcut menu,
point to Groups, and then click Group
membership report.
The Group Membership report dialog box opens, displaying all group assignments for your selected users.
- To rearrange the report entries, click any column heading to list report entries in ascending or descending order based on the values in that column.
- To produce an HTML version of the report, click Create Report.
Use the commands in your browser menu to print, save, or send the report.
- To close the dialog box, click OK.
| WebFOCUS | |
|
Feedback |