Creating a Change Management Package
Many organizations do not grant developers write access to the user acceptance test and production environments. Access to these environments is strictly controlled and granted only to administrators, production control personnel, or automated change management processes.
Only developers know which changes are ready to be moved into the test environment. The Change Management Export facility presents developers with a graphical view of the resources they manage and allows them to build a change management package. This package is then loaded into another environment by production control personnel or automated processes.
Note: Execution IDs and passwords cannot be imported or exported through the Change Management utility. A new Execution ID and password must be created on the selected system.
Working With CM Zip Files
The zip file format compresses the resources that make up a change management package into a single file, delivering the advantages of speed and security to change management packages. They are especially useful when you must transfer change management packages from one physical location to another. Their compressed and consolidated format captures all files included in a change management package into a single file that can be emailed, copied, or cut and pasted from a source folder on one network component to a target folder on another.
WebFOCUS creates change management zip files, called CM zip files, by default. To disable this feature, clear the Zip Change Management Package (IBI_CM_ZIP) check box, which is found on the Change Management page of the Configuration tab in the Administration Console. When this feature is disabled, change management packages use the uncompressed CM file format.
The default CM zip file name format is NAME_DATE_TIME_USERID, which combines the name of the change management package, with the date and time on which it was created, and the ID of the user who created it. For example, retail_samples_20160504_161133_administrator.zip. To specify an alternative format for CM zip file names, select a template from the Name format of Zip export files (IBI_CM_ZIP_FILE_FORMAT) setting, which is found on the Change Management page of the Configuration tab in the Administration Console.
Procedure: How to Create a Change Management Extract Package
Only members of the Managers group have access to the Change Management feature, which is available as a node that contains two subfolders: Import and Export on the WebFOCUS Resources panel. To open the WebFOCUS Resources panel, in the portal Menu bar, click Resources.
The steps required to create a Change Management Package are:
- Create a Scenario. Utilizing the Change Management Export facility, an authorized user creates a scenario by selecting the resources to be exported. A scenario is a description of all the resources that will be exported into a Change Management Export Package.
-
Export a Scenario. After a scenario is created,
a user can export this scenario into a Change Management Export
Package. This Change Management Export Package is placed in the drive:\ibi\WebFOCUS_BUE82\WebFOCUS\cm\export directory in two formats: a zip file and a folder, which contains
the expanded contents of the zip file.
The zip file or the exported folder is then copied to the target environment and placed in the drive:\ibi\WebFOCUS_BUE82\WebFOCUS\cm\import directory. For convenience the CM zip file can be downloaded from Business User Edition using a web browser and similarly uploaded to the target Business User Edition where its content can then be imported and accessed.
Procedure: How to Create a Scenario From the Change Management Export Facility
- In the portal, on the Menu bar, click Resources.
- In the WebFOCUS Resources panel, expand the Change Management node.
- Right-click Export, and click New Scenario.
- In the New Scenario dialog box, type the scenario name, and then click OK.
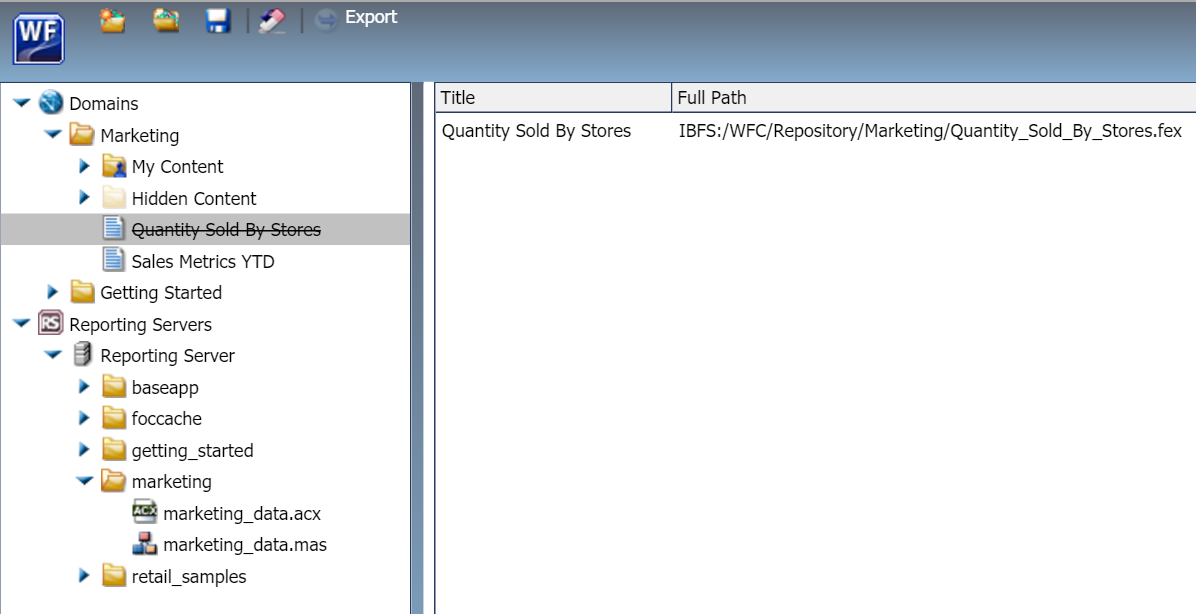
The Change Management Scenario dialog box opens, as shown in the following image.
- Right-click the domain, folder, or other resource you want to include, and:
- Click Select with Sub-Tree to include that folder and all subfolders in your selection.
- Click Select Folder Only to include the specific folder, with no content. Typically, this is done to move rules on the folder.
- You can also select resources by dragging them from the Resources tree and dropping them in the right pane. When you do so, the With Subtree check box is selected, by default, and you must clear it if you wish to exclude subfolders and content from your selection.
When your selection is complete, an entry for it appears in the right pane, and a strikethrough line appears on the entry under the Resources tree, as shown in the following image.
- If you select a private resource, the With Private Content check box is automatically selected and cannot be cleared.
- If you select private content, it will only be imported if the owner of that private content already exists in the target environment.
- If you select a published folder, you can include private content within it by selecting the With Private Content check box for that resource. This will export all of the private content in that folder and its subfolders, including those My Content folders that are assigned to individual users, even if you do not have the privileges necessary to view that private content.
- If you select a subfolder without a parent folder, the Import process will recreate the parent folder in the target environment. A connection to the same metadata must exist within the target environment as well as the source environment.
-
If the rules on the source and target environments are different, users may have access to private content in the source environment, but be denied access in the target environment. This occurs if users have access to the published folder that contains the private content in the source environment, but do not have it in the target environment.
- Repeat the previous step for any additional resources you want to include in the change management scenario.
- If you need to clear your unsaved selections, click Reset Scenario.
- When you have selected all resources, click Save.
An entry for the new scenario appears beneath the Export node.
- If the new scenario does not appear, right-click the Export node, and then click Refresh.
Procedure: How to Open a New Change Management Scenario from the Change Management Scenario Dialog Box
- In the Change Management Scenario dialog box, on the toolbar, click Create a new Scenario.
- If you receive a message that asks if you want to save the changes you made, click Yes.
- Type the name of the new scenario, and click OK.
A new Change Management Scenario dialog box opens. The current Change Management Scenario dialog box also remains open.
- Create the new scenario as described in the procedure, How to Create a Scenario From the Change Management Export Facility, starting with step 4.
Procedure: How to Open an Existing Change Management Scenario from the Change Management Scenario Dialog Box
- In the Change Management Scenario dialog box, on the toolbar, click Open existing Scenario.
- If you receive a message that asks if you want to save the changes you made, click Yes.
- In the Open Scenario dialog box, navigate to the existing scenario you want to open and double-click it, or click it and then
click Open.
Your selected Change Management scenario dialog box opens and replaces the Change Management scenario dialog box that was on display.
Procedure: How to Export a Saved Change Management Scenario Using the Change Management Facility
Before you can export a change management scenario, you must make sure that you have saved it. You cannot export an unsaved change management scenario.
- In the Scenario dialog box Quick Access Toolbar, click Export.
- When the confirmation message opens, click OK.
The new scenario appears in the WebFOCUS Resources panel, under the Change Management, Export node.
- If the new scenario does not appear, right-click the Export node, and then click Refresh.
Procedure: How to Download a Change Management Package Zip File
The export process saves a CM zip file to the following location:
drive:\ibi\WebFOCUS_BUE82\WebFOCUS\cm\export
The download process takes that CM zip file, and downloads it to your local machine. You can then transfer the copy of that CM zip file to another environment for use as a change management package.
- In the portal, on the Menu bar, click Resources.
- In the WebFOCUS Resources panel, expand the Change Management node.
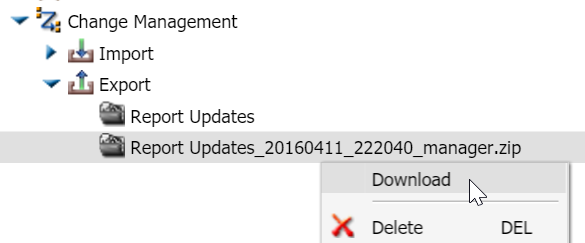
- Expand the Export node.
- Right-click the CM zip file you want to download, and then click Download, as shown in the following image.
- Save the CM zip file to an external location as directed by your browser.
Procedure: How to Upload a Change Management Package Zip File
The zip file upload process saves a copy of a CM zip file stored on your local machine to the change management import directory on the server at the following location:
drive:\ibi\WebFOCUS_BUE82\WebFOCUS\cm\import
You can then import the copy of that CM zip file to WebFOCUS Business User Edition.
- In the portal, on the Menu bar, click Resources.
- Expand the Change Management node, right-click Import, and then click Upload a Zip File.
- In the Upload a Zip File dialog box, click Browse, navigate to the location where you have saved the change management package, click the CM zip file you want to upload, and then click Open.
- Ensure that the correct CM zip file appears in the File to Upload field, and decide whether or not to import files from the
package as published or unpublished files.
- To establish the contents taken from the CM zip file as published after the upload is complete, select the Publish Documents check box. This is the default setting.
- To establish the contents taken from the CM zip file as private after the upload is complete, clear the Publish Documents check box.
- Click Upload.
When you receive a confirmation message, click OK to complete the upload.
- In the Upload a Zip File dialog box, click Close.
If an entry for the new CM zip file does not appear below the Import node, right-click it, and then click Refresh.
Procedure: How to Import a Change Management Package
Only members of the Managers group can import Change Management Packages.
This procedure assumes that a change management zip package has been previously created on another system, the Manager is signed in to the target environment, and the CM zip file is available to the Manager.
- In the WebFOCUS Resources panel, expand the Change Management node,
and then expand the Import node.
If the CM zip file is not visible, right-click the node, and then click Refresh.
- Right-click the uploaded change management package, and click Import.
The Import Package dialog box appears, as shown in the following image.
- Select one of the following options:
Add New Resource Only (do not replace). This option only adds new resources to the target environment. For newly created items, the Created On and Last Modified On fields are updated with the time at which they were imported. To view the Created On and Last Modified On fields, right-click an item and click Properties.
If an item already exists in the target environment but is also part of the change management export package, the target resource are left alone and the Last Modified On field will not be updated.
Add New and Update Existing Resources. This option adds new resources to the target environment, and updates existing resources . For newly created items, this option assigns the time of the import to the Created On and Last Modified On fields. For updated items, this option retains the original value in the Created On field, but updates the value in the Last Modified On field with the time of the most recent import.
The other options on this panel are not used in WebFOCUS Business User Edition and can be ignored.
- Click OK.
| WebFOCUS | |
|
Feedback |