Using the Administration Console
|
Topics: |
The Administration Console contains the settings that configure the WebFOCUS Client, customize internal or external authentication settings, connect you to ReportCaster, and support diagnostic research.
Opening the Administration Console
|
How to: |
Because the Administration Console contains settings that can alter the operation of your entire WebFOCUS installation, it is available only to those users with the privileges to update or reconfigure system settings. In the Business User Edition, the Administration Console is available only to the Manager User.
Before you can open the Administration Console, you must sign in with a User ID that has the privilege to do so. Once you have signed in with the appropriate privileges, the Administration Console is visible and available for review and updates. You can then open the Administration Console from the Menu bar, or from a link on the Getting Started page.
You can also open the Administration Console directly from the address bar of your browser window by entering the URL of the Administration Console and then signing in with a User ID that has the appropriate privileges.
Procedure: How to Sign In to the Administration Console From the Start Menu
- If WebFOCUS Business User Edition has been installed on a Windows machine, click the Start button, and then click the Information Builders folder.
- Click the WebFOCUS Business User Edition 82 folder, and then click Run WebFOCUS Business User Edition.
- In the Sign In page, type the ID and Password of a User that has privileges to open the Administration Console, and then click Sign In.
- To open the Administration Console from the Menu bar, click Administration, and then click Administration Console.
- To open the Administration Console from the Quick Links Page, in the Manage section, click Configure System.
Procedure: How to Sign in to the Administration Console From a Browser Window
- Go to the URL:
http(s)://machine:port/context/admin
where:
- machine
-
Is the network id of your computer.
- port
-
Is the number of the port that connects your computer to the server hosting WebFOCUS BUE.
- context
-
Is the local address for WebFOCUS BUE. For example, ibi_apps.
- On the Sign In page, type the ID and Password of
a User that has privileges to open the Administration Console, and
click Sign In.
The Administration Console opens automatically.
To display the Administration Console using a different language, you can use the Dynamic Language Switch on the Configuration menu.
Using the Administration Console Menu Bar
|
Topics: |
|
How to: |
The Administration Console menu bar appears above the Administration Console tab display. Its commands and features are available to all of the Administration Console tabs.
Using the Licenses Menu
|
Topics: |
The Licenses Menu links you to information about your current product license, an audit of User and Group licenses and roles, and to information about licenses for all third-party software products included in the installation. Using Licenses menu commands you can:
- View the current license number, product edition, license key expiration date, and the number of licensed users. You can also add new license numbers.
- Access license information for all third-party software packaged with WebFOCUS BUE.
Reviewing Client License Information
The WebFOCUS Client command opens the License Information dialog box. This dialog box identifies the current license key and the individual product components made available by that key. You can also use it to replace the current license key with a new license key when your current license expires or changes.
- Product Edition. The name of the current product edition.
- License Key. The license key currently in use.
- License Key Expiration Date. The date the license key will expire. By default, a warning message for the client license key expiration date begins to appear fourteen (14) days before the actual expiration date. This message displays the expiration date and the number of days remaining until that date. The License Expiration Warning message appears only to Administrators during sign on, and it is written to the event.log file located in the logs directory of the WebFOCUS Client installation.
- User Licenses. The total number of available user licenses and the number of licenses used for each user category. For example:
- Product Components. The product components your license entitles you to use. If the check box to the right of an entry is visible and selected, you are entitled to use that product component.
- New License Key. Opens the Update License dialog box, where you can add a new license key and site code.
Reference: Managing Client Licenses
Access to WebFOCUS features and the number of licensed users is based on your license key and site code.
When the number of users exceeds the number of licensed users, the User Licenses Used count displays, in red, a message that the user license count has been exceeded, which is written to the event.log trace file. Users that are authorized to access the Administration Console will receive a message upon signing in.
User licenses are maintained or enforced when the following product components are licensed:
- Total Users. The total number of named users in the WebFOCUS Repository.
- Portal Users (PR). The number of users with portal privileges.
- InfoAssist+ Users. The number of users with portal privileges and InfoAssist+ privileges.
Procedure: How to Configure License Codes
Access to the WebFOCUS features and the number of Managed Reporting users is based on your license key and site code. You can change these values from the License Management page.
- In the Administration Console menu bar, click Licenses,
and then click WebFOCUS Client.
The License Information window opens, displaying features available under the current license.
- Click New License Key.
- Type your new license key and site code.
- Click Validate.
The License Management page displays the current license key, the new license key, and the features that the new license key provides.
- Click Save to implement the new license.
You must reload your web application in order for your changes to take effect. In addition, users must sign out and sign back in to obtain access to any new features.
Reviewing User Audit Information
The User Audit command evaluates the repository license usage for Total Users, Portal Users, and InfoAssist+ Users. The command produces a License Analysis report that identifies the total number of licenses by license type, the number of licenses in use by license type, and analyzes license assignments by Group and by User.
You can run the User Audit utility (license_audit.bat) from your local WebFOCUS installation directory, which is available in the following location:
drive:\ibi\WebFOCUS_BUE82\WebFOCUS\utilities\mr
When you run this program, it generates the License Analysis report and transfers it to the auditUserCounts.htm file, in the same directory.
The License Analysis report contains the following information:
|
License Analysis |
|
|---|---|
|
License Key |
Displays your current license key. |
|
User License |
Displays the user license
types that are authorized under your current license key. This can
include the following:
|
|
Code |
Displays the code for each user license, such as TU for Total Users. |
|
Maximum |
Displays the maximum number of user licenses that are available with your license key. |
|
In Use |
Displays the number of user licenses that are currently in use. |
|
Available |
Displays the number of user licenses that are available for each license. |
|
Analysis of Groups |
|
|
Group Path |
Displays the Groups
stored in the repository. The following groups are created by the
WebFOCUS Repository Creation utility, by default:
|
|
License Type(s) |
Displays the license types for each Group, such as TU. |
|
Role |
Displays the role of each Group, such as SystemFullControl. |
|
On Resource |
Displays the resource to which the Role is applied for the Group. |
|
Former Type(s) |
Displays the former types of licenses for each Group. |
|
Groups Summary |
Displays counts for
the following:
|
|
Analysis of Users |
|
|
User Name |
Displays the users stored
in the repository. The following users are created by the WebFOCUS
Repository Creation utility, by default:
|
|
License Type(s) |
Displays the license types assigned to each user. |
|
# Group w/Licenses |
Displays the number of groups with licenses of which the user is a member. |
|
Former Type(s) |
Displays the license types that have been changed or cleared for each user. |
|
User Summary |
Displays counts for
the following:
|
Procedure: How to Run the User Audit for the WebFOCUS Client from the Administration Console
-
From
the Administration Console menu bar, click Licenses,
and then click User Audit.
The License Analysis report opens in a separate browser window.
Reviewing Third Party Licenses
The Third Party command opens the 3rd Party Information page that displays the following information for each third-party software application used to support different features in WebFOCUS BUE:
- Description
- Version
- File(s)
- License
- Third-Party Links
The WebFOCUS BUE product uses various third-party software applications that support a variety of features.
Clearing the Cache
The Clear Cache command refreshes the state of the WebFOCUS application by applying saved changes that are not applied dynamically. Even though some changes are dynamic or only require the administrative user to clear the cache to take effect, others require an administrative user to recycle the web application.
Closing the Administration Console
The Close command closes the Administration Console. After the console closes, you remain signed in to your work session.
Opening Administration Console Help
When you click the Help icon, the online Help file opens to a topic that describes the tab, setting, or feature currently on display.
Configuring Security
|
Topics: |
In the Administration Console Security Tab, you can adapt the default security settings to your local environment.
Security can either be configured internally in the WebFOCUS BUE repository, or externally in a Microsoft Active Directory or an LDAP directory that is not part of WebFOCUS BUE. To accommodate this, you can use either the Internal page or the External page on the Security tab in the Administration Console.
Internal authentication and authorization is enabled by default.
Using Internal Security
|
How to: |
Internal authentication and authorization are enabled, by default. Optionally, you can use the settings in the Internal page to configure sign in and password policies.
- Sign In Settings (Enable Sign In Settings)
-
Determines the default values assigned to the Sign In Settings on the Internal Security Page.
This check box is cleared (False), by default. Sign In Settings are inactive and unavailable, and display a value of 0.
When this check box is selected (True), Sign In Settings are activated, automatically assigned a set of pre-configured values, and made available for updates. To deactivate an individual setting while this check box is selected, type or select zero (0). When this check box is later cleared, all values assigned to the Sign In Settings return to 0, and the settings are deactivated.
This setting does not affect the value or availability of the Password Expiration Result options.
- Maximum Sign-in Attempts (IBI_Max_Bad_Attempts)
-
Specifies the number of unsuccessful sign-in attempts allowed before the account status is changed to locked. When the Sign In Settings check box is cleared, the default value is 0, which allows unlimited attempts. When the Sign In Settings check box is selected, the default value is 5, and managers can type or select an alternative value. To deactivate this setting when the Sign In Settings check box is selected, type or select 0.
- Lockout Duration (Minutes) (IBI_Account_Lockout_Duration)
-
Specifies the number of minutes before the status of an account changes from locked to active. When the Sign-in Settings check box is cleared, the default value is 0 (off). When the Sign In Settings check box is selected, the default value is 3 minutes, and managers can type or select an alternative value. To deactivate this setting when the Sign In Settings check box is selected, type or select 0.
- Lockout Duration Reset (Minutes) (IBI_Account_Lockout_Duration_Reset)
-
Specifies the number of minutes that must elapse after the number of failed sign-in attempts specified by the Maximum Sign-in Attempts setting before the allowed sign-in attempt counter is reset to 0. The available range is from 1 to 99,999 minutes. When the Sign-in Settings check box is cleared, the default value is 0 (off). When the Sign In Settings check box is selected, the default value is 3 minutes, and managers can type or select an alternative value. To deactivate this setting when the Sign In Settings check box is selected, type or select 0.
- Days Until Password Expires (IBI_Password_Expire)
-
Specifies the number of days that a password will remain active. When Sign-in Settings is cleared, the default value is 0, which prevents passwords from expiring. When Sign In Settings is selected, the default value is 90 days. Once the password has expired, the user must take the action specified by the Password Expiration Result (IBI_Password_Expire_Action) setting, and managers can type or select an alternative value. To deactivate this setting when the Sign In Settings check box is selected, type or select 0.
- Days Until Password Expiration Warning (IBI_Password_Expire_Warning)
-
Specifies the number of days prior to expiration that a warning will be displayed to the user. When Sign-in Settings is cleared, the default value is 0, which provides no warning. When Sign In Settings is selected, the default value is 75 days. This value should be less than or equal to the value assigned to the Days Until Password Expires (IBI_Password_Expire) setting, and managers can type or select an alternative value. To deactivate this setting when the Sign In Settings check box is selected, type or select 0.
- Password Expiration Result (IBI_Password_Expire_Action)
-
Specifies the action required when a password expires. You can choose one of the following options:
- To force Users with Expired passwords to change their passwords before signing in (MUSTCHANGE). This is the default value.
- Change the status of users with expired passwords to inactive. Such users cannot sign in until an administrator resets the password (DISABLE-USER).
- Enable Password Complexity (IBI_Password_Complexity)
-
Determines the default values assigned to the Password Settings on the Internal Security Page.
This check box is cleared (False), by default. All of the Password Settings are inactive and unavailable, and display a value of 0.
When this check box is selected (True), all of the Password Settings are activated and available for updates. WebFOCUS BUE automatically assigns a pre-configured set of values to them.
When this check box is later cleared, all values assigned to the Password Settings return to 0, and the settings are deactivated.
If this check box is selected (True), passwords also must:
- Not contain the user account name or parts of the full name of the user that exceed five consecutive characters.
- Be at least six characters long or at least the number of characters specified in Minimum Password Length, whichever is greater.
- Contain characters from three of the following four categories:
- Uppercase English characters (A through Z).
- Lowercase English characters (a through z).
- Base 10 digits (0 through 9).
- Non-alphabetic al characters (for example, !, $, #, %).
- Complexity requirements are enforced when passwords are changed or created.
- Minimum Password Length (IBI_Password_Minimum_Length)
-
Defines the required minimum length of a password. When Enable Password Complexity is cleared, the default value is 0 characters. When the Enable Password Complexity check box is selected, the default value is 6 characters. To deactivate this setting when the Enable Password Complexity check box is selected, type or select 0.
- Password Reuse (IBI_Password_Reuse)
-
Specifies the number of recent passwords that cannot be reused. If Password Reuse is set to 6, for example, WebFOCUS BUE will track the 6 most recent password changes and prevent you from reusing them when creating a new password. When the Enable Password Complexity check box is cleared, the default value is 0 changes, and users can re-use any previously-assigned password. When the Enable Password Complexity check box is selected, the default value is 2 changes. To deactivate this setting when the Enable Password Complexity check box is selected, type or select 0.
Procedure: How to Configure Sign In Settings
- Sign in to WebFOCUS BUE as a manager and, from the BUE Portal Menu bar, click Administration, and then click Administration Console.
- Click the Security tab, and on the Security page, under the Security Configuration folder, click Internal.
- Select the Sign In Settings check box.
The Internal page displays the following default values:
- Maximum Sign-in Attempts – 5
- Lockout Duration (Minutes) – 3
- Lockout Duration Reset (Minutes) – 3
- Days Until Password Expires – 90
- Days Until Password Expiration Warning – 75
- To change the default value assigned to any of these settings, type or select an alternate value in any of these boxes.
- To clear all settings, clear the Sign In Settings check box. All values automatically return to 0.
- In the Password Expiration Result section, accept the default option To force users with expired passwords to change their passwords before signing in, or click the alternative option Change the status of users with expired passwords to inactive. Such users cannot sign in until an administrator resets the password.
- Continue with any other Internal Security page updates or save your changes.
Procedure: How to Configure Password Settings
- Sign in to WebFOCUS BUE as a manager and, from the BUE Portal Menu bar, click Administration, and then click Administration Console.
- Click the Security tab. On the Security page, under the Security Configuration folder, click Internal.
- Select the Enable Password Complexity check box.
The Internal page displays the following default values:
- Minimum Password Length – 6
- Password Reuse – 2
- To change the default value assigned to any of these settings, type or select an alternate value in either of these boxes.
- To clear all settings, clear the Enable Password Complexity check box. All values automatically return to 0.
- Continue with any other Internal Security page updates or save your changes.
Procedure: How to Save Internal Security Page Configuration Updates
- When all of your Internal Security Page Configuration updates are complete, click Save.
- When you receive a confirmation message, click OK.
- When you receive a message to clear the cache, click OK.
- In the Administration Console menu bar, click Clear Cache and, when you receive a confirmation message, click OK.
Using External Security
Use the External page if you have elected to configure security in a Microsoft Active Directory (AD) or Lightweight Directory Access Protocol (LDAP) directory that is not part of WebFOCUS BUE.
- Enable External Security
-
When you select this check box, internal security settings are overridden. WebFOCUS BUE directs all authentication activities and approvals to the external system you identify on this page.
- External Security Type (IBI_Authentication_Type)
-
The drop-down list box for this field contains the following values:
- Reporting Server. Authenticates users against an AD or LDAP directory.
- Legacy LDAP. This value is not used with the Business User Edition.
- Custom Java Plug-In. This value is not used with the Business User Edition.
Understanding Custom Settings
|
How to: |
The Custom Settings page allows you to customize WebFOCUS BUE by typing customized values for standard settings.
When you save updates to settings that you type into the Customized Setting text box, they are transferred to the site.wfs file, located at drive:\ibi\WebFOCUS_BUE82\WebFOCUS\client\wfc\etc\. When you use this page to assign new values to settings, they override the default values assigned to them. These overrides are carried over as you upgrade to new versions.
After you save a custom setting, the text continues to display on this page. You can use comments to identify specific updates and additional information about them.
Procedure: How to Configure Custom Settings
Only a manager can configure settings on the Custom Settings page.
- In the BUE Portal, on the Menu bar, click Administration, and then click Administration Console.
- On the Configuration tab, click Custom Settings.
- Under the final comment statement at the top of the Custom Settings text box, or the most recent custom setting entry, type
the variables, settings, commands, or comments that comprise the custom settings.
Use the format required by the application or operating system that will execute the command.
To help track changes to custom settings, use comments to identify and separate individual changes.
- To store your custom settings in an encrypted format, select the Encrypt check box.
Note: Even when you select this check box, settings continue to appear in an unencrypted format in the Custom Settings text box.
- When your configuration is complete, click Save.
- When you receive a confirmation message, click OK.
- When the Custom Setting page clears, click Custom Settings under the Application Settings folder to see your updated comments, settings, or commands in the Custom Settings text box.
Procedure: How to Configure Collation Sequence Settings
Only a manager can configure settings on the Custom Settings page.
- In the BUE Portal, on the Menu bar, click Administration, and then click Administration Console.
- On the Configuration tab, click Custom Settings.
- Under the final comment statement at the top of the Custom Settings text box, type the comment line:
# Collation Sequence Settings
- Under the comment line, type the command:
_site_profile=&_site_profile\nSET COLLATION={BINARY|SRV_CI|SRV_CS|CODEPAGE}where:
- BINARY
-
Bases the collation sequence on binary values.
- SRV_CI
-
Bases the collation sequence on the LANGUAGE setting, and is case-insensitive.
- SRV_CS
-
Bases the collation sequence on the LANGUAGE setting, and is case-sensitive.
- CODEPAGE
-
Bases the collation sequence on the code page in effect, and is case-sensitive. CODEPAGE is the default value. In most cases, CODEPAGE is the same as BINARY. The only differences are for Danish, Finnish, German, Norwegian, and Swedish in an EBCDIC environment.
- To store your custom settings in an encrypted format, select the Encrypt check box.
Note: Your settings will continue to appear in the Custom Settings text box in an unencrypted format.
- When your configuration is complete, click Save.
- When you receive a confirmation message, click OK.
- When the Custom Setting page clears, click Custom Settings under the Application Settings folder to see your updated comments, settings, or commands in the Custom Settings text box.
Understanding NLS Settings
|
How to: |
You can use the Administration Console to configure National Language Support and enable the Dynamic Language Switch.
Separate message files exist for every national language that WebFOCUS supports. If you want to customize the set of characters used in your report output, you must select the code page for every language you use.
These settings do not carry over during updates. You must repeat this customization step for each new release that you install.
Procedure: How to Configure National Language Support
- In the Administration Console, on the Configuration tab, click NLS Settings.
- On the NLS settings page, click the option for the operating system on which the WebFOCUS Client resides.
The list adjusts to display the code pages that are available to the selected operating system.
- From the list, select a code page that configures the client for the correct display of report output in the browser.
Tip: The language selected for the Client usually corresponds to the language selected for the Server from the Reporting Server Console.
If the language chosen from the Reporting Server Console does not appear in the list, click User Defined Code Page and type the number of the user-defined code page.
Use this option, for example, when the server adds support for a new code page that is not yet reflected in the client software.
In the following sample configuration window, the administrator specified code page 437.

Unicode (UTF-8) is available for the Windows, UNIX, or AS/400 operating systems.
- Click Save to store your NLS settings.
The Administration Console will generate and update the client configuration file (nlscfg.err), found in drive:\ibi\WebFOCUS_BUE82\WebFOCUS\client\home\etc, with the CODE_PAGE setting. Note that if you click NLS Settings again, your new setting is highlighted as the active code page.
Reference: WebFOCUS BUE Client Code Page Settings
The following code page settings are available:
- * 137 - U.S. English/Western European
- 874 - Thai
- * 942 - Japanese
- * 946 - Simplified Chinese
- 949 - Korean
- 1250 - Eastern European
- 1251 - Russian
- * 1252 - Western European
- 1253 - Greek
- 1254 - Turkish
- 1255 - Hebrew
- 1256 - Arabic
- 1257 - Baltic
- * 10942 - Japanese EUC
- * 10948 - Traditional Chinese
- * 65001 - Unicode (UTF-8)
Note: Only those code page settings marked with an asterisk are fully supported in the current release.
Customizing the Dynamic Language Switch
|
How to: |
You can customize the languages that are made available on the sign in pages by activating the Dynamic Language Switch.
Procedure: How to Customize the Dynamic Language Switch
- On the Administration Console, on the Configuration tab, under the Application Settings folder, click Dynamic Language Switch.
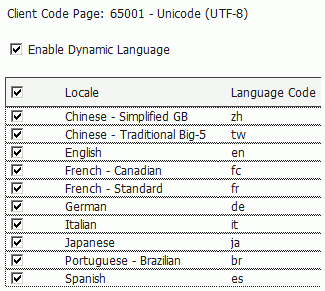
The Dynamic Language Switch window appears with a list of the languages made available by the code page selected in the NLS Settings page. By default, the Enable Dynamic Language check box is unselected, and all of the language check boxes are deactivated.
The Dynamic Language Switch window also shows the Client Code Page setting specified in How to Configure National Language Support.
- Select the Enable Dynamic Language check box to activate the check boxes for all of the available languages displayed in the panel, as shown in the following
image:
Selecting the Enable Dynamic Language check box and one or more languages activates the display of the Select Languages button on all of the sign in pages. It also activates the Language menu on the BUE Portal Menu bar.
- Select the check box next to the Locale heading if you want all of the languages to appear in the Select Languages drop-down
list on the sign in pages and in the Language menu.
OR
- Clear the check box next to the Locale heading and select the individual check boxes next to the individual languages that you want to appear on the sign in pages and in the Language menu.
- Click Save to save your changes.
Note: To remove individual languages from the Select Languages drop-down list on the sign in pages, clear the check boxes next to the languages you want to remove.
Understanding Redirection Settings
|
How to: |
You can view or edit redirection settings for the WebFOCUS Client though the Redirection Settings area of the Administration Console. However, you should not alter Redirection Settings without consulting Customer Support Services.
Redirection allows users to save report output in a temporary directory when a request is executed. Then an HTTP call is made from the browser to retrieve the temporary stored output for display in the browser.
If redirection is turned off, the report output displays in the browser immediately after the request is executed.
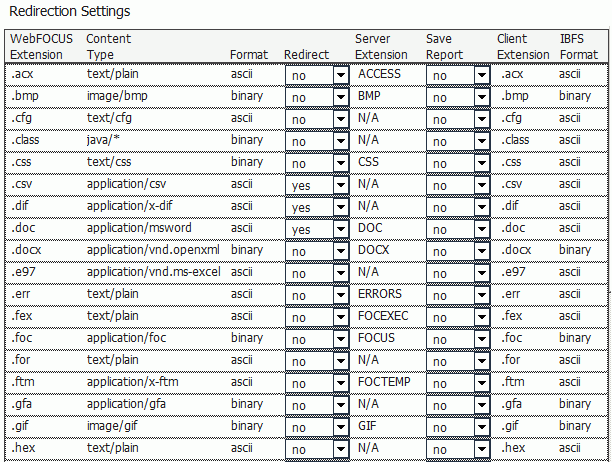
To change redirection settings in the Administration Console, click the Configuration tab and then Redirection Settings. The Redirection Settings panel opens, as shown in the following image.
Procedure: How to Change Redirection Settings
It is recommended that you do not change these settings unless instructed to do so by Customer Support Services.
- In the Administration Console on the Configuration tab, click Redirection Settings.
- In the Redirect column, select yes on a row to redirect the output to a temporary directory for the specified extension.
- In the Save
Report column, select yes to prompt users
in the browser to open or save report output. When Save Report is
set to yes, the report output retains the
Save As name, if specified in the request.
For example, specifying ON TABLE PCHOLD AS MYREPORT FORMAT PDF in a request and setting Save Report to yes for the .pdf extension enables a user to open or save the output as MYREPORT.pdf. The Save As name specified is returned to the browser in uppercase. If Save Report is set to yes and no Save As name is specified in the request, a random file name is generated.
Important: You must do the following to use the Save Report functionality for GRAPH requests (specified with a PNG, SVG, GIF, JPEG, or JPG format in the procedure):- Set Save Report to yes for
the .htm Extension.
Running a server-side GRAPH request creates an HTM file that contains a link to the actual graph output, which is stored as a temporary image file with a .jpeg, .jpg, .gif, .svg, or .png extension.
- When you execute a GRAPH request, if you select the Save option when prompted to open or save the output, the output is saved to an HTM file using only a reference to the graph image, which will eventually expire and be deleted from the server (according to the temporary file expiration settings in the Client Configuration).
- To preserve the output of the GRAPH request, open the saved HTM file, right-click the graph image, and select Save Picture As to save it to disk permanently. You can then substitute an absolute reference to the saved image file in the returned HTM output file.
- Set Save Report to yes for
the .htm Extension.
- If you want to encrypt the redirection settings, select the Encrypt check box at the bottom of the screen.
- Click Save to save your changes in the Redirection Settings panel.
| WebFOCUS | |
|
Feedback |