Configuring the Adapter for ESRI ArcGIS
|
How to: |
This content describes how to configure the Adapter for ESRI ArcGIS.
Procedure: How to Configure the Adapter for ESRI ArcGIS for Non-Premium API Calls to ArcGIS Online
- Clear cookies from the web browser that will be used to start the Reporting Server Web Console.
- Access the Reporting Server Web Console using the host
name and port that you specified in the Redirect URI field of the
ESRI ArcGIS Online application.
For example:
http://host.ibi.com:8121
For more information, see Creating an ESRI ArcGIS Online Application.
- From the
Web Console sidebar, click Connect to Data.
or
From the Data Management Console, expand the Adapters folder.
In the DMC, the Adapters folder opens. In the Web Console, the Adapters page opens showing your configured adapters.
- In the Web Console, click the New Datasource button on the menu bar and find the adapter on the drop-down list or, in the DMC, expand the Available folder if it is not already expanded.On the Web Console, you can select a category of adapter from the drop-down list or use the search option (magnifying glass) to search for specific characters.
- Right-click the ESRI ArcGIS node and click Add connection.
The Add ESRI ArcGIS to Configuration pane opens, as shown in the following image.
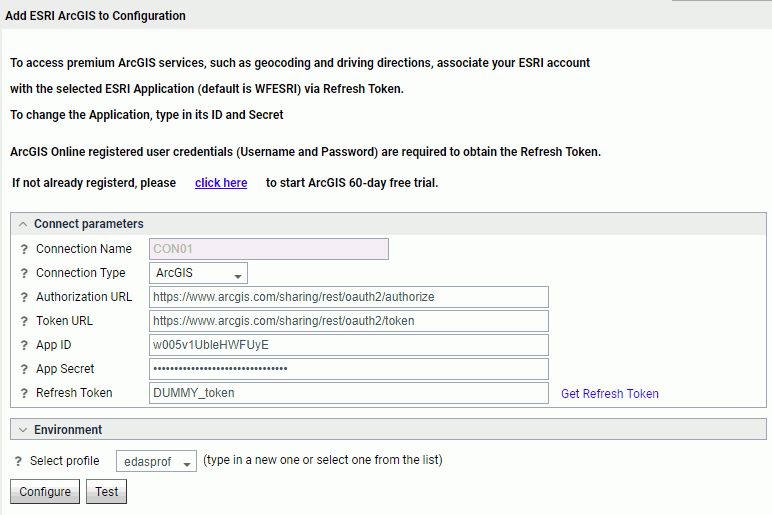
A default App ID and App Secret is prepopulated, to be used for the Non-Premium ESRI ArcGIS Online API calls covered in the Information Builders agreement.
Data Enrichment is included in the Premium ESRI ArcGIS Online API calls.
- Click Get Refresh Token.
The ESRI Sign In screen opens, as shown in the following image.
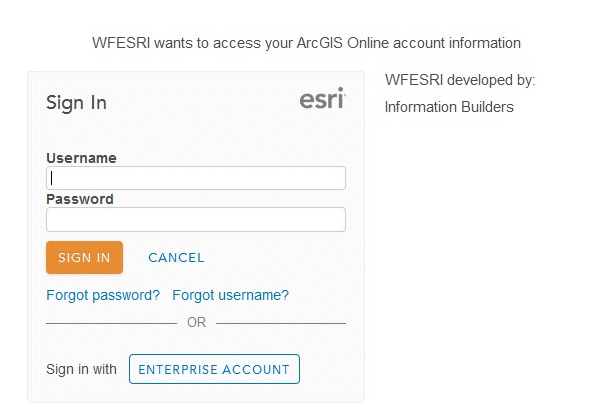
- Enter the ESRI Sign In credentials and click Sign In.
In order to obtain ESRI credentials, you can sign up at the following URL:
https://developers.arcgis.com/sign-up/
You are returned to the Add ESRI ArcGIS to Configuration pane where the Refresh Token is now populated.
- Click Configure.
The configured ESRI ArcGIS connection is added to the ESRI ArcGIS node in the left pane.
Procedure: How to Configure the Adapter for ESRI ArcGIS for Premium API Calls to ArcGIS Online
- Clear cookies from the web browser that will be used to start the Reporting Server Web Console.
- Access the Reporting Server Web Console using the host
name and port that you specified in the Redirect URI field of the
ESRI ArcGIS Online application.
For example:
http://host.ibi.com:8121
For more information, see Creating an ESRI ArcGIS Online Application.
- From the Reporting Server Web Console menu bar, click Adapters.
The Adapters pane opens.
- Expand the Configured folder, if it is not already expanded.
- Expand the GIS folder.
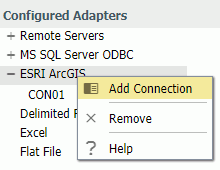
- Right-click the ESRI ArcGIS node and click Add connection,
as shown in the following image.
The Add Connection for ESRI ArcGIS pane opens, as shown in the following image.
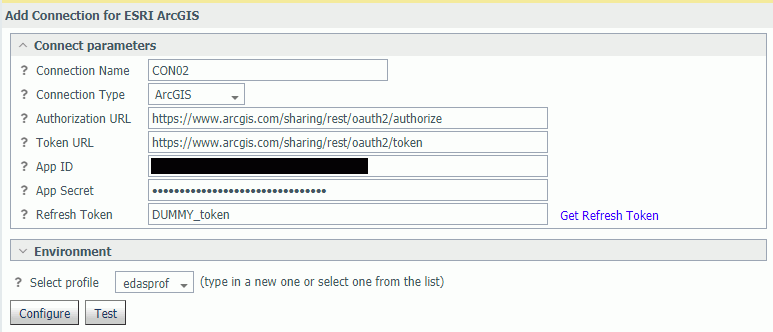
- Enter the values for the App ID and App Secret defined
in the ESRI application you created.
For more information, see Creating an ESRI ArcGIS Online Application.
Data Enrichment is included in the Premium ESRI ArcGIS Online API calls.
- Click Get Refresh Token.
The ESRI Sign In screen opens, as shown in the following image.
- Enter the ESRI Sign In credentials and click Sign In.
In order to obtain ESRI credentials, you can sign up at the following URL:
https://developers.arcgis.com/sign-up/
You are returned to the Add ESRI ArcGIS to Configuration pane where the Refresh Token is now populated.
- Click Configure.
The configured ESRI ArcGIS connection is added to the ESRI ArcGIS node in the left pane.
Procedure: How to Configure a Locally Hosted ArcGIS Server
At some sites, ArcGIS Server is used in conjunction with or instead of ArcGIS Online. This type of configuration is called Esri on Premise.
- When adding a connection for the Adapter for Esri
ArcGIS, select on premises from the Connection
Type drop-down list, as shown in the following image.
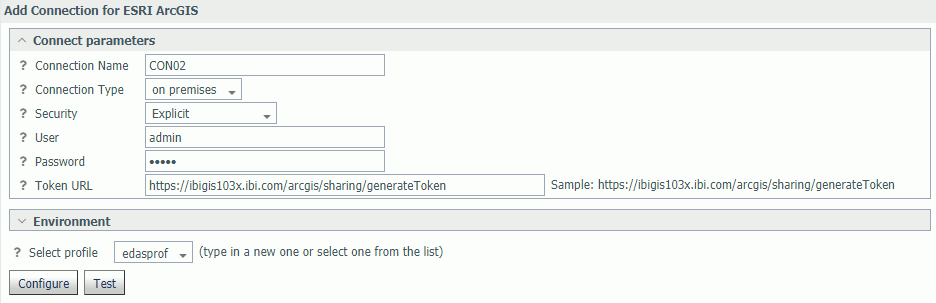
- Select Explicit from the Security drop-down list.
- Enter the user ID for the locally hosted ArcGIS Server in the User text box.
- Enter the password for the locally hosted ArcGIS Server in the Password text box.
- Enter the Token URL in the following format in the Token URL text
box.
https://hostname/arcgis/sharing/generateToken
where:
- hostname
-
Is the host where the ArcGIS Server is installed. For example:
https://ibigis103x.ibi.com/arcgis/sharing/generateToken
- Test the connection by clicking Test.
- When the test is successful, click Configure.
| WebFOCUS | |
|
Feedback |