Workspace Configuration Settings
You can set a variety of general parameters from the Workspace folder in the navigation pane. The parameters are available from a right-click menu and from buttons on the ribbon, organized under the following categories:
- Settings
- License
These settings are saved in the appropriate configuration files.
Tip: If you prefer, you can edit these parameters directly in the associated configuration files. To do so, select Workspace from the menu bar. In the navigation pane, expand the Configuration Files folder, and choose the option that opens the file you wish to edit in a text editor. For details, see Editing Configuration Files.
You can monitor and troubleshoot server activity from the Workspace folder in the navigation pane. These functions are available from a right-click menu and from buttons on the ribbon, organized under the following categories:
- Monitor
- Status. See Monitoring Server Status.
- Data Service Agents. See Displaying and Customizing a Data Service Agents Page.
- Data Service Statistics. See Displaying Status Statistics and Aggregated Statistics for Data Services.
- Scheduler Agents. See How to Display and Customize the Scheduler Agents Page.
- Web Sessions.
- Live Console. See How to Display the Live EDAPRINT Log File.
- Diagnostic
- Savediag - Report a Bug. See Gathering Diagnostic Information for Customer Support Services.
- Log and Trace. See Analyzing Server Activity and Tracing Server Activity.
Workspace SET
|
How to: |
|
Reference: |
The Workspace SET button lets you configure SMTP Server settings, Profile settings, Application settings, and Miscellaneous settings.
Reference: SMTP Server Settings
You can specify an IP address for the email server and a sender address. If the server is secured, you can specify the credentials for connecting to the server. You can also test your email connection from the E-mail Settings pane.
To access these settings, select Workspace from the menu bar or right-click the Workspace folder. Click the Workspace SET icon on the ribbon and select SMTP Server Settings.
The E-Mail SMTP Server page opens, as shown in the following image.

The following settings are saved in the odin.cfg file:
- smtp_host
-
Indicates the IP address of the SMTP email server using the notation that is supported for your IP version (for example, for IPv4, use base 256 standard dot notation. When IPv6 is supported on a platform, and enabled, you can use either 256 standard dot notation or IPv6 notation.)
- port
-
Indicates the TCP port number that a client is connecting to. The default value is 25.
- smtp_user
-
Is the user ID to authorize access to the SMTP server.
- smtp_password
-
Is the password for the smtp_user.
- sender_email
-
Is the sender email address (the address that appears in the From field in emails).
- server_admin_email
-
Is a list that can consist of email addresses, user IDs and procedure names (for example, %myfex.fex), each on a separate line, with no delimiters.
Note: If email send operations fail, verify that the smtp host is active and/or that a virus scanner is not blocking edachkup.
When you have completed your entries, optionally click the Send Test E-mail button to test your connection, then click Save.
Reference: Profile Settings
You can control aspects of profile execution from the Profile Settings pane.
To access these settings, select Workspace from the menu bar. From the ribbon, click the Workspace SET icon, and select Profile Settings, or right-click the Workspace folder in the navigation pane, and select Workspace SET, and then Profile Settings.
The Profile Settings pane opens, as shown in the following image.
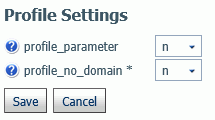
The following Profile Settings are saved in the edaserv.cfg file:
- profile_parameter
-
By passing parameters to profiles, you can submit different session parameters at different connection times. When this parameter is activated, any unresolved variables are prompted for during your initial logon to the Web Console.
Available settings are y and n.
If the server, user, or group profiles contain any unresolved variables, set the profile parameter keyword to y. The default setting is n.
- profile_no_domain *
-
In the Windows Server, to control whether the domain name is included in or excluded from a user profile name, choose:
n to add the domain name to the profile name (for example, user ibi/edaport becomes ibi_edaport.prf). N is the default value.
y to omit the domain name from the profile name (for example, user ibi/edaport becomes edaport.prf). This setting is required for compatibility with earlier releases of the Server.
Note: The y setting can be safely employed if a single domain is in use and there are no local user IDs that could interfere with domain IDs. If there is potential for interference between local user IDs and domain IDs that are connected to the server, the n setting is required to ensure that each user has a unique profile name.
Note that server must be restarted when this parameter is changed.
When you have completed your entries, click Save.
Reference: Application Settings
When you want to be able to reuse data within the same browser session, you can store the data in the form of a HOLD, SAVE, or SAVB file in the foccache directory, which is automatically created when the connection to the server is established. This becomes the first directory in the application path.
As long as the browser session remains active, the stored files remain in the foccache directory and can be referenced in requests using standard two part names. For example, the first request below creates a HOLD file in foccache, which is referenced by the second request:
TABLE FILE CAR
PRINT CAR
ON TABLE HOLD AS FOCCACHE/myfile
END
TABLE FILE FOCCACHE/myfile
PRINT *
END
When the maximum foccache retention time is reached (180 minutes by default), the foccache directory is removed by the server and can no longer be referenced. (For related information, see Application Settings.)
This feature provides an important mechanism for caching and running multiple instances of WebFOCUS active and drill-down reports. You can use any WebFOCUS graphical tool to create the request and generate a report.
Note: Each time a WebFOCUS user logs into the Managed Reporting (MR) environment, a new session with its own foccache directory is created. Files that were stored in a prior foccache directory are no longer accessible. When the user logs out of MR the foccache directory used within that MR session is no longer accessible.
To access these settings, select Workspace from the menu bar. From the ribbon, click the Workspace SET icon, and select Application Settings, or right-click the Workspace folder in the navigation pane, and select Workspace SET, and then Application Settings.
The Application Settings pane opens, as shown in the following image.
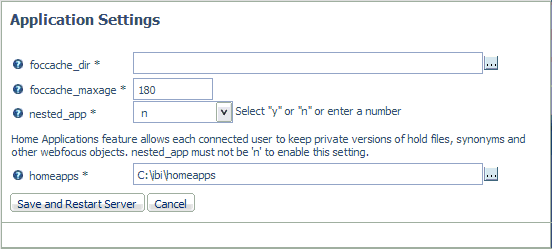
The following Application Settings are saved in the edaserve.cfg file.
- foccache_dir
-
Defines the location of the foccache directory. The default is edatemp/foccache/....
- foccache_maxage
-
Defines the maximum number of minutes that a foccache directory will last. The default is 180 minutes. When the foccache directory expires, the session also expires.
0 means unlimited (that is, the directory will be remain active as long as the session lasts or the server is running).
- nested_app
-
For applications containing subfolders or multiple-level subfolder trees, this parameter controls whether subfolders will be automatically added to the application path.
The valid values are:
- A positive integer - Enable nested application, and only a specific number of subfolder levels in the active application path.
- n - Disables nested applications. Only applications explicitly in the APP PATH will be used.
- y - Enables nested applications. The entire application subfolder tree under each application in the APP PATH is included into active application path.
The default value is 5.
Note: For z/OS servers, this setting is only applicable to directory-style applications, it is not applicable to PDS-style applications nor to applications mapped as a collection of ddnames.
- homeapps
-
If nested_app is set to y or a number, homeapps defines the location of the home application root directory. With homeapps defined, each connected user will see a My Home applications folder on the Application tree. Users can create new applications (home applications) in this folder. These applications will be visible and available only to the connected user and the server administrator. The user will have full access to his home applications.
Note: Only available with a DataMigrator or Managed Reporting license. A WebFOCUS Reporting Server requires a homeapps license to enable home applications.
When you have completed your entries, click Save and Restart Server.
Reference: Miscellaneous Settings
Miscellaneous Settings allow you to set additional Workspace operating parameters, including automatic recovery, transaction coordination, soft and hard kill delays, maximum session log rows, time window for running response time averages, and proxy server settings.
To access these settings, select Workspace from the menu bar. From the ribbon, click the Workspace SET icon, and select Miscellaneous Settings, or right-click the Workspace folder in the navigation pane, and select Workspace SET, and then Miscellaneous Settings.
The Miscellaneous Settings pane opens, as shown in the following image.
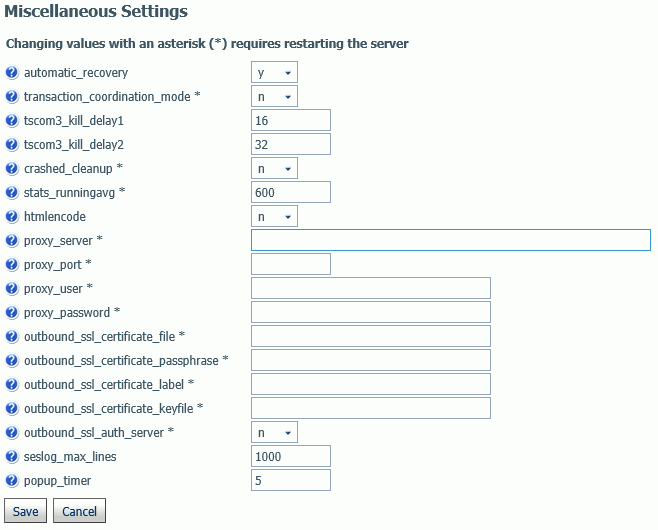
The following Miscellaneous Settings are saved in the edaserv.cfg file:
- automatic_recovery
-
Determines whether the server will automatically recover crashed listeners and/or special services. The default is n.
- transaction_coordination_mode
-
Selecting y, activates the iWay Transaction Coordinator. A Two-Phase Commit will be used when XA-Compliant databases participate in a transaction. The default is n.
- tscom3_kill_delay1
-
Defines the time (in seconds) allowed for an agent to stop before soft kill is sent. The default is 16.
- tscom3_kill_delay2
-
Defines the time (in seconds) allowed for a soft kill to work before a hard kill is sent. The default is 32.
- crashed_cleanup
-
By default, crashed agents are kept in the agents table for diagnostics purposes, and are only removed when they are explicitly killed. When this set to y, crashed agents are automatically removed from agents list when the Workspace Manager detects a crash. The default value is n.
- crashed_max_dump
-
If crashed_cleanup is set to y, this determines the number of memory dump files retained for later diagnosis.
- stats_runningavg
-
Defines the time window in seconds for the calculation of running response time averages. The default is 600.
- htmlencode
-
Specifies whether to encode HTML tags in data as plain text in order to prevent attacks by inserting executable code into data. Valid values are y and n. The default value is n.
- proxy_server
-
Defines a proxy server, which acts as an intermediary on requests for resources from other servers.
- proxy_port
-
Defines the port number of the proxy server.
- proxy_user
-
Defines a user ID for the proxy server.
- proxy_password
-
Defines a password for the user ID connecting to the proxy server.
- outbound_ssl_certificate_file
-
Required for SSL when using self-signed certificates on i5 systems.
- outbound_ssl_certificate_passphrase
-
Required for SSL when using self-signed certificates on i5 systems.
- outbound_ssl_certificate_label
-
Required for SSL when using self-signed certificates on i5 systems.
- outbound_ssl_certificate_keyfile
-
Required for SSL when using self-signed certificates on i5 systems.
- outbound_ssl_auth_server
-
Required for SSL when using self-signed certificates on i5 systems.
- seslog_max_lines
-
Defines the upper limit for the number of rows in a session log. When the limit is exceeded, only the latest records will be kept in the session log and the number of records will equal the limit. The default is 1000.
- popup_timer
-
Defines the time in seconds to wait before the popup timer appears. The default is 5.
z/OS Specific Parameters
- tmpalloc_primary
- tmpalloc_secondary
-
Allocation (in CYLs) for temporary Web Console files allocated by the HTTP listener. The default is 5 and 50, respectively.
- submit_opt
-
Customizes the call of the IKJEFF10 exit when submitting jobs with the DYNAM SUBMIT command.
- smf_recno
-
Defines the SMF record number that the server will use to record utilization statistics.
- smf_subtype
-
Defines which pairs of SMF subtype records are cut. The options are:
- all. Cut all records. This is the default.
- logon. Cut logon/logoff subtype only.
- query. Cut query begin/query end subtype only.
- privatedd
-
Defines how server will handle allocations for duplicated ddnames (same ddname allocated both to IRUNJCL and from a customer application using DYNAM) and what the search strategy will be.
When you have completed your entries, click Save.
Procedure: How to Customize the IKJEFF10 Exit for DYNAM SUBMIT From the Web Console (z/OS)
To change how the server calls the IKJEFF10 exit, set the submit_opt parameter as follows:
- From the menu bar, select Workspace.
- From the
ribbon, click the Settings icon, and select Miscellaneous
Settings, or right-click the Workspace folder
in the navigation pane, and select Settings,
and then Miscellaneous Settings.
The Miscellaneous Settings page opens.
- For the
submit_opt option, assign a separate value (0 or 1) in each of the
three drop-down lists. The default is 000.
The first drop-down list enables the call to IKJEFF10 from DYNAM SUBMIT. By default, the call is disabled.
- 0
-
Does not call IKJEFF10. This is the default setting.
- 1
-
Calls IKJEFF10.
The second drop-down list specifies that SUBMIT is to call IKJEFF10 in problem state, not in supervisor state. The IBM specification for IKJEFF10 requires supervisor state. If the version of IKJEFF10 in use at your site is capable of running in problem state, this option may be changed, thus allowing DYNAM SUBMIT to be used with IKJEFF10 when the server is not running APF-authorized. When you set:
- 0
-
Supervisor state is required for calling IKJEFF10. This is the default setting.
- 1
-
Supervisor state is not required to call IKJEFF10.
The third drop-down list allows SUBMIT to continue in the event that an error occurs while processing an in-stream data set. In-stream data sets are created by the following statements in the job:
//ddname DD *
//ddname DD DATA
/*XMIT
//name XMIT
/*DATASET
If an error is found in one of the previous statements (for example, a syntax error in the DLM parameter), the SUBMIT operation is normally cancelled. This option allows submission of the job to continue, although in such a case the results are unpredictable since the JCL contained within the in-stream data set may be erroneously interpreted as part of the job being submitted.
- 0
-
Terminates SUBMIT on in-stream data set error. This is the default setting.
- 1
-
Does not terminate SUBMIT on in-stream data set error.
- Click Save.
Your entries are registered in the edaserve.cfg file.
Event Routing
|
Topics: |
|
How to: |
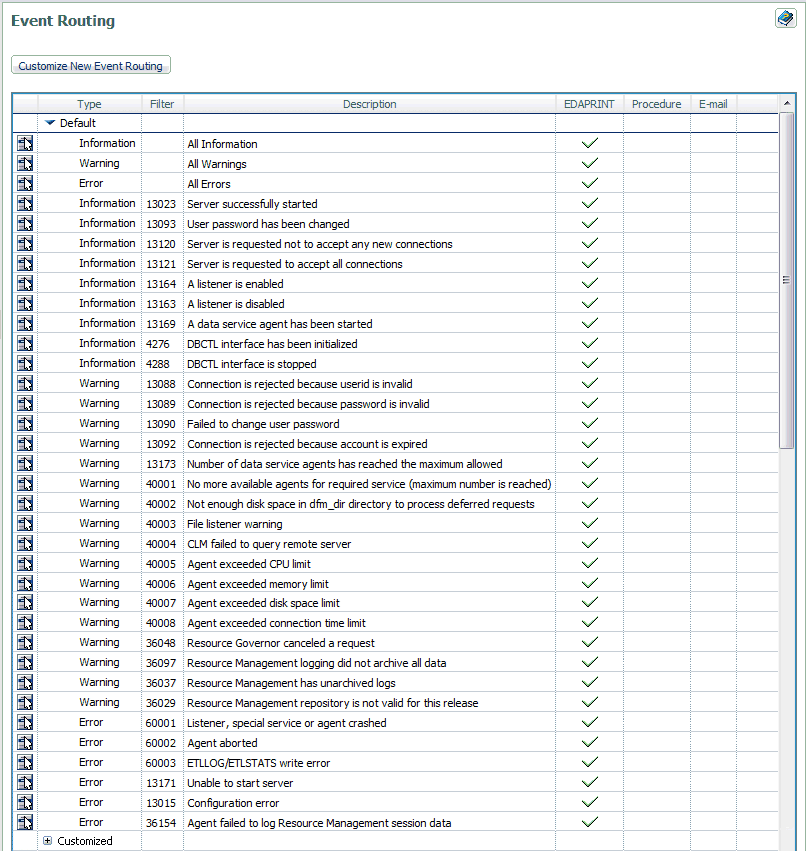
Event Routing allows you to launch procedures or send email based on different server events (agent or listener crashes, server configuration errors, disk space limitations, and others). All events are classified by type as information, warning, or error. These can be pre-defined or custom-defined events.
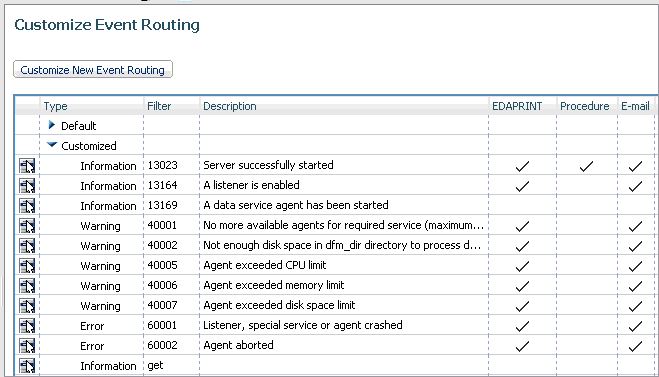
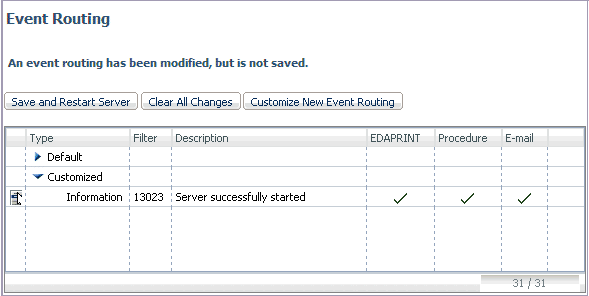
The Customize Event Routing page shows the Default and Customized Event Routing.
The Default routings are shown in the following image.
Customized routings are shown in the following image.
Procedure: How to Customize an Event Routing
By customizing event routing, you can launch a procedure or send email based on server events.
- From the menu bar, select Workspace.
- From the
ribbon, click the Event Routing icon, or right-click
the Workspace folder in the navigation pane,
and select Event Routing.
The Customize Event Routing page opens.
- Click Customize
New Event Routing.
The Customize New Event Routing page opens.
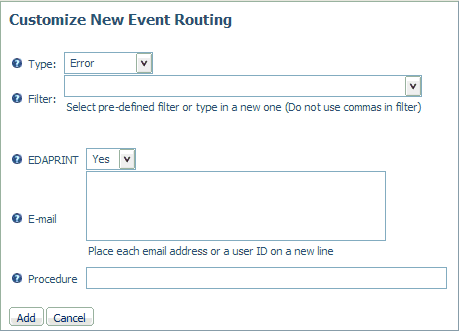
- From the Type drop-down menu, select a message type. The choices are Error, Information, Warning, and Any.
- Enter a
criteria in the Filter field or select a predefined one from the
drop-down menu.
- From the
EDAPRINT drop-down menu, select Yes if you
want to write the selected event message to the server log.
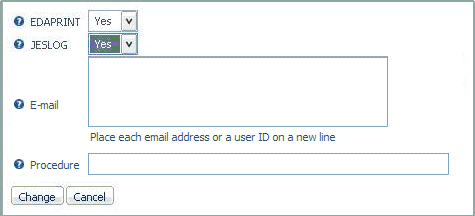
In z/OS, the selected server messages can be also written to the z/OS system log by selecting Yes from the JESLOG drop-down menu, as shown in the following image.
- Optionally, enter an email address to send an email when the event occurs.
- Optionally, enter a procedure to execute in the Procedure field, including the application name, for example, utility/movefiles.
- Click Add.
The event is added to the Customize Event Routing Page.
- Click Save and Restart Server.
Setting Workspace Log Properties for Event Routing
|
How to: |
Workspace Log properties allow you to specify a suppression interval for email notifications from event routing, and to include a number of lines from the edaprint log file in the email body. The edaprint log file provides information about the events occurring on the server before a triggered event.
Procedure: How to Set Workspace Log Properties for Event Routing
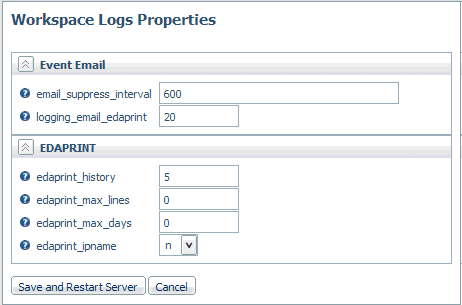
The Workspace Log Properties page controls both event routing email and the edaprint log. For information on the edaprint log, see How to Set Workspace Log Properties to Control the Edaprint Log.
- From the menu bar, select Workspace.
- Open the Logs and Traces folder.
- Right-click Workspace
Logs and select Properties.
The Workspace Logs Properties page opens, as shown in the following image.
- Enter or
select values for the Event Email parameters.
The Event Email parameters are:
- email_suppress_interval
-
Suppresses duplicate email notifications if the same event occurs again during this time interval (in seconds). Zero disabled suppression. The default value is 600 (10 minutes).
- logging_email_edaprint
-
Defines the maximum number of server messages from edaprint.log are included in the email. The default value is 20.
- Click Save and Restart Server.
EVENT_TEXT and EVENT_ID
When a procedure is triggered by an event, the ID of the routing event and the text of the event message are automatically available to the procedure as the EVENT_ID and EVENT_TEXT parameters, respectively. The EVENT_TEXT parameter needs to be decrypted using the following user subroutine:
B64DECODE('XXXXXXXXXX', 'Ann');Locale Settings
|
Reference: |
The Web Console provides parameters that define locale-specific date, time, and currency formats as well as parameters for configuring National Language Support.
Reference: NLS Settings
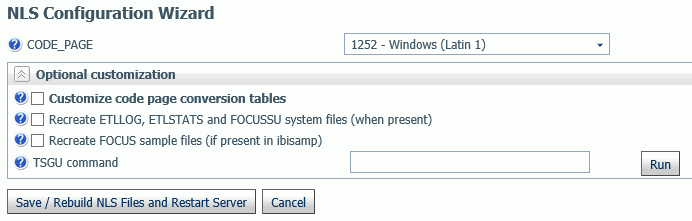
To access these settings, select Workspace from the menu bar or right-click the Workspace folder. Then click Locale and select Configuration Wizard. The NLS Configuration Wizard opens, as shown in the following image.
The following NLS settings are saved in the nlscfg.err file:
- CODE_PAGE
-
Is the code page of the data sources accessed by the server.
Select a code page from the drop-down list of supported code pages, including Unicode.
The default value is 1252 for Windows and UNIX, and 37 for IBM i (formerly known as i5/OS) and z/OS.
The current value of CODE_PAGE is available to applications as the &FOCCODEPAGE variable.
Optional customization
- Customize code page conversion tables
-
Select this check box to display a list of code pages and descriptions for the possible data sources accessed by the server or the client code page.
Several code pages are always selected by default and cannot be deselected. These are:
37 --IBM MF United States
137 --U.S. English/Western Europe (Latin 1)
437 --U.S. English
1047 --IBM MF Open Systems (Latin 1)
1252 --Windows Latin; 65001 --Unicode (UTF-8)
65001 Unicode (UTF-8)
65002 Unicode (UTF-EBCDIC)
Other code pages may also be selected by default, depending on the LANG attribute chosen.
The NLS Configuration Wizard creates conversion tables for these code pages to make them available for subsequent conversion.
Select any additional code pages for which you want tables to be created. For example, if you want to designate a particular code page to be generated in synonyms for flat (fixed) files or VSAM files, you must already have created a code page conversion table using the Customize code page conversion table option during NLS configuration.
- Recreate ETLLOG, ETLSTATS and FOCUSSU system files
-
Check this box if you wish to load FOCUS internal files in the server code page (as defined in the CODE_PAGE field).
This is recommended if the compatibility of the new and prior code pages is unknown.
- Recreate FOCUS sample files
-
Check this box if you wish to load the sample files (in the ibisamp application) in the server code page (as defined in the CODE_PAGE field).
- TSGU command
-
TSGU is a utility program to configure NLS settings. It is usually not required, but in the following cases it must be executed manually.
- To create PDFXTBL. When TYPE 1 fonts should be included
in PDF format file, the TYPE 1 font transcoding table must be generated
using the following syntax:
PDFX {font-name}
- To create PDFYTBL. When
Unicode fonts should be used in PDF format file, the special font
information tables (PDFYTBL) must be generated using the following
syntax:
KTBL {pdfy-name}
- To create PDFXTBL. When TYPE 1 fonts should be included
in PDF format file, the TYPE 1 font transcoding table must be generated
using the following syntax:
Complete the configuration, then click Save/Rebuild NLS Files and Restart Server. The server creates the necessary transcoding, sorting, and monocasing tables for the selected code page.
Reference: Locale Parameters
The Web Console provides parameters for configuring locale-based date, time, and currency parameters.
To access these settings, select Workspace from the menu bar or right-click the Workspace folder. Then click Locale and select Locale (Language, Numbers, Currency, Dates). The Change Core Engine Settings in edasprof.prf page opens, as shown in the following image.
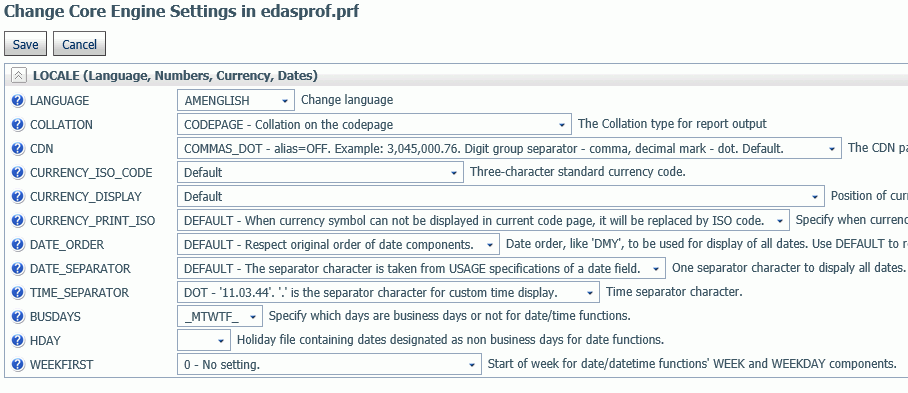
The following parameter values can be set and stored in edasprof.prf.
- LANGUAGE
-
Controls the default value of the code page, and the language of server error messages, if available in translation.
Choose a language name or abbreviation from the drop-down list.
The default value is AMENGLISH (American English) on all platforms.
Localized error message files exist for certain languages. If you choose a language for which localized error message files do not exist, the server messages and console appear in English. If you would like the messages and console to appear in a language for which the server has not been localized, you can provide translation yourself. To localize the console, translate the file wceng.lng and rename it to wcXXX.lng where 'XXX' is the three-letter language code for the server. For error messages, translate all or any relevant *.err files and append the same three-letter language code to it. All files are located in the \home\nls folder.
The current value of LANG is available to applications as the &FOCLANGCODE variable. However, it will be blank if it is not configured.
- COLLATION
-
Establishes a binary or case-insensitive collation sequence. The values are:
- CODEPAGE. Bases the collation sequence on the code page in effect. This is the default value.
- BINARY. Bases the collation sequence on binary values.
- SRV_CS. Bases the collation sequence on the LANGUAGE setting, and is case-sensitive.
- SRV_CI. Bases collation sequence on the LANGUAGE setting, and is case-insensitive.
When code page files are not modified, CODEPAGE is the same as BINARY, except for Danish, Finnish, German, Norwegian, or Swedish in EBCDIC environment.
The SET COLLATION command has the same effect, and overrides this default setting.
- CDN
-
Defines the punctuation symbols to be used for numbers. Valid values are:
- COMMAS_DOT. Uses a dot (.) as the decimal separator and comma (,) as the thousands separator. The alias is OFF. This is the default value.
- DOTS_COMMA. Uses a comma as the decimal separator and dot as the thousands separator. The alias is ON.
- SPACES_COMMA. Uses a comma as the decimal separator and space as the thousands separator. The alias is SPACE.
- QUOTES_COMMA. Uses a comma as the decimal separator and single quotation mark (') as the thousands separator. The alias is QUOTE.
- QUOTES_DOT. Uses a dot as the decimal separator and single quotation mark as the thousands separator. The alias is QUOTEP.
- CURRENCY_ISO_CODE
-
Is a standard three-character currency code such as USD for US Dollars or JPY for Japanese Yen. The default value is default, which uses the currency code for the configured language code.
- CURRENCY_DISPLAY
-
Defines the position of the currency symbol relative to a number. The default value is default, which uses the position for the format and currency symbol in effect. Valid values are:
- LEFT_FIXED. The currency symbol is left-justified preceding the number.
- LEFT_FIXED_SPACE. The currency symbol is left-justified preceding the number, with at least one space between the symbol and the number.
- LEFT_FLOAT. The currency symbol precedes the number, with no space between them.
- LEFT_FLOAT_SPACE. The currency symbol precedes the number, with one space between them.
- TRAILING. The currency symbol follows the number, with no space between them.
- TRAILING_SPACE. The currency symbol follows the number, with one space between them.
- CURRENCY_PRINT_ISO
-
Defines what will happen when the currency symbol cannot be displayed by the code page in effect. Valid values are:
- DEFAULT. Replaces the currency symbol with its ISO code, when the symbol cannot be displayed by the code page in effect. This is the default value.
- ALWAYS. Always replaces the currency symbol with its ISO code.
- NEVER. Never replaces the currency symbol with its ISO code. If the currency symbol cannot be displayed by the code page in effect, it will not be printed at all.
- DATE_ORDER
-
Defines the order of date components for display. Valid values are:
- DEFAULT. Respects the original order of date components. This is the default value.
- DMY. Displays all dates in day/month/year order.
- MDY. Displays all dates in month/day/year order.
- YMD. Displays all dates in year/month/day order.
- DATE_SEPARATOR
-
Defines the separator for date components for display. Valid values are:
- DEFAULT. Respects the separator defined by the USAGE format of the field.
- SLASH. Uses a slash (/) to separate date components.
- DASH. Uses a dash (-) to separate date components.
- BLANK. Uses a blank to separate date components.
- DOT. Uses a dot (.) to separate date components.
- NONE. Does not separate date components.
- TIME_SEPARATOR
-
Defines the separator for time components for the &TOD system variable. Valid values are:
- DOT. Uses a dot (.) to separate time components. This is the default value.
- COLON. Uses a colon (:) to separate time components.
- BUSDAYS
-
Defines which days are business days for date-time functions. The default value is _MTWTF_.
- HDAY
-
Specifies a holiday file for listing dates that are non-business days for use with date functions. The default value is OFF (no holiday file).
- WEEKFIRST
-
Defines the first day of the week for the WEEK and WEEKDAY components of date and date-time functions.
Reference: Times New Roman Font Support for Arabic PDF and PostScript Formats
Users that want to output Arabic characters in PDF or PostScript formats can select the Times New Roman font.
Reference: Tahoma Font Support for Thai PDF and PostScript Formats
Users that want to output Thai characters in PDF or PostScript formats can select the Tahoma font.
Reference: Language and Default Code Pages for Windows and UNIX
This chart provides information generated by the ? LANG SET command from the Windows and UNIX platforms.
|
Language Code |
Language Name |
Language Abbreviation |
Language ID |
Code Page |
|---|---|---|---|---|
|
001 |
AMENGLISH |
AME |
en |
1252 |
|
001 |
ENGLISH |
ENG |
en |
1252 |
|
020 |
ARABIC |
ARB |
ar |
1256 |
|
10351 |
B-PORTUGUESE |
BRA |
br |
1252 |
|
385 |
CROATIAN |
HRV |
hr |
1250 |
|
420 |
CZECH |
CZE |
cs |
1250 |
|
045 |
DANISH |
DAN |
da |
1252 |
|
031 |
DUTCH |
DUT |
nl |
1252 |
|
372 |
ESTONIAN |
EST |
et |
923 |
|
358 |
FINNISH |
FIN |
fi |
1252 |
|
033 |
FRENCH |
FRE |
fr |
1252 |
|
033 |
FRENCH |
FRE |
fc |
1252 |
|
049 |
GERMAN |
GER |
de |
1252 |
|
049 |
GERMAN |
GER |
at |
1252 |
|
030 |
GREEK |
GRE |
el |
1253 |
|
972 |
HEBREW |
HEB |
iw |
916 |
|
036 |
HUNGARIAN |
HUN |
hu |
1250 |
|
039 |
ITALIAN |
ITA |
it |
1252 |
|
081 |
JAPANESE |
JPN |
ja |
942 |
|
081 |
JAPANESE-EUC |
JPE |
je |
10942 |
|
082 |
KOREAN |
KOR |
ko |
949 |
|
371 |
LATVIAN |
LVA |
lv |
1257 |
|
370 |
LITHUANIAN |
LTU |
lt |
1257 |
|
047 |
NORWEGIAN |
NOR |
no |
1252 |
|
048 |
POLISH |
POL |
pl |
1250 |
|
351 |
PORTUGUESE |
POR |
pt |
1252 |
|
040 |
ROMANIAN |
ROM |
ro |
1250 |
|
007 |
RUSSIAN |
RUS |
ru |
1251 |
|
085 |
S-CHINESE |
PRC |
zh |
946 |
|
421 |
SLOVAK |
SVK |
sk |
1250 |
|
034 |
SPANISH |
SPA |
es |
1252 |
|
046 |
SWEDISH |
SWE |
sv |
1252 |
|
086 |
T-CHINESE |
ROC |
tw |
10948 |
|
066 |
THAI |
THA |
th |
874 |
|
090 |
TURKISH |
TUR |
tr |
920 |
|
044 |
UKENGLISH |
UKE |
uk |
1252 |
|
800 |
UNICODE |
UCS |
uc |
65001 |
Reference: Language and Default Code Pages for IBM i and z/OS
This chart provides information generated by the ? LANG SET command from the IBM i and z/OS platforms.
|
Language Code |
Language Name |
Language Abbreviation |
Language ID |
Code Page |
|---|---|---|---|---|
|
001 |
AMENGLISH |
AME |
en |
37 |
|
001 |
ENGLISH |
ENG |
en |
37 |
|
020 |
ARABIC |
ARB |
ar |
420 |
|
10351 |
B-PORTUGUESE |
BRA |
br |
37 |
|
420 |
CZECH |
CZE |
cz |
870 |
|
045 |
DANISH |
DAN |
da |
277 |
|
031 |
DUTCH |
DUT |
nl |
37 |
|
372 |
ESTONIAN |
EST |
et |
1112 |
|
358 |
FINNISH |
FIN |
fi |
278 |
|
033 |
FRENCH |
FRE |
fr |
297 |
|
033 |
FRENCH |
FRE |
fc |
297 |
|
049 |
GERMAN |
GER |
de |
273 |
|
049 |
GERMAN-500 |
GE5 |
at |
500 |
|
030 |
GREEK |
GRE |
el |
875 |
|
972 |
HEBREW |
HEB |
iw |
424 |
|
036 |
HUNGARIAN |
HUN |
hu |
870 |
|
039 |
ITALIAN |
ITA |
it |
280 |
|
081 |
JAPANESE |
JPN |
ja |
939 |
|
10081 |
JAPANESE-930 |
JPK |
jk |
930 |
|
082 |
KOREAN |
KOR |
ko |
933 |
|
371 |
LATVIAN |
LVA |
lv |
1112 |
|
370 |
LITHUANIAN |
LTU |
lt |
1112 |
|
047 |
NORWEGIAN |
NOR |
no |
277 |
|
048 |
POLISH |
POL |
pl |
870 |
|
351 |
PORTUGUESE |
POR |
pt |
37 |
|
040 |
ROMANIAN |
ROM |
ro |
870 |
|
007 |
RUSSIAN |
RUS |
ru |
1025 |
|
085 |
S-CHINESE |
PRC |
zh |
935 |
|
042 |
SLOVAK |
SVK |
sk |
870 |
|
034 |
SPANISH |
SPA |
es |
284 |
|
046 |
SWEDISH |
SWE |
sv |
278 |
|
086 |
T-CHINESE |
ROC |
tw |
937 |
|
066 |
THAI |
THA |
th |
838 |
|
090 |
TURKISH |
TUR |
tr |
1026 |
|
044 |
UKENGLISH |
UKE |
uk |
285 |
|
800 |
UNICODE |
UCS |
uc |
65002 |
Login Message
|
How to: |
Server administrators can customize the login and connection result screens with custom messages. The Login Message option is available by right-clicking the Workspace folder in the navigation pane.
Procedure: How to Customize the Login Screen With a Message
To customize the login screen:
- Select Workspace from the menu bar.
- From the ribbon, select the Login Message icon,
or right-click the Workspace folder in the
navigation pane, and select Login Message.
The Login Message page opens.
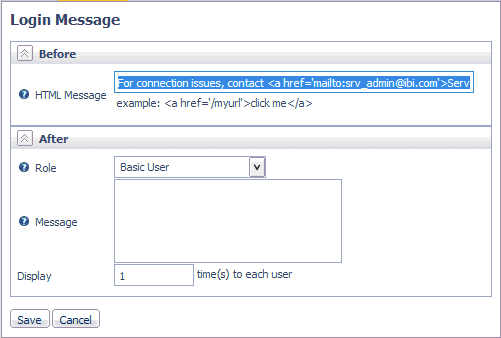
- Enter the text of the message in the HTML Message field
in the Before section, as shown in the following image.
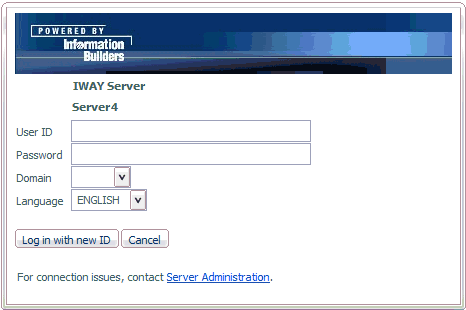
- Click Save.
The message is added to the login page, as shown in the following image.
Procedure: How to Customize the Connection Result Screen With a Message
Server administrators can customize the connection result screen for each user type.
- Select Workspace from the menu bar.
- From the ribbon, select the Login Message icon,
or right-click the Workspace folder in the
navigation pane, and select Login Message.
The Login Message page opens.
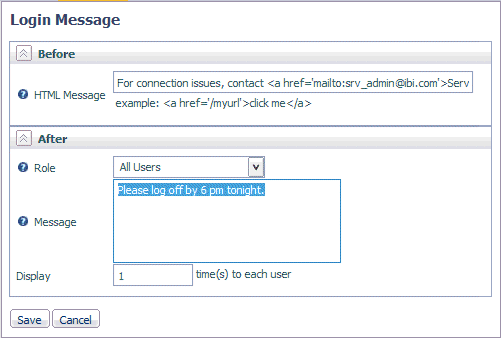
- Select a user type from the Role drop-down menu. The options are Server Administrator, Application Administrator, Server Operator, Basic User, and All Users.
- Enter the text of the message in the Message field of
the After field, as shown in the following image.
Optionally, you can set the number of times the message will appear by entering a value in the Display field.
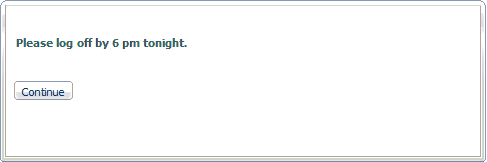
- Click Save.
The message is displayed after a successful connection, as shown in the following image.
Web Console Appearance
|
Reference: |
The Web Console appearance parameters control the look of the Web Console, as well as accessibility and menu bar customization.
Reference: Web Console Appearance
To access these settings, select Workspace from the menu bar. From the ribbon, click the Web Console Appearance icon, or right-click the Workspace folder in the navigation pane, and select Web Console Appearance.
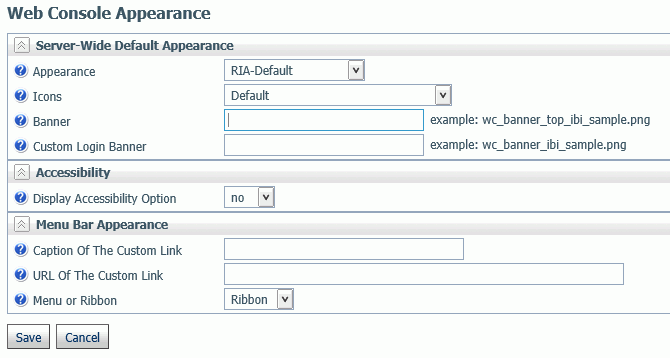
The Web Console Appearance page opens, as shown in the following image.
The following Web Console Appearance settings are saved in the edaserv.cfg file.
Server-Wide Default Appearance
- Appearance
-
Controls the look of the Web Console.
Possible values are RIA-CarbonRounded, RIA-Default, and RIA-OceanRounded. The default value is RIA-Default.
- Icons
-
On the Icons drop-down list, the value is Default.
- Banner
-
Specifies if a banner image should be displayed on top of the menu bar in the Web Console. The image file must be located in EDAHOME/etc/wc directory.
- Custom Login Banner
-
Specifies if a banner image should be displayed on the Web Console login page. The image file must be located in EDAHOME/etc/wc directory.
Accessibility
- Display Accessibility Option
-
Allows users to enable or disable an accessibility display.
Menu Bar Appearance
- Caption Of The Custom Link
-
Specifies the text of a custom link that is shown in the menu bar of the Web Console.
- URL Of The Custom Link
-
Specifies the URL of a custom link that is shown in the menu bar of the Web Console.
- Menu or Ribbon
-
Specifies whether the Web Console will display a menu bar or a ribbon. The default is Ribbon.
When you have completed your entries, click Save.
Focus Sets and Info
|
Reference: |
You can generate reports about many aspects of WebFOCUS processing using the Focus Sets and Info button on the Workspace ribbon.
Reference: Focus Sets and Info
To access these settings, select Workspace from the menu bar. From the ribbon, click the Focus Sets and Info icon, or right-click the Workspace folder in the navigation pane, and select Focus Sets and Info.
The following options are available.
- Core Engine Settings. For information, see Core Engine Settings.
- Core Engine System Variables. For information, see Core System Variables.
- Core Engine Global Variables. For more information, see Core Engine Global Variables.
- Settings for Web Console Preferences. For more information, see Displaying Settings for Web Console Preferences.
- HOLD Keywords. For information, see HOLD Keywords.
- Focus Limits. For information, see Displaying Focus Limits.
- Error Message Report. For information, see Displaying Error Messages.
- Currency Report. For more information, see Displaying the Currency Report..
- Function Parameters Report. For more information, see Determining Function Parameters.
Core Engine Settings
|
How to: |
Core engine settings allow you to control a wide range of services, including Bulk Load, FOCUTL, HLI, StyleSheet, Common, TABLE, and GRAPH, as well as NLS, Tracing, Obsolete Sets and PFKEYs sets.
Procedure: How to Access Core Engine Settings
To access Core Engine settings:
- Select Workspace from the menu bar.
- From the ribbon, click the Settings icon,
and select Core Engine Settings, or right-click
the Workspace folder in the navigation pane,
and select Settings, and then Core
Engine Settings.
The Core Engine Settings pane opens, as shown in the following image.
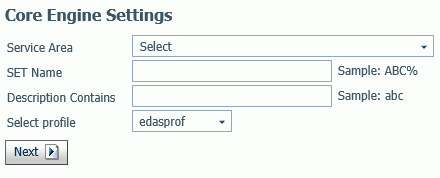
- Select a service from the Service Area list.
- Optionally, enter a string in the Setting
Name field to find specific settings, using % as a wildcard.
For example, to find settings containing DATE, enter DATE%. All settings are upper case and the Setting Name field is case sensitive.
- Optionally, enter a string in the Description Contains field to search for settings by their descriptions.
- Optionally, select a profile from the Select profile drop-down menu.
- Click Next.
The Change Core Engine Settings pane opens, as shown in the following image.
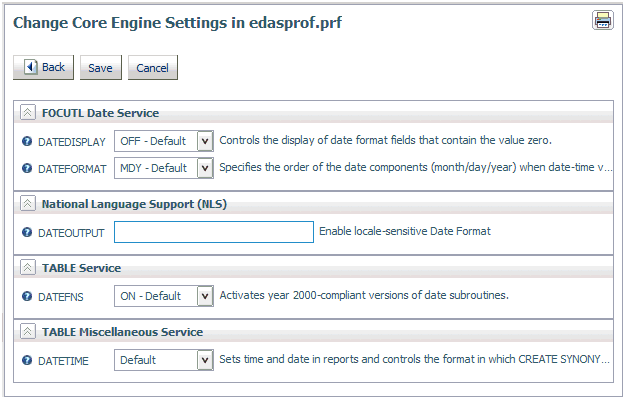
- Make your changes and click Save.
The following confirmation message displays:
Core engine settings successfully changed in edasprof.prf
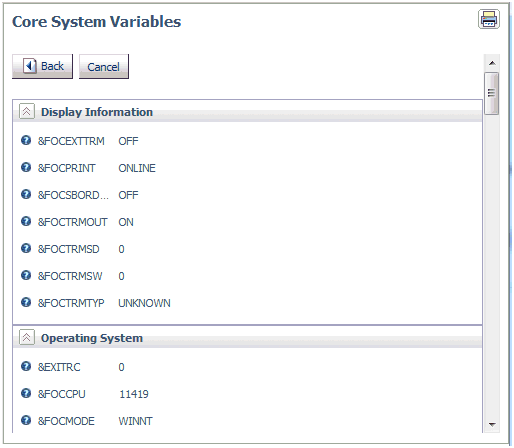
Core System Variables
|
How to: |
Core System variables control the functionality of the server.
The variables fall into the following categories:
- Display Information
- Operating System
- Release Information
- National Language Support
- File Information
- Statistical Variables
- Date/Time Variables
- Security Information
- Miscellaneous System Variables
Procedure: How to View Core System Variables
To view Core System variables:
- Select Workspace from the menu bar.
- From the ribbon, click the Settings icon,
and select Core System Variables, or right-click
the Workspace folder in the navigation pane,
and select Settings, and then Core
System Variables.
The Core System Variable pane opens, as shown in the following image.

- Select a service from the Service Area list.
- Optionally, enter a string in the Variable Name field to find specific variables, using % as a wildcard. Variables are all upper case and all begin with an ampersand (&).
- Optionally, enter a string in the Description Contains field to search for variables by their descriptions.
- Click Next.
The Core System Variables are displayed, as shown in the following image.
Core Engine Global Variables
|
How to: |
You can add global variables to a profile on the server to deliver default values or execute SET commands.
Procedure: How to Create Core Engine Global Variables
To create Core Engine global variables:
- Select Workspace from the menu bar.
- From the ribbon, click the Settings icon,
and select Core Global Variables, or right-click
the Workspace folder in the navigation pane,
and select Settings, and then Core
Global Variables.
The Core Global Variable pane opens, as shown in the following image.
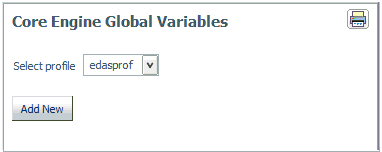
- Optionally, select a profile from the drop-down menu. The default is edaprof.
- Click Add New.
- On the Core Global Variable pane, select SET or DEFAULT from the Command drop-down menu.
- Enter a name and value for the variable in the corresponding
fields and click Add New, as shown in the
following image.
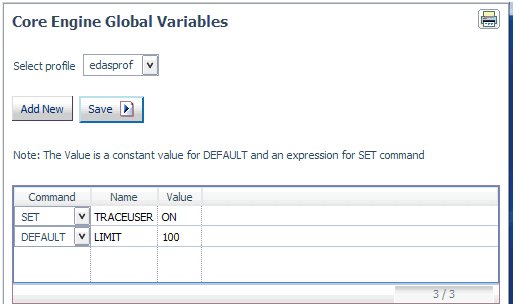
- Click Save.
Displaying Settings for Web Console Preferences
To display or change the Web Console preferences, select Workspace from the main menu, click the FOCUS Sets and Info button, and then Settings for Web Console Preferences.
The Settings for Web Console Preferences page opens, as shown in the following image.
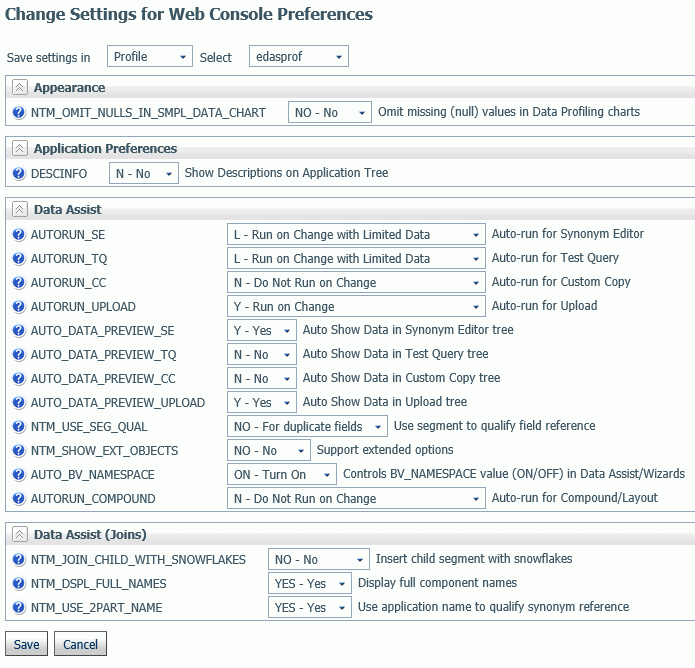
You can select a profile in which to save these settings. The default profile is edasprof.prf. You can set preferences for the following categories.
- Appearance. Lets you select whether to omit missing or null values in Data Profiling charts. The default value is No.
- Application Preferences. Lets you select whether to show descriptions on the Application tree. The default value is No.
- Data Assist. You can select values for the following options:
- Auto-run for Synonym Editor. Default value is L, Run on Change with Limited Data.
- Auto-run for Test Query. Default value is L, Run on Change with Limited Data.
- Auto-run for Custom Copy. Default value is N, Do Not Run on Change.
- Auto-run for Upload. Default value is Y, Run on Change.
- Auto show data in Synonym Editor tree. Default value is Yes.
- Auto show data in Test Query tree. Default value is No.
- Auto show data in Custom Copy tree. Default value is No.
- Auto show data in Upload tree. Default value is Yes.
- Use segment name to qualify field references.
- Support extended options. Default value is No.
- Control BV_NAMESPACE value in Data Assist and Wizards. Default value is ON.
- Auto-run for Compound Layout. Default value is N, Do Not Run on Change.
- Data Assist Joins. You can select values for the following options.
- Insert child segments with snowflakes. Default value is No.
- Display full component names. Default value is Yes.
- Use application names to qualify synonym references. Default Value is Yes.
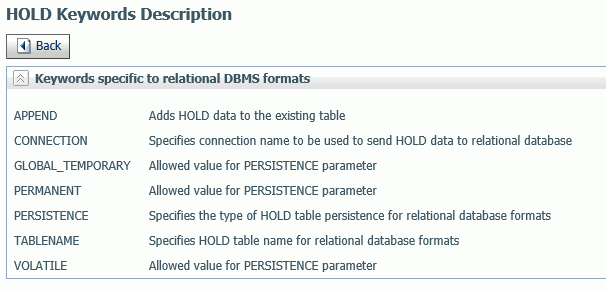
Displaying HOLD Keywords
|
How to: |
You can display the keywords available for generating different types of HOLD files.
Procedure: How to Display HOLD Keywords
- Select Workspace from the main menu.
- From the Settings section of the ribbon, click the FOCUS
Sets and Info button, and then HOLD Keywords.
The HOLD Keywords page opens, as shown in the following image.
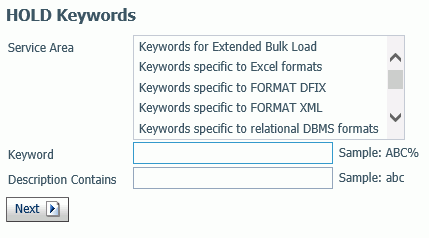
- Select the following parameters.
- Optionally, select a Service Area from the drop-down list.
- Optionally, enter a keyword or keyword pattern in the Keyword text box.
- Optionally, enter a description or description pattern in the Description Contains text box for the keywords you want to see.
- Click Next.
The HOLD Keywords Report is displayed, as shown in the following image.
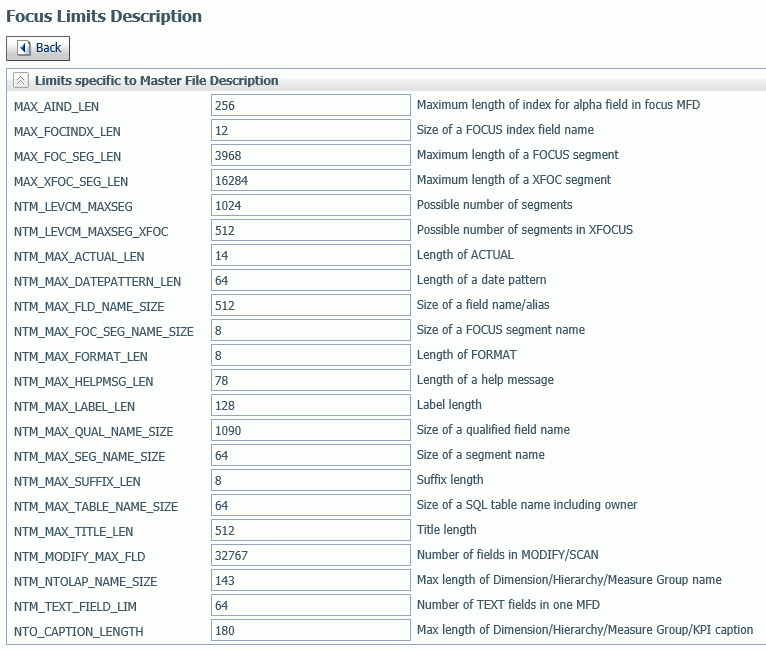
Displaying Focus Limits
|
How to: |
You can display limits for WebFOCUS requests and components, as well as limits that have been removed.
Procedure: How to Display Focus Limits
- Select Workspace from the main menu.
- From the Settings section of the ribbon, click the FOCUS
Sets and Info button, and then Focus Limits.
The Focus Limits page opens, as shown in the following image.
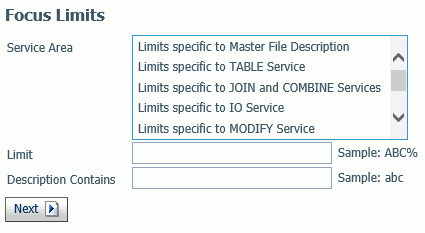
- Select the following parameters.
- Optionally, select a Service Area from the drop-down list.
- Optionally, enter a limit name or pattern in the Limit text box.
- Optionally, enter a description or description pattern in the Description Contains text box for the limits you want to see.
- Click Next.
The FOCUS Limits Description report displays, as shown in the following image.
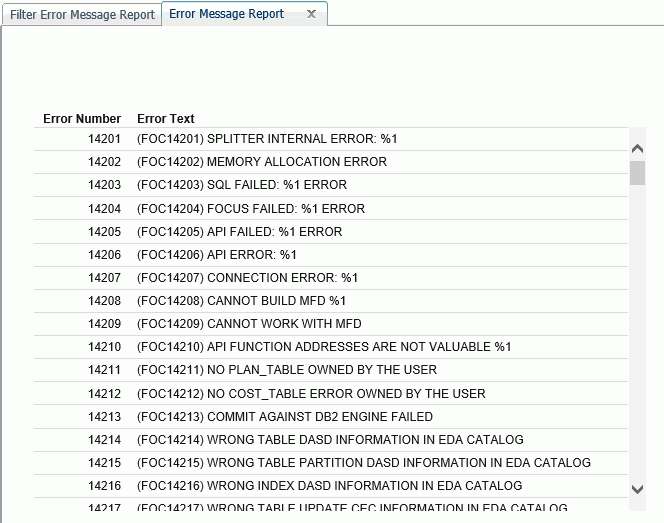
Displaying Error Messages
|
How to: |
You can display all or different categories of error messages.
Procedure: How to Display Error Messages
- Select Workspace from the main menu.
- From the Settings section of the ribbon, click the FOCUS
Sets and Info button, and then Error Message Report.
The Filter Error Message Report page opens, as shown in the following image.
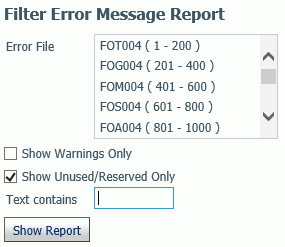
- Select the following parameters.
- Optionally, select an Error File from the drop-down list.
- Optionally, check the Show Warnings Only check box to limit the report to warning messages.
- Optionally, uncheck the Show Unused/Reserved Only check box to control whether used or reserved messages display in the report.
- Optionally, enter text in the Text Contains text box for the messages you want to see.
- Click Show Report.
The Error Message report displays in a new tab, as shown in the following image.
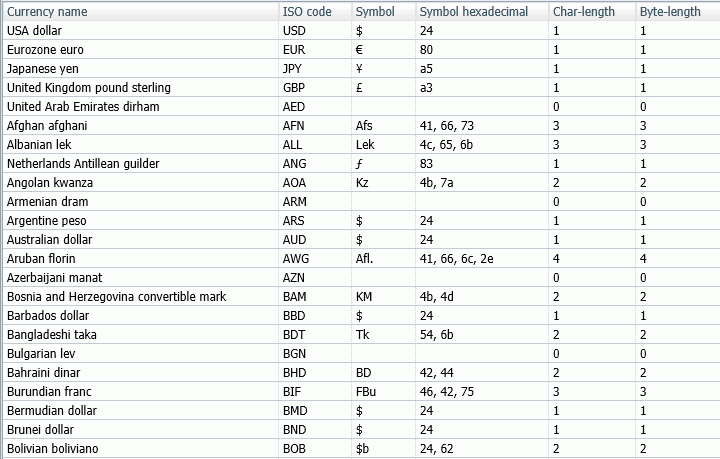
Displaying the Currency Report.
The currency report lists currency names, ISO codes, currency symbols, currency symbols hexadecimal values, currency symbol character lengths, and currency symbol byte lengths.
To display the Currency Report, select Workspace on the main menu, click the FOCUS Sets and Info button, and click Currency Report. The Currency Report page opens, as shown in the following image.
Determining Function Parameters
|
How to: |
You can determine the parameters for a particular function from the Function Parameters Report. The report also includes a brief description of the function.
Procedure: How to Display the Function Parameters Report
- Select Workspace from the main menu.
- From the Settings section of the ribbon, click the FOCUS
Sets and Info button, and then Function Parameters Report.
The Filter IBI Functions Report page opens, as shown in the following image.
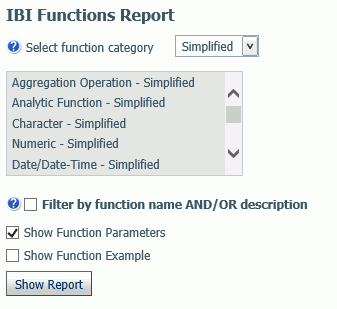
- Select the following parameters.
- Optionally, select a Function Category from the drop-down list. The choices are Simplified, Legacy, and All.
- Optionally, select a function type from the list box.
- Optionally, click Filter by function name AND/OR description to provide a name, description, or pattern for the functions you want to see.
- Click Show Function Parameters to see descriptions of the function parameters.
- Optionally click Show Function Example to see an example of using the function.
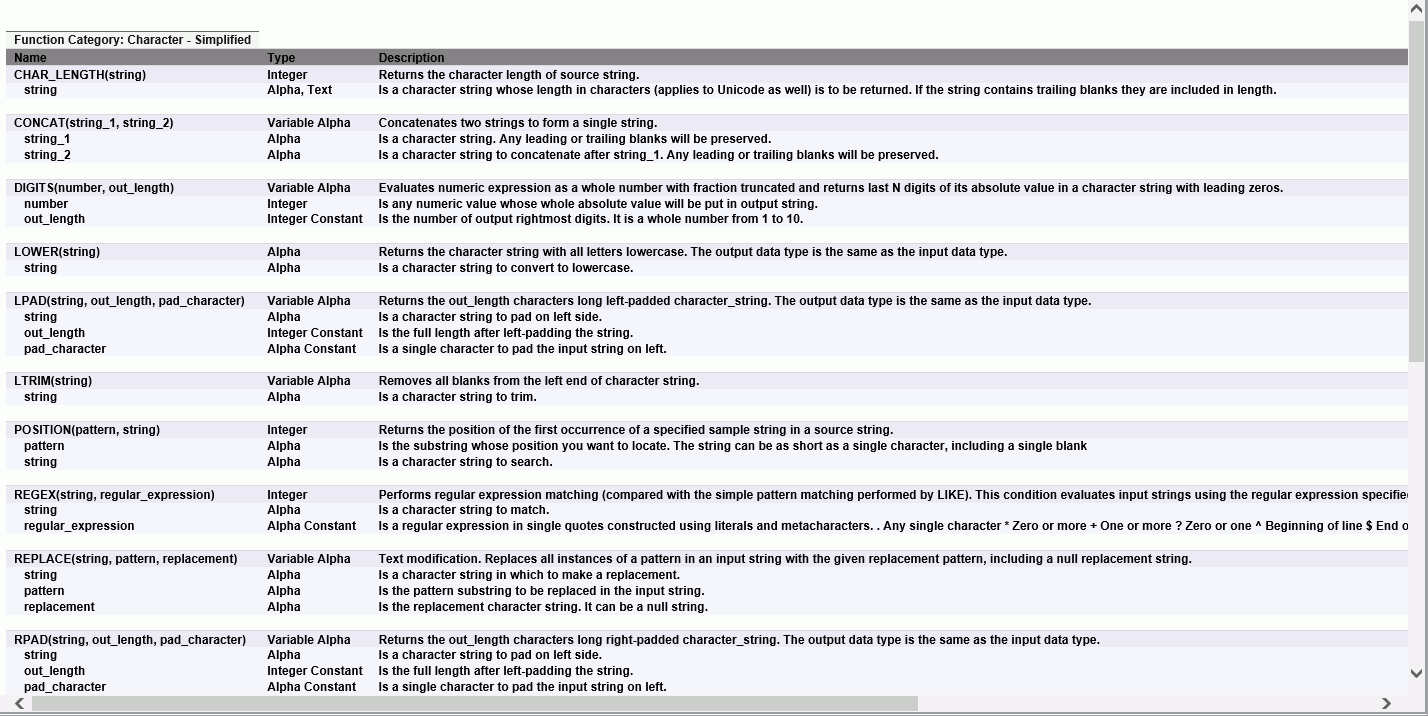
- Click Show Report.
The Function Parameters Report is displayed, as shown in the following image.
License Settings
|
Reference: |
You can view and change the current license code and provide and/or change your site code using the License Management page.
The license code is encoded to determine the configuration, additional products available in the configuration, the number of CPUs on the server, and the number of user seats the configuration supports.
For more information on how to obtain a new license code, contact Customer Support or your local Information Builders sales office.
Reference: License Settings
To access these settings, select Workspace from the menu bar. From the ribbon, click the License icon, or right-click the Workspace folder in the navigation pane, and select License.
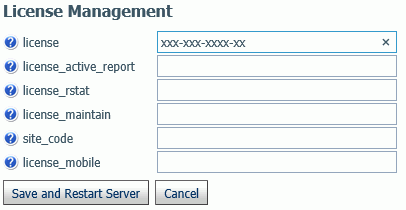
The following License Management settings are saved in the edaserv.cfg file:
When you have completed your entries, click Save and Restart Server.
- license
-
Enter the license number (required for the type of server you are using).
- license_active_report
-
Enter the license number for WebFOCUS Active Technologies.
- license_rstat
-
Enter the license number for the RStat scoring feature.
- license_maintain
-
Enter the license number for the Maintain Data feature.
- site_code
-
Enter the site code number (required for support calls).
- license_mobile
-
Enter the license number for the Mobile Faves feature.
Migrate Settings
|
How to: |
The Migrate Settings page allows you to migrate a server from a previous release.
It is recommended that you migrate configuration information from previous releases after you verify the proper basic installation of the new release.
Procedure: How to Migrate Configuration Information
To migrate from a previous release:
- From the menu bar, select Workspace.
- From the
ribbon, click the Migrate icon, or right-click
the Workspace folder in the navigation pane,
and select Migrate.
The Migrate page opens.
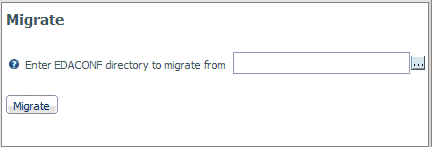
- Type the full path of the configuration instance directory (EDACONF) or click the ellipsis (...) and navigate to it.
- Click Continue.
| WebFOCUS | |
|
Feedback |