Running a Data Flow
|
Topics: |
|
How to: |
There are two main ways to run a data flow from the DMC: Run and Submit.
Run will run the data flow immediately. When you run a flow, processing information is displayed in the Console Log.
Submit will submit the data flow to the scheduler to run. When you submit a flow, the processing information is recorded in the DataMigrator Log and Statistics tables. Email messages are also sent if the flow properties are set to send email messages at the start or end of the job.
Procedure: How to Run a Data Flow
On the Flow tab, in the Run group, click Run, and select one of the run options available.
or
Right-click a data flow in the navigation pane and select one of the Run options available.
Note: When you submit the flow, processing information is recorded in the DM log and, if specified, email messages are sent. When you run the flow, the processing information is only displayed in the Console Log. It is not written to the DM log.
For more information on the Run options, see Navigation Pane: Procedures Button.
Using the Cluster Manager Scheduler
|
How to: |
The DataMigrator scheduler can be used to automatically initiate Data Flows at a specified time or interval. However, if you are connected to a single server and it is not running, those flows will not execute when they are scheduled to run.
The Cluster Manager (CLM) available in the DMC results in a highly available DataMigrator scheduler that automatically switches to other application servers in the event that the main server is unavailable.
CLM regulates the server nodes of the configured cluster and makes a decision about which cluster node should run the scheduled jobs. One of the advantages of CLM is that it can help with business continuity tasks. You can create a Cluster and assign multiple nodes on the CLM. With CLM configured, the scheduled jobs run on the nodes that were added to the Cluster. The jobs scheduled on each node will be running on one node only; the currently active node, which is the node that has the Scheduler running.
To use the Cluster Manager, the following is required:
- A server to use as the Cluster Manager.
- Two or more DataMigrator Servers.
- An Application path for ScanID that is copied or shared.
Procedure: How to Enable the Cluster Manager
To enable the Cluster Manager from the DMC, connect to your server and perform the following steps.
- Expand the Workspace folder.
- Right-click Cluster Manager and click Enable.
- Enter the license code for the Cluster Manager and click Configure and Restart Server.
- Click OK to submit your changes and restart the server.
Procedure: How to Add Remote Nodes
To add nodes for cluster management:
- From the Workspace folder, right-click Cluster Manager, point to New Remote Server, and click TCP.
The Remote Server Configuration dialog box opens.
- Enter the configuration settings for the first DataMigrator Server, as shown in the following image.
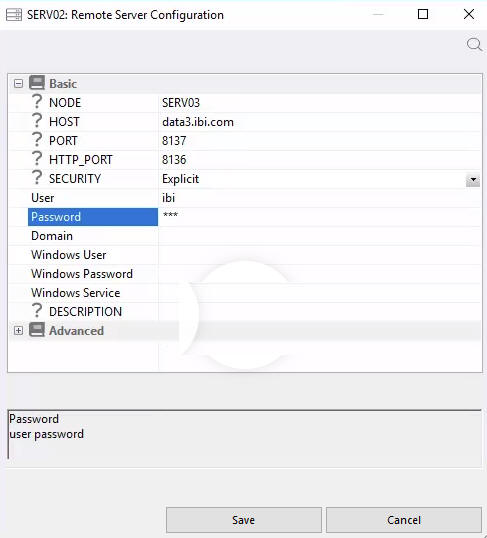
- Click Save.
Procedure: How to Configure a Cluster
To configure a cluster that includes your remote nodes:
- From the Workspace folder, right-click Cluster Manager, point to New Remote Server, and click Cluster.
The Remote Server Configuration dialog box opens.
- Enter the configuration settings for the cluster and click Save.
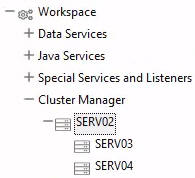
The nodes that comprise the cluster will appear under the cluster name, as shown in the following image.
To view or edit the properties for the cluster manager, right-click Cluster Manager and click Properties. You can edit the properties as needed.
- All servers on the assigned nodes should run the same version of DataMigrator.
- Scanning on all nodes should be enabled. To enable the Scheduler to scan the parameters, set sched-autostart to Y in the Scheduler Properties dialog box.
- The scheduler should be stopped on all nodes except for one active node. When the Cluster Manager finds that the Scheduler is running on another node other than that active node, it attempts to stop the Scheduler on that node. If a server on an active node goes down, the Cluster Manager detects this and will start the Scheduler on the next available server node.
- Only a Server Administrator or Server Operator can start or stop the Schedule.
Procedure: How to View the Activities on a Cluster
Once jobs are scheduled on each server node, you can review the statistics of your configured cluster.
- Right-click the cluster name and click Statistics.
The CLM Node Statistics dialog box opens showing the details of the cluster. The Active Scheduler parameter reflects the name of the node that is currently active
- To refresh the connection, re-connect to your server node where your Cluster Manager is running.
- Expand the Workspace folder, followed by the Logs and Traces folder to view the Cluster Manager Log.
| WebFOCUS | |
|
Feedback |