About Tasks in the Basic Scheduling Tool
|
Topics: |
When you access the Basic Scheduling tool, the information for the Task tab options is predefined with the selected report procedure (FEX) information. You can complete the available task options, such as specifying parameter values, as well as select whether or not to burst the report.
Note:
- You can use parameters (amper variables) when specifying a value in the Save Report As field of a schedule. These parameters can be system variables, such as &YYMD or any amper variable for which a value is returned by the Reporting Server when the scheduled procedure is executed. To use the dot file extension separator after a variable, terminate the variable with the '|' character, for example, &YYMD|.htm. Similarly, to use the ampersand character itself, follow the ampersand with the '|' character (for example, Smith&|Jones). If a value for a parameter specified in a schedule is not returned by the Reporting Server when the procedure executes, the schedule will fail with a "No report to distribute" error. If the scheduled task is burst, you can also use the '%BURST' symbol to include the burst value in the Save Report As field.
- The WebFOCUS Client Universal Profile is executed by ReportCaster when a WebFOCUS Repository procedure or WebFOCUS Reporting Server procedure is run. For more information, see the WebFOCUS Security and Administration manual.
Task Options in the Basic Scheduling Tool
The options available when you select the Task tab are:
- Path. Shows the report path in the Repository or on the Reporting Server.
- Procedure. The name of the procedure you are scheduling.
- Server Name. The Reporting Server to which the report procedure (FEX) will be submitted.
- Execution ID. The user ID running the report procedure (FEX) on the Reporting Server. Click on the Password button to the right of this field to set the password.
- Password. Enter a password for the Execution ID.
-
Alert.
Specifies how to reactivate the alert or to deactivate the alert condition when
it is triggered. Click
Alert to specify the alert options.
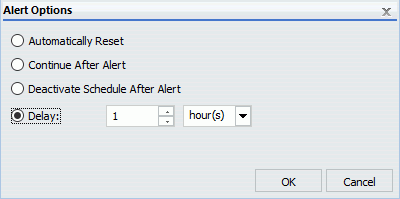
Select one of the following options from the Alert Options dialog box.
- Automatically Reset. After the alert is triggered, reactivate the alert when the condition is no longer true. The system will keep checking the condition after the alert has been triggered. As soon as the condition is no longer true, it will reactivate the alert. This is the default value.
- Continue After Alert. After the alert is triggered, reactivate the alert immediately.
- Deactivate Schedule After Alert. Deactivate the schedule after the alert is triggered.
-
Delay.
Restart the alert after a specified period. You can specify to restart the
alert after a maximum of 99 hour(s), day(s), week(s), month(s), or year(s). For more information, see Setting a Delay for an Alert Schedule.
Caution: Be sure that you set the schedule interval to a time period greater than the time it takes to run the scheduled procedure. When the schedule interval is less than the time it takes to run the procedure and the Delay option is selected, an alert schedule will distribute (based on the distribution option that you selected) more frequently than expected. For email distribution, this can result in unnecessary distribution of emails which can impact the business or operational goals of the alert report distribution.
- Enabled. Selected by default, this option allows you to disable a task.
Report Properties
- Burst Report. If you want to burst the report, select the Burst Report check box. The burst feature enables you to instruct the Reporting Server to create the report in sections so that they can be distributed separately. For more information, see Bursting a Report.
- Override the Format
Specified in the Procedure. Select this check box to
indicate a format
other than the one specified in the procedure.
Note:
- If the scheduled report is a compound report that uses the stabilized SET COMPOUND OPEN syntax, you must select the Override the Format Specified in the Procedure check box and specify the format in the schedule when scheduling this report. Otherwise, the report will not be distributed. Compound reports produced by the and App Studio reporting tools such as InfoAssist and the App Studio Document canvas do not require that the Override the Format Specified in the Procedure check box be checked.
-
FLEX, VISDIS, and VISDISAE report output formats are no longer supported. If you are editing a task that uses one of these formats within a schedule, you can change the output format in the dialog box that opens.
- If you click OK, and the output format of the report is set to FLEX, the task output is saved as AHTML.
- If you click OK, and the output format of the report is set to VISDIS or VISDISAE, the task output is saved as HTML.
- If you click Exit, the output format will not be changed, and any changes that you made to the task will not be saved.
- When an existing schedule is opened in the Basic Scheduling tool, if the Override the Format Specified in the Procedure check box was selected, the list of formats displays. If you clear the Override the Format Specified in the Procedure check box, the list of formats does not display.
- When an existing schedule is opened in the Basic Scheduling tool, if the Override the Format Specified in the Procedure check box was not selected, the list of formats does not display. If you select the Override the Format Specified in the Procedure check box, the list of formats displays.
- Save Report As.
Allows you to specify a different name for the report, which defaults to the
name of the report that you selected to schedule.
Note: When the Save Report As field contains an amper variable followed by a file extension, the separating characters between the amper variable and the file extension must be either two additional period (.) characters, or a single vertical bar (|) character, as shown in the following examples.
- The file extension is preceded by two additional period characters. For example, car_&YYMD…csv.
- The file extension is preceded by a vertical bar character. For example, car_&YYMD|.csv.
Setting a Delay for an Alert Schedule
When an alert has been triggered, you can set the alert schedule to deactivate under certain conditions.
When a recurring alert schedule is configured to have a delay, the alert schedule runs repeatedly throughout the secondary run interval until the alert is triggered, and then does not run again until the next primary run interval. This delay will only happen if the alert is triggered.
The Alert Options dialog box is shown in the following image.
For example, an alert schedule is set to run daily at 9:00 AM and has a secondary run interval that occurs every five minutes, lasting for a total of 15 minutes. This alert schedule runs four times per day, at 9:00 AM, 9:05 AM, 9:10 AM, and 9:15 AM. These recurrence settings are shown in the following image.
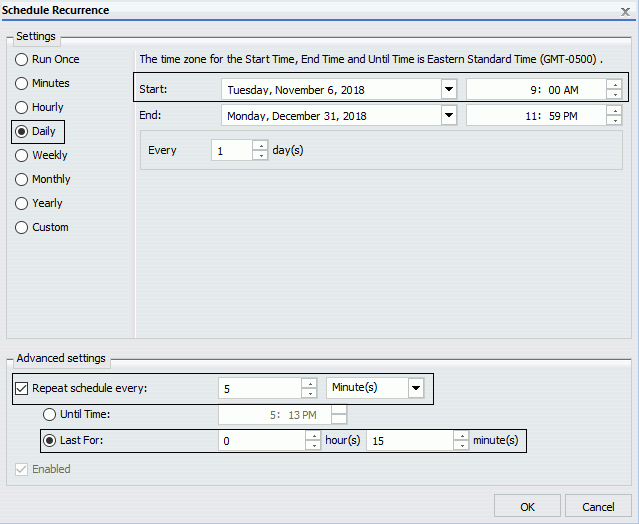
If the alert is triggered at 9:00 AM, an alert result report distributes at 9:00 AM. Once the alert has been triggered, if you do not want to repeatedly receive the same report at 9:05 AM, 9:10 AM, and 9:15 AM, but you do not want to deactivate the alert schedule, you can use the Delay option to reschedule the alert schedule to run on the next primary interval.
This means that if the alert is triggered at 9:00 AM on Tuesday, the alert schedule will not continue to run at 9:05 AM, 9:10 AM, and 9:15 AM. All remaining scheduled runs that are planned to occur during the secondary run interval are cancelled. However, the delayed alert schedule is rescheduled to run at the next primary run interval, which is Wednesday at 9:00 AM.
For example, if we add a delay of one hour to the alert schedule before the alert is triggered at 9:00 AM on Tuesday, the next run time of the alert schedule would be 10:00 AM. However, since 10:00 AM is past the duration of the secondary run interval, which is only from 9:00 AM to 9:15 AM, the alert schedule is delayed to run the next day at 9:00 AM on Wednesday.
Specifying Parameter Values
|
Topics: |
|
How to: |
|
Reference: |
You can customize a report and control its execution with parameters. When scheduling a report procedure (FEX), the schedule Task Parameters section allows you to supply a value for parameters referenced in the report procedure or add a parameter to the schedule by creating a new parameter and specifying the parameter name and value.
If your Server Procedure contains Pre/Post Procedures, see How to Use the Pre/Post-Procedures Tab.
Procedure: How to Specify Parameter Values
If the scheduled procedure contains parameters for which values must be supplied at run time, these parameters are displayed in the parameters section of the scheduling tool.
In the Basic Scheduling tool, click the Parameters tab to open the Task Parameters dialog box, shown in the following image.
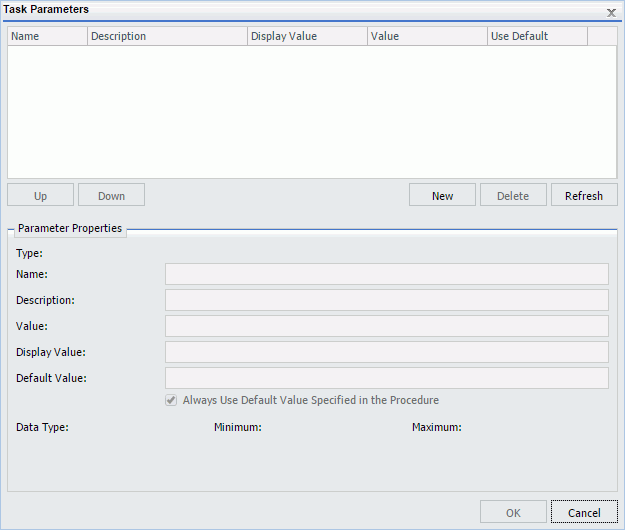
Parameters may have default values and may have values that can be selected from a static or dynamic list. For more information about selecting parameters in the Scheduling Task Parameters dialog box, see the examples provided in this chapter.
Reference: Considerations When Specifying Parameter Values
The following are considerations when specifying parameter values for a procedure:
- The maximum number of characters for each individual parameter value is 3200. You can store multiple values for a single parameter. Multiple values for a parameter are stored as one entry, which must not exceed the 3200 maximum character limit.
- ReportCaster displays the description for the parameter when it is specified in the procedure. Otherwise, ReportCaster displays the parameter name.
-
ReportCaster displays default variable values, as
well as static or dynamic single-select and multiselect lists.
Note:
- The No Selection option is displayed for dynamic multiselect lists. When selected, this option does not perform any data selection test on that field.
- ReportCaster does not support using the -HTMLFORM command to create a dynamic selectable list of parameter values.
-
ReportCaster displays global variables that are used in FILTERS defined in Master Files and referenced by a procedure. For example, if a Master File contains
FILENAME=CAR,SUFFIX=FOC
VARIABLE NAME=&&COUNTRY1, USAGE=A10, DEFAULT=ENGLAND,$
FILTER FILTER1=COUNTRY EQ '&&COUNTRY1'; $
and the procedure being scheduled contains
WHERE FILTER1
then ReportCaster displays COUNTRY1 in the Parameters window.
- ReportCaster will not prompt for variables with defaults set by the -DEFAULTH command. The purpose of the -DEFAULTH command is to assign a default value to amper variables and not be dynamically prompted for that variable.
- ReportCaster does not prompt for the value of its internal variables that are set by the Distribution Server at schedule execution time. For example, &DSTOWNER is the user ID of the schedule owner. If this parameter is referenced in a scheduled procedure, the value will be available because the Distribution Server sets the value to the owner of the schedule at schedule execution time. However, the scheduling tool will not prompt for this value in the Task Parameters dialog box.
- When specifying
parameters with special characters (for example, %, &, |):
- If you are specifying the entire WHERE condition as the parameter value, you must enclose the value within two single quotation marks rather than a double quotation mark. For example, ''WHERE CAR NOT LIKE MOTO%''.
- If you are only specifying a value as the parameter value, you do not need to enclose the parameter value within quotation marks. For example, O&DINFO.
- If you want to specify parameter values in a pre-processing or post-processing procedure, these must be typed in by selecting the Pre/Post-RPC tab. See Schedule Pre-Processing and Post-Processing Procedures for information about schedule pre-processing and post-processing procedures.
- Once a parameter is stored for a schedule, ReportCaster will continue to display that parameter in the Parameter list and submit the parameter to the Reporting Server when the schedule is run even if the parameter is removed from the underlying report. To remove the parameter from the schedule information, edit the schedule and delete the parameter. For information on how to delete a parameter from a schedule, see Deleting a Parameter.
- A parameter value that contains special characters should not be used in a schedule setting that refers to an output file name, since file names cannot contain special characters. Examples of affected schedule settings include the Save Report As value, the Report Name value for single-file FTP distribution, and the Zip File Name.
- A FEX can be coded to set the Display Value for any value. For example, if a value is named ENGLAND, the Display Value can be set to display as England.
Example: Specifying a Default Parameter Value in the Report Procedure (FEX)
Specifying default parameter values can be done with the -DEFAULT or -DEFAULTH command or within the WHERE statement. Default values specified with the -DEFAULTH command are not prompted for.
The following procedure sets a default value of NY for the STATE (2-3 letters for US State) parameter.
-DEFAULT &STATE=NY
TABLE FILE GGSALES
SUM DOLLARS UNITS
BY ST
BY CATEGORY
BY PRODUCT
ON TABLE SUBHEAD
"Product Sales Report"
WHERE ST EQ '&STATE.2-3 letters for US State.'
END
The parameters that have default values defined in the report procedure (FEX) are listed within the Parameters tab with the default value in the Value column. When parameters are stored in a schedule, ReportCaster adds a -SET for the parameter to the schedule procedure sent to the Reporting Server to be run. A -SET command overrides a value specified in a -DEFAULT command.
The following image shows the Task Parameters dialog box displaying the STATE parameter. In the Use Default column, the State parameter shows a value of Yes. In the Parameter Properties section, NY is shown in the Value and Default Value fields. This is the default parameter value.
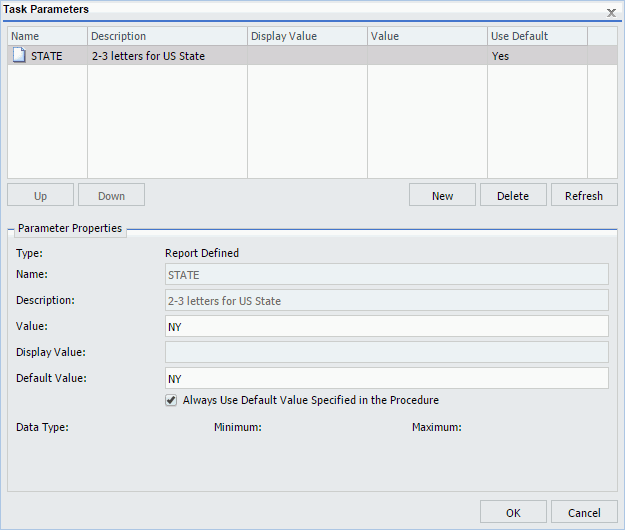
To use a value other than the default value at schedule execution time, so that it will be used even if the procedure is changed, click the parameter and change the parameter value within the Parameter Properties section. Values for simple parameters are specified by entering a value for the parameter in the Value field. There are also static and dynamic parameter types that allow selection of a single or multiple values, which are explained in the following examples.
When parameters are stored in a schedule, ReportCaster adds a -SET for the parameter to the schedule procedure sent to the Reporting Server to be run. A -SET command overrides a default value specified in a -DEFAULT command.
Example: Adding a Static Single-Select List of Parameter Values
The following procedure provides a list of static values that are valid for the CATEGORY (Category) parameter.
-DEFAULT &STATE=NY
TABLE FILE GGSALES
SUM DOLLARS UNITS
BY ST
BY CATEGORY
BY PRODUCT
ON TABLE SUBHEAD
"Product Sales Report"
WHERE ST EQ '&STATE.2-3 letters for US State.'
WHERE CATEGORY EQ '&CATEGORY.(Coffee,Food,Gifts).Category.'
END
The following image shows the Task Parameters dialog box displaying the CATEGORY parameter. In the Value column, the CATEGORY parameter has a value of Coffee. Since this CATEGORY parameter has a list of possible parameter values, there is no default value specified. Therefore, the Use Default column is blank.
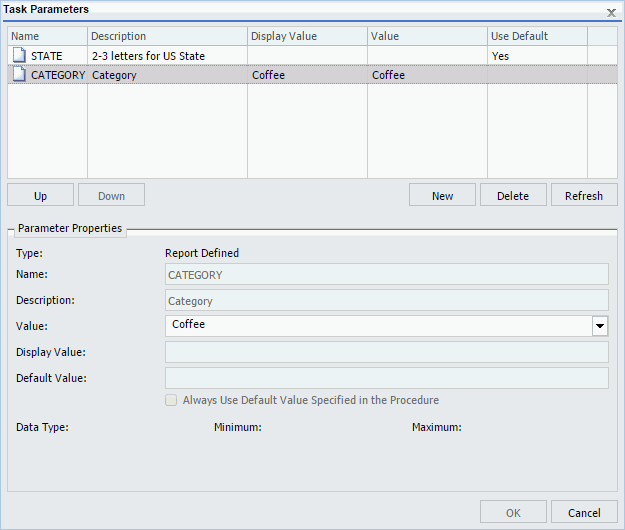
To supply a value for a single select parameter, select the parameter in the Task Parameters table and enter a value in the Value field in the Parameter Properties section. From the list of the values, select a value to assign to the parameter. You can select only one value for a static single-select parameter.
Example: Adding a Dynamic Single-Select List of Parameter Values
The following procedure provides a single select list of values that are valid for the PRODUCT (Product Name) field. This list is dynamically populated with values from the GGSALES data source.
-DEFAULT &STATE=NY;
TABLE FILE GGSALES
SUM DOLLARS UNITS
BY ST
BY CATEGORY
BY PRODUCT
ON TABLE SUBHEAD
"Product Sales Report"
WHERE ST EQ '&STATE.2-3 letters for US State.'
WHERE PRODUCT EQ '&PRODUCT.(FIND PRODUCT IN GGSALES).Product Name.'
END
The following image shows the Task Parameters dialog box displaying the PRODUCT parameter. In the value column, the PRODUCT parameter has a value of Espresso. Since the PRODUCT parameter has a list of possible parameter values, there is no default value specified. Therefore, the Use Default column is blank.
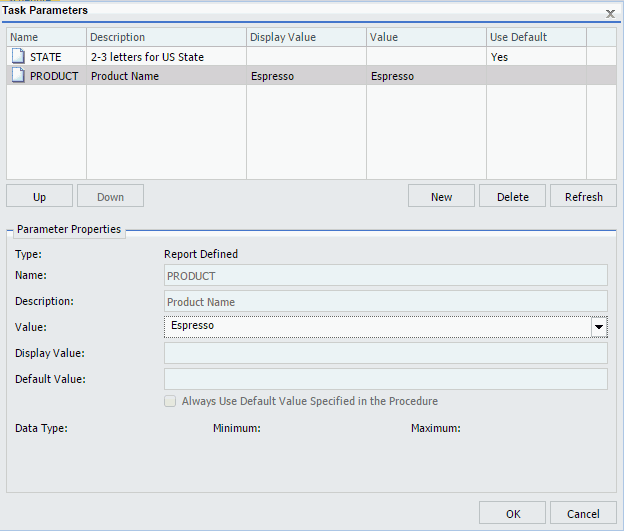
To supply a different value, click the PRODUCT parameter in the table and change the parameter value within the Parameter Properties section. You can select only one value from the dynamic single-select list.
Example: Adding a Static Multiselect List of Parameter Values
The following procedure provides a static multiselect list of values that are valid for the CATEGORY (Category) field.
-DEFAULT &STATE=NY
TABLE FILE GGSALES
SUM DOLLARS UNITS
BY ST
BY CATEGORY
BY PRODUCT
ON TABLE SUBHEAD
"Product Sales Report"
WHERE ST EQ '&STATE.2-3 letters for US State.'
WHERE CATEGORY EQ '&CATEGORY.(OR(Coffee,Food,Gifts)).Category.'
END
The following image shows the Task Parameters dialog box displaying the CATEGORY parameter. The CATEGORY parameter has been encoded to only use the values Coffee, Food or Gifts. The selected values will show in the Value column. Since the CATEGORY parameter has a list of possible parameter values, there is no default value specified. Therefore, the Use Default column is blank.
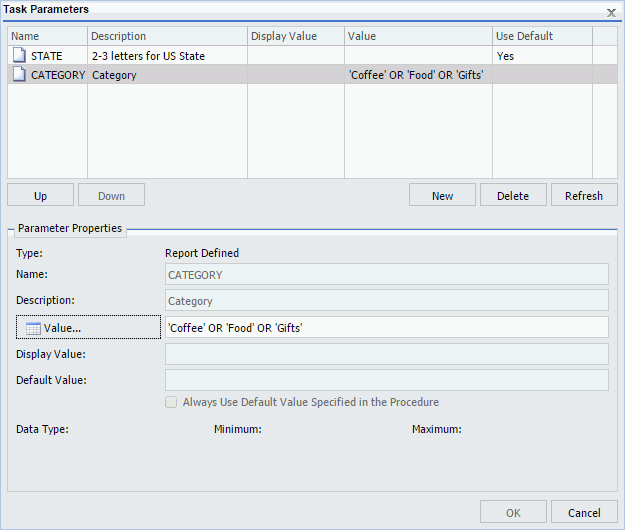
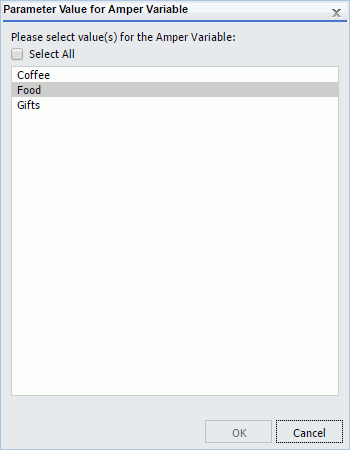
When the Value button is selected in the Parameter Properties section, a list of available values displays, as shown in the following image. Using the Ctrl key, you can select more than one value from the static multiselect list.
Example: Adding a Dynamic Multiselect List of Parameter Values
The following procedure provides a dynamic multiselect list of values that are valid for the PRODUCT field. This list is dynamically populated with values from the GGSALES data source.
-DEFAULT &STATE=NY;
TABLE FILE GGSALES
SUM DOLLARS UNITS
BY ST
BY CATEGORY
BY PRODUCT
ON TABLE SUBHEAD
"Product Sales Report"
WHERE ST EQ '&STATE.2-3 letters for US State.'
WHERE PRODUCT EQ '&PRODUCT.(OR(FIND PRODUCT IN GGSALES)).Product Name.'
END
The following image shows the Task Parameters dialog box displaying the CATEGORY parameter. The CATEGORY parameter has been encoded to use any value found in the GGSALES data source. The selected values will show in the Value column. Since the CATEGORY parameter has a list of possible parameter values, there is no default value specified. Therefore, the Use Default column is blank.
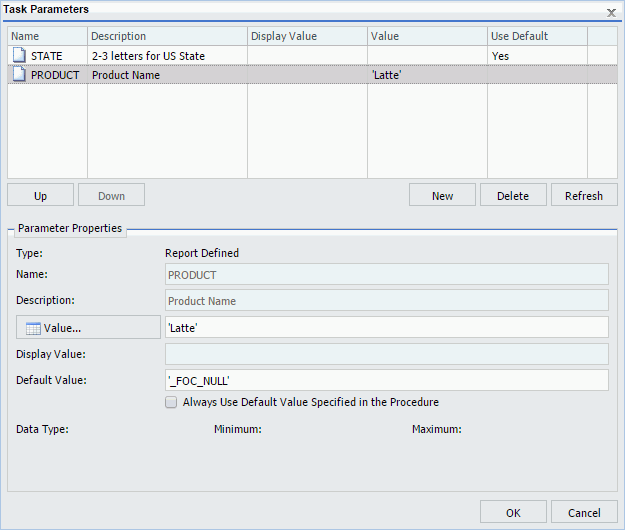
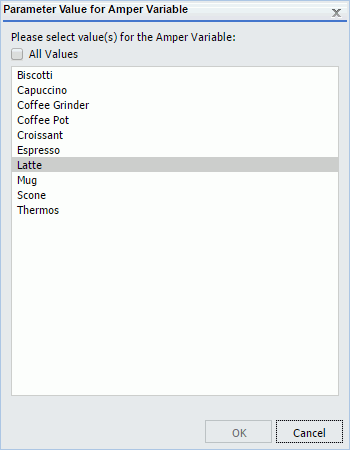
When the Value button is selected in the Parameter Properties section, a list of available values displays, as shown in the following image. Using the Ctrl key, you can select more than one value from the dynamic multiselect list.
Deleting a Parameter
It is important to verify that the parameters you delete when scheduling a report procedure (FEX) will be handled, as follows, so that the scheduled job will run successfully:
- A default value is specified in the report procedure (FEX) being scheduled.
- A value will be dynamically assigned to the parameter by the report procedure (FEX) processing when the scheduled job runs on the Reporting Server.
- The parameter will not be referenced when the report procedure (FEX) is processed by the Reporting Server.
To delete a parameter so that it is not stored with the schedule information, highlight the parameter in the parameter table you want to delete, and click the Delete button.
Creating a New Parameter
|
How to: |
If you need to have the schedule job send a parameter and value that is not defined in the report procedure being scheduled, you can create a new parameter in the Task Parameters dialog box. Parameters referenced during processing by the Reporting Server must be assigned a value for the scheduled job to run successfully. The schedule job log report will contain information when required parameter values were not provided.
Procedure: How to Create a New Parameter
You can create parameters for a task as follows:
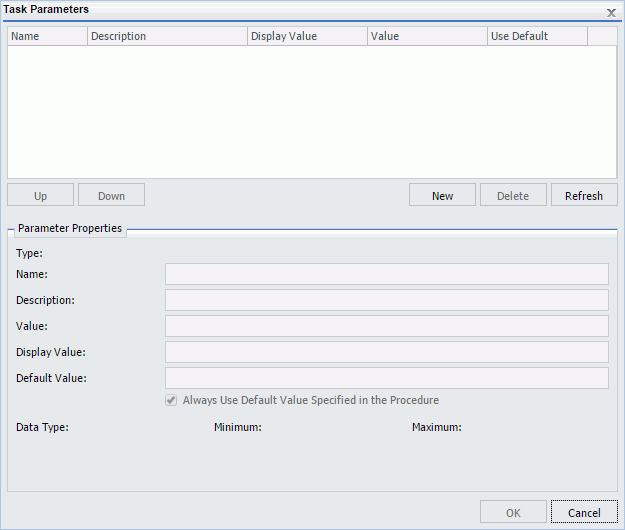
- Click
Parameters on the ribbon to display the Task
Parameters dialog box, which is shown in the following image.
- Click
the
New button located above the Parameter Properties
section.
The Task Parameter dialog box displays, as shown in the following image.
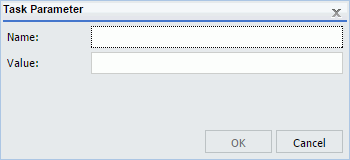
- Enter a value in the Name and Value boxes.
- Click
OK.
The Name and Value boxes are populated in the Task Parameters dialog box Parameters table.
- If you would like to change the parameter value, select the parameter in the Parameters table and specify the values in the Value field located in the Parameter Properties section.
- Click OK when you have completed entering parameter settings for the task.
Selecting a Report Format
Use the following guidelines when selecting a format:
- The formats that support bursting are AHTML (except for FML reports), ALPHA, COM, COMMA, COMT, DHTML (except for FML reports), DFIX, DOC, EXL07, EXL2K, EXL2K FORMULA, EXL2K TEMPLATE, EXL97, GIF, HTML and HTML ODP (except for FML reports), JPEG, PDF, PNG, PPT, PS, SVG, TAB, TABT, and WP. Coordinated compound reports can only be burst with DHTML, PDF, and PPT formats.
- When a format is selected, ReportCaster automatically adds an appropriate file extension to the output file name in the Save As field. In certain cases, you must manually change the extension added by ReportCaster. For example, if you select format DHTML in the schedule and the report output is not a web archive file, you must change the extension to .htm. If you select format HTML in the schedule and the report output is a web archive file, you must change the extension to .mht. If you select format EXL07 TEMPLATE in the schedule and the specified template is a macro-enabled template, you must change the extension to .xlsm. For more information about DHTML and EXL07 TEMPLATE formats, see ReportCasterReport Broker Formats for Scheduled Output.
- The WP, DOC, and PS formats support printing. The PDF format supports printing when ReportCaster is configured to enable PDF to print and the printer is configured with the appropriate driver. For more information, see ReportCaster Configuration.
- When a format is selected using the Override the Format Specified in the Procedure option, only the HTML, DHTML, WP, and DOC formats can be distributed as an inline email message. When the Override the Format Specified in the Procedure option is not used and inline is selected, the output will be distributed as an attachment if the format does not support inline distribution. Additionally, when distributing a report inline, the appearance of the report can be affected by the email server, or potentially blocked. Review the restrictions for your mail server provider before utilizing reporting formats and options that utilize JavaScript™, embedded images, and referenced CSS.
Schedule Pre-Processing and Post-Processing Procedures
|
How to: |
If you are scheduling a Server Procedure or report procedure (FEX), you can schedule a maximum of two pre-processing and post-processing procedures. The pre-processing and post-processing procedures that you schedule must reside on the Reporting Server.
Note: All ReportCaster internal variables, which start with &DST, are passed to pre-processing and post-processing procedures so that they are available for application specific logic. For more information, see ReportCaster Internal Variables.
Procedure: How to Use the Pre/Post-Procedures Tab
- Click the Pre/Post-Procedures tab.
- Click the First... or Second... button to open a dialog box, from which you can select a procedure.
- Once a procedure is selected you can click the Pre First, Pre Second, Post First, or Post Second buttons to insert the path of the procedure into the respective field.
- Click OK to confirm your selections.
- Optionally, enter the following information:
The procedure (FEX) name can be entered with or without the application path. When an application path is not specified, the Reporting Server default search path is used to locate the specified procedure.
One or more parameter values can be assigned using a name and value pair, and multiple pairs must be separated by commas, as follows:
procedurename name=value, name=value
You do not have to enter the pairs in the order in which they are encountered in the procedure. For additional information on supplying parameter values for a procedure, see the Supplying Variable Values From Another Procedure topic in the Developing Reporting Applications manual.
- Click OK.
Advanced Task Settings
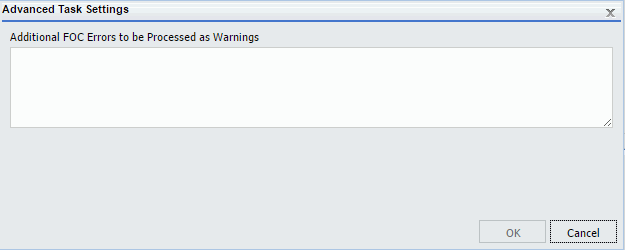
The Advanced Options tab provides access to the Additional FOC Errors to be Processed as Warnings dialog box, where you can specify one or more FOCUS error message numbers, separated by a comma. If one of these FOCUS error numbers is encountered during schedule execution, ReportCaster will process it as a warning rather than an error. For example, if a FOC1517 error is generated by the procedure, add 1517 to the text box to convert this error to a warning. This means that if a report is produced, it will be distributed in spite of the FOCUS error number. It also means that this FOCUS error number will not trigger error notification if the schedule is configured to notify on error.
The Advanced Task Settings dialog box is shown in the following image.
| WebFOCUS | |
|
Feedback |