Installing the WebFOCUS Client
|
Topics: |
|
How to: |
The following procedures describe how to install the WebFOCUS Client.
Procedure: How to Install Using the Typical Installation Option
- Download the WebFOCUS Client installation file, then double-click the file.
- Choose the
appropriate language from the drop-down list and click OK.
The Welcome to WebFOCUS 8.2 window opens, recommending that you quit all programs before continuing with the installation.
- Click Next to
continue the installation.
The License Agreement dialog box opens.
- Read the license agreement, select the radio button to
accept the terms of the license agreement, and click Next to
continue the installation.
The Choose Install Type dialog box opens. Select one of the following:
- To update your existing 8.2.x installation to a new
service pack level, select Update and the existing instance you want to
update.
If you select Update, the Pre-Installation Summary dialog box opens. Continue to step 11.
- To install all available features of WebFOCUS, select Full Install. If you select Full Install, the Software Registration dialog box opens. Continue to step 5.
- To update your existing 8.2.x installation to a new
service pack level, select Update and the existing instance you want to
update.
- Type the
License Code and Site Code that were delivered with your WebFOCUS
software and click Next to continue the installation.
The Choose Install Set dialog box opens.
- Select Typical and
click Next to continue the installation.
The Select Program Folder dialog box opens.
- Accept the
default program folder (WebFOCUS 82) or specify a different program
folder name by adding a suffix to the Program Group name. Then, click Next.
Note: A message displays if the provided folder name already exists. The folder name must be unique in order to proceed.
The Choose Destination Locations dialog box opens.
- Perform
the following steps:
- Specify a path for the WebFOCUS application folder. The default
is C:\ibi.
Note: You can specify any path on the local machine or use a Universal Naming Convention (UNC) path.
- Choose the appropriate disk from the Disk Space Information drop-down list and click Next.
The Select Components to Install dialog box opens, as shown in the following image.
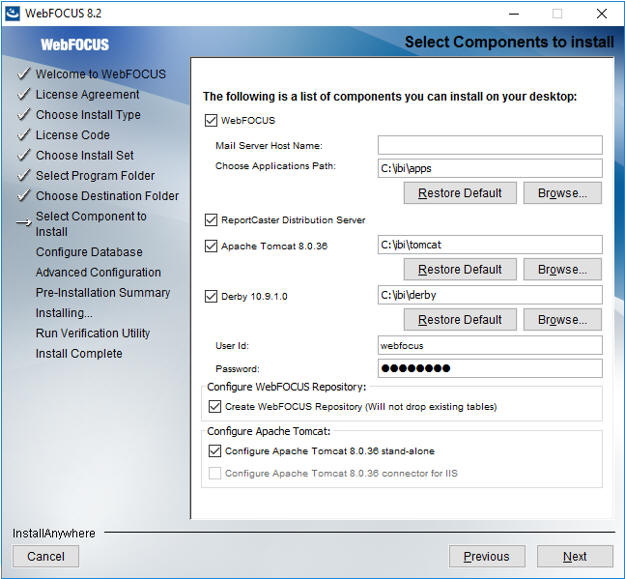
Note: If you specified a UNC path for the WebFOCUS application folder, then the ReportCaster Distribution Server must be installed separately. In the Select Components to install dialog box, the ReportCaster Distribution Server check box will be disabled. In the Advanced Configuration dialog box, you must provide the ReportCaster Distribution Server host and port values that correspond to the system where you are going to install the ReportCaster Distribution Server.
- Specify a path for the WebFOCUS application folder. The default
is C:\ibi.
- Perform the following steps:
- In the WebFOCUS component area, type the host name or IP address for your mail server in the Mail Server Host Name field.
- Type a path where WebFOCUS applications will be saved in the Choose
Applications Path field or accept the default location (C:\ibi\apps).
Options to install Tomcat and Derby are enabled if these components are not preinstalled on your system. Allow these options to be installed and configured with WebFOCUS if you want to use default configuration options.
- If you clear the options to install and configure Tomcat, an application server needs to be configured post-installation.
- If you clear the option to install Derby, or Derby is preinstalled, continue to the next substep.
- Select an existing database (for example, Apache Derby or MS SQL) from the
Configure pre-existing Database drop-down list.
Note:
- If you want to use an existing WebFOCUS repository that already has tables defined, clear the Create WebFOCUS Repository option. After the installation is completed, you must drop and recreate the existing tables in the repository if you plan on working with a new WebFOCUS repository. Alternatively, you can run the WFReposUtilCMDLine.bat file with the CREATE_INSERT mode to update your database and create the required tables and columns.
- If you select the Create WebFOCUS Repository option, the installation checks the database to see if it contains existing tables. If it contains tables, the Create WebFOCUS Repository option will not be performed and a message displays. In this case, you can provide information for a new empty database, create the tables using WebFOCUS utilities post-installation, or in the case that you are using an 8.1.x or 8.0.x database, follow the post-installation steps required to update the database to an 8.2.01 level. For more information, see Upgrading Content From Release 8.1.x or 8.0.x to Release 8.2 Version 01M.
- If you want to use a web or application server other than Apache Tomcat, then uncheck the Configure Apache Tomcat option. The Configure WebFOCUS Client area will appear and you must enter the port number that is currently used by your web server in the corresponding field.
- Click Next to accept the remaining default installation components and configuration settings.
The Database Configuration dialog box opens, as shown in the following image. In this example, Apache Derby is being configured, since it was the pre-existing database that was selected.
 Note:
Note:- The Database Configuration
for Apache Derby dialog box opens if you have an existing version
of Derby installed on your system. In this case, the Derby 10.9.1.0 check
box will be disabled in the Select Components to install dialog
box. The Database Configuration for Apache Derby dialog box also
opens if you uncheck the Derby 10.9.1.0 check box and select the
option to use an existing Derby installation.
If the installer detects an existing Derby installation on the machine, the JDBC Path will be populated automatically. Otherwise, the JDBC Path text box will be blank, and the user will have to enter the full path to the jar files.
- For security reasons, the DB Server Node is set to 127.0.0.1. If you are running on multiple environments and want to access this Derby from another location, change 127.0.0.1 to the machine name.
- Click Next to
continue the installation.
The Pre-Installation Summary window opens.
- Verify that
all of the information is correct and click Install to
continue with the configuration and installation.
As WebFOCUS is being configured on your system, the Please Wait window is displayed.
After WebFOCUS is configured, the Installing WebFOCUS 8.2 dialog box opens. As WebFOCUS is being installed, the Installing WebFOCUS 8.2 dialog box informs you about the installation tasks that are being performed.
When the installation is complete, the Run Verification Utility dialog box appears.
- Select the
verification utilities you would like to run and click Next.
The available utilities are:
- The WebFOCUS Console Verification Utility
- WebFOCUS Online Documentation
The Install Complete window opens, listing the installation directory.
- If you performed an upgrade installation, ensure that the application server cache is cleared prior to using the new installation.
Procedure: How to Install Using the Custom Installation Option
- Download the WebFOCUS Client installation file, then double-click the file.
- Choose the
appropriate language from the drop-down list and click OK.
The Welcome to WebFOCUS 8.2 window opens, recommending that you quit all programs before continuing with the installation.
- Click Next to
continue the installation.
The License Agreement dialog box opens.
- Read the license agreement, select the radio button to
accept the terms of the license agreement, and click Next to
continue the installation.
The Choose Install Type dialog box opens. Select one of the following:
- To update your existing 8.2.x installation to a new
service pack level, select Update and the existing instance you want to
update.
If you select Update, the Pre-Installation Summary dialog box opens. Continue to step 13.
- To install all available features of WebFOCUS, select Full Install. If you select Full Install, the Software Registration dialog box opens. Continue to step 5.
- To update your existing 8.2.x installation to a new
service pack level, select Update and the existing instance you want to
update.
- Type the
License Code and Site Code that were delivered with your WebFOCUS
software and click Next to continue the installation.
The Choose Install Set dialog box opens.
- Select Custom and
click Next to continue the installation.
The Select Program Folder dialog box opens.
- Accept the
default program folder (WebFOCUS 82) or specify a different program
folder name by adding a suffix to the Program Group name. Then, click Next.
Note: A message displays if the provided folder name already exists. The folder name must be unique in order to proceed.
The Choose Destination Locations dialog box opens.
- Perform
the following steps:
- Specify a path for the WebFOCUS application folder. The default
is C:\ibi.
Note: You can specify any path on the local machine or use a Universal Naming Convention (UNC) path.
- Choose the appropriate disk from the Disk Space Information drop-down list and click Next.
The Select Components to Install dialog box opens, as shown in the following image.
Note: If you specified a UNC path for the WebFOCUS application folder, then the ReportCaster Distribution Server must be installed separately. In the Select Components to install dialog box, the ReportCaster Distribution Server check box will be disabled. In the Advanced Configuration dialog box, you must provide the ReportCaster Distribution Server host and port values that correspond to the system where you are going to install the ReportCaster Distribution Server.
- Specify a path for the WebFOCUS application folder. The default
is C:\ibi.
- Perform the following steps:
- In the WebFOCUS component area, type the host name or IP address for your mail server in the Mail Server Host Name field.
- Type a path where WebFOCUS applications will be saved in the Choose
Applications Path field or accept the default location (C:\ibi\apps).
Options to install Tomcat and Derby are enabled if these components are not preinstalled on your system. Allow these options to be installed and configured with WebFOCUS if you want to use default configuration options.
- If you clear the options to install and configure Tomcat, an application server needs to be configured post-installation.
- If you clear the option to install Derby, or Derby is preinstalled, continue to the next substep.
- Select an existing database (for example, Apache Derby or MS SQL) from the
Configure pre-existing Database drop-down list.
Note:
- If you want to use an existing WebFOCUS repository that already has tables defined, clear the Create WebFOCUS Repository option. After the installation is completed, you must drop and recreate the existing tables in the repository if you plan on working with a new WebFOCUS repository. Alternatively, you can run the WFReposUtilCMDLine.bat file with the CREATE_INSERT mode to update your database and create the required tables and columns.
- If you select the Create WebFOCUS Repository option, the installation checks the database to see if it contains existing tables. If it contains tables, the Create WebFOCUS Repository option will not be performed and a message displays. In this case, you can provide information for a new empty database, create the tables using WebFOCUS utilities post-installation, or in the case that you are using an 8.1.x or 8.0.x database, follow the post-installation steps required to update the database to an 8.2.01 level. For more information, see Upgrading Content From Release 8.1.x or 8.0.x to Release 8.2 Version 01M.
- If you want to use a web or application server other than Apache Tomcat, then uncheck the Configure Apache Tomcat option. The Configure WebFOCUS Client area will appear and you must enter the port number that is currently used by your web server in the corresponding field.
- Click Next to accept the remaining default installation components and configuration settings.
The Database Configuration dialog box opens, as shown in the following image. In this example, Apache Derby is being configured, since it was the pre-existing database that was selected.
Note:- The Database Configuration
for Apache Derby dialog box opens if you have an existing version
of Derby installed on your system. In this case, the Derby 10.9.1.0 check
box will be disabled in the Select Components to install dialog
box. The Database Configuration for Apache Derby dialog box also
opens if you uncheck the Derby 10.9.1.0 check box and select the
option to use an existing Derby installation.
If the installer detects an existing Derby installation on the machine, the JDBC Path will be populated automatically. Otherwise, the JDBC Path text box will be blank, and the user will have to enter the full path to the jar files.
- For security reasons, the DB Server Node is set to 127.0.0.1. If you are running on multiple environments and want to access this Derby from another location, change 127.0.0.1 to the machine name.
- Click Next.
The Advanced Configuration dialog box opens, as shown in the following image.

- Perform
the following steps:
- In the WebFOCUS Application Context field, type a context root or accept the default (ibi_apps).
- In the WebFOCUS Help Context field, type a help context root or accept the default (ibi_help).
- In the WebFOCUS Reporting Server Host field, type a host name or accept the default. The default WebFOCUS Reporting Server host is the name of the machine where WebFOCUS is being installed.
- In the WebFOCUS Reporting Server Port field, type a server port or accept the default (8120).
- In the Distribution Server Host field, type a host name. The default Distribution Server host is the name of the machine where WebFOCUS is being installed.
- In the Distribution Server Port field, type a server port or accept the default (8200).
- In the Web/App Server Ports area, specify the port values that are being used by your application server.
- Click Next to
continue the installation.
The Pre-Installation Summary window opens.
- Verify that
all of the information is correct and click Install to
continue with the configuration and installation.
As WebFOCUS is being configured on your system, the Please Wait window is displayed.
After WebFOCUS is configured, the Installing WebFOCUS 8.2 dialog box opens. As WebFOCUS is being installed, the Installing WebFOCUS 8.2 dialog box informs you about the installation tasks that are being performed.
When the installation is complete, the Run Verification Utility dialog box appears.
- Select the
verification utilities you would like to run and click Next.
The available utilities are:
- The WebFOCUS Console Verification Utility
- WebFOCUS Online Documentation
The Install Complete window opens, listing the installation directory.
- If you performed an upgrade installation, ensure that the application server cache is cleared prior to using the new installation.
Procedure: How to Install WebFOCUS Client Using the Silent Install
- To generate the silent install properties file from the command prompt, navigate to the directory where the installWebFOCUS82nn.exe file resides.
- Enter the
following command:
installWebFOCUS82nn.exe -r drive:\fullpath\name.properties
Note:- Replace nn with the specific WebFOCUS 82 release, for example, installWebFOCUS8201.exe
- Always generate the properties file before performing the silent install to ensure that the properties are correct.
- The properties file has the extension *.properties.
- You need to specify the full path to where the properties file will be created.
- To install
in silent mode, navigate to the directory where the installWebFOCUS82nn.exe
file resides and enter the following command:
installWebFOCUS82nn.exe -i silent -f drive:\fullpath\name.properties
Troubleshooting the Installation
- If you experience issues during the installation, due to Java memory resources:
- Start the Command Window with the option Run as administrator and issue the following command:
set_JAVA_OPTIONS=-Xmx1024m
This is a temporary variable applicable for the duration of the Command Window session.
- From the same Command Window, navigate to the location of the WebFOCUS installation program and run the installation program.
- Start the Command Window with the option Run as administrator and issue the following command:
- The following are the main trace files for the installation.
The names are generated with a date and random number, where userprofile is
the user ID logged on during the installation.
C:\Users\userprofile\WebFOCUS82_inst_date_######.log
C:\Users\userprofile\WebFOCUS82_Install_inst_date_######.log
If the server cannot find the Java VM, the JSCOM Listener will not be able to start and the messages will be written to the server log file (edaprint.log), stating that the Java VM cannot be found. To resolve this issue, specify the location of the Java VM in JDK_HOME or IBI_JNIPATH. For more information, see the Server Installation manual.
| WebFOCUS | |
|
Feedback |