Creating Filtered Dashboard Pages
|
Topics: |
In Release 8.2 Version 01, App Studio has a new Filter Panel option in the Requests & Data Sources tab, which lets you pick the Reporting Object and then streamlines the workflow for creating a filter panel to be used in a Portal. This includes setting up the layout to be a responsive, single row of filter controls. It also sets the Load in iFrame Object property on the file to No, so that the Portal will create an HTML DIV for the filter panel instead of an iFrame. This is important so that custom jQuery controls on the filter panel, such as the multi-select drop-down list and the calendar control, will be able to overlap the filter panel boundary.
An example of a filtered dashboard page, displayed on multiple devices, is shown in the following image.
To build a filtered dashboard page, you need to perform the following steps.
- Step One. Create a Reporting Object and populate it with parameters.
- Step Two. Create parameterized analytical content, such as a parameterized report, using the same Reporting Object.
- Step Three. Build filter controls in App Studio.
- Step Four. Combine parameterized content and the filter panel in a responsive portal.
Step One: Creating a Parameterized Reporting Object
|
How to: |
In this step, you create a Reporting Object and populate it with the Where statements that you will later use for building a filter panel.
Procedure: How to Create a Parameterized Reporting Object
- In the Resources tree, right-click a domain or folder, point to New, and click Reporting Object.
The Tool Setup dialog box opens.
- Select an application path and click OK.
The Open dialog box opens.
- Select a Master File. In this example, we are using the wf_retail_lite Master File. Click OK.
The Reporting Object tool opens.
- Right-click Where Statements and click New.
The Create a filtering condition dialog box opens.
- Create WHERE statements that you will later use as parameters in a filter panel. In this example, we are creating the following
five WHERE statements.
- Store,Business,Region Equal to Optional Static Parameter
- Product,Category Equal to Optional Multiselect Parameter
- Store Type Equal to Optional Static Parameter
- Sale,Date Greater than or equal to Optional Simple Parameter
- Sale,Date Less than or equal to Optional Simple Parameter
Follow the steps below to create these.
Store,Business,Region Equal to Optional Static Parameter
- Set the Field to Store,Business,Region, set the expression to Equal to, and set the Value to Parameter.
- Select the Static radio button, and then select the Optional check box.
- In the Value field, type _FOC_NULL, and click the Add to List button.
- Click Get Values and then click All.
- Multi-select all values and click the Add to List button.
- Click OK.
Product,Category Equal to Optional Multiselect Parameter- Click New Filter.
- Set the Field to Product,Category, set the expression to Equal To, and set the Value to Parameter.
- Select the Dynamic radio button, and then select the Optional check box.
- Select the Select multiple values at runtime check box.
- Click OK.
Store Type Equal to Optional Static Parameter- Click New Filter.
- Set the Field to Store,Type, set the expression to Equal To, and set the Value to Parameter.
- Select the Static radio button, and then select the Optional check box.
- In the Value field, type _FOC_NULL, and click the Add to List button.
- Click Get Values and then click All.
- Multi-select all values and click the Add to List button.
- Click OK.
Sale,Date Greater than or equal to Optional Simple Parameter- Click New Filter.
- Set the Field to Sale,Date, set the expression to Greater than or equal to, and set the Value to Parameter.
- Select the Simple radio button, and then select the Optional check box.
- Click OK.
Sale,Date Less than or equal to Optional Simple Parameter- Click New Filter.
- Set the Field to Sale,Date, set the expression to Less than or equal to, and set the Value to Parameter.
- Select the Simple radio button, and then select the Optional check box.
- Click OK.
The following image shows the completed WHERE statements.
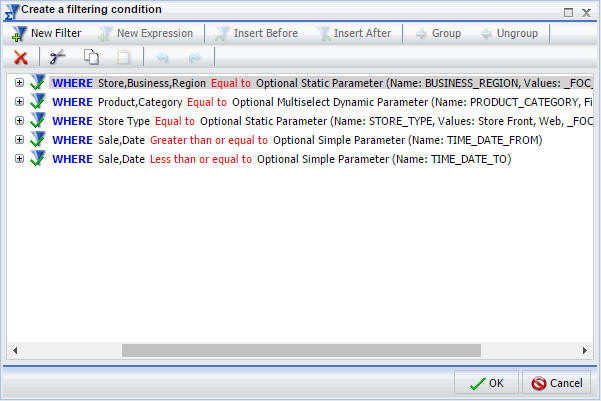
- Click OK to close the Create filtering condition dialog box.
- Save and close the Reporting Object tool.
Step Two: Creating Parameterized Content Using a Reporting Object
|
How to: |
In this step, you use your newly created Reporting Object to generate analytical content. This procedure provides a fast and easy way to ensure the uniformity of the parameters used across the content.
Procedure: How to Create Content Using a Reporting Object
- In the Resources tree, right-click the Reporting Object that you created in the previous step, point to New and click Report or Chart, depending on a type of content you want to create.
InfoAssist+ opens. The Master File that you used to build your reporting object is automatically selected.
- Drag fields of your choice from the Data pane to the Query pane to build a report or chart.
- Save your item and close InfoAssist+.
Note: Repeat these steps to create more content.
Step Three: Building Filter Controls
|
How to: |
In this step, you create an HTML document with the filter controls that can be used to filter content on a page.
Procedure: How to Build Filter Controls in App Studio
- Launch WebFOCUS App Studio.
- In the Environments tree, right-click a domain or folder, point to New, and then click HTML/Document.
The HTML/Document Wizard opens.
- Click Next.
The Templates, Settings, and Themes screen appears.
- Keep the default settings and click Finish.
- In the Requests & Data Sources panel, click the arrow next to the New button, and then click Requests->Parameters->Filter Panel.
The Open File dialog box opens.
- Navigate to the reporting object that you created in Step 1 and click OK.
The New Parameters dialog box opens, as shown in the following image.
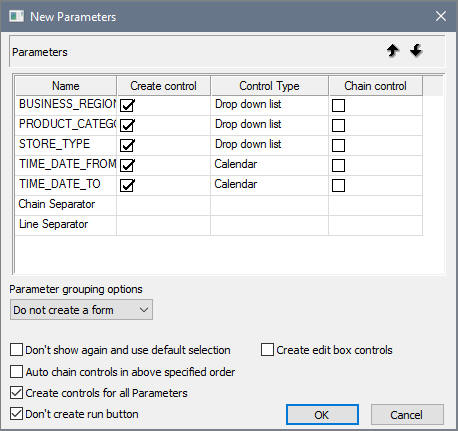
- Right-click the control type for the STORE_TYPE field and select Radio Button from the list of options.
- Keep the remaining default options and click OK.
The filter controls appear in the HTML canvas.
- Perform the following actions to visually streamline the controls:
- Multi-select two date fields, right-click either one of them, point to Html object manipulation, and then click Merge containers.
- Change _FOC_NULL to All wherever applicable. To do so, select a control, open the Settings panel, double-click the Display value and modify the entry.
- Optionally, edit the titles of the controls. To do so, double-click the title of a control and modify the entry.
An example of completed filter controls is shown in the following image.

- In the Tasks & Animations panel, under Tasks, click the New button.
- From the Trigger Type drop-down list, select Selection Changed.
- In the Trigger Identifier field, select check boxes next to all controls.
- In the Requests/Actions section, click the arrow next to the Requests Selections button, and then click Refresh.
The Target type automatically changes to Refresh BI Portal and the Current page only radio button is automatically selected.
- Save the page and close the App Studio.
Step Four: Combining the Filter Panel and the Content
|
How to: |
In this step, you build a responsive portal page and add your new filter panel to create a filtered dashboard.
Procedure: How to Use a Filter Panel in a Portal
- Create a new portal and build a responsive page in one the following ways:
- In the Resources tree, under the Domains node, create a collaborative portal, as described in How to Create a Collaborative Portal, select one of the Responsive templates and populate it with the content that you created in Step Two.
Note: To learn more about page templates, see Page Templates.
- In the Resources tree, under the Portals node, create a basic portal, as described in How to Create a Portal from the Portals Node, and then build a responsive page as described in Building a Responsive Portal and populate it with the content that you created in Step Two.
- In the Resources tree, under the Domains node, create a collaborative portal, as described in How to Create a Collaborative Portal, select one of the Responsive templates and populate it with the content that you created in Step Two.
- Add your new filter panel to a responsive page, as described in Building a Responsive Portal.
- Once you finished customizing your filtered dashboard page, click Save and close the Portal Designer.
- Run the portal.
The completed filtered dashboard page at run time is shown in the following image.
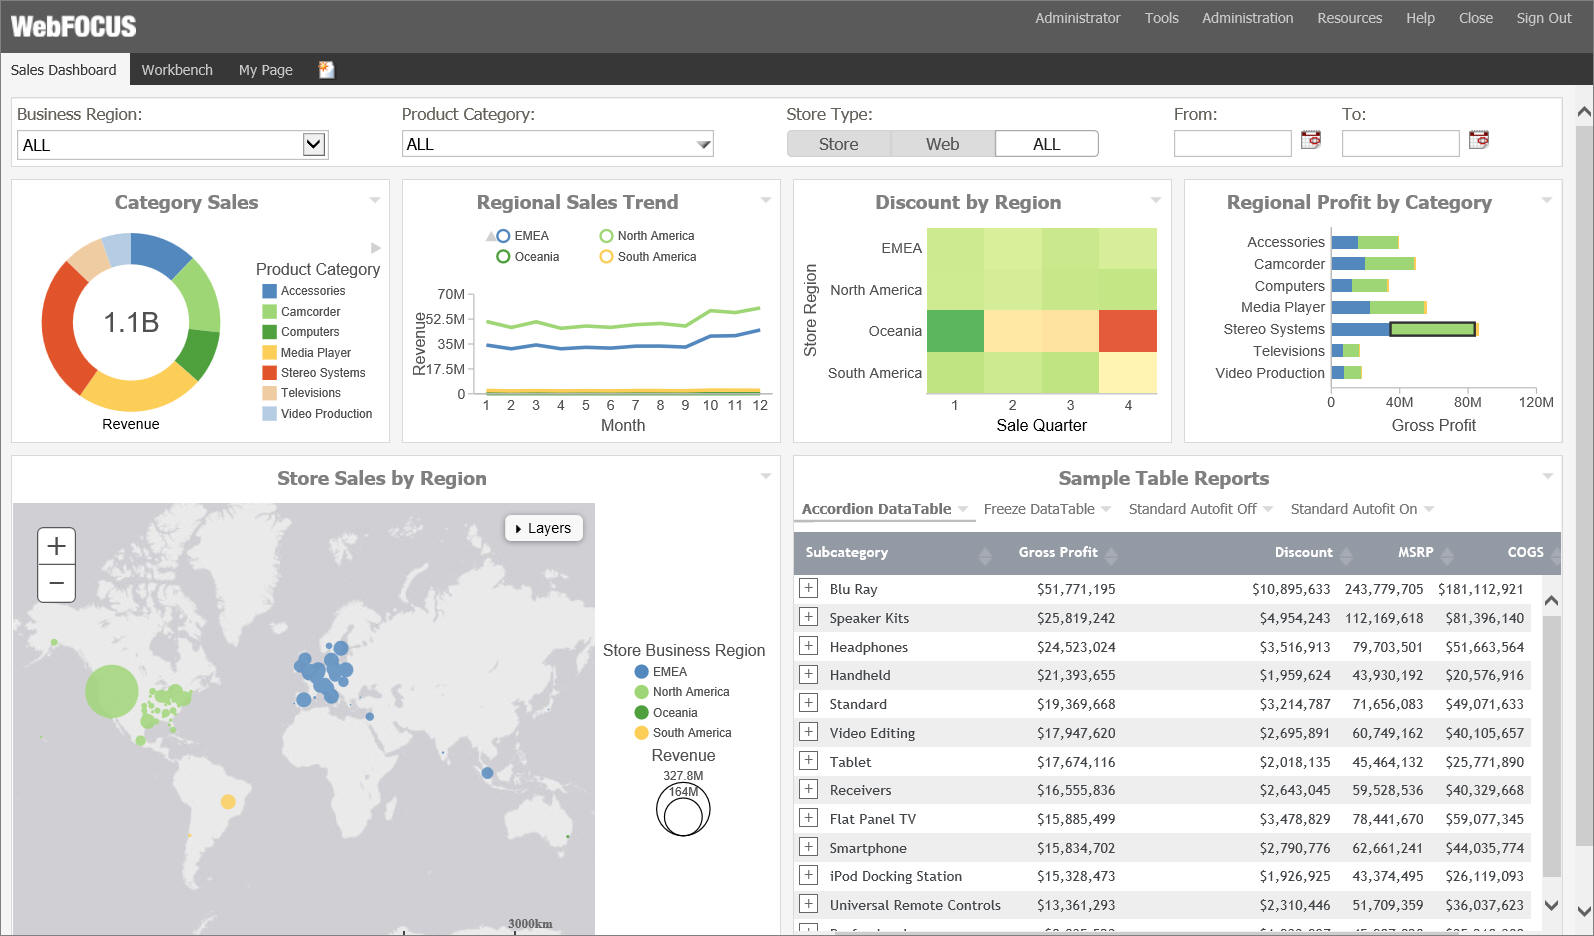
- Manipulate the filter controls to see the content refresh, change the browser width to observe the responsive behavior.
- Optionally, publish your portal to make it available to other users and groups.
| WebFOCUS | |
|
Feedback |