Working With Pages
|
How to: |
Pages are a vital part of the BI Portal architecture. Basic and collaborative portals allow different levels of versatility in the way you organize and interact with pages. In a basic portal, pages are a part of the portal structure and can only be used inside a specific portal. If the collaborative portal feature is enabled in your environment, pages become part of the content structure, and you can share, reuse, link, copy and move them between different portals, domains, or folders.
There are two types of pages in a portal. These include:
- Base Page. Created at design time by a developer or administrator. If a base page is unlocked, users can customize it at run time. If the user removes customizations or the administrator removes all user customizations from the portal, all changes made by the user are removed, and the base page reverts to its default state. The visibility of the base pages is controlled by the security rules of the domain or portal.
- Personal Page. Created at run time by the user. Personal pages are stored in the repository but they are not visible in the Resources tree. If the user removes customizations or the administrator removes all user customizations from the portal, all personal pages are removed. Personal pages are only visible to the user that has created these pages.
- Linked Page. Linked to a portal at design time or run time from the repository. If the page is linked at design time, its behavior is similar to the base page. If the page is linked at run time, it behaves like a personal page. In both cases, all customizations that are made to a linked page in a portal do not affect the original page in the repository. If the original page is edited or deleted from the repository, this change is reflected in the linked page in the portal. If the linked page is removed from the portal, the original page remains in the repository. Linked pages are only available for collaborative portals.
- Copied Page. Copied from the repository. Copied pages are custom versions of a page, with no link to the original page in the repository. Copied pages can be added both at design or run time. If a copy of a page is added to a portal at design time, it behaves like a base page. Conversely, if a copy of a page is added to a portal at run time, it behaves like a personal page. Copied pages are only available for collaborative portals.
- Stand-alone Page. Created with the Page Designer directly in a domain or folder. A stand-alone page can be copied or linked to a portal. If a page is unlinked from a portal, it becomes a stand-alone page and can be reused in a different portal.
Note: To avoid unwanted behaviors, you should not edit pages in the Portal Designer or Page Designer, or move or unlink pages in the repository, while users are running the affected portals.
Procedure: How to Add a Base Page to a Portal
- In the
Resources tree, right-click a domain or folder, point to
New, and then click
Collaborative Portal.
The New Collaborative Portal dialog box opens.
- Populate the
Title field and click
Create.
The Portal Designer opens, and the Add Page dialog box opens inside the Portal Designer.
- Select a page template and, optionally, edit the Title and Name fields.
- Click
Create.
The page displays in the Portal Designer.
- Optionally
add content to the page.
If left blank, panels behave like Easy Selector containers at run time. To learn more about the Easy Selector, see Using the Easy Selector.
- Optionally, lock the page to prevent run time edits. Select the Lock Page check box in the Properties panel.
- Save and
close the Portal Designer.
A new portal and base page are created.
To add a base page inside a new basic portal, right-click the Portals node, click New Portal, and follow steps 2, 5, 6, and 7.
To add a new base page to an existing portal, right click a portal and click Edit. Click the New Page icon and follow steps 3 to 7 for a collaborative portal or 5 to 7 for a basic portal.
Procedure: How to Add a Personal Page to a Portal
- In the
Resources tree, right-click an existing portal and click
Run.
The portal opens in a new tab or browser window depending on your browser configuration.
- Click the
New
Page icon, which is the last item in the navigation bar.
In a basic portal, a new page is created and the WebFOCUS Resources tree opens, so you can start adding content to the new page.
In a collaborative portal, the Add Page dialog box opens, allowing you to choose a template for your new page. Once you select a template and click OK, the new page opens.
You can rearrange your personal pages using drag-and-drop operations. Your personal pages always come after any base pages that were created using the Portal Designer. You can also rename, rearrange, refresh a page, or delete a page by using the page shortcut menu options.
Procedure: How to Link a Page to a Portal
- In the
Resources tree, right-click a collaborative portal and click
Run.
A portal opens in a new tab or browser window depending on your browser configuration.
- Link to an
existing page in one of the following ways:
- Link to a page from the Add
Page dialog box.
- Click the
New Page icon.
The Add Page dialog box opens.
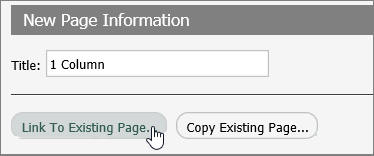
- Click
Link To Existing Page, as shown in the following
image.
The Open dialog box opens.
- Select a page to which
you want to link and click
Open.
The new linked page displays in the portal.
- Click the
New Page icon.
- Link to a page from the
WebFOCUS repository tree.
- On the Menu bar, click
Resources.
The WebFOCUS Resources tree opens.
- Select a page and drag
onto the Navigation bar, as shown in the following image.
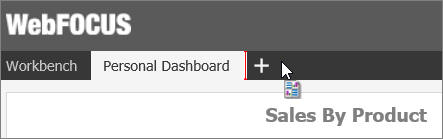
The new linked page displays in the portal.
- On the Menu bar, click
Resources.
- Link to a page from the Add
Page dialog box.
- Optionally, customize the page to fit your needs.
Your customizations are visible to you and will not affect the original page in the repository. You can remove the linked page from the portal by clicking Remove in the page shortcut menu. If the original page in the repository is edited or deleted, these changes affect the linked page in your portal.
If you add a linked page at design time, it becomes a base page.
Procedure: How to Add a Copy of a Page to a Portal
- In the
Resources tree, right-click a collaborative portal and click
Run.
A portal opens in a new tab or browser window depending on your browser configuration.
- Click the
New Page icon.
The Add Page dialog box opens.
- Click
Copy Existing Page, as shown in the following image.
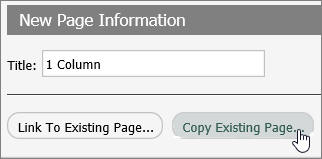
The Open dialog box opens.
- Select a
page and click
Open.
The page is copied and its title is displayed in the Title fields in the Add Page dialog box.
- Click
Create.
The copy of a page displays in the portal.
- Optionally, customize the page to fit your needs.
Your customizations are visible to you and will not affect the original page in the repository. You can delete the copied page from the portal by clicking Delete in the page shortcut menu. If the original page in the repository is edited or deleted, these changes will not affect the copy of that page in your portal.
If you add a copy of a page at design time, it becomes a base page.
Procedure: How to Create a Stand-alone Page
- In the
Resources tree, right-click a domain or folder, point to
New, and then click
Page.
The Page Designer opens, the Add Page dialog box opens inside the Page Designer.
- Select a page template and, optionally, edit the Title and Name fields.
- Click
Create.
The page displays in the Page Designer.
- Optionally, add content to the page.
If left blank, panels behave like Easy Selector containers at run time. To learn more about the Easy Selector, see Using the Easy Selector.
- Save and
close the Page Designer.
The new stand-alone page displays in the Resources tree. You can now share, copy, move, and link this page to portals.
Reference: Page Designer
The Page Designer is a subset of a Portal Designer. It allows you to create stand-alone pages inside domains and folders of your choice. The Page Designer interface is shown in the following image.

The Page Designer contains three major elements:
- Page Templates. Page templates are preset layouts that you can use to quickly create pages. This feature is identical to the one in the Portal Designer. To learn more about page templates, see Page Templates.
- Ribbon. The ribbon is
the abridged version of the ribbon in the Portal Designer. It contains three
tabs:
- Layout. Allows you to
select a theme and choose a page layout.
Note: Custom themes do not get saved in the Page Designer because pages cannot be run on their own and do not have their own CSS files. In Page Designer, the Custom Theme CSS and CSS Editor features act as tools to create a preview of what the page looks like using a selected CSS theme. You can only apply and save this theme when the page is inside a portal.
- Insert. Provides choices of containers and content that you can add to a page.
- Style. Applies styles to common properties, such as background, border, and font.
- Layout. Allows you to
select a theme and choose a page layout.
- Properties Panel. The Properties panel appears near the bottom of the window, below the canvas. It shows properties that apply specifically to the currently selected item.
To learn more about these options, see Portal Designer Overview.
| WebFOCUS | |
|
Feedback |