Using Source Control in App Studio
Through the Source Control feature, you can use App Studio to manage files and add them to the Source Control system repository. Your Source Control provider must first be configured in the WebFOCUS Administration Console. For more information, see the WebFOCUS Security and Administration manual.
Within an App Studio domain, you can add a published folder to Source Control. Within a designated folder, you can add individual files to Source Control.
Source Control Benefits
Source Control is a feature that provides many benefits to developers, including the following:
- A valuable feature for companies that need to audit changes made to their applications.
- A repository to store your source code, providing backup in a central location.
- A historical record of changes over time.
- Ability to review and compare changes.
- Ability to retrieve a specific version of a file.
- Ability to compare files between WebFOCUS and Source Control.
Source Control Requirements and Usage Notes
The following are requirements and usage notes when using Source Control:
- WebFOCUS must be configured for Source Control.
- You must be signed in to WebFOCUS and to Source Control.
- Source Control operations are available while working in the Domains area.
- Folders and files in the Domains area need to be Published.
- Source Control operations are not available if an item is not Published.
- Source Control is not available when accessing WebFOCUS from a browser. Development against a WebFOCUS environment from a browser client should be avoided to ensure that there are no conflicts in files, as files may be modified and changes may be overwritten. When using Source Control, all development must be performed through App Studio.
- Source Control operations are supported with the following file
types:
- .fex
- .htm
- .html
- .css
- .js
- .sql
- .sty
- .txt
- .url
- .xls
- .xlsx
- Source Control operations are supported with the following image files:
- .bmp
- .gif
- .jpg
- .png
- Currently, Source Control operations are not supported with the following:
ReportCaster related files
- Distribution List: .adr
- Access List: .acl
- Schedules: .sch
- Library content: .lib
Business Intelligence Portal related files
- Portal files .page and .prtl
- Blog files .blog
- Source Control operations are not available for My Content files, including Shared files.
- Single-file check out configuration needs to be implemented and enforced by the version control system, meaning that the same file cannot be checked out by multiple users.
How Source Control Works
When you start App Studio, it checks the WebFOCUS instance to determine if it is configured for Source Control.
If WebFOCUS is configured for Source Control and the App Studio user provides Source Control credentials, App Studio enables options to perform Source Control operations against the connected WebFOCUS environment.
Procedure: How to Test Source Control From App Studio
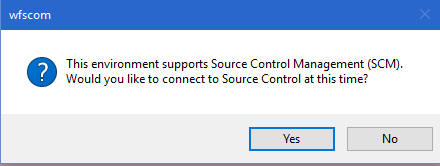
- When configuring a new WebFOCUS environment for App Studio, the product prompts you to connect to WebFOCUS to validate the
connection and, if App Studio detects that the environment is configured for Source
Control, it prompts you to connect to Source Control, as shown in the following image.
-
If you select Yes,
a prompt to provide Source Control credentials is presented.
Source Control credentials are validated and saved for the current
and future sessions of App Studio.
The Environment Properties dialog box closes, you can
proceed, use the new environment, and perform Source Control
operations without getting prompted to sign in to WebFOCUS or
Source Control.
Source Control credentials are cleared when you select the
Disconnect from Source Control operation.
Note: If you type invalid credentials, you will receive an error message.
- If you select No, the environment is saved and Source Control operations are disabled. You can proceed and perform development against the new environment without getting prompted to sign in to WebFOCUS or Source Control. Signing out of the environment and attempting to work with the same environments properly prompts the user to sign in to WebFOCUS and optionally to Source Control. The same applies when restarting App Studio.
Note: If a WebFOCUS environment is configured for Source Control and you are not connected to Source Control, App Studio starts and you are prompted to connect to both WebFOCUS and Source Control when attempting to use the Source Control configured environment.
-
If you select Yes,
a prompt to provide Source Control credentials is presented.
Source Control credentials are validated and saved for the current
and future sessions of App Studio.
The Environment Properties dialog box closes, you can
proceed, use the new environment, and perform Source Control
operations without getting prompted to sign in to WebFOCUS or
Source Control.
Source Control credentials are cleared when you select the
Disconnect from Source Control operation.
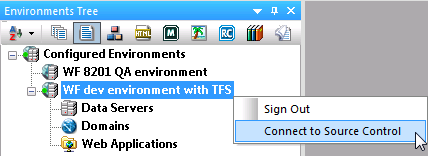
- You can also connect to or disconnect from Source Control, on demand.
- To connect to Source Control on demand, right-click the environment in the Configured Environments Tree panel and select
Connect to Source Control, as shown in the following image.
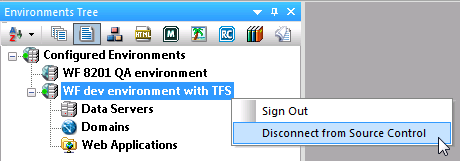
- To disconnect from Source Control on demand, right-click the environment in the Configured Environments Tree panel and select
Disconnect to Source Control, as shown in the following image.
- To connect to Source Control on demand, right-click the environment in the Configured Environments Tree panel and select
Connect to Source Control, as shown in the following image.
Procedure: How to Add Folders and Files to Source Control
As a first step, you must first add a published domain folder to Source Control or select specific files to be added to Source Control.
Note: If files and folders are not published, Source Control options are not available. The same applies if you are not connected to Source Control.
- To publish a folder, right-click the folder and select Publish from the shortcut menu. Content in this folder may now be accessed by other users.
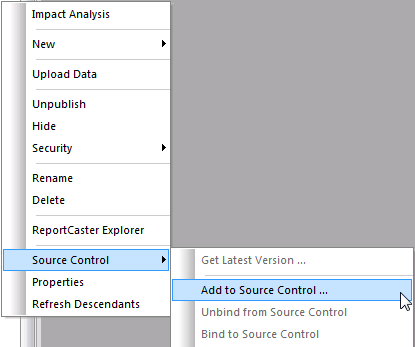
- To add a published folder to Source Control, right-click
the folder and select Source Control from the shortcut
menu.
The Source Control shortcut menu displays.
If the Source Control shortcut menu does not display, the WebFOCUS environment is not configured for Source Control. For more information on configuring a WebFOCUS environment for Source Control, see the WebFOCUS Security and Administration manual.
- Select Add to Source Control from
the shortcut menu, as shown in the following image.
The Add to Source Control dialog box opens, as shown in the following image.
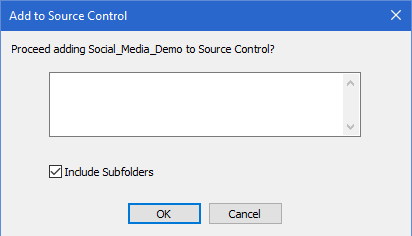
- Select the Include Subfolders check box to add all items, including subfolders and files in these folders, to the Source Control database.
This operation binds your selected folder to a folder with the same name in the Source Control database, and adds all folders and files, based on your selection.
To verify this, select the folder and open the File/Folders Properties panel. The Source Control Status property value is Added to Source Control.
A folder that has been added to Source Control may contain files that are added to Source Control, and also files that are not.
Note: Files in a published folder are accessible to all developers.
Procedure: How to Remove a Folder From Source Control
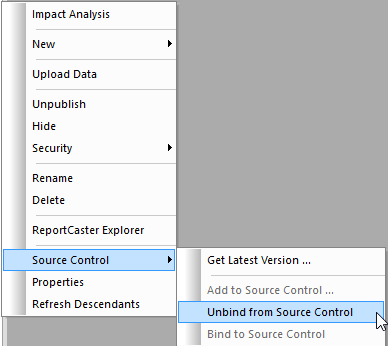
- To remove the association of a WebFOCUS folder from Source Control, right-click
the folder and select Source Control from the shortcut
menu.
The Source Control shortcut menu displays.
- Select Unbind
from Source Control from the shortcut
menu, as shown in the following image.
Reference: Source Control Icons
The following table describes how App Studio uses the icons in the Configured Environments tree to indicate the status of a file in Source Control.
|
Icon |
Description |
|---|---|
|
|
The folder has been added to Source Control. |
|
|
The file has been added to Source Control. |
|
|
The file has been checked out by the current user. |
|
|
The file has been exclusively checked out by another user. |


Note: Files not added to Source Control do not have overlay icons.
Example: Source Control Icons in the Configured Environments Tree
The following image shows an example of Source Control icons for added and checked out folders and files in the Configured Environments tree.
Procedure: How to Check Files In and Out of Source Control
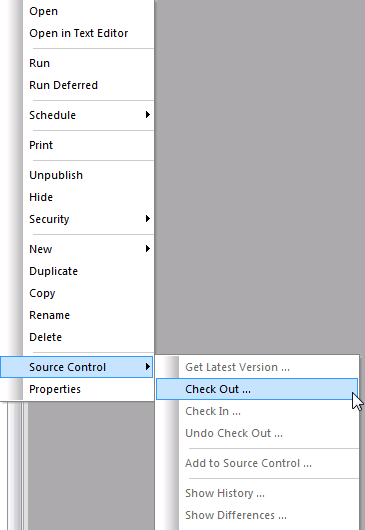
- To check out a file for editing, right-click
the file and select Source Control from the shortcut
menu.
The Source Control shortcut menu displays.
- Select Check Out from the shortcut
menu, as shown in the following image.
The Check Out dialog box opens, as shown in the following image.
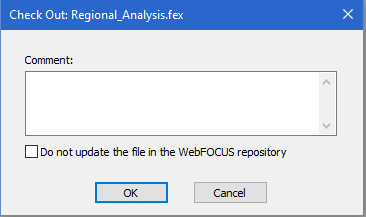
- Select Do not update the file in the WebFOCUS repository to only mark the file as checked out and not update the file
currently in the WebFOCUS repository with the version of the file
that is in the Source Control database. This allows you to preserve changes
that are made to the WebFOCUS version of the file. A later check in
operation will update the Source Control file with the one from
WebFOCUS.
Optionally, you may type a comment describing
your edits and click OK.
The Check Out dialog box closes, and the file is marked as checked out in App Studio and in the Source Control repository. The Source Control Status property value in the File/Folder Properties panel is Checked out by <user name>, as shown in the following image.
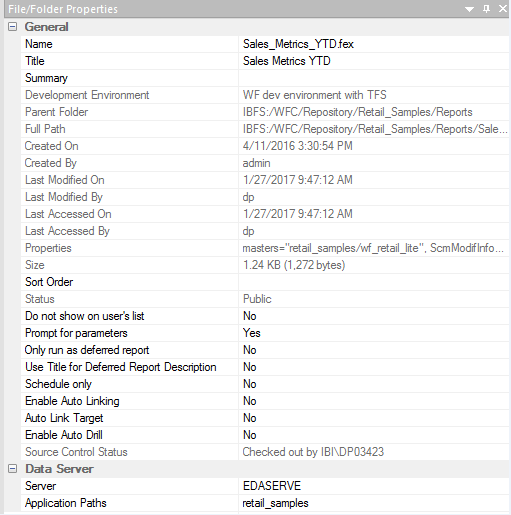
Note: If the Check Out option is not available from the shortcut menu, it means that another user has checked out the file. To verify this, open the File/Folders Properties panel. The Source Control Status property value is Checked out by <user name>.
- To check the file in after making edits, save the file, right-click
the file, and then select Source Control from
the shortcut menu.
The Source Control shortcut menu displays.
- Select Check In from the shortcut
menu.
The Check In dialog box opens, as shown in the following image.
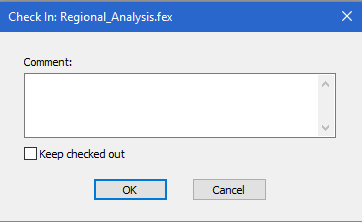
- Select Keep checked out to update the file in Source Control and keep the
file as checked out. Optionally, you may type a comment describing
your edits and click OK.
The Check In dialog box closes.
- Close the file.
To verify, open the File/Folders Properties panel. The Source Control Status property value is Added to Source Control.
Reference: Source Control Status
The following are the Source Control status values that display in the App Studio File/Folder Properties panel:
- Connection to Source Control is not available
- Added to Source Control/Bound to a Source Control project (folder level)
- Source Control status was not retrieved for the selected item/Not bound to a Source Control project (folder level). This occurs when a folder has not been added to Source Control or has been unbound.
- Added to Source Control (file level)
- Not added to Source Control (file level)
- Source Control status was not retrieved for the selected item (file level).
- File type not supported by the WebFOCUS Source Control system
- Checked out by <user name>. This status displays for the current user and also for an exclusive check out by another user.
Procedure: How to Undo a Check Out From Source Control
If you decide that you do not want to make changes to a file, you can undo its check out from Source Control.
- To undo a check out, right-click
the file and select Source Control from the shortcut
menu.
The Source Control shortcut menu displays.
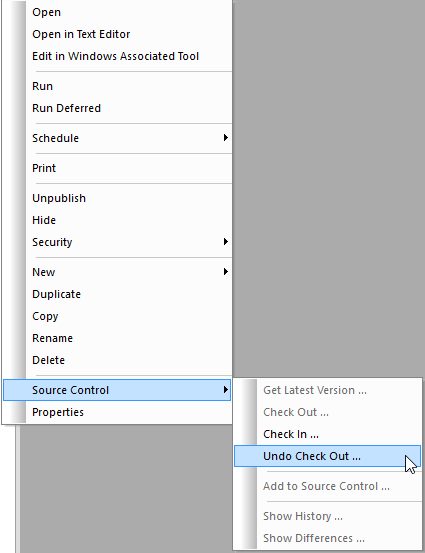
- Select Undo Check Out from the shortcut
menu, as shown in the following image.
The Undo Check Out dialog box opens, as shown in the following image.
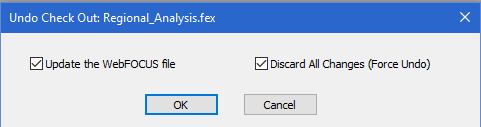
- If you select Update the WebFOCUS file, if the WebFOCUS file is different than the one in Source Control, the WebFOCUS copy gets replaced with the latest version of the file from the Source Control database. This is ignored if the WebFOCUS file has not changed.
- If you select Discard All Changes (Force Undo), it forces an undo check out if the file in the WebFOCUS repository is different than the latest version of the file in the Source Control database.
Note: Keeping the default options ensures that all changes will be discarded.
Procedure: How to Retrieve the Latest Version of a Folder or File
You can retrieve the latest version of a folder or file from the Source Control database and update the file in the WebFOCUS repository.
- To retrieve the latest version of a folder, right-click the folder and select Source Control from the shortcut menu.
The Source Control shortcut menu displays.
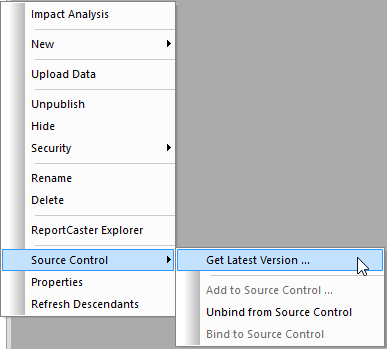
- Select Get Latest Version from the shortcut menu, as shown in the following image.
The Get Latest Version dialog box opens, as shown in the following image.
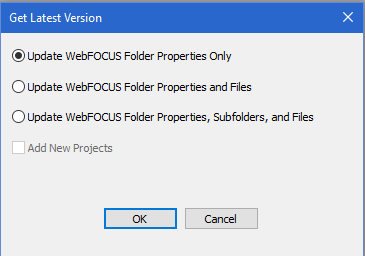
- Select one of the following options:
- Update WebFOCUS Folder Properties Only to update WebFOCUS folders only.
- Update WebFOCUS Folder Properties and Files to update WebFOCUS folders and children (files under the selected folder), using the latest version from Source Control.
- Update WebFOCUS Folder Properties, Subfolders, and Files to update WebFOCUS folders, children (files under the selected folder), and subfolders, using the latest version from Source
Control.
Note: If you select this option, the Add New Projects check box is activated. Use this option if you have a folder or file that is in Source Control that you want to add back to WebFOCUS.
You can also use this option to get an entire new project from Source Control to WebFOCUS (the folder does not exist in WebFOCUS). To do this, create an empty folder in WebFOCUS that exactly matches the name and case of the folder name in Source Control. On the Get Latest Version dialog box, select the Update WebFOCUS Folder Properties, Subfolder, and Files and Add New Projects options.
Procedure: How to View the History for a Specific File
Using the History feature, you can view information about a file, such as version history, date of creation or modification, and other details. You can also compare two versions of a file.
- To view information about a file, right-click the file and select Source Control from the shortcut menu.
The Source Control shortcut menu displays.
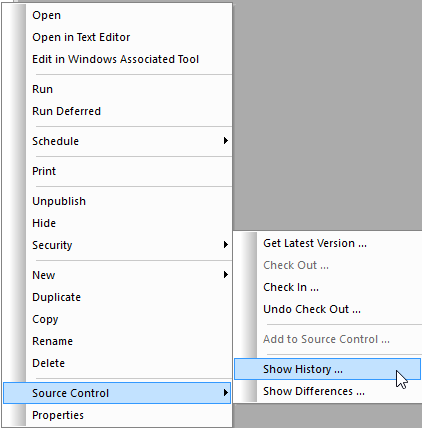
- Select Show History from the shortcut menu, as shown in the following image.
 This History dialog box opens, as shown in the following image.
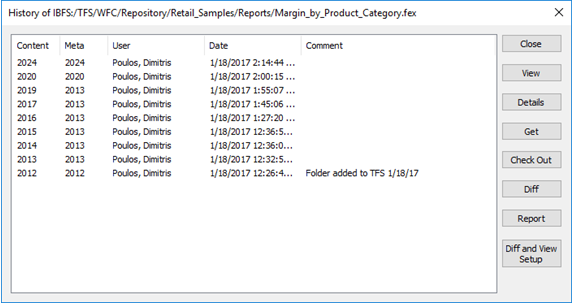
The following table describes the options that are available on the History dialog box.
Button Description Close
Closes the History dialog box. This option is always enabled.
View
Opens the selected version of the file in an editor. This option is disabled for multi-select. The viewer program can be set by a user, and is defaulted to notepad.exe.
Details
Displays the summary of a selected revision in a viewer. The same viewer is used for the View option. This option is disabled for multi-select.
Get
Updates the WebFOCUS version with the selected revision. This option is disabled for multi-select.
Check Out
Checks out the selected revision. This option is disabled for multi-select.
Diff
Enables you to compare two versions of a file from Source Control:
- If a single row is selected, the selected revision and current WebFOCUS version will be compared.
- If two rows are selected, the two selected revisions will be compared.
The diff program can be set by a user, and is defaulted to fc.exe. Batch program RunFC.bat, located in the bin folder, is used to perform the file comparison.
Report
Displays a summary for all of the revisions. The same viewer is used for the View option. This option is always enabled.
Diff and View Setup
Opens the History Viewer and Diff Setup dialog box, which enables you to configure the editor and application used as a Compare tool. This dialog box includes edit input controls for specifying the following:
- Text Viewer Command Line for viewing text content.
- Binary Viewer Command Line for viewing binary content.
- Text Diff Command Line for viewing the difference between text content.
- Binary Diff Command Line for viewing the difference between binary content.
For more information, see Diff and View Setup Dialog Box.
Reference: Diff and View Setup Dialog Box
The Diff and View Setup dialog box is shown in the following image.
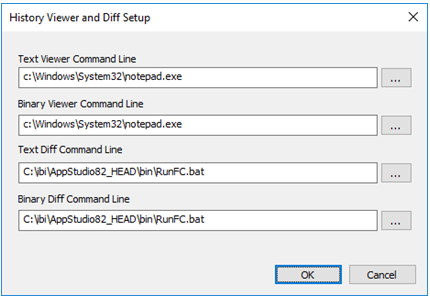
You can type, copy-and-paste, or click the browse buttons located next to the edit controls to update the configuration and specify other programs. The browse buttons open the standard Windows Files Open dialog boxes.
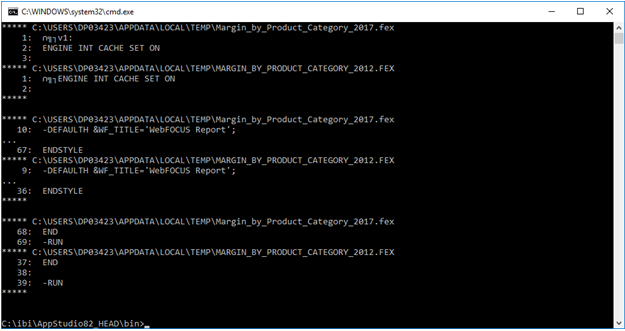
By default, the product is configured to use the Windows built in editor notepad.exe. For compare, file RunFC.bat is configured to use the Windows fc.exe Compare tool and passes as arguments the two selected versions of the file, in addition to setting arguments /A and /N.
where:
- /A
-
Abbreviates the output of an ASCII comparison. Instead of displaying all of the lines that are different, fc displays only the first and last line for each set of differences.
- /N
-
Displays the line numbers during an ASCII comparison.
Performing a diff with these options displays the output in a command window, as shown in the following image.
Optionally, you can customize the Compare tool and editor. The Compare application you select needs to support the running from a command window and allow a user to pass, as input, the file names to be compared, for example, as done in RunFC.bat and the new sample Compare.bat.
The following example uses Notepad++ as the editor and Compare.bat as a new batch file that is configured to use the Compare tool KDiff3, as shown in the following image.
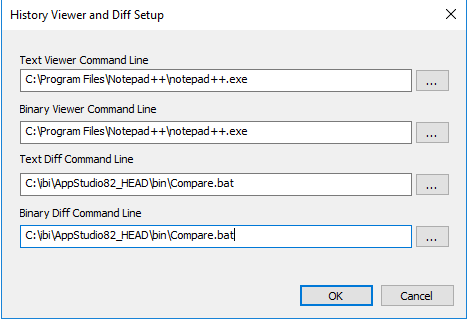
The following is in the compare.bat file:
ECHO OFF
cls
cmd /K "C:\Program Files (x86)\KDiff3\kdiff3.exe" %1 %2
The following image shows an example of a diff request using the above configuration.
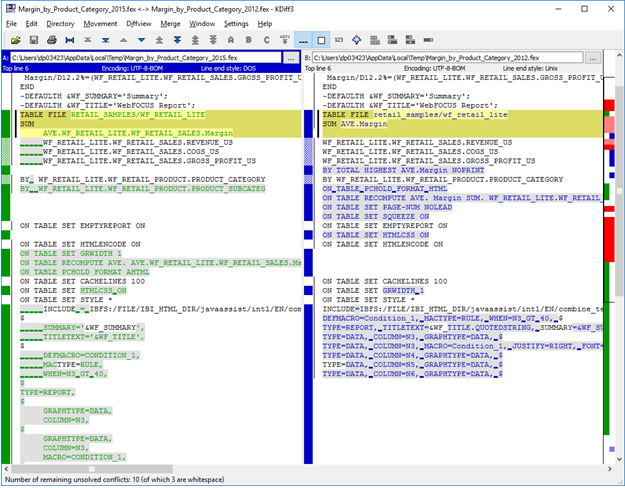
Note: This process opens a command window that needs to be closed manually.
Procedure: How to Show Differences Between WebFOCUS and Source Control Files
You can show the difference between a file in WebFOCUS and the file in the Source Control database.
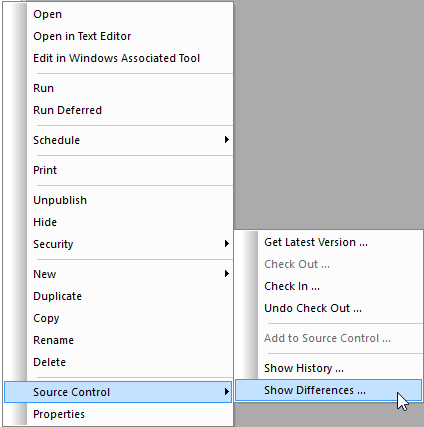
- To show differences between files, right-click the file and select Source Control from the shortcut menu.
The Source Control shortcut menu displays.
- Select Show Differences from the shortcut menu, as shown in the following image.
- If there are no differences between the files, you will receive a no difference encountered message.
- If there are difference between the files, the differences display in the Compare tool that is configured on your machine.
Note: Files for comparison get downloaded to the local temp folder on the user machine. For example, %LOCALAPPDATA%\Temp, which is mapped to C:\Users\<username>\AppData\Local\Temp.
Reference: Supported Source Control Operations
Folder Level Operations
- Get Latest Version. Select this option to retrieve the latest version of the folder from the Source Control database and update the folder properties in the WebFOCUS repository. This also contains options to update folders and files and to retrieve new files.
- Add to Source Control. This is the first operation to add folders or files to Source Control.
- The Include Subfolders option adds all items, including subfolders and files in these folders, to the Source Control database.
- Bind to Source Control. Associates the WebFOCUS item with a copy in the
Source Control database.
- This is needed to perform further commands, such as Check In, Check Out, and Get.
- The Bind to Source Control option is enabled only when a folder is added to Source Control and it is later unbound.
- Unbind from Source Control. Select this option to disassociate the connection of the WebFOCUS item
with the copy in the Source Control database and disable all
Source Control commands.
Note: Unbind does not remove the item from the Source Control database.
File Level Operations
- Get Latest Version. Select this option to retrieve the latest version of the file from the Source Control database and update the file in the WebFOCUS repository.
- Check Out. To make changes to a file in Source Control, you must first check it out of the Source Control database.
The Check Out option retrieves the latest version of the selected file and allows you to edit it.
You can control the replacement of the local WebFOCUS file copy by selecting Do not update the file in the WebFOCUS repository. When this option is selected, the file is only marked as checked out and it does not update the file currently in the WebFOCUS repository with the version of the file that is in the Source Control database. This allows you to preserve changes that are made to the WebFOCUS version of the file. A later check in operation will update the Source Control file with the one from WebFOCUS.
- Check In. Select this option to return a checked out file to the Source Control database. Source Control stores any changes made to
the file in the database.
- The Keep checked out option updates the file in Source Control and keeps the file as checked out.
- Undo Check Out. Select this option to reverse a check out and cancel any changes made to a file in your working area.
- If you select the Update the WebFOCUS file option, if the WebFOCUS file is different than the one in Source Control, the WebFOCUS copy gets replaced with the latest version of the file from the Source Control database. This is ignored if the WebFOCUS file has not changed.
- If you select the Discard All Changes (Force Undo) option, it forces an undo
check out if the file in the WebFOCUS repository is different than
the latest version of the file in the Source Control
database.
Note: Keeping the default options ensures that all changes will be discarded.
- Add to Source Control. This is the first operation to add folders or files to Source Control.
- The Include Subfolders option adds all items, including subfolders and files in these folders, to the Source Control database.
- Show History. Select this option to view information about a file, such as version history, date of creation or modification, and other details. This also enables the comparison of two versions of the file.
- Show Differences. Allows a comparison between the file in WebFOCUS and the file in the Source Control database.
| WebFOCUS | |
|
Feedback |