Viewing Object Attributes
|
Topics: |
|
Reference: |
The Properties panel shows the attributes of the object or objects selected on the canvas. For example, if you select a hyperlink object, the Properties panel shows the different attributes associated with a hyperlink, such as Enable Dragging. General attributes for the entire HTML page or Document are shown when no object is selected. The Properties panel is available when you are using the HTML canvas or Document canvas. The attributes can be sorted by category or alphabetically.
You can also select Events. When Events is selected, a list of all available JavaScript events that can be used in conjunction with an object appears. The events that are available change depending on what type of object is selected. For example, a report object has different events available than a button object. When no object is selected, events for the HTML page are displayed. Double-clicking on an event will create a function block for the selected object, using that event. You can view the created functions in the Embedded JavaScript and Embedded CSS tabs, where you can type the JavaScript code to execute when the selected event occurs.
For more information on customizing the Properties panel, see Customizing the Properties Panel for HTML Objects Using the Properties Toolbar.
Color Selection
For properties that affect color, such as Background-color, Border-color, and Color, you can enter the hexadecimal value of the color you want to use directly into the property, rather than opening the Color Picker dialog box. If you use the Color Picker dialog box to select a color, the hexadecimal value of that selected color will be entered into the selected property. For more information on the Color Picker dialog box, see Color Picker Dialog Box.
Sizing
Size property fields for a selected object can be set using the Left, Top, Width, and Height fields. The default setting is in pixels (px), and the settings are also displayed in the Locations field. You can also select <Not set>, auto, or inherit in the Left, Top, Width, and Height fields but only pixels are displayed in the Location field.
The Position field also contributes to the location of an object in the HTML canvas. The default value is absolute, but you can change it to one of the values in the list below:
- <Not Set>. The element is positioned relative to its first positioned (not static) ancestor element.
- inherit. Inherits this property from its parent element
- absolute. The element is positioned relative to its first positioned (not static) ancestor element. This is the default value.
- fixed. The element is positioned relative to the browser window.
- relative. The element is positioned relative to its normal position, so setting the Left field to 20px adds 20 pixels to the elements left position.
- static. Elements render in order, as they appear in the document flow.
- initial. Sets this property to its default value.
Controls
The Name or Unique Identifier attribute settings for controls appear automatically in the Parameters tab of the HTML canvas.
- When you change the Name attribute for a control, the new name automatically appears in the Parameters tab.
- Some controls do not have a Name attribute. For these controls, the Unique Identifier setting automatically appears in the Properties panel instead.
Customizing the Properties Panel for HTML Objects Using the Properties Toolbar
The Properties toolbar contains the buttons and menus that you need to navigate and customize the contents of the Properties panel.
- Categorized
-
Groups the attributes by category.
- Alphabetical
-
Sorts the attributes alphabetically, without categories.
- Properties
-
Shows the property names and values. This is the default setting. Properties and Events cannot be selected at the same time.
- Events
-
Shows the JavaScript events that can be associated with the selected object on the canvas. Properties and Events cannot be selected at the same time.
Resizing HTML Components Using the Autosize Children Option
|
Topics: |
|
How to: |
The Autosize Children option can resize all child components on an HTML page to automatically fit the maximum available screen space on any monitor or device where it might be viewed. For example, a single component will take up one hundred percent of the available space, while two components will take up fifty percent each.
This option is used so that when your HTML page is run on different devices, components and controls do not appear off the screen and have to be scrolled to in order to use them. To accommodate this, the orientation of components may be different on different devices. For example, a report and chart that appear side-by-side when run on a desktop monitor, may appear stacked one above the other when run on a tablet. Similarly, this difference could occur when run on a 24-inch desktop monitor and a 26-inch desktop monitor.
There are autosize Enable properties that work at both the document and component levels:
- Autosize Children Enable. This property is set at
the document level. When set to Yes, it
enables some or all of the child components in the document to resize
automatically.
The Autosize Children Enable property is also available at the component level for the form, group box, and panel container objects.
- Autosize settings Enable. This property is set for each
component in the document. The setting for this option may be:
- Yes. Enables the component to resize automatically.
You can prevent the component from becoming too small using the Min-width and Min-height options. Type the minimum number of pixels for the width, height, or both, in the appropriate fields. When a component reaches the minimum width or height that you specified, a scroll bar appears and the size of the component does not decrease further.
- No. Prevents the individual component from resizing automatically, even when the document and other components resize. Components tagged in this way are rendered first, when the HTML page runs.
- Yes. Enables the component to resize automatically.
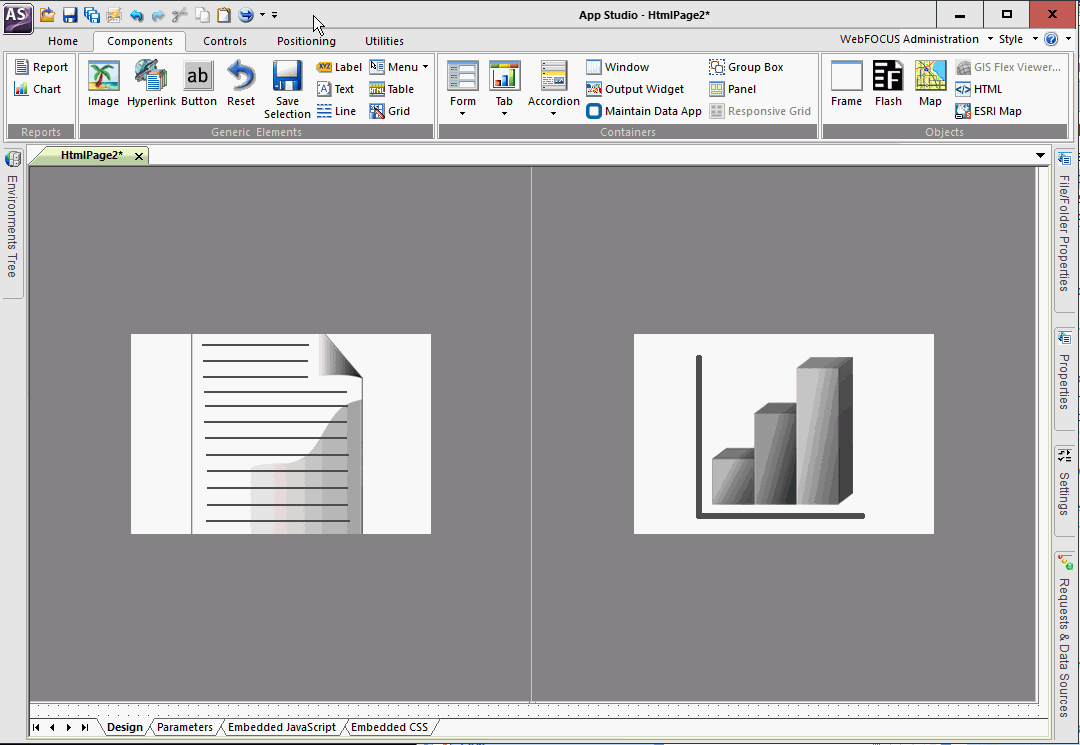
The following image shows a report component and a chart component on the HTML canvas where Autosize Children is enabled. Both components share the available space equally.
You can enable Autosize Children for an existing HTML file or create a new file with the option enabled.
Procedure: How to Enable Autosize Children for an Existing HTML File
- Open the HTML file.
The HTML canvas opens.
- In the Properties panel for the document, set the Autosize Children Enable property to Yes.
- For each component on the page that you want to resize automatically, set the Autosize settings Enable property to Yes.
- Right-click the HTML canvas and click Update Layout.
The components are resized to occupy all of the space on the canvas.
Procedure: How to Create a New HTML File with Autosize Children Enabled
- On the Home tab, in the Content group,
click HTML/Document.
You can also create a new HTML file from the Application menu or by using the shortcut menu in the Environments Tree panel, for a folder that supports content creation.
The HTML/Document Wizard opens.
- Navigate to where you want to create your HTML page and
click Next.
The Themes and Settings window of the HTML/Document Wizard opens.
- In the Other settings area, select the Autosize reports/charts check box.
Selecting this option sets the Autosize Children Enable property for the document to Yes.
- Click Finish.
The HTML canvas opens.
- For each component on the page that you want to resize automatically, set the Autosize settings Enable property to Yes.
Working With Autosize Children
|
Topics: |
|
How to: |
Working with Autosize Children entails some practices and conditions beyond those found in the native HTML canvas. This is because, when Autosize Children is enabled, components automatically move and resize themselves on the canvas.
Adding Components to the HTML Canvas
When you add a component to the canvas with the Autosize Children option enabled, the existing components will temporarily move out of the way so that you can draw the new one. The components will then reposition and resize automatically.
If the screen does not refresh, you can right-click the canvas and click Update Layout. There is a small amount of canvas space shown to the bottom and right of the screen, which allows you to access the shortcut menu. This extra canvas space is not shown at run time.
Note: If Update Layout does not resize the component automatically, check the properties. The Autosize Children Enabled property for the document must be set to Yes, and the Autosize settings Enable property for the component must be set to Yes. Components with an Autosize settings Enable property set to No will not resize automatically on the canvas or at run time.
To change the order of the components, drag a component to the front or to the left of another component.
The following items apply to form, group box, and panel containers:
- Forms, group boxes, and panels that contains components and controls must have the Autosize Children Enable property set to Yes, and the Autosize settings Enable property set to Yes.
- The components that are children of a form, group box, and panel have their Autosize settings Enable property automatically set to Yes. For controls that are children of a form, group box, or panel, you must manually set the Autosize settings Enable property to Yes.
- The form, group box, or panel should have the Number of Columns property set to the value you want. For example, if you want three reports or charts to be next to each other, set the value for the Number of Columns property to 3.
If an object has the Autosize settings Enable property set to No, and you want that object to occupy the entire width of the available space, you must set the Width property to 100%.
Note: Reports and charts do not automatically re-execute once the page loads and the screen size changes. You must re-execute reports and charts to ensure that the content refreshes. If the output format of a chart is HTML5, the chart content refreshes automatically and you will not have to re-execute.
Procedure: How to Add Content Inside a Container
You can easily add content inside a container, such as a panel, in the native HTML canvas. However, if the Autosize Children property is enabled, the container moves when you try to add content to it. To prevent this movement, use the following steps:
- Click to select and freeze the container to which you want to add content.
- On the Components tab, in the Generic Elements group, choose an object, such as a text box, that you want to add to the container.
- Click in the container again to add the element. For example, draw the text box and type the text.
- Click the element to select it.
In the Properties panel, set the Autosize settings Enable property to Yes, if you want the element to resize automatically.
Click No, if you want the element to remain fixed in the container.
- Right-click the canvas and click Update Layout.
The content now appears inside the container.
Working With Containers
If you place an object that has Autosize settings Enable property set to No inside a container that has Autosize Children Enable property set to Yes, the object will move to the upper-left corner of the container.
When a container has Autosize Children Enable property set to Yes, and a report or chart is added to that container, the Autosize Children settings property for the report or chart is automatically set to Yes.
When a Tab, Accordion, or Window container has Autosize Children Enable property set to Yes, and multiple reports or charts are added to it, use the Number of columns property. Select the number of columns you want from the drop-down list and arrange the contents in the container, as desired. This ensures the contents will be arranged the same for all browsers. If you do not use the Number of columns property, different browsers may arrange the contents in different ways.
Reference: Color Picker Dialog Box
The Color Picker dialog box contains the Web Palette tab, Named Colors tab, System Colors tab, and Custom Color tab. From these tabs, you can pick different colors.
-
Web Palette. You can choose a color from common web colors.
-
Named Colors. You can choose a color from common named colors.
-
System Colors. You can choose a color based on the colors of .
-
Custom Color. You can drag red, green, and blue sliders to create custom colors.
The hexadecimal value for any color you select or create is displayed at the bottom of the dialog box. If you want to enter a specific hexadecimal value, you must enter using the Properties panel or the Style Composer dialog box, in the appropriate area. For example, you can enter a hexadecimal value on the Background-color property line.
| WebFOCUS | |
|
Feedback |