Using the Esri HTML5 Viewer
The Esri HTML5 Viewer for is based on the Esri ArcGIS JavaScript API. The ArcGIS JavaScript API is a robust API for creating maps with a variety of symbology options, enabling you to embed maps and tasks in web applications. It is supported on all modern browsers on any device.
The Esri map component allows you to use online content published on ArcGIS Online. ArcGIS Online publishes demographic and feature data that is location related. On the Esri map component, you can place any number of these data layers on top of a base map (background map image) of your choosing, and configure symbols and colors to highlight any relevant information.
You provide the location dimension for drawing map layers from a standard report with XML output.
At run time, the map displays with a set of controls that let you show or hide individual layers, change the basemap, access layer tools, and change the map viewing area. In addition, you can add interactive widgets and other content, including drilldowns to reports and charts, to create complete applications that leverage Esri content.
automatically gives you access to public content from ArcGIS Online. If you have ArcGIS credentials, you can access any additional content for which you are licensed by signing into your ArcGIS Portal.
ArcGIS Portal is software from Esri that you can deploy either on premises or in the cloud. ArcGIS Online is the Esri Software as a Service offering that represents GIS as a Service and is implemented using the same technology as ArcGIS Portal. Portals allow you to publish and share content over the web.
A portal can have users who are unaffiliated with an organization or users who are part of an organization. A portal has users, groups, and content. Users sign in to the portal and create and share content. The system supports different types of items including the following:
- Maps. Web maps can be displayed on all supported platforms (web, mobile, and desktop).
- Layers. Layer types that are supported include feature, map, and image services that can be added as layers in web maps.
- Applications. You can create web and mobile applications whose content is provided by web maps.
- Tools. Your applications can include geocoding, routing, and other task-based services.
- Data files. You can upload, store, download, and, in some cases, activate files to create services (map layers).
In order to run a map in the Business Intelligence Portal, you must configure the properties panel of the HTML page as shown in the following image.

Note that you must set the property Load in iframe object to No. The default value is Yes.
Note: When building HTML pages for mobile devices, please use the Responsive Design Templates available in .
Creating an Esri Component on an HTML Page
|
Topics: |
|
Reference: |
You insert an Esri map component in an HTML page by clicking the Esri Map button on the right end of the Objects group on the Components tab, as shown in the following image.

After clicking the button, use your mouse to draw an area on the HTML Canvas for the map component.
Configuring the Esri Map Component
|
Reference: |
Once you insert the Esri map component into the HTML page, you can configure the following properties and objects.
- The basemap on top of which the feature layers will display.
- Layers (Esri feature layers).
- The map view.
- Geographic role or longitude and latitude for each layer.
- Symbology using colors, shapes, sizes, and images.
The Esri viewer has widgets available at runtime that provide a table of contents (layer list) and a set of tools for making selections and changing the viewing area on the map.
You have the following options for configuring the map component contents.
- A map published on your own portal or on ArcGIS.com.
- The initial spatial extent of the map component (the bounding box for the initial display of the map).
Note: On the Properties panel, the Map type property defaults to Google map. This property is not relevant to an Esri component and can be ignored in this context.
Reference: Choosing a Basemap
The Miscellaneous options on the Properties panel lets you select one of the following default basemaps:
- Light Gray. Provides a light gray neutral background. This is the default basemap.
- Dark Gray. Provides a dark background that allows the focus to be on other layers.
- Imagery. Provides a detailed World Imagery map layer.
- Imagery with Labels. Provides a detailed World Imagery map layer with labels.
- Streets. Provides a multiscale street map for the world.
- Topographic. Provides a topographic map.
- Terrain with labels. Provides a terrain base map with labels.
- National Geographic. Provides a general reference map from National Geographic.
- Oceans. Provides a background designed to be used as a reference map for ocean data.
- Open Street Map. Provides the OpenStreetMap community map layer.
- USA Topo Maps. Presents land cover and detailed topographic maps for the United States. The TOPO maps are seamless, scanned images of United States Geological Survey (USGS) paper topographic maps.
- USGS National Map. Presents a combination of contours, shaded relief, woodland and urban tint, along with vector layers, such as geographic names, governmental unit boundaries, hydrography, structures, and transportation, to provide a composite topographic base map provided by the USGS Topo base map service from The National Map. Data sources are the National Atlas for small scales, and The National Map for medium to large scales.
You can also add a custom basemap, as described in Customizing the List of Basemap Definitions.
Reference: Configuring Whether Selections on a Map Are Required to Run a Request
When selections on a map trigger a request to run, you can configure whether clearing the selections reruns the request. To specify whether to rerun the request, use the Selection Required property on the Properties panel for the map object.
- "Selection Required" = yes runs the request only when features have been selected on the map. When you click Clear Selection in the Selection Widget, the request is not run again
- "Selection Required" = no always runs the request. When you click Clear Selection in the Selection Widget, the request is run again
Reference: Defining the Esri Component Layers
To define the layers that will display on your map component, you use the ESRI Object Settings panel, shown in the following image:

On this panel, you configure:
- The layers that will display
on your map component.
Add a layer by clicking the New Layer icon at the top of the panel, and remove a selected layer by clicking the X at the top of the panel. You can change the default layer name by selecting the default name, clicking it, and typing over it when the edit box displays.
- The visualizations for each layer.
- The symbology used for each layer.
Using the arrow keys at the top of the panel, you can control the order of layers on the resulting map.
Configuring a Map Data Layer
For each data layer that you place on your map component, you create an external request that generates location or point values and any other values you want to use on your layer. The request must provide these values to the browser in XML format. You add this request to the map component in the Requests & Data Sources panel.
In the top section of the ESRI Object Settings panel, you configure the geographic role, the external request to be used for the geographic values of interest, and attributes for the layer.
Descriptions of the layer settings in the ESRI Object Settings panel follow.
- Layers
-
Description. Is a unique name for the layer.
Type of field. Textfield VARCHAR2(20).
Required? Yes.
Populated by. User.
Limits. Maximum length = 20 characters. Special characters (' " \ / * + ? ^ $ [ ] ( ) { } < > | & ,) are not allowed.
Example. Customer
- Request
-
Description. Name of the request that provides locations or points.
Type of Field. Drop-down list.
Required? Yes.
Populated by. System defined.
Limits. Defined earlier in the Requests & Data Sources panel to an external Procedure that outputs the values to the browser in XML format.
Example. customer_locations
- Geographic Role
-
Description. Geography lookup column. For more information, see Using Geographic Roles.
Type of Field. Drop-down list.
Required? Yes.
Populated by. System Defined.
Limits. Choices are:
- Point of Interest (Latitude/Longitude)
- City
- Continent
- Country (Name)
- Country (ISO-3166-2 code)
- Country (ISO-3166-3 code)
- Country (NUTS level 0) (Name)
- Country (NUTS level 0) (NUTS code)
- Region (NUTS level 1) (Name)
- Region (NUTS level 1) (NUTS code)
- Province (NUTS level 2) (Name)
- Province (NUTS level 2) (NUTS code)
- District (NUTS level 3) (Name)
- District (NUTS level 3) (NUTS code)
- Postal Code
- State (Name)
- State (ISO subdivision code)
- US city (Name)
- US city (FIPS code)
- US county (Name)
- US county (FIPS code)
- US state (Name)
- US state (Abbreviation)
- US state (FIPS code)
- US postal code (3 digits)
- US postal code (5 digits)
- You can also add a custom geographic role, as described in Adding Custom Geographic Roles. Private custom geographies will only be available after authenticating against ArcGIS Online or Esri on Premise credentials.
Example. Latitude/Longitude
- Column(s) that match the role
-
Description. Column or columns in the request that will provide values for the geographic role.
Type of Field. Drop-down list box.
Required? Yes.
Populated by. System Defined.
Limits. Must be fields that are available in the request.
Example. LATITUDE/LONGITUDE
- Unique ID
-
Description. This is the field that will be used as a parameter for other requests.
Type of Field. List box.
Required? Yes, for Point of Interest layers, no otherwise.
Populated by. System defined.
Limits. Must be a field available in the request.
Example. ID_CUSTOMER
- Layer Attributes
-
Description. These are fields in the request that will appear in popups when a point or location is clicked and the Enable Popups visualization is turned on. You can multi-select fields using the Shift key and Ctrl key. Click the green button at the bottom to apply your selections, or the red button to cancel your selections. The selection dialogue box is shown in the following image.

Note: In order to display customized names rather than field names in the popup, the custom names must be defined with the TITLE attribute in the Master File. The TITLE attribute cannot contain any commas. Using an AS name in the request to create a custom name is not supported in the infoWindow.
Type of Field. List box.
Required? No.
Populated by. System defined.
Limits. Must be fields available in the request.
Example. COGS_US
Example: Configuring a Point of Interest Map Layer
This example configures a map layer using longitude and latitude point values that come from an external request named customer_locations.fex.
You can create a request using the Report Canvas or by entering request syntax in the Text Editor. For information about creating a report request using the Report Canvas, see Creating Reports in WebFOCUS App Studio.
Following is the syntax for the customer_locations procedure. Note that the fields that return the longitude and latitude values must be named LONGITUDE and LATITUDE, and that a request that returns these values for the geographic points must also have a unique ID field, in this case ID_CUSTOMER. The values must be returned to the browser in XML format. Paste this procedure into the Text Editor and save it as customer_locations.fex:
TABLE FILE WF_RETAIL_LITE
PRINT ID_CUSTOMER
     COGS_US
     QUANTITY_SOLD
     COMPUTE LONGITUDE/D12.2 =CUSTOMER_LONGITUDE;
     COMPUTE LATITUDE/D12.2 = CUSTOMER_LATITUDE;
BY   STATE_PROV_NAME
BY   ID_CUSTOMER NOPRINT
WHERE COUNTRY_NAME EQ 'United States';
ON TABLE PCHOLD FORMAT XML
END
First, add the external procedure customer_locations.fex to the HTML page using the Requests & Data Sources panel, as shown in the following image:

Next, use the Settings panel to configure the map layer. The layer uses the default visualizations and symbology, so only the top portion of the ESRI Object Settings panel needs to be configured.
Each layer has a default name. To change the layer name, select and type over the default name. The geographic role to use when you provide latitude and longitude values in your request is called Point of Interest. The following image shows the configured Customers layer with the layer name changed and the geographic role configured:

Note: For any Spatial Coordinate System under Layer Settings other than 4326 for a point of interest layer, please use an internally hosted Geometry Service. This will require projection on the fly. For more details about Geometry Service please see http://server.arcgis.com/en/server/latest/publish-services/linux/about-the-geometry-service.htm.
Run the HTML page. The output is shown in the following image:

Example: Configuring a US State Map Layer
This example configures a map layer using U.S. state names.
You can create a request using the Report Canvas or by entering request syntax in the Text Editor. For information about creating a report request using the Report Canvas, see Creating Reports in WebFOCUS App Studio.
Following is the syntax for a procedure that returns the state name for U.S. states. Paste this procedure into the text editor and save it as customer_states.fex.
TABLE FILE WF_RETAIL_LITE
SUM QUANTITY_SOLD
BY STATE_PROV_NAME
WHERE COUNTRY_NAME EQ 'United States'
ON TABLE PCHOLD FORMAT XML
END
First, add the external procedure customer_states.fex to the HTML page using the Requests & Data Sources panel.
Next, use the Settings panel to configure the map layer. The layer uses the default visualizations and symbology, so only the top portion of the ESRI Object Settings panel needs to be configured.
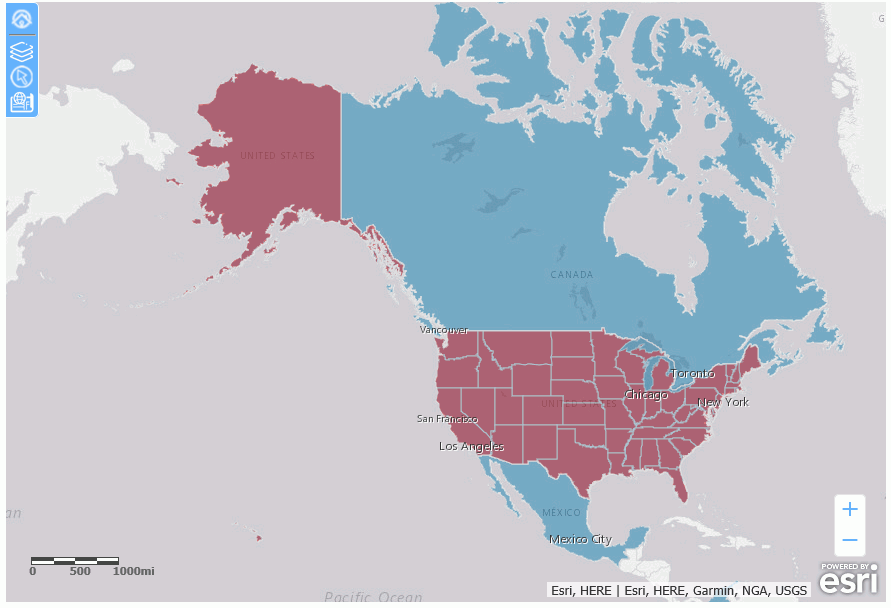
Each layer has a default name. To change the layer name, select and type over the default name. The geographic role to use when you provide U.S. state names in your request is called US state (Name). The field in the request that matches the geographic role is STATE_PROV_NAME. The following image shows the configured CustState layer:

Run the HTML page. The output is shown in the following image:

Adding a Demographic Layer to a Map
|
How to: |
Esri demographic data enables you to add info-layers to a map that provide global demographic, spending, lifestyle, and business data on your map application.
Procedure: How to Configure a Demographic Layer on an Esri Map
Once you have added an Esri map component to your HTML page, you can add one or more preconfigured demographic layers.
- In the Settings panel for the Esri map component, click the arrow next to the New Layer icon and select Demographic Layer, as shown in the following image.

The layer is created with a default name. You can rename the layer by clicking in the default name and typing a new name.
- Select a type of demographic layer from the Layer group pull-down list, as shown in the following image.

- Select a layer name from the Layer name pull-down list, as shown in the following image.

Note: If the layer is not freely available from Esri, you will be asked to provide your Esri credentials before the layer can be added to the map.
- Configure the layer visualizations you require, such as the transparency of the layer and the default visibility.
- Save the HTML page.
When you run the HTML page, the demographic layer is added to the map output, as shown in the following image.

Note: You may need to adjust the transparency values for each layer to make them all visible.
- To open the demographic layer table of contents open the Change Base Maps widget and select the Info Maps tab, as shown in the following image

The following options are available on the Info Map table of contents.
Description
Icon Example Toggle Layer Legend
This icon toggles the legend on and off.


Show Description
This icon toggles a layer description on and off.


Visibility
This icon toggles the layer visibility on and off.

Using Map Widgets
|
Topics: |
|
Reference: |
When you generate a map, a set of map widgets is generated that let you interact with the map output. The following table describes each widget.
|
Widget Name |
Image |
Description |
|---|---|---|
|
Default Extent |
|
Toggles between the default extent (entire layer) and the extent that includes the majority of points for the layer. |
|
Table of Contents |
|
Opens a list of layers, their properties, and an icon for opening a set of layer tools. The tools differ depending on the type of layer. In the layer list, this widget toggles between showing the list and hiding the list. |
|
Selection Tools |
|
Provides selection tools and options based on the layer type. |
|
Change Base Map |
|
Opens thumbnails of the available map base layers and lets you select a new one, as shown in the following image.  |
|
Find my location |
|
Zooms the map to your current location. Note: If you use Chrome 50 or higher from an unsecured connection (for example, http instead of https), the GeoLocation Widget will not find your location. Chrome no longer supports obtaining the location using the HTML5 Geolocation API from pages delivered by non-secure connections. |
|
Zoom in |
|
Increases the zoom level. |
|
Zoom out |
|
Decreases the zoom level. |
|
Close |
|
Closes the widget. |


Reference: Layer Tools and Options
The following shows the options for a polygon layer in the table of contents:

The following shows the options for a point layer in the table of contents:

The visible icons when you first open this widget are:
- A polygon or point, which identifies this layer as a layer with polygon or point geometry.
- A check box for showing or hiding the layer on the map.
- The layer name.
- The Show Tools icon. Clicking this icon toggles the tools widgets on and off.
The following image shows the table of contents widget with the tools widgets toggled on:

|
Option Name |
Image |
Description |
|---|---|---|
|
Show tools |
|
Toggles the layer tools widgets on and off. |
|
Toggle layer legend |
|
Toggles the layer legend on and off. The layer legend shows the fields, markers, colors, and sizes represented on the map layer. For example:  |
|
Toggle options |
|
Shows or hides the layer visualization options. |
|
Zoom to layer extent |
|
Zooms to the extent configured for the layer. |


The following layer options are available.
|
Option Name |
Image |
Description |
|---|---|---|
|
Opacity slider |
|
Enables you to adjust the layer transparency. |
|
Cluster (points only) |
|
Click the button to invoke clustering (markers are combined into cluster markers, depending on the range of points they represent and the zoom). A green button on the right shows that this option is selected, and an icon displays on the layer table of contents. |
|
Heat layer (points only) |
|
Click the button to draw a heat map depicting the concentration of points. The areas of highest concentration will be red, the next highest will be yellow. A green button on the right shows that this option is selected. |


The following image shows cluster markers. The points are categorized into ranges and the cluster markers are colored according to the range of points they represent.

The following image shows a heat layer.

Reference: Selection Tools and Options
The selection widget has a drop-down list for selecting the layer on which to make a selection.
The following image shows the selection tools for a polygon layer.

The following image shows the selection tools for a point layer.

The following selection tools and options are available.
|
Option Name |
Image |
Description |
|---|---|---|
|
Zoom to layer extent |
|
Zooms to the extent configured for the layer. |
|
Select features within an extent |
|
Selects map points or locations included in a rectangle. To draw a rectangle, drag from the starting position to the ending position on the map and release the mouse pointer. |
|
Select features within a polygon |
|
Selects map points or locations included in a polygon. To draw a polygon, click each position on the map where you want a vertex. Double-click to complete the polygon at the last vertex you want to add. |
|
Select features within a distance (point geography only) |
|
When this option is selected, a distance text box opens. You can select miles or kilometers from a drop-down list, and enter a distance. For information, see Changing Default Distance Settings From Miles to Kilometers. When you double-click a point, the map zooms to show the points at that distance around the selected point. Note: There is no validation of the characters you enter in the text box. Make sure you enter valid numbers. |
|
Select features intersecting a line (polygon geography only) |
|
Selects polygons that intersect a line. To draw a line, click at the starting position, and double-click at the ending position. |
|
Select features to delete |
|
Deletes previously selected points or locations within a rectangle that you draw over selected points or locations. |
|
Pan |
|
Switches from making selections to panning when you click and drag on the map layer. |
|
Clear selection |
|
Clears all selections. Note: If making selections triggers a report to run, you can specify whether the report should be rerun when the selections are cleared. For details, see Configuring Whether Selections on a Map Are Required to Run a Request. |
|
Zoom to Selection |
|
Identifies the number of points or locations selected. If you click this button, the map zooms in to the selection. |


Reference: Changing Default Distance Settings From Miles to Kilometers
In the Esri Viewer Selection widget, you can select features within a distance of a point you select on the map, as shown in the following image.

Although you can select either the miles or kilometers distance unit from the drop-down list in the widget, the default unit in which the distance is shown is determined by your browser locale settings. For example, if your browser language is United States English, the distance will be shown as miles, but if your language is Australian English or United Kingdom English, the distance will be shown as kilometers.
For information about configuring locale settings in your browser, see the help content for your browser.
Configuring the Map Menu
|
Reference: |
You can change background and hover colors of icons in the map menu by editing the .css classes that represent the menu components. To edit the .css class definitions, you can use the Embedded CSS tab on the HTML page that contains the map component or reference an external .css file.
To embed .css classes in the HTML page, click the Embedded CSS tab at the bottom of the HTML page. The default embedded CSS tab is shown in the following image.

Add your customized classes outside of the .internal_default class (for example, starting on line 3).
To create a new .css file, right-click an application in a domain, point to New, and select Cascading Style Sheet from the context menu, as shown in the following image.

The new .css file opens, as shown in the following image.

Add your customized classes outside of the body tag (for example, starting on line 4).
After you save the .css file, you can reference it in the HTML page:
- Click on the HTML page outside of any of its components.
- Open the Settings panel and click the .css icon, as shown in the following image.

The Open File dialog box opens.
- Navigate to the application that contains the .css file, select the .css file, and click OK.
The .css file is added to the CSS Files list in the Settings panel.
Reference: Map Menu Classes
This section describes the classes that color the map widgets. You can type them into the Embedded CSS tab of the HTML page that contains the map, or you can access an external .css file.
If you add them to an external .css file, place them outside of the body tag.
The following table lists the map menu classes with an image of the map menu component affected by that class. The affected areas are outlined in or colored red.
|
Class Name |
Class Description |
Class Image (Outlined in or Colored Red) |
|---|---|---|
|
.mainMenuColor |
Main menu container colors |
 |
|
.HomeButton |
Home button hover color |
 |
|
.layersWidget |
Layers (Table of Contents) button hover color |
 |
|
.selectionWidget |
Selection button hover color |
 |
|
.basemapBtn |
Basemap button hover color |
 |
|
.LocateButton .zoomLocateButton |
Locate button hover color |
 |
|
.lyrCheckBoxColors |
Check boxes to turn layers on and off in Table of Contents |
 |
|
.lyrContainerColors |
Color of each layer container in the Table of Contents widget |
 |
|
.optionsListColors |
Layer options box container background color |
 |
|
.stContentColor |
Selection tools content background color |
 |
|
.selectionInfoColors |
Number of selected features box |
 |
|
.tabsHeaderColors |
Background color of Basemaps and Info Maps tabs |
 |
|
.imTabsTitlesColors |
Button color of Basemaps and Info Maps tabs |
 |
|
.imContentColor |
Background color of the Basemaps and Info Maps content area. |
 |
|
.imActive |
Color of the active button, either the Basemaps and Info Maps tab |
 |
|
.dojoxFloatingPaneTitle |
Background and border colors of the title pane of all widgets |
 |
|
.esriPopup .titlePane |
Background color of the title pane in the Esri pop-up window |
 |
|
.tocContentColor |
Background color of the content area in the Table of Contents widget |
 |
|
.WidgetOn |
Color of any button in the main menu when its corresponding widget is active |
 |
Reference: Default Map Widget Class Definitions
The following syntax shows the .css definitions for the colors of the components in the map menu. You can replace any color definition using a hexadecimal color value, an RGBA color value, or a color name. Some classes contain multiple background color properties in order to support browsers that may require color definitions in different formats (hexadecimal or RGBA). The default color definitions are the same in both formats.
/*MAIN MENU STYLES*/

/*main menu container colors*/
.mainMenuColor{
    border-color: #FFFFFF;
    border-left-color: #66b2ff;
    background: #66b2ff;
}

/*Color of the home button in the main menu when mouse hovers*/
.HomeButton .home:hover {
    background-color: #5390cf;
    background-color: rgba(83, 144, 207,1);
}

/*Color of the button in the main menu that invokes the table of contents widget when mouse hovers*/
.layersWidget:hover {
    background-color: #5390cf;
    background-color: rgba(83, 144, 207,1);
}

/*Color of the button in the main menu that invokes the selection widget when mouse hovers*/
.selectionWidget:hover {
    background-color: #5390cf;
    background-color: rgba(83, 144, 207,1);
}
/*Color of the button in the main menu that invokes the basemaps widget when mouse hovers*/
.basemapBtn:hover {
background-color: #5390cf;
background-color: rgba(83, 144, 207,1);
}
/*Color of the locate button in the main menu when mouse hovers*/
.LocateButton .zoomLocateButton:hover {
background-color: #5390cf;
background-color: rgba(83, 144, 207,1);
}
/*Color any button in the main menu when its corresponding widget is active*/
.WidgetOn {
background-color: #023858;
background-color: rgba(2, 56, 88,1);
}
/*Color any button in the main menu when its corresponding widget is active and mouse hovers*/
.WidgetOn:hover {
background-color: #023858;
background-color: rgba(2, 56, 88,1);
}
/*background color of the content area in the Table-Of-Contents widget*/
.tocContentColor{
background-color: #c9dbdf;
}
/*style of each layer container in the Table-Of-Contents widget*/
.lyrContainerColors{
background-color: white;
border-color: #00b2f3;
color: #66b2ff; /*text color. All child nodes will inherit this color*/
}
/*check boxes to turn On and Off layers in Table-Of-Contents widget*/
.lyrCheckBoxColors{
border-color: #66b2ff;
color: #66b2ff;
}
/* layer options box container background color*/
.optionsListColors{
background-color: rgba(243, 10, 21, 0.19);
}/*selection tools content background color*/
.stContentColor{
background-color: #c9dbdf;
}
/*number of selected features box*/
.selectionInfoColors{
color: #cd5c5c;
border-color: #cd5c5c;
}
/*BASE MAPS WIDGET*/
/*basemaps and info-maps tabs background color */
.tabsHeaderColors{
background-color: #66b2ff;
}
/*base-maps and info-maps tabs buttons colors*/
.imTabsTitlesColors{
color: #ffffff;
background-color: transparent;
}
/*base-maps and info-maps tabs buttons active colors*/
.imActive{
background-color: #5390cf;
border: 1px solid white;
}
/*base-maps and info-maps tabs buttons hover colors*/
.imTabsTitles:hover{
background-color: #5390cf;
background-color: rgba(83, 144, 207,1);
}
/*base-maps and info-maps content area background color*/
.imContentColor{
background-color: #00ff00;
}
/*Title pane of all widgets*/
.dojoxFloatingPaneTitle {
background-color: #023858;
border-color: #ffffff;
}
/*title pane in the esri pop-up window*/
.esriPopup .titlePane{
background-color: #66b2ff; !important;
}Example: Changing the Map Menu Background Color
Place the following CSS commands above the .internal_default CSS command on the Embedded CSS tab of the map object to make the background color of the map menu cyan.
.mainMenuColor{
 border-color: #FFFFFF;
 border-left-color: #66b2ff;
 background: cyan;
 }
The menu generated when you run the HTML page is shown in the following image.

Example: Changing the Hover Color of the Home (Default Extent) and Layers Buttons
The following .HomeButton .home:hover class changes the background hover color of the Home (Default Extent) button to orange and the .layersWidget:hover class changes the background hover color of the Layers (Table of Contents) widget to yellow.
.HomeButton .home:hover {
 background-color: orange;
 }
.layersWidget:hover {
 background-color: yellow;
 }
The following image shows the background hover color of the Home button:

The following image shows the background hover color of the Table of Contents button:

Example: Coloring a Button When its Widget is Active
The following .WidgetOn class makes any button green when its widget is active.
.WidgetOn {
  background-color: green;
 }
The following image shows that the Table of Contents widget is green when the Table of Contents is open.

Example: Changing the Background Color of the Table of Contents Content Area
The following .tocContentColor class makes the area directly around the layer container purple.
.tocContentColor{
 background-color: purple;
The following image shows the Table of Contents widget with the background color purple.

Example: Styling the Layer Containers
The following class definition makes the layer container background color yellow, the border orange, and the text red.
.lyrContainerColors{
 background-color: yellow;
 border-color: orange;
 color: red;
The following image shows a layer container whose background color is yellow, border color is orange, and text color is red

Example: Styling the Widget Title Panes
The following class definition makes the background color of the title pane burlywood and the border color navy.
.dojoxFloatingPaneTitle {
 background-color: burlywood;
 border-color: navy;
The following image shows the selection widget. Its title pane has a navy border and burlywood background color.

Example: Changing the Background Color of the Pop-up Window Title Panes
The following class definition makes the background color of the pop-up window title panes magenta.
 .esriPopup .titlePane{
 background-color: magenta;
 !important;
 }
The following image shows a pop-up window with a magenta title pane.

Using Geographic Roles
Geographic roles are configured on the Reporting Server in the home/catalog/geo_services.xml file. A geographic role can be available in multiple formats, such as a name, an abbreviation, an ISO (International Organization for Standardization) code, a FIPS (Federal Information Processing Standards) code, or a NUTS (Nomenclature of Territorial Units for Statistics ) code. For each geographic role and format selected in the ESRI Object Settings panel, the server returns a GEO_ROLE value that will be used to retrieve map data from Esri.
The following table lists the geographic roles and formats configured on the server.
|
ROLE_NAME_TITLE |
ROLE_FORMAT_TITLE |
GEO_ROLE |
|---|---|---|
|
City |
Name |
CITY |
|
Continent |
Name |
CONTINENT |
|
Country (Name) |
Name |
COUNTRY |
|
Country (ISO-3166-2) |
ISO-3166-2 code |
COUNTRY_ISO2 |
|
Country (ISO-3166-3) |
ISO-3166-3 code |
COUNTRY_ISO3 |
|
Country (NUTS level 0) (Name) |
Name |
NUTS0 |
|
Country (NUTS level 0) (NUTS code) |
NUTS code |
NUTS0_CC |
|
Region (NUTS level 1) (Name) |
Name |
NUTS1 |
|
Region (NUTS level 1) (NUTS code) |
NUTS code |
NUTS1_CC |
|
Province (NUTS level 2) (Name) |
Name |
NUTS2 |
|
Province (NUTS level 2) (NUTS code) |
NUTS code |
NUTS2_CC |
|
District (NUTS level 3) (Name) |
Name |
NUTS3 |
|
District (NUTS level 3) (NUTS code) |
NUTS code |
NUTS3_CC |
|
Postal Code |
POSTAL_CODE |
|
|
State |
Name |
STATE |
|
State (ISO subdivision code) |
ISO subdivision code |
STATE_ISO_SUB |
|
US State |
Name Abbreviation FIPS code |
USSTATE USSTATE_ABBR STATE_FIPS |
|
US City |
Name FIPS code |
USCITY USCITY_FIPS |
|
US County |
Name FIPS code |
USCOUNTY USCOUNTY_FIPS |
|
US Postal Code |
3 digits 5 digits |
ZIP3 ZIP5 |
The server also configures the Esri endpoints (URLs) to the map data for each geographic role.
The server adds parameters in the edahome/catalog/geo_services.xml file that will be used for matching the columns in the request to each georole, as described in the following table.
|
Returned Georole |
Description |
Parameter Name |
|---|---|---|
|
CITY |
World Cities |
CITY_NAME ADMIN_NAME CNTRY_NAME FIPS_CNTRY |
|
CONTINENT |
World Continents |
CONTINENT |
|
COUNTRY |
World Countries |
Country |
|
COUNTRY_ISO_CC |
World Countries (by CC) |
ISO |
|
STATE |
World Admin Divisions |
NAME COUNTRY ISO_CC |
|
STATE_ISO_SUB |
World Admin Divisions (by ISO_SUB) |
ISO_SUB COUNTRY ISO_CC |
|
USCITY |
USA Major Cities |
NAME ST |
|
USCITY _FIPS |
USA Cities |
PLACEFIP ST |
|
USCOUNTY |
USA_Counties_Generalized |
NAME STATE_NAME |
|
USSTATE |
USA_States_Generalized |
STATE_NAME |
|
USSTATE_ABBR |
USA_States_Generalized (by abbreviation) |
STATE_ABBR |
|
ZIP3 |
USA ZIP3 |
ZIP3 |
|
ZIP5 |
USA ZIP5 |
ZIP |
Configuring Layer Visualizations
The visualizations available in a map layer depend on the layer type.
The following image shows the Layer Visualizations section of the ESRI Object Settings panel.

A list of layer visualizations you can configure in the Layer Visualizations section of the ESRI Object Settings dialog box follows.
- Clustering
-
Description. Enables clustering (grouping of symbols) on the selected layer.
Type of Field. Boolean.
Populated by. User.
Limits. On/Off. Default is Off.
Example. On
- Transparency
-
Description. Transparency of the layer.
Type of Field. Numeric.
Populated by. User.
Limits. Values 0 - 100. 100 is 100% opaque, and 0 is 100% transparent. Default is 50.
Example. 50
- Add Heatmap
-
Description. Applies to Point of Interest and Cities geographic roles. Colors the areas around the points using a gradient in which the intensity of the color is based on the concentration of points.
Type of Field. Boolean.
Populated by. User.
Limits. On/Off. Default is Off.
Example. Off
- Enable Popups
-
Description. Shows an InfoWindow with the values of the layer attribute fields when a polygon or point is clicked.
Type of Field. Boolean.
Populated by. User.
Limits. On/Off. Default is Off.
Example. Off
- Default Visibility
-
Description. Makes the layer initially visible or not visible.
Type of Field. Boolean.
Populated by. User.
Limits. On/Off. Default is On.
Example. On
- Default Extent
-
Description. If Default Extent is Off, the map view is the extent of the first layer loaded. If it is On, the map view is the full layer. The map extent is determined as follows:
- If there are no layers, the extent is the entire map.
- If any layer is configured with the default extent, the extent is determined by that layer data.
- If there are one or more layers and no layer is configured with the default extent, the extent is determined by the data for the first layer.
Type of Field. Boolean.
Populated by. User.
Limits. On/Off. Default is Off.
Example. Off
- Spatial Coordinate System
-
Description. Is the id of coordinate system used by the procedure to provide geographic data. For information about coordinate systems available with Esri, see https://developers.arcgis.com/javascript/jshelp/ref_coordsystems.html.
Note: For any Spatial Coordinate System under Layer Settings other than 4326, please use an internally hosted Geometry Service. This will require projection on the fly. For more details about Geometry Service please see http://server.arcgis.com/en/server/latest/publish-services/linux/about-the-geometry-service.htm.
Type of Field. ID.
Populated by. User.
Limits. Default option is decimal degrees (id=4326).
Example. 4326
Example: Enabling Clustering
If you turn on Clustering in the Layer Visualizations section of the ESRI Object Settings panel, groups of markers will be combined into one cluster icon, with the number of individual markers included shown on the icon. The markers are categorized into ranges, and the cluster markers are colored according to the range of markers they represent.
Using the customer_locations procedure described in Configuring a Map Data Layer, run the HTML page. The output is shown in the following image:

The clusters change as you zoom the map.
Example: Enabling Popups
When you enable popups in the Layer Visualizations section of the ESRI Object Settings panel, and you click a marker or polygon, an InfoWindow opens that shows additional information for the map layer drawn. This popup is dependent on the layer attributes enabled at design time.
The following image shows an InfoWindow for a marker on the map layer:

Note: In order to display customized names rather than field names in the popup, the custom names must be defined with the TITLE attribute in the Master File. Using an AS name in the request to create a custom name is not supported in the infowindow.
To close the InfoWindow, click the X in the header or click another marker.
Clicking Zoom to zooms in the map to the location of the clicked marker.
Example: Enabling the Default Extent
With the Default Extent visualization Off (the default), the initial view of the layer shows the map view of the data layer defined. If there are multiple data layers, only one layer can have the Default Extent turned on. In this case, the map view will be determined by the map layer that has the Default Extent turned on. If no layer has Default Extent turned on, the extent of the first data layer defined for the map will be used.
The following image shows a map that has two layers, one based on countries, and one based on US states, as shown in the following image.

Running the HTML page shows both layers, with the default extent set by the Countries layer, as shown in the following image.

The following image shows the States map layer with the Default Extent turned on.

The following image shows that the map now zooms to the default extent of the States map layer.
If you have zoomed the map using the zoom controls, you can return to the default extent using the Default Extent control, shown in the following image.

For any layer, you can zoom to the layer extent using the Table of Contents control, shown in the following image.

Configuring Symbology for a Data Layer
The symbology available for a layer depends on the type of layer and on whether the geographic data provided to the layer consists of points (X/Y values in either decimal degrees or other units) or polygons (geographic areas).
When the geographic data consists of points, each point is represented by a marker on the map. Each marker can be drawn using a standard shape or an image file. Markers can be assigned a size and can be colored based on several classification schemes, using any metrics.
When the geographic data defines polygons, the areas on the map representing each polygon can be colored based on several classification schemes, using any metrics. It can have an outline that consists of a color, a thickness, and a line style. It can also have a fill style such as solid, diagonal lines (forward or backward), or crosshatch.
Configuring Symbology for a Point Data Layer
|
Topics: |
Geographical point data places markers on the map layer that can be configured with a wide range of shape, size, color, and image options.
The following image shows the Symbol Settings section of the ESRI Object Settings panel for a point-based data layer. Some selections may open additional options not shown in this image.

The following table summarizes the types of symbology available for a point layer. Each type of symbology is illustrated in one of the sections that follows.
|
Type of Symbol (Subtype) |
Description |
Configuration Fields |
|---|---|---|
|
Single (Shape) |
User selects from a list of marker shapes. |
Use. Selects the type of symbols, Single for this option. Color. User selects a marker color. The default is red. Size. User specifies the marker size in pixels. The default is 12 and the maximum is 99. Shape/Image. Select Shape for this option. Shape. User selects one of the following marker shapes:
For more information, see Configuring Point Symbology Using a Single Standard Shape |
|
Single (Image) |
User provides an image source for the markers. |
Use. Selects the type of symbols, Single for this option. Color. N/A. The image has its own colors. Size. User specifies the marker size in pixels. The default is 12 and the maximum is 99. Shape/Image. Select Image for this option. Image Source. User must provide the path to the image. For more information, see Configuring Point Symbology Using a Single Image File |
|
Color |
User specifies a field to be used to classify marker colors. |
Use. Selects the type of symbols, Color for this option. Using Field. User selects a field in the request to be used to classify the markers by color. By. User selects from the following classification methods.
Number of Classes. User specifies the number of color breaks. The default is 5. Color Scheme. User selects the color palette for the markers. The default uses shades of green. For more information, see Configuring Point Symbology Using Color |
|
Size |
User specifies a field to be used to size the markers. |
Use. Selects the type of symbols, Size for this option. Using Field. User selects a field in the request to be used to classify the markers by size. Color. User selects a color for the markers. For more information, see Configuring Point Symbology Using Size |
|
Dynamic |
The request that provides the location dimension defines the marker properties. |
Use. Selects the type of symbols, Dynamic for this option. Label. User specifies a field in the request that contains the label text for the legend. The default is the AS name, title, or field name. Color. User specifies a field in the request that defines the colors for the markers. Not supported when marker images are used, as each image has its own colors. Size. User specifies a field in the request that defines the sizes in pixels for the markers. The default is 12 and the maximum is 99. Image Source. User specifies a field in the request that contains the path to the marker images. For more information, see Configuring Dynamic Point Symbology |
|
Unique |
User selects marker properties for each value of a dimension in the request. |
Use. Selects the type of symbols, Unique for this option. Using Field. User selects a dimension in the request and assigns marker properties for each value. Size. User specifies a size in pixels for the markers. The default is 12 and the maximum is 99. Shape / Image. User can select a standard shape or specify an image source for the markers. Dimension Values box. A box is populated with the dimension values. The user can select values and move them to the right, then assign marker properties to those selected values. Label. User specifies text to display in the legend for each selected dimension value. Color. If Shape is the selected marker type, the user selects a color for each selected dimension value. Shape. If Shape is the selected marker type, the user selects a standard shape for each selected dimension value. Image Source. If Image is the selected marker type, the user specifies an image source for each selected dimension value. For more information, see Configuring Unique Symbology for Points |
Configuring Point Symbology Using a Single Standard Shape
The default symbol used for points is a 12-pixel red circle, as shown in the following image.

You can open a color picker dialog box by clicking the Color field, can enter a size in pixels, and select a different shape (square, diamond, cross, or X). The maximum size supported is 99.
Example: Configuring Point Symbology Using a Standard Shape
This example uses a blue diamond symbol as the marker. The following image shows the symbol settings. The external request used to provide the point data is the customer_locations procedure created in Configuring a Map Layer. The geographic role is Point of Interest, and the fields that match the role are LATITUDE/LONGITUDE.

Run the HTML page. The output is shown in the following image.

Configuring Point Symbology Using a Single Image File
You can select a valid image file to use as the marker for point data and specify its size, as shown in the following image.

The default size is 12 pixels and the maximum is 99.
Selecting a color has no effect on the output, as the image file is placed on the points with no manipulation, except for size.
The symbol can be located on your machine or at a URL reference.
Example: Configuring Point Symbology Using an Image File
The following example uses a US flag as the symbol for the Customer layer.
In the Symbol Settings section of the ESRI Object Settings panel, select Single in the Use drop-down list and Image in the Shape / Image drop-down list.
Enter the following URL in the Image Source box.
http://ecl.informationbuilders.com/jschart/us.gif
Run the HTML page. The output is shown in the following image.

Configuring Point Symbology Using Color
When you select Color in the Symbol Settings Use drop-down list of the ESRI Object Settings panel, the markers are colored using a choice of color classification systems, as shown in the following image.

- Using Field
-
Description. This is a numeric field in the request whose values will be used by the classification schema to define the class breaks.
Type of field. Combo box.
Populated by. User.
User limitations. User can only select one field. It should be a measure field or numeric.
- Number of Classes
-
Description. This is the number of class breaks that will be rendered.
Type of field. Combo box.
Populated by. User.
User limitations. User can only select values 2 through 9. The default is 5.
- By
-
Description. This is the classification scheme to be used for assigning the breaks and ranges.
Type of field. Drop-down list.
Populated by. User.
User limitations. Choices are:
- Natural Jenks, a classification scheme that uses breaks inherent in the data, grouping similar values and maximizing differences between groups. This is the default choice.
- Quantile, a classification scheme in which each class contains an equal number of points.
- Equal Breaks, a classification scheme that breaks the data into equal ranges of values.
- Standard Deviation, a classification scheme that defines the breaks based on the number of standard deviations from the mean.
- Geometrical Breaks, a classification scheme that bases class breaks on intervals that have a geometrical series.
- Color Scheme
-
Description. This lets you select an array of color values, defining the color ramp. The first color will be used to render the minimum data class, and the last color will be used to render the maximum data class.
Type of field. Drop-down list.
Populated by. User.
User limitations. User can only select one color array. The default array uses shades of off-white and green.
Example: Symbolizing Points Using Color
This example symbolizes the points using color. The external request used to provide the point data is the customer_locations procedure created in Configuring a Map Layer. The geographic role is Point of Interest, and the fields that match the role are LATITUDE/LONGITUDE. This example uses the Natural Jenks color classification scheme based on the COGS_US field, as shown in the following image.

Run the HTML page. The output is shown in the following image.

Configuring Point Symbology Using Size
When you choose Size in the Symbol Settings Use box in the ESRI Object Settings panel, each symbol is sized based on a numeric field in the request. You can also select a single color for the markers, as shown in the following image.

Example: Symbolizing Points Using Size
This example uses the COGS_US field to size the markers and blue to color the markers, as shown in the following image.

The request that provides the values is customer_locations.fex, described in Configuring a Map Data Layer. Run the HTML page. The output is shown in the following image.

Configuring Dynamic Point Symbology
When the symbology for points is Dynamic, you can specify columns in the request that provide labels, colors, sizes, and image sources for the points, as shown in the following image.

Descriptions of the fields available when you select Dynamic in the Symbol Settings Use drop-down list follow.
- Label
-
Description. This column will be used to provide the text in the Legend.
Type of field. Combo box.
Populated by. User.
User limitations. User can only select one column in the layer request.
- Color
-
Description. This column will provide a value for the color of a marker. Any valid color value is accepted for example, RGB, hex, or named. The default is red.
Type of field. Combo box.
Populated by. User.
User limitations. User can only select one column in the layer request. Not supported when the markers are configured as images.
- Size
-
Description. This column will provide a value for the size of a marker in pixels. The default is 12 and the maximum is 99.
Type of field. Combo box.
Populated by. User.
User limitations. User can only select one column in the layer request.
- Image Source
-
Description. This column will provide a value for the image used as a marker. The value needs to be a qualified URL. If no image source is specified, the default marker is a circle.
Type of field. Combo box.
Populated by. User.
User limitations. User can only select one column in the layer request.
Once Image symbology is selected, color and size are disabled.
Note: You cannot type characters in the combo boxes for dynamic symbols. You can only select field names.
Example: Using Dynamic Symbols for Points
This example uses dynamic images, sizes, and labels for points.
You can create a request using the Report Canvas or by entering request syntax in the Text Editor. For information about creating a report request using the Report Canvas, see Creating Reports in WebFOCUS App Studio.
The following procedure dynamically defines fields that supply the labels, sizes, and images for the map points. Paste this procedure into the text editor and save it as customer_locations2.fex.
DEFINE FILE WF_RETAIL_LITE
SIZE1/I4 = IF COUNTRY_NAME EQ 'United States' THEN 25
            ELSE IF COUNTRY_NAME EQ 'France' THEN 20
            ELSE IF COUNTRY_NAME EQ 'Japan' THEN 12
            ELSE IF COUNTRY_NAME EQ 'Italy' THEN 15
            ELSE 10;
LABEL1/A20 = IF COUNTRY_NAME EQ 'United States' THEN 'US'
            ELSE IF COUNTRY_NAME EQ 'France' THEN 'France'
             ELSE IF COUNTRY_NAME EQ 'Japan' THEN 'Japan'
             ELSE IF COUNTRY_NAME EQ 'Italy' THEN 'Italy'
            ELSE 'UK';
IMAGE1/A80 = IF COUNTRY_NAME EQ 'United States'
             THEN 'http://ecl.informationbuilders.com/jschart/us.gif'
             ELSE IF COUNTRY_NAME EQ 'France'
             THEN 'http://ecl.informationbuilders.com/jschart/france.gif'
             ELSE IF COUNTRY_NAME EQ 'Japan'
             THEN 'http://ecl.informationbuilders.com/jschart/japan.gif'
             ELSE IF COUNTRY_NAME EQ 'Italy'
             THEN 'http://ecl.informationbuilders.com/jschart/italy.gif'
             ELSE 'http://ecl.informationbuilders.com/jschart/uk.gif';
END
TABLE FILE WF_RETAIL_LITE
SUM
     WF_RETAIL_LITE.WF_RETAIL_CUSTOMER.ID_CUSTOMER
     WF_RETAIL_LITE.WF_RETAIL_SALES.COGS_US
     QUANTITY_SOLD
     LABEL1 SIZE1 IMAGE1
     COMPUTE LONGITUDE/D12.2 = CUSTOMER_LONGITUDE;
     COMPUTE LATITUDE/D12.2 = CUSTOMER_LATITUDE;
BY COUNTRY_NAME
BY WF_RETAIL_LITE.WF_RETAIL_CUSTOMER.ID_CUSTOMER NOPRINT
WHERE COUNTRY_NAME EQ 'United States' OR 'France' OR 'Italy' OR 'Japan' OR 'United Kingdom';
ON TABLE NOTOTAL
ON TABLE PCHOLD FORMAT XML
END
Add this request to the HTML page using the Requests & Data Sources panel. Then configure the ESRI Object Settings panel to use this request for the Customer layer. Configure the symbol settings by selecting the appropriate fields from the request, as shown in the following image.

The output is shown in the following image, after zooming in to fill the frame. The Legend is toggled on to show the labels, sizes, and images used.

Configuring Unique Symbology for Points
When you configure Unique symbology, you can display a different shape or image for each value of a dimension field in the request.
The following image shows the Symbol Settings properties for Unique symbology in the ESRI Object Settings pane.

Descriptions of the fields for unique symbology for points follow.
- Using Field
-
Description. Is a dimension field in the request whose values will determine the shape or image to use.
Type of field. Combo box.
Populated by. User.
User limitations. Must be a dimension field in the request.
- Size
-
Description. Is the size of a marker in pixels. The default is 12 and the maximum is 99.
Type of field. Text box.
Populated by. User.
User limitations. Must be a measure field in the request.
- Shape / Image
-
Description. Indicates which type of marker to use, a standard shape or an image file.
Type of field. Drop-down list.
Populated by. User.
User limitations. All values must use the same type of marker.
- Values
-
Description. This is the list of values for the Using Field. You can select any value and click the arrow keys to move them between the original list box and the user-selected values list box. Any values not in the user-selected list will display with default markers.
Type of field. List box.
Populated by. System.
User limitations. The user can select values from the system-generated list.
- Label
-
Description. For each value selected, you can enter a label to display in the legend.
Type of field. Text box.
Populated by. User.
User limitations. User can enter a single label for each value of the Using Field.
- Color
-
Description. For each value selected, you can select a marker color. The default is red. Note that color is disabled if the type of marker is image.
Type of field. Color picker.
Populated by. User.
User limitations. User can select a single color for each value of the Using Field.
- Shape
-
Description. For each value selected, you can select a standard shape.
Type of field. Drop-down list.
Populated by. System defined.
User limitations. User can select a single shape for each value of the Using Field. Choices are:
- Circle. This is the default shape.
- Diamond.
- Cross.
- Square.
- X.
- Image Source
-
Description. For each value selected, specify an image file. This file must have a valid image format.
Type of field. Text box with Browse to button.
Populated by. User.
User limitations. User can specify a single image file for each value of the Using Field. It can be a path to a file accessible by the user PC or a URL reference. This file must have a valid image format.
Example: Configuring Unique Image Symbology for Points
This example configures a unique image for the markers for each country name.
Configure the map to use the customer_locations2 procedure and the Point of Interest geographic role in the ESRI Object Settings panel. Configure the unique symbology to use the COUNTRY_NAME field, as shown in the following image.

Move the values of the COUNTRY_NAME field to the right using the > arrow and configure them as follows.
For France, enter France in the Label box and enter the following in the Image Source box:
http://ecl.informationbuilders.com/jschart/france.gif
For Italy, enter Italy in the Label box and enter the following in the Image Source box:
http://ecl.informationbuilders.com/jschart/italy.gif
For Japan, enter Japan in the Label box and enter the following in the Image Source box:
http://ecl.informationbuilders.com/jschart/japan.gif
For the United Kingdom, enter UK in the Label box and enter the following in the Image Source box:
http://ecl.informationbuilders.com/jschart/uk.gif
For the United States, enter US in the Label box and enter the following in the Image Source box:
http://ecl.informationbuilders.com/jschart/us.gif
The output is shown in the following image, after zooming in to fill the frame. The Legend is toggled on to show the labels, sizes, and images used.

Configuring Symbology for a Polygon Data Layer
|
Topics: |
When the geographic data defines polygons, the areas on the map representing each polygon can be colored based on several classification schemes and can have an outline that consists of a color, a thickness, and a line style and a fill style.
The following image shows the Symbol Settings section of the ESRI Object Settings panel for a polygon-based layer. Some selections may open additional options not shown in this image.

The following table summarizes the types of symbology available for a polygon layer. Each type of symbology is illustrated in one of the sections that follows.
|
Type of Symbol |
Description |
Configuration Fields |
|---|---|---|
|
Single |
User selects a single color, outline color, outline thickness, and outline style for the polygons. |
Use. Selects the type of symbols, Single for this option. Color. User selects a polygon fill color. The default is red. Outline Color. User selects a color for the borders around the polygons. The default is gray. Outline Thickness. User specifies a thickness in pixels for the polygon borders. The default is 1. Outline Style. User selects one of the following polygon border styles:
For more information, see Configuring Polygon Symbology Using a Single Color |
|
Color |
User specifies a field to be used to classify polygon colors. |
Use. Selects the type of symbols, Color for this option. Using Field. User selects a field in the request to be used to classify the polygons by color. By. User selects from the following classification methods.
Number of Classes. User specifies the number of color breaks. The default is 5. Color Scheme. User selects the color palette for the polygons. The default uses shades of green. For more information, see Configuring Polygon Symbology Using a Single Color |
|
Dynamic |
The request that provides the location dimension defines the polygon properties. |
Use. Selects the type of symbols, Dynamic for this option. Label. User specifies a field in the request that contains the label text to display in the legend. The default is the AS name, title, or field name. Color. User specifies a field in the request that defines the fill colors of the polygons. For more information, see Configuring Dynamic Polygon Symbology |
|
Unique |
User selects polygon properties for each value of a dimension in the request. |
Use. Selects the type of symbols, Unique for this option. Using Field. User selects a dimension in the request and assigns polygon properties for each value. Dimension Values box. A box is populated with the dimension values. The user can select values and move them to the right, then assign polygon properties to those selected values. Label. User specifies text to display in the legend for each selected dimension value. Color. User selects a polygon fill color for each selected dimension value. The default value is red. Outline Color. User selects a polygon border color for each selected dimension value. The default value is gray. Outline Thickness. User specifies a polygon border thickness in pixels for each selected dimension value. The default value is 1. Outline Style. User selects a polygon border style (Solid, None, Dot, Dash) for each selected dimension value. The default value is Solid. For more information, see Configuring Unique Symbology for Polygons |
Configuring Polygon Symbology Using a Single Color
The default symbology for a polygon data layer is to color the polygons red with a light gray, 1-pixel solid outline, as shown in the following image.
You can change the color for the polygon, the color for the outline, the thickness of the outline, the line style for the outline, and a fill style for the polygon.
The following fields are available when you use Single as the symbology setting.
- Color
-
Description. Opens a color picker dialog box that lets you select a color for the polygons. You can select from a palette, select a named string, select a system color, or create a custom color, and set this color instance to that value.
Type of field. Color value.
Populated by. User.
User limitations. User can browse to a single color. The default is red.
- Outline Color
-
Description. Opens a color picker dialog box that lets you select a color for to outline the polygons. You can select from a palette, select a named string, select a system color, or create a custom color, and set this color instance to that value.
Type of field. Color value.
Populated by. User.
User limitations. User can browse to a single color. The default is light gray.
- Outline Thickness
-
Description. Is a thickness for the outline in pixels.
Type of field. Integer.
Populated by. User.
User limitations. User can enter a single number. The default is 1.
- Outline Style
-
Description. Is the style of the polygon outline.
Type of field. Drop-down list.
Populated by. User.
User limitations. Choices are:
- Solid (this is the default value).
- None.
- Dot.
- Dash.
- Fill Style
-
Description. Is the fill style of the polygon.
Type of field. Drop-down list.
Populated by. User.
User limitations. Choices are:
- Backward Diagonal.
- Cross.
- Diagonal Cross.
- Forward Diagonal.
- Horizontal.
- None.
- Solid (this is the default value).
- Vertical.
Note: The hatch patterns are images from Esri whose color cannot be altered using the Settings panel.
Example: Using Single Symbology for Polygons
This example makes the polygons blue and the outline a dashed light blue line. The request used is customer_states, as described in Configuring a Map Data Layer. Add this request to the HTML page in the Requests & Data Sources panel.
Configure the map layer to use the customer_states procedure described in Configuring a Map Data Layer. The geographic role is US state (Name), and the field that matches the role is STATE_PROV_NAME. Configure the Symbol Settings in the ESRI Object Settings panel as shown in the following image, by clicking the Color field and selecting a dark blue color, clicking the Outline Color field and selecting a light blue color, and selecting Dash from the Outline Style drop-down list.

Run the HTML page. The output is shown in the following image.

Configuring Unique Symbology for Polygons
When you configure Unique symbology, you can display a different color for each value of a dimension field in the request. This is a good technique for defining categories.
The following image shows the Symbol Settings properties for Unique symbology in the ESRI Object Settings pane.

Descriptions of the fields for unique symbology for polygons follow.
- Using Field
-
Description. Is a dimension field in the request whose values will determine the shape or image to use.
Type of field. Combo box.
Populated by. User.
User limitations. Must be a dimension field in the request.
- Values
-
Description. This is the list of values for the Using Field. You can select any value and click the arrow keys to move them between the original list box and the user-selected values list box. Any values not in the user-selected list will display with default colors.
Type of field. List box.
Populated by. System.
User limitations. The user can select values from the system-generated list.
- Label
-
Description. For each value selected, you can enter a label to display in the legend.
Type of field. Text box.
Populated by. User.
User limitations. User can enter a single label for each value of the sing Field.
- Color
-
Description. For each value selected, you can select a polygon color. The default is red.
Type of field. Color picker.
Populated by. User.
User limitations. User can select a single color for each value of the Using Field.
- Outline Color
-
Description. For each value selected, you can select a color for the polygon outline. The default is light gray.
Type of field. Color picker.
Populated by. User.
User limitations. User can select a single color for each value of the Using Field.
- Outline Thickness
-
Description. Is a thickness for the outline in pixels.
Type of field. Integer.
Populated by. User.
User limitations. User can enter a single number. The default is 1.
- Outline Style
-
Description. Is the style of the polygon outline.
Type of field. Drop-down list.
Populated by. User.
User limitations. Choices are:
- Solid (this is the default value).
- None.
- Dot.
- Dash.
- Fill Style
-
Description. Is the fill style of the polygon.
Type of field. Drop-down list.
Populated by. User.
User limitations. Choices are:
- Backward Diagonal.
- Cross.
- Diagonal Cross.
- Forward Diagonal.
- Horizontal.
- None.
- Solid (this is the default value).
- Vertical.
Note: The hatch patterns are images from Esri whose color cannot be altered using the Settings panel.
Example: Configuring Unique Color Symbology for Polygons
This example configures a unique color for the polygons for each US region.
You can create a request using the Report Canvas or by entering request syntax in the Text Editor. For information about creating a report request using the Report Canvas, see Creating Reports in WebFOCUS App Studio.
Following is the syntax for a request that defines regions based on state names. Paste this request into the text editor and save it as customer_states4.
DEFINE FILE WF_RETAIL_LITE
STATE/A20 = STATE_PROV_NAME;
REGION/A10 = IF STATE EQ 'Connecticut' OR 'Maine' OR 'Massachusetts' OR
       'New Hampshire' OR 'Rhode Island' OR 'Vermont' OR
       'New Jersey' OR 'New York' OR 'Pennsylvania' THEN 'Northeast'
       ELSE IF STATE EQ 'Illinois' OR 'Indiana' OR 'Michigan' OR 'Ohio'
       OR 'Wisconsin' OR 'Iowa' OR 'Kansas' OR 'Minnesota' OR 'Missouri'
       OR 'Nebraska' OR 'North Dakota' OR 'South Dakota' THEN 'Midwest'
       ELSE IF STATE EQ 'Delaware' OR 'Florida' OR 'Georgia' OR 'Maryland'
       OR 'North Carolina' OR 'South Carolina' OR 'Virginia' OR
       'Washington D.C.' OR 'West Virginia' OR 'Alabama' OR 'Kentucky' OR
       'Mississippi' OR 'Tennessee' OR 'Arkansas' OR 'Louisiana' OR
       'Oklahoma' OR 'Texas' THEN 'South' ELSE 'West';
END
TABLE FILE WF_RETAIL_LITE
SUM QUANTITY_SOLD
BY REGION
BY STATE_PROV_NAME
WHERE COUNTRY_NAME EQ 'United States'
ON TABLE PCHOLD FORMAT XML
END
Configure the map layer to use this request in the ESRI Object Settings panel. The geographic role is US state (Name), and the field that matches the role is STATE_PROV_NAME. Configure the unique symbol settings using the REGION field, as shown in the following image.

Move each region value to the right using the > arrow, and configure the following entries and selections for each:
For Northeast, enter Northeast in the Label box and select a green polygon color from the color picker.
For West, enter West in the Label box and select a blue polygon color from the color picker.
For South, enter South in the Label box and leave the polygon color as red.
For Midwest, enter Midwest in the Label box and select and orange polygon color from the color picker.
Run the HTML page. The output is shown in the following image. The table of contents is open to show the labels and colors.

Configuring Polygon Symbology Using Color
When you select Color in the Symbol Settings Use drop-down list of the ESRI Object Settings panel, the polygons are colored using a choice of color classification systems, as shown in the following image.
- Using Field
-
Description. This is a numeric field in the request whose values will be used by the classification schema to define the class breaks.
Type of field. Combo box.
Populated by. User.
User limitations. User can only select one field. It should be a measure field or numeric.
- Number of Classes
-
Description. This is the number of class breaks that will be rendered.
Type of field. Combo box.
Populated by. User.
User limitations. User can only select values 2 through 9. The default is 5.
- By
-
Description. This is the classification scheme to be used for assigning the breaks and ranges.
Type of field. Drop-down list.
Populated by. User.
User limitations. Choices are:
- Natural Jenks, a classification scheme that uses breaks inherent in the data, grouping similar values and maximizing differences between groups. This is the default choice.
- Quantile, a classification scheme in which each class contains an equal number of points.
- Equal Breaks, a classification scheme that breaks the data into equal ranges of values.
- Standard Deviation, a classification scheme that defines the breaks based on the number of standard deviations from the mean.
- Geometrical Breaks, a classification scheme that bases class breaks on intervals that have a geometrical series.
- Color Scheme
-
Description. This lets you select an array of color values, defining the color ramp. The first color will be used to render the minimum data class, and the last color will be used to render the maximum data class.
Type of field. Drop-down list.
Populated by. User.
User limitations. User can only select one color array. The default array uses shades of off white and green.
Example: Symbolizing Polygons Using Color
This example uses the Natural Jenks color classification scheme based on the QUANTITY_SOLD field, as shown in the following image. The request that provides the point data is the customer_states4 procedure. The geographic role is US state (Name), and the field that matches this role is STATE_PROV_NAME.

Run the HTML page. The output is shown in the following image.

Configuring Dynamic Polygon Symbology
When the symbology for polygons is Dynamic, you can specify columns in the request that provide labels and colors for the polygons, as shown in the following image.

Descriptions of the fields available when you select Dynamic in the Symbol Settings Use drop-down list follow.
- Label
-
Description. This column will be used to depict values in the Legend.
Type of field. Combo box.
Populated by. User.
User limitations. User must select one column in the layer request.
- Color
-
Description. This column will provide a value for the color of a polygon. The default is red.
Type of field. Combo box.
Populated by. User.
User limitations. User can only select one column in the layer request.
Note:
- Dynamic symbology automatically creates an Other category that is symbolized using a pink color. With the Edge browser, the Other category does not show the default pink color, but shows a white outline instead.
- You cannot type characters in the combo boxes for dynamic symbols, you can only select field names.
Example: Using Dynamic Symbols for Polygons
This example uses dynamic colors and labels for polygon.
You can create a request using the Report Canvas or by entering request syntax in the Text Editor. For information about creating a report request using the Report Canvas, see Creating Reports in WebFOCUS App Studio.
The following procedure defines fields that supply the color and label for each country. Paste this procedure into the text editor and save it as customer_countries.fex.
DEFINE FILE WF_RETAIL_LITE
COLOR/A10 = IF COUNTRY_NAME EQ 'United States' THEN 'blue'
      ELSE IF COUNTRY_NAME EQ 'France' THEN 'red'
      ELSE IF COUNTRY_NAME EQ 'Italy' THEN 'green'
      ELSE IF COUNTRY_NAME EQ 'Japan' THEN 'black'
      ELSE 'purple';
Label/A20 = IF COUNTRY_NAME EQ 'United States' THEN 'US'
      ELSE IF COUNTRY_NAME EQ 'France' THEN 'France'
      ELSE IF COUNTRY_NAME EQ 'Japan' THEN 'Japan'
      ELSE IF COUNTRY_NAME EQ 'Italy' THEN 'Italy'
      ELSE 'UK';
END
TABLE FILE WF_RETAIL_LITE
SUM
   COGS_US
   QUANTITY_SOLD
   Label
   COLOR
BY COUNTRY_NAME
WHERE COUNTRY_NAME EQ 'United States' OR 'France' OR 'Italy' OR 'Japan'
   OR 'United Kingdom';
ON TABLE NOTOTAL
ON TABLE PCHOLD FORMAT XML
END
Add this request to the Customer Layer using the Requests & Data Sources panel. Then configure the map layer to use this request. The geographic role is Country (Name), and the field that matches this role is COUNTRY_NAME. Configure the Symbol Settings section of the ESRI Object Settings panel by selecting the appropriate fields from the request, as shown in the following image. The Label is taken from the Label field in the request, and the Color is taken from the COLOR field in the request.

Run the HTML page. The output, zoomed in to fit the frame is shown in the following image. The Legend is toggled on to show the labels, sizes, and colors used.

Summary of Symbology and Visualizations by Layer Type
The following table lists the visualizations available by layer type.
|
Feature Type |
Geographic Roles |
Available Symbology |
Available Visualizations |
|---|---|---|---|
|
Point |
Latitude/Longitude City US City |
Shape/Image, Color, Size |
Clustering, Heatmap, Popups, Default Visibility, Transparency |
|
Polygon |
State US State County Country Continent Three-digit Zip Code Five-digit Zip Code |
Color |
Popups, Default Visibility, Transparency |
Note: The symbology and visualizations available for custom geographic roles depend on whether they define points or polygons.
Refreshing Markers on an ESRI Map Without Refreshing the Entire Map
|
How to: |
Markers on a Point of Interest layer may be used to represent the positions of objects (such as vehicles or incidents) whose location changes over time. You can update these markers without updating the entire map using the IbComposer_refreshEsriMapLayer JavaScript function in a control.
The refresh will do the following:
- Update the locations of the markers without refreshing the map layer or other map layers.
- Maintain the extent (zoom level) of the map layer.
- Maintain the symbols with which the map layer was configured.
- Maintain the visibility of the map layer.
- Allow infoWindows to be opened on click.
Syntax: How to Refresh Map Markers Without Refreshing the Map
Add the following JavaScript function call to the onclick event of the control created to refresh the markers.
IbComposer_refreshMapLayer("mapid", "layerid") ;where:
- "mapid"
-
Is a map ID (for example, "emfobject1").
- "layerid"
-
Is a layer ID (for example, "Layer1").
Example: Refreshing Markers on an ESRI Map Without Refreshing the Entire Map
The following image shows a map layer that contains a map object and three buttons. The map ID is emfobject1, and the layer ID is Layer1, which are the default IDs.

The request associated with the map is fed the coordinates of the cars and prints each car ID and its latitude and longitude as the car positions change.
The button labeled Start, whose name is button1, has the IbComposer_refreshMapLayer function call in its onclick event, as shown on the Embedded JavaScript tab.
//Begin function button1_onclick
function button1_onclick(event) {
var eventObject = event ? event : window.event;
var ctrl = eventObject.target ? eventObject.target : eventObject.srcElement;
// TODO: Add your event handler code here
//IbComposer_refreshMapLayer("emfobject1", "Layer1") ;
//IbComposer_triggerExecution("task2",1);
if (glbInterval) return;
glbInterval = setInterval(doMapRefresh,1000);
}
//End function button1_onclick
The following image shows the map output before the Start button is clicked. The circles that represent the map markers are in their starting positions within the large X's on the map.

After the Start button is clicked, the markers move on the map, but the map is not refreshed and its zoom and position remain unchanged, as shown in the following image.

Clicking a marker opens its InfoWindow. The values displayed in the InfoWindow update as the marker moves. The following images show an open InfoWindow for the same marker in two different locations.


Retrieving the Esri Map Viewer Current Extent Coordinates as Variables
The current extent of an Esri map can be retrieved as map parameters and used for subsequent filtering of map layers and reports. The extent can be in any coordinate system and must be a simple polygon.
The names of the map extent variables are:
- &MINX, which defines the minimum longitude of the extent.
- &MINY, which defines the minimum latitude of the extent.
- &MAXX, which defines the maximum longitude of the extent.
- &MAXY, which defines the maximum latitude of the extent.
Example: Using the Current Extent Parameters in a Map
The following steps create a map with a procedure that shows the markers within the current extent when the map is refreshed.
- Create a domain named RetailExtent.
- Right-click the domain, point to New, and click Procedure via Text Editor.
- Copy the following procedure, paste it into the text editor, and save it as retail_map.fex.
-DEFAULT &MINX=_FOC_NULL
-DEFAULT &MAXX=_FOC_NULL
-DEFAULT &MINY=_FOC_NULL
-DEFAULT &MAXY=_FOC_NULL

DEFINE FILE WF_RETAIL_LITE
LATITUDE = STATE_PROV_CAPITAL_LATITUDE;
LONGITUDE = STATE_PROV_CAPITAL_LONGITUDE;
END
TABLE FILE WF_RETAIL_LITE
PRINT
     ID_CUSTOMER
     QUANTITY_SOLD
     MSRP_US
     FST.LATITUDE
     FST.LONGITUDE

WHERE RECORDLIMIT EQ 250
WHERE COUNTRY_NAME EQ 'United States'
WHERE LATITUDE GE &MINY
WHERE LATITUDE LE &MAXY
WHERE LONGITUDE GE &MINX
WHERE LONGITUDE LE &MAXX
ON TABLE SET PAGE-NUM NOLEAD
ON TABLE SET ASNAMES ON
ON TABLE NOTOTAL
ON TABLE PCHOLD FORMAT XML
ON TABLE SET HTMLEMBEDIMG ON
ON TABLE SET HTMLCSS ON

END
This procedure uses WHERE selection tests to show the markers only for the extent that is displayed.
- Create a new HTML page and add a map object and a button, as shown in the following image.

- In the Requests & Data Sources panel, open the drop-down menu next to the New icon, point to External Request, and click WebFOCUS Procedure. Select retail_map.fex.
- Select the map and configure the Settings panel as shown in the following image.

- In the Requests & Data Sources panel, right-click the retail_map request
and select Create Controls for Parameters.
The New Parameters dialog box opens.
- Right-click the value in the first row of the Control Type column, point to Existing Control, and click emfobject1, as shown in the following image.

- Click OK.
- Select the button and in the Tasks & Animations panel create a task that will refresh the map when the button is clicked,
as shown in the following image.

- Save the HTML page.
When you run the page, all of the markers are displayed on the map, as shown in the following image.

Zoom in and click the button. The map will be refreshed and only markers for that extent are displayed, as shown in the following image.

Configuring Maps to Interact With Other Components
|
How to: |
Variables in requests and maps can be used as parameters that are passed from one component to other components on an HTML page. When selections are made on one component, other components on the HTML page can be automatically updated to show those same selected values.
A point layer on a map has a unique ID field that automatically turns into a parameter. When you use that same parameter in a filter in a report or chart component, any selection on the map layer will change the output of the report or chart.
For a polygon layer, you must create the variables to be passed between the map and other components.
A report or chart request can have drill-down links that select and zoom to points or polygons on a map layer.
Procedure: How to Update a Request Based on Map Selections
In order to cause map selections to update a report or chart, you need a parameter in the request that supplies the location dimension for the map, and a matching parameter in the request that will be updated when a selection is made on the map.
Note: You can specify whether to rerun the request when the map selections are cleared. For information, see Configuring Whether Selections on a Map Are Required to Run a Request.
For a point layer using the map unique ID field, the report or chart must have a parameter matching the unique ID parameter automatically generated for the map. For a polygon layer, you can define a parameter in the request that supplies the location dimension for the map.
Once you have the parameter in the request to be updated and the parameter in the map defined, you must bind it to the map object on the Parameters tab by dragging the mouse from the map object to the request parameter, as shown in the following image.

The example used in this section to provide the point data is the customer_locations procedure created in Configuring a Map Layer. The unique ID field is ID_CUSTOMER.
The following version of the request populates a report and contains a parameter named &ID_CUSTOMER. Paste the syntax into the Text Editor and save it as customer_locations2b.fex.
-DEFAULT ID_CUSTOMER=FOC_NONE
TABLE FILE WF_RETAIL_LITE
SUM
  ID_CUSTOMER
  COGS_US
  REVENUE_US
  QUANTITY_SOLD
BY COUNTRY_NAME
BY STATE_PROV_NAME
BY  ID_CUSTOMER NOPRINT
WHERE ID_CUSTOMER EQ &ID_CUSTOMER
ON TABLE NOTOTAL
ON TABLE SET PAGE NOLEAD
ON TABLE SET STYLE *
INCLUDE=IBFS:/FILE/IBI_HTML_DIR/javaassist/intl/EN/combine_templates/ENWarm.sty,$
ENDSTYLE
END
Note that the WHERE condition selects ID_CUSTOMER values that are equal to the &ID_CUSTOMER parameter values. When selections are made on the map, the map component will automatically pass the ID_CUSTOMER values selected to the report component, and the report will update to display those selections only. The -DEFAULT command causes the WHERE test to be ignored when no selection has been made.
The following steps set up the report and the task for updating it.
- Add an Esri component to the HTML page.
- Add the customer_locations.fex and customer_locations2b.fex external requests to the HTML page using the Requests & Data Sources panel.
- Configure the Esri component to use the Point of Interest geographic role and the customer_locations procedure, as described in Configuring a Map Data Layer.
- Add a Frame component next to the map component on the HTML page.
- With the map component selected, create a new task in
the Tasks & Animations panel.
Set the following properties for the task.
- Set the Trigger Type to Selection Changed.
- For the Trigger, check the map layer whose selections should trigger the task.
- For Requests/Actions, select Run Request and
then customer_locations2b.
Note: The Load task should also run this request so that it is populated as soon as the HTML page is run.
- For Target Type, select Frame.
- For Target/Template Name, select the name of the frame where customer_locations2b will be run.
The Tasks & Animations panel should look similar to the following:

- Bind the parameter to the map object on the Parameters
tab by dragging the mouse from the map object to the request parameter,
as shown in the following image.

Run the HTML page. The output will be similar to the following:

Make a selection on the map using the selection widget. The report updates to show the selected points on the map, as shown in the following image.

Procedure: How to Update a Request Based on Map Selections for a Polygon Layer
In order to cause map selections to update a report or chart, the report or chart must have a parameter matching a parameter on the map.
The request used in this example to provide the polygon data is the customer_states3 procedure. It is similar to the customer_states procedure created in Configuring a Map Layer, but it has a variable added to select regions.
The customer_states3 procedure follows:
-DEFAULT REGION = FOC_NONE
DEFINE FILE WF_RETAIL_LITE
STATE/A20 = WF_RETAIL_LITE.WF_RETAIL_GEOGRAPHY_CUSTOMER.STATE_PROV_NAME;
REGION/A10 = IF STATE EQ 'Connecticut' OR 'Maine' OR 'Massachusetts' OR
'New Hampshire' OR 'Rhode Island' OR 'Vermont' OR
'New Jersey' OR 'New York' OR 'Pennsylvania' THEN 'Northeast'
ELSE IF STATE EQ 'Illinois' OR 'Indiana' OR 'Michigan' OR 'Ohio'
OR 'Wisconsin' OR 'Iowa' OR 'Kansas' OR 'Minnesota' OR 'Missouri'
OR 'Nebraska' OR 'North Dakota' OR 'South Dakota' THEN 'Midwest'
ELSE IF STATE EQ 'Delaware' OR 'Florida' OR 'Georgia' OR 'Maryland'
OR 'North Carolina' OR 'South Carolina' OR 'Virginia' OR
'Washington D.C.' OR 'West Virginia' OR 'Alabama' OR 'Kentucky' OR
'Mississippi' OR 'Tennessee' OR 'Arkansas' OR 'Louisiana' OR
'Oklahoma' OR 'Texas' THEN 'South' ELSE 'West';
END
TABLE FILE WF_RETAIL_LITE
SUM QUANTITY_SOLD
BY REGION
BY STATE_PROV_NAME
WHERE REGION EQ ®ION
WHERE COUNTRY_NAME EQ 'United States'
ON TABLE PCHOLD FORMAT XML
END
The DEFINE FILE command defines which states are in which regions. The WHERE phrase for REGION sets the values of the REGION field to the values of the ®ION parameter. When a selection has been made on the map, the parameter values will be passed to a report request. The -DEFAULT command causes the WHERE test to be ignored when no selection has been made.
Paste this syntax into the Text Editor, and save it as customer_states3.fex.
The following version of the request, named customer_states3b, populates a report and also contains a parameter named ®ION. Paste the syntax into the Text Editor and save it as customer_states3b.fex.
-DEFAULT ®ION = FOC_NONE
DEFINE FILE WF_RETAIL_LITE
STATE/A20 = STATE_PROV_NAME;
REGION/A10 = IF STATE EQ 'Connecticut' OR 'Maine' OR 'Massachusetts' OR
'New Hampshire' OR 'Rhode Island' OR 'Vermont' OR
'New Jersey' OR 'New York' OR 'Pennsylvania' THEN 'Northeast'
ELSE IF STATE EQ 'Illinois' OR 'Indiana' OR 'Michigan' OR 'Ohio'
OR 'Wisconsin' OR 'Iowa' OR 'Kansas' OR 'Minnesota' OR 'Missouri'
OR 'Nebraska' OR 'North Dakota' OR 'South Dakota' THEN 'Midwest'
ELSE IF STATE EQ 'Delaware' OR 'Florida' OR 'Georgia' OR 'Maryland'
OR 'North Carolina' OR 'South Carolina' OR 'Virginia' OR
'Washington D.C.' OR 'West Virginia' OR 'Alabama' OR 'Kentucky' OR
'Mississippi' OR 'Tennessee' OR 'Arkansas' OR 'Louisiana' OR
'Oklahoma' OR 'Texas' THEN 'South' ELSE 'West';
END
TABLE FILE WF_RETAIL_LITE
SUM QUANTITY_SOLD
BY REGION AS Region
BY STATE_PROV_NAME
WHERE REGION EQ ®ION
WHERE COUNTRY_NAME EQ 'United States'
ON TABLE SET PAGE NOLEAD
ON TABLE SET STYLE *
INCLUDE=IBFS:/FILE/IBI_HTML_DIR/javaassist/intl/EN/combine_templates/ENWarm.sty,$
ENDSTYLE
END
Note that the WHERE condition selects REGION values that are equal to the ®ION parameter values. When selections are made on the map, the map component will pass the REGION values selected to the report component, and the report will update to display those selections only.
The following steps set up the report and the task for updating it.
- Add an Esri component to the HTML page.
- Add the customer_states3.fex and customer_states3b.fex external requests to the HTML page using the Requests & Data Sources panel.
- Configure the Esri component to use the US state (Name)
geographic role and the customer_states3 procedure. The field that
matches the geographic role is STATE_PROV_NAME.
For clarity, the map component has been configured with unique symbology using the REGION field, as described in Configuring Unique Symbology for Polygons.
- Add a Frame component next to the map component on the HTML page.
- With the map component selected, create a new task in
the Tasks & Animations panel.
Set the following properties for the task.
- Set the Trigger Type to Selection Changed.
- For the Trigger, check the map layer whose selections should trigger the task.
- For Requests/Actions, select Run Request and
then customer_states3b.
Note: The Load task should also run this request so that it is populated as soon as the HTML page is run.
- For Target Type, select Frame.
- For Target/Template Name, select the name of the frame where customer_states3b will be run.
The Tasks & Animations panel should look similar to the following:

- On the parameters tab, make the map parameter populate
the report parameter (drag the REGION parameter onto the emfobject1
parameter and back down), as shown in the following image.

Run the HTML page. The output will be similar to the following:

Make a selection on the map using the selection widget. The report updates to show the selected points on the map, as shown in the following image, in which the South and West regions have been selected on the map.

Syntax: How to Drill Down From a Request to Selections on a Map
The JavaScript function IbComposer_selectEsriMap can be used in a StyleSheet to make a selection on a request and zoom to that selection on a map. The syntax is.
TYPE=DATA,
     COLUMN=requestcol,
      JAVASCRIPT=parent.IbComposer_selectEsriMap( \
     'mapobject' \
     'maplayer' \
     'mapfield' [\
     fieldvalue]
     ),
where:
- requestcol
-
Is a designation for the drilldown column in the request.
- 'mapobject'
-
Is the object name for the map component that is the target of the drilldown.
- 'maplayer'
-
Is the name of the map layer that is the target of the drilldown.
- 'mapfield'
-
Is the name of the map field that is the target of the drilldown.
- fieldvalue
-
Is the field value of the target field, passed from the request when a drill-down link is selected.
Example: Creating a Drilldown From a Report to a Map
This example has a report component named customer_states4 that has a drilldown from the REGION field to the map component. The syntax follows. Paste it into the Text Editor and save it as customer_states4.fex.
DEFINE FILE WF_RETAIL_LITE
STATE/A20 = WF_RETAIL_LITE.WF_RETAIL_GEOGRAPHY_CUSTOMER.STATE_PROV_NAME;
REGION/A10 = IF STATE EQ 'Connecticut' OR 'Maine' OR 'Massachusetts' OR
    'New Hampshire' OR 'Rhode Island' OR 'Vermont' OR
    'New Jersey' OR 'New York' OR 'Pennsylvania' THEN 'Northeast'
    ELSE IF STATE EQ 'Illinois' OR 'Indiana' OR 'Michigan' OR 'Ohio'
    OR 'Wisconsin' OR 'Iowa' OR 'Kansas' OR 'Minnesota' OR 'Missouri'
    OR 'Nebraska' OR 'North Dakota' OR 'South Dakota' THEN 'Midwest'
    ELSE IF STATE EQ 'Delaware' OR 'Florida' OR 'Georgia' OR 'Maryland'
    OR 'North Carolina' OR 'South Carolina' OR 'Virginia' OR
    'Washington D.C.' OR 'West Virginia' OR 'Alabama' OR 'Kentucky' OR
    'Mississippi' OR 'Tennessee' OR 'Arkansas' OR 'Louisiana' OR
    'Oklahoma' OR 'Texas' THEN 'South' ELSE 'West';
END
TABLE FILE WF_RETAIL_LITE
SUM QUANTITY_SOLD
BY REGION
BY STATE
WHERE COUNTRY_NAME EQ 'United States'
ON TABLE SET PAGE NOLEAD
ON TABLE SET STYLE *
INCLUDE=IBFS:/FILE/IBI_HTML_DIR/javaassist/intl/EN/combine_templates/ENWarm.sty,$
TYPE=DATA,
     COLUMN=REGION,
     JAVASCRIPT=parent.IbComposer_selectEsriMap( \
     'emfobject1' \
     'State' \
     'REGION' \
      REGION \
     ),
$
END
The drilldown in the StyleSheet is on the REGION column. It uses the IbComposer_selectEsriMap function to target the map object on the State layer using the REGION field and the REGION values passed from the selected drill-down link.
The map component will use the customer_states3 procedure, as described in the previous example.
Use the following steps to set up the report request and map component.
- Add the customer_states3 and customer_states4 requests to the HTML page in the Requests & Data Sources panel.
- Add a Frame component on the HTML page.
- Set the Load task to run the customer_states4 request in the Tasks & Animation panel, with the target being the frame you created.
- Add a map component next to the report frame on the HTML page.
Configure it to use the customer_states3 request, the US state (Name)
geographic role, the STATE_PROV_NAME field. Name the layer State,
as shown in the following image.

The map component in this example has been configured for unique symbology based on the REGION field, as described in Configuring Unique Symbology for Polygons.
Run the HTML page. The output should be similar to the following.

Click the Northeast link on the report. The map component zooms to that region with all of the states selected, as shown in the following image.

You can change the selection by clicking another drill-down link on the report. You can also change the extent or clear the selection using the map widgets.
Customizing the List of Geographic Roles
|
Reference: |
Customers with Enterprise Data often have map layers that represent their territories, events, or logistical information. These are published as Map Services to either a subscription based in the Esri Cloud (ArcGIS.com) or on an internal portal. This portal is available with ArcGIS Server 10.3 installations. More information can be found at
http://server.arcgis.com/en/portal/.
comes with a configuration file (geo_services.xml) that contains elements that describe all of the geographic roles, geographic hierarchies, URLs to the map services, and base maps available to the Esri map viewer. This file is located in the catalog directory under the server home directory:
_edahome/catalog/Note: You can show this directory on the application tree by clicking Show edahome, edaconf, edaprfu, scaroot, edatemp, edalog and foccache for all users on the Filter menu of the Reporting Server Console Applications page. Then, you can edit the geo_services.xml file directly in the Reporting Server Console.
The geographic role selections that you can make in the Settings panel are built dynamically using this configuration file. Each role definition in the configuration file, when selected in , generates metadata and a request that is sent to Esri in order to download the appropriate map and place the markers or polygons on the map.
A geographic role can be part of a hierarchy. For example, the World geographic role is at the top of a hierarchy that contains continents, countries, states, and cities. These hierarchies are also described in the geo_services.xml file.
To add a custom geographic role, you must add the necessary parameters for the geography to this file.
You can also customize the geographic roles available by deleting geographic role definitions from the <GEO_ROLES> object. To configure Esri on Premise, you should remove any geographic role definition that references a URL that points to a location outside of your locally hosted Esri server.
Following standard XML syntax rules, each element is enclosed in element start and end tags (<elementname>, </elementname>), and attribute values are enclosed in double quotation marks (").
Reference: Geographic Role Definitions
A geographic role is stored as a geo_role element in the geo_roles object of the geo_services.xml file. A geographic role must be defined with:
- An ID that will identify the role in the configuration file.
- A format and length for the data to be returned.
- A role name.
- A display title for the role name (to appear as a selection in the Settings panel).
- An optional role format (if the role can have multiple formats, such as a name and an abbreviation).
- A display title for the format.
- A role type (geography for geographic objects such as country or state, geometry for geometry points, geometry areas, or geometry lines, or coordinate for longitude or latitude).
- An optional vocabulary rule element containing vocabulary elements for associating the role with a field in the metadata.
The syntax is
<geo_role id="id" value_size="size" unified="false" role_name="rname"
        role_name_title="rname_title" role_format="rformat"
        role_format_title="rformat_title" geo_type="gtype"
        type="datatype" >
        <vocabulary_rules>
            <vocabulary>vrule</vocabulary>
         </vocabulary_rules>
      </geo_role>
where:
- id="id"
-
Is an alphanumeric uppercase value, up to 50 characters, used to identify the geographic role.
- type="datatype"
-
Is the data type for the ID. Can be one of the following.
- "alpha" for alphanumeric data, formats An or In.
- "integer" for integer numeric data, format In.
- "numeric" for fractional numeric data, formats Pn.m, Dn.m, or Fn.m.
- "text" for text data, format TXn.
- value_size="size"
-
Is the optional number of characters in USAGE format length (any, if not set).
- role_name="rname"
-
Is the name of the geographic role.
- role_name_title="rname_title"
-
Is the title of the geographic role, to be displayed in the Settings panel for selection.
- role_format="rformat"
-
Is an optional format for the geographic role, useful when the role can be referenced using multiple formats, such as a name, an ISO code, and an abbreviation. Standard role titles include the following.
- NAME. Specifies that the role defines the name of a geographic entity, such as Florida.
- ABBR. Specifies that the role defines an abbreviation, such as FL.
- ZIP3. Specifies that the role defines a 3-digit zip code.
- ZIP5. Specifies that the role defines a 5-digit zip code.
- FIPS. Specifies that the role defines a FIPS (Federal Information Processing Standard) code.
- ISO2. Specifies that the role defines an ISO 3166-2 code published by the International Organization for Standardization (ISO).
- ISO3. Specifies that the role defines an ISO 3166-3 code published by the International Organization for Standardization (ISO).
- LINE. Specifies that the role defines one line of a role, just as an address line.
- FULL. Specifies that the role defines a full geographic role, such as a full address.
- role_format_title="rformat_title"
-
Is an optional title for the format of the geographic role. It will be shown in parentheses along with the role title in the Settings panel, for example, State (Abbreviation).
- geo_type="gtype"
-
Is one of the following predefined role types.
- "geography", for geographic objects such as country or state.
- "geometry", for geometry objects such as geometry point, geometry line, and geometry area.
- "coordinate", for coordinates such as latitude and longitude.
- <vocabulary>vrule</vocabulary>
-
Is an element that consists of a group of vocabulary elements that explicitly describe column names for the geographic role. These rules will be used to select the best geographic data for the role.
Elements in a rule are connected by the Boolean logic operation OR (only one needs to be satisfied). Each vocabulary element contains words enclosed with special characters. Words in the rule element are connected by the Boolean logic operation AND (all need to be satisfied).
A word may be prefixed and/or suffixed with the percent character (%), which is a place holder for any sequence of characters. If an element contains more than one word, each word has to be prefixed by the character plus (+) or minus (-). Plus indicates that the word must be found in the column name. Minus indicates that word must not be found in the column name.
Once you have added a geographic role definition, you can run the geo_srv_roles procedure to see that the parameters were added correctly.
Example: Sample Geographic Role Definitions
The following defines the State Abbreviation geographic role. The role ID is USSTATE_ABBR. The role name is USSTATE with a role format of ABBR. The titles that show in the Settings panel are US state (Abbreviation). The format is A2, and the vocabulary rules specify that the characters state must be present, but the characters iso, capital, and population must not be present. The geo type is geography, indicating that the returned data will be a geographic area.
<geo_role
id="USSTATE_ABBR"
 value_size="2"
 type="alpha"
role_name="USSTATE"
role_name_title="US state"
role_format="ABBR"
role_format_title="Abbreviation"
 geo_type="geography">
<vocabulary_rules>
<vocabulary>+%state%-%iso%-%capital%-%population%</vocabulary>
</vocabulary_rules>
</geo_role>
The following is a role definition for latitude values. The role ID is LATITUDE. The role name is also LATITUDE. Its format is numeric. The title that displays in the Settings panel is Latitude. The geo type is coordinate, indicating that the returned data will be points. The vocabulary rules specify that the characters latitude must be present.
<geo_role
 id="LATITUDE"
 type="numeric"
 role_name="LATITUDE"
role_name_title="Latitude"
 geo_type="coordinate">
 <vocabulary_rules>
  <vocabulary>%latitude%</vocabulary>
 </vocabulary_rules>
</geo_role>
The following is the definition for the city role. The ID is CITY. The role name is also CITY. Its format is NAME. The title that displays in the Settings panel is City (Name). The definition has a set of vocabulary elements. Only one of the elements in the list must be true. Therefore, the characters city, or town, or country plus capital, or state plus capital must be present.
<geo_role
 id="CITY"
type="alpha"
role_name="CITY"
role_name_title="City"
role_format="NAME"
role_format_title="Name"
 geo_type="geography">
 <vocabulary_rules>
  <vocabulary>+%city%-%population%</vocabulary>
  <vocabulary>+%town%-%population%</vocabulary>
  <vocabulary>+%country%+%capital%-%population%</vocabulary>
  <vocabulary>+%state%+%capital%-%population%</vocabulary>
 </vocabulary_rules>
</geo_role>
Reference: Geographic Role URI Definitions
After adding a geographic role, you must add its URI to the <URIS> object in the geo_services.xml file. The syntax is.
<uri description="description">
   <returned_geometry>type </returned_geometry>
   <returned_georole>role</returned_georole>
   <url type="esri" authorization="auth" synonym="">
         "url_to_georole"
   <parameters>
    <parm order="number" parm_name="pname" parm_georole="parmrole"/>
   </parameters>
  </uri>
where:
- "description"
-
Is a description for the geographic role the URI is pointing to.
- type
-
Is any supported geometry type, such as GEOMETRY AREA.
- role
-
Is the name of the returned geographic role.
- "auth"
-
Is the type of authentication needed to access this geographic role. Valid values are:
- silent. Credentials for your ArcGIS application are provided in the connection string of the Adapter for Esri.
- none. No authorization is needed.
- named. User credentials are provided in the connection string of the Adapter for Esri.
- on premise. User credentials for a locally hosted ArcGIS server are provided in the connection string of the Adapter for Esri.
- "url_to_georole"
-
Is the URL for the geographic role.
- parm order="number"
-
Is the number of a parameter needed to retrieve the correct geographic role.
- parm_name="pname"
-
Is the name of the parameter associated with parm order.
- parm_georole="parmrole"
-
Is the name of the geographic role associated with parm order.
Once you have added the URI, you can run the geo_srv_map_uris procedure to see that the parameters were added correctly.
Note: You must add the base URL to the list of proxy URLs in the esri_arcgis_rest.xml file, as described in Adding an Esri Proxy URL. For example:
<ESRI_URL URL="//services7.arcgis.com/L95Wwv9OjRQ0tjAs/ArcGIS" DESCRIPTION="Custom Data" />
Reference: Adding the Retail Regions Geographic Role
These steps describe how to add the Retail Regions geographic role to the geo_services.xml file.
- Open the geo_services.xml
file. The default location is:
C:\ibi\AppStudionn\srv\home\catalog\geo_services.xmlwhere nn is your release of . For example, 82 for release 8.2
- Add the role to the end of the GEO_ROLES object:
<geo_role id="REGION" value_size="50" unified="false"
        role_name="WF_Region" role_name_title="WF_Region"
        role_format="NAME" role_format_title="NAME"
        geo_type="geography" type="alpha" >
        <vocabulary_rules>
            <vocabulary>+%region%</vocabulary>
         </vocabulary_rules>
      </geo_role>
The ID is REGION. The role name is WF_Region. Its format is NAME. The title that displays in the Settings panel is WF_Region. The definition has a vocabulary rule. The characters region must be present.
Run the geo_srv_roles procedure to see that the role was added correctly. The output is shown in the following image.

- Add the URI to the map server layer for this role at the end
of the URIS object:
<uri description="WFRetail Regions" >
    <returned_geometry>GEOMETRY_AREA</returned_geometry>
    <returned_georole>REGION</returned_georole>
    <parameters_georoles>
       <parm position="1" parm_georole="REGION" />
    </parameters_georoles>
    <urls>
      <url type="esri" authorization="none" synonym=""
      value="//services7.arcgis.com/L95Wwv9OjRQ0tjAs/ArcGIS/rest/services/wfretail_sub_regions/FeatureServer/0"
      provider="Esri" >
          <keys key="default" />
          <parameters_names>
             <parm position="1" parm_name="SUB_REGION" />
          </parameters_names>
       </url>
    </urls>
</uri>
Note: You must add the base URL to the list of proxy URLs in the esri_arcgis_rest.xml file, as described in Adding an Esri Proxy URL. For example:
<ESRI_URL URL="//services7.arcgis.com/L95Wwv9OjRQ0tjAs/ArcGIS" DESCRIPTION="Custom Data" />
Run the geo_srv_map_uris procedure to see if the parameters were added correctly. The output is shown in the following image.

You will now be able to select this role in the settings panel the next time you start , as shown in the following image.

Example: Using the Retail Regions Role in a Map Layer
This example configures a map layer using the WF_Region role.
You can create a request using the Report canvas or by entering request syntax in the text editor. For information about creating a report request using the Report canvas, see Creating Reports in WebFOCUS App Studio.
Following is the syntax for a procedure that returns the region names. Paste this procedure into the text editor and save it as wf_region.fex.
DEFINE FILE WF_RETAIL_LITE
REGION/A20 = BUSINESS_SUB_REGION;
END

TABLE FILE WF_RETAIL_LITE
SUM QUANTITY_SOLD
BY REGION
WHERE COUNTRY_NAME EQ 'United States'
ON TABLE PCHOLD FORMAT XML
END
Add the external procedure wf_region.fex to the HTML page using the Requests & Data Sources panel.
Next, use the Settings panel to configure the map layer. It uses the wf_region request and the WF_Region geographic role. as shown in the following image.

Run the HTML page. The output is shown in the following image:

Customizing the List of Basemap Definitions
The list of basemaps available to the Esri Viewer is built dynamically on the server using the list of <basemap> objects in the geo_services.xml file, which is located in the catalog directory under the server home directory:
_edahome/catalog/Note: You can show this directory on the application tree by clicking Show edahome, edaconf, edaprfu, scaroot, edatemp, edalog and foccache for all users on the Filter menu of the Reporting Server Console Applications page. You can then edit the geo_services.xml file directly in the Reporting Server Console.
Following are some sample standard basemap definitions from this file that exist prior to customization.
<BASEMAPS>
...
 <basemap custom="false" default="false" name="streets"
    title="World Street Map" icon="qb/streets_map_108x72.png" />
 <basemap custom="false" default="false" name="satellite"
    title="World Imagery" icon="qb/imagery_map_108x72.png" />
 <basemap custom="false" default="false" name="terrain"
    title="Terrain with Labels" icon="qb/terrain_map_108x72.png" />
 <basemap custom="false" default="true" name="gray"
    title="Light Gray Canvas Map" icon="qb/gray_map_108x72.png" />
...
</BASEMAPS>
The properties defined for the standard basemaps are custom (which is false for the standard basemaps), default, name, title, and icon.
To define a custom basemap you must define these properties for your custom basemap, and add a URL that points to the map service that has the basemap image.
Note: Any basemap you add must be a tiled map layer.
You can also customize the list of basemaps by deleting basemap definitions from the <basemaps> object. To configure Esri on Premise, you should remove any basemap definition that references a URL that points to a location outside of your locally hosted Esri server.
The syntax for a basemap definition is
<basemap custom="boolean" default="boolean" name="mapname"
  title="maptitle" icon="url_to_icon" url="url_to_basemap"
/>
where:
- custom="boolean"
-
Specifes whether the basemap is standard or custom. Valid values are true and false. To add a custom basemap, specify custom="true".
- default="boolean"
-
Specifies whether this basemap should be the default basemap if the user does not select a basemap. Valid values are true and false.
- name="mapname"
-
Is a name for the basemap.
- title="maptitle"
-
Is a title that will display in the Basemap drop-down list in the Properties panel of the Esri Viewer.
- icon="url_to_icon"
-
Is the location of a thumbnail image for the basemap.
- url="url_to_basemap"
-
Is the URL to the map service that provides the basemap.
After you add the basemap definition, you can run the geo_srv_basemaps procedure to see if the parameters were added correctly.
Example: Adding a Custom Basemap
The following <basemap> object defines the soil survey basemap.
<basemap name="soil_survey" custom="true" default="false" title="Soil_Survey_Basemap"
icon="https://server.arcgisonline.com/arcgis/rest/services/Specialty/Soil_Survey_Map/MapServer/info/thumbnail"
url="https://server.arcgisonline.com/ArcGIS/rest/services/Specialty/Soil_Survey_Map/MapServer" />
Add this definition to the list of basemap objects in the geo_services.xml file. Note that the entire URL string must be on one line in the file, even if it breaks in this document because of the page size.
Run the geo_srv_basemaps procedure. The output is shown in the following image.

When you create a map, your custom basemap appears in the Basemap drop-down list of the Properties panel, as shown in the following image.

The following image shows the map output from the example in Customizing the List of Geographic Roles using the soil survey basemap.

Adding an Esri Proxy URL
All of the configured proxy URLs for retrieving data from Esri are stored in the file esri-arcgis-rest.xml, which is located under your configuration directory. For example, the default configuration directory on Windows is, C:\ibi\WebFOCUSxx\config, where xx is your release of (for example, 82). The file contains configuration properties followed by a list of Esri proxy URLs, which start with the characters <ESRI_URL.
To add a new proxy URL, add a new <ESRI URL line to the <WF_ESRI_ARCGIS_PROXY> list in the esri-arcgis-rest.xml file. We recommend that you add the proxy URL prior to using the URL to define a new geographic role.
The syntax for a public proxy URL is:
<ESRI_URL URL="public_proxy_url" DESCRIPTION="Public access data" />
where:
- public_proxy_url
- Is your public proxy URL.
The syntax for a restricted proxy URL is:
<ESRI_URL PROFILE_ID="default" URL="restricted_proxy_url" DESCRIPTION="Restricted access data" />
where:
- restricted_proxy_url
- Is your restricted proxy URL.
Following are sample public Esri proxy URLs from the esri-arcgis-rest.xml file.
<ESRI_URL URL="http://services.arcgisonline.com/ArcGIS" DESCRIPTION="Public access data" />
	<ESRI_URL URL="http://services.arcgisonline.com/arcgis" DESCRIPTION="Public access data" />
 	<ESRI_URL URL="http://static.arcgis.com/attribution" DESCRIPTION="Public access data" />
Following is a sample restricted Esri proxy URL from the esri-arcgis-rest.xml file.
<ESRI_URL PROFILE_ID="default" URL="http://www.arcgis.com/sharing/rest" DESCRIPTION="Restricted access data" />
Adding Before Load and After Load Events
You can add JavaScript events to occur before and after a map layer is loaded:
- Draw an ESRI map component.
- Add a map layer.
- Open the Properties panel, click the Events icon to open the list of events, and either double-click Before Load or After
Load or select Before Load or After Load and click the ellipsis.
The Embedded JavaScript tab opens with a template for your JavaScript function.
- Add your JavaScript code.
Every time a layer is ready, meaning that the layer has all its graphics, the event geometry-complete is fired. The afterload event fires when geometry-complete has fired as many times as there are data layers in the application. The load event fires after base maps and the first layer (if it exists) have been added to the map (not drawn, just added).
There is a time gap between the time the afterload event fires and when you actually see the layer in the map. This time gap is related to the time the map takes to render the layer. So the layer is already in the map, but it has not rendered yet. There is no event that will fire after the layer is finished rendering in the map.
| WebFOCUS | |
|
Feedback |