Managing SQL Server Analysis Services Metadata
|
Topics: |
When the server accesses a data source, it needs information on how to interpret the data stored there. For each data source the server will access, you create a synonym that describes the structure of the data source and the server mapping of the SQL Server Analysis Services data types.
Creating Synonyms
|
How to: |
|
Reference: |
Synonyms define unique names (or aliases) for each Analytical Engine cube that is accessible from a server. Synonyms are useful because they hide location information and the identity of the underlying data source from client applications. They also provide support for extended metadata features of the server such as virtual fields and additional security mechanisms.
Using synonyms allows an object to be moved or renamed while allowing client applications to continue functioning without modification. The only modification required is a redefinition of the synonym on the server. The result of creating a synonym is a Master File and Access File.
For details on how to create a synonym through the Web Console, see the Server Configuration and Operation manual for your platform.
Procedure: How to Create a Synonym
- From the
Web Console sidebar, click Applications or Connect to Data.
The Applications page opens.
- If you started from the Applications page, right-click an application folder, point to New,
and click Synonym on the context menu.
The Connect to Data page opens.
- On the Configured list, click the down arrow next to a
connection for the configured adapter, or right-click a connection.
Depending on the type of adapter you chose, one of the following options appears on the context menu.
- Show DBMS objects. This opens the page for selecting synonym objects and properties.
- Create metadata objects. This opens the page for selecting synonym objects and properties.
- Show files. This opens a file picker. After you choose a file of the correct type, the page for selecting synonym objects and properties opens.
- Show local files. This opens a file picker. After you choose a file of the correct type, the page for selecting synonym objects and properties opens.
- Show topics. This opens the page for selecting synonym objects and properties for topics within the Kafka environment.
- Enter values for the parameters required by the adapter as described in the chapter for your adapter.
- After entering
the parameter values, click the highlighted button on the ribbon.
The button may be labeled Next, Create Synonym, Create Base Synonyms, Create Cluster Synonym, or Update Base Synonyms.
The synonym creation process for most adapters has been consolidated so that you can enter all necessary parameters on one page. However, for some adapters such as LDAP, you must click Next buttons until you get to a page that has a Create Synonym button.
The synonym is created and added under the specified application directory.
Note: When creating a synonym, if you choose the Validate check box (where available), the server adjusts special characters and checks for reserved words. For more information, see Validation for Special Characters and Reserved Words.
Reference: Synonym Creation Parameters for SQL Server Analysis Services (SSAS)
The following list describes the parameters for which you will need to supply values, and related tasks you will need to complete in order to create a synonym for the adapter. These options may appear on multiple panes. To advance from pane to pane, click the buttons provided, ending with the Create Synonym button, which generates the synonym based on your entries.
- Select catalog
-
You can select a catalog from the drop-down list. The default selection is All Catalogs.
- Filter by Cube Name
-
If you wish to filter your selections, click this check box and enter a cube name in the input box.
You can enter a full cube name or use a wildcard character (%) as needed, at the beginning and/or end of the string. For example, enter: ABC% to select cubes that begin with the letters ABC; %ABC to select cubes that end with the letters ABC; %ABC% to select cubes that contain the letters ABC at the beginning, middle, or end.
- Include Attribute (System-Enabled) Hierarchies
-
To include all hierarchies, not just user-defined hierarchies, in the synonym, select the Include Attribute (System-Enabled) Hierarchies check box.
- Generate Qualified Field Names
-
To generate qualified field names (field names qualified with the Master File and segment names) in the synonym, click the Generate Qualified Field Names check box.
- Create Fields for Member Unique Names
-
To create fields in the synonym for member unique names, select the Create Fields for Member Unique Names check box.
- Present Parent/child Hierarchies as
-
Select how you want parent/child hierarchies represented in the synonym:
- As parent/child hierarchies, the default. This option creates a set of fields for each parent/child hierarchy that describe a member's position in the hierarchy. To report from a parent/child hierarchy use the BY HIERARCHY syntax to automatically retrieve, display, and format portions of the hierarchy with appropriate indentations to identify the hierarchical relationships between the members.
- As level hierarchies. This option creates separate fields for each hierarchy level. To report from this type of hierarchy, specify the field name for each level of the hierarchy you want to display as a BY field in the request.
- Field Name Case
-
Select whether you want mixed-case or uppercase field names. Mixed-case is the default value.
- Application
-
Select an application directory. The default value is baseapp.
- Prefix/Suffix
-
If you have tables with identical table names, assign a prefix or a suffix to distinguish them. For example, if you have identically named human resources and payroll tables, assign the prefix HR to distinguish the synonyms for the human resources tables. Note that the resulting synonym name cannot exceed 64 characters.
If all tables and views have unique names, leave the prefix and suffix fields blank.
- Overwrite Existing Synonyms
-
To specify that this synonym should overwrite any earlier synonym with the same fully qualified name, select the Overwrite existing synonyms check box.
Note: The connected user must have operating system write privileges in order to recreate a synonym.
- Select cubes
-
Select the cubes for which you wish to create synonyms:
- To select all cubes in the list, select the check box to the left of the Default Synonym Name column heading.
- To select specific cubes, select the corresponding check boxes.
- Default Synonym Name
-
This column displays the name that will be assigned to each synonym. To assign a different name, replace the displayed value.
Example: Creating a Synonym
To generate a synonym for the Sales cube in the FoodMart 2000 Data Warehouse, enter the following information on the Create Synonym panes of the Web Console or the Data Management Console:
- On the first Create Synonym pane, select FoodMart 2000 from the Select catalog drop-down list.
- Click the Filter by Cube Name check box.
- Enter S% in the Cube Name field.
- Click the Next button.
- On the second Create Synonym pane, select Sales from the list of displayed cubes in the FoodMart 2000 catalog.
- Click Create Synonym. The synonym is
created and added under the specified application directory (The
default is ibisamp).
A status window displays that the synonym was created successfully.
- Open the ibisamp application folder in the navigation pane and right-click the synonym Sales.
- Choose Edit as Text from the menu to view the generated Master File, then choose Edit Access File as Text to view the corresponding Access File.
Generated Master File
FILENAME=Sales, SUFFIX=SSAS    , $
  SEGMENT=SALES, SEGTYPE=S0, $
    FIELDNAME=Unit_Sales, ALIAS='Unit Sales', USAGE=D18.2C, ACTUAL=D8,
      MISSING=ON,
      TITLE='Unit Sales', MEASURE_GROUP=Sales,
      PROPERTY=MEASURE,  $
FIELDNAME=Store_Cost, ALIAS='Store Cost', USAGE=D18.2C, ACTUAL=D8,
MISSING=ON,
TITLE='Store Cost', MEASURE_GROUP=Sales,
PROPERTY=MEASURE, $
FIELDNAME=Store_Sales, ALIAS='Store Sales', USAGE=P20.2MB, ACTUAL=P16,
MISSING=ON,
TITLE='Store Sales', MEASURE_GROUP=Sales,
PROPERTY=MEASURE, $
FIELDNAME=Sales_Count, ALIAS='Sales Count', USAGE=I11, ACTUAL=I4,
MISSING=ON,
TITLE='Sales Count', MEASURE_GROUP=Sales,
PROPERTY=MEASURE, $
FIELDNAME=Store_Sales_Net, ALIAS='Store Sales Net', USAGE=D18.2C, ACTUAL=D8,
MISSING=ON,
TITLE='Store Sales Net', MEASURE_GROUP=Sales,
PROPERTY=MEASURE, $
FIELDNAME=Profit, ALIAS=Profit, USAGE=D18.2C, ACTUAL=D8,
MISSING=ON,
TITLE='Profit', MEASURE_GROUP=Undefined,
PROPERTY=MEASURE, $
FIELDNAME=Sales_Average, ALIAS='Sales Average', USAGE=D18.2C, ACTUAL=D8,
MISSING=ON,
TITLE='Sales Average', MEASURE_GROUP=Undefined,
PROPERTY=MEASURE, $
DIMENSION=[Customers], CAPTION='Customers', $
HIERARCHY=[Customers], CAPTION='Customers', HRY_DIMENSION=[Customers], $
FIELDNAME=Country, ALIAS=Country, USAGE=A6, ACTUAL=A6,
TITLE='Country',
WITHIN='*[Customers]',
PROPERTY=CAPTION, $ FIELDNAME=State_Province, ALIAS='State Province', USAGE=A9, ACTUAL=A9,
TITLE='State Province',
WITHIN=Country,
PROPERTY=CAPTION, $
FIELDNAME=City, ALIAS=City, USAGE=A14, ACTUAL=A14,
TITLE='City',
WITHIN=State_Province,
PROPERTY=CAPTION, $
FIELDNAME=Name, ALIAS=Name, USAGE=A26, ACTUAL=A26,
TITLE='Name',
WITHIN=City,
PROPERTY=CAPTION, $
$ LEVEL [Customers].[Name] PROPERTIES
FIELDNAME=Date_Accnt_Opened, ALIAS='Date Accnt Opened', USAGE=A10, ACTUAL=A10,
TITLE='Date Accnt Opened',
REFERENCE=Name, PROPERTY=ATTRIBUTE, $
FIELDNAME=Education, ALIAS=Education, USAGE=A19, ACTUAL=A19,
TITLE='Education',
REFERENCE=Name, PROPERTY=ATTRIBUTE, $
FIELDNAME=Gender, ALIAS=Gender, USAGE=A1, ACTUAL=A1,
TITLE='Gender',
REFERENCE=Name, PROPERTY=ATTRIBUTE, $
FIELDNAME=Marital_Status, ALIAS='Marital Status', USAGE=A1, ACTUAL=A1,
TITLE='Marital Status',
REFERENCE=Name, PROPERTY=ATTRIBUTE, $
FIELDNAME=Member_Card, ALIAS='Member Card', USAGE=A6, ACTUAL=A6,
TITLE='Member Card',
REFERENCE=Name, PROPERTY=ATTRIBUTE, $
FIELDNAME=Yearly_Income, ALIAS='Yearly Income', USAGE=A13, ACTUAL=A13,
TITLE='Yearly Income',
REFERENCE=Name, PROPERTY=ATTRIBUTE, $
DIMENSION=[Education Level], CAPTION='Education Level', $
HIERARCHY=[Education Level], CAPTION='Education Level', HRY_DIMENSION=[Education Level], $
FIELDNAME=Education_Level1, ALIAS='Education Level', USAGE=A19, ACTUAL=A19,
TITLE='Education Level',
WITHIN='*[Education Level]',
PROPERTY=CAPTION, $
DIMENSION=[Gender], CAPTION='Gender', $
HIERARCHY=[Gender], CAPTION='Gender', HRY_DIMENSION=[Gender], $
FIELDNAME=Gender11, ALIAS=Gender, USAGE=A1, ACTUAL=A1,
TITLE='Gender',
WITHIN='*[Gender]',
PROPERTY=CAPTION, $
DIMENSION=[Marital Status], CAPTION='Marital Status', $
  HIERARCHY=[Marital Status], CAPTION='Marital Status', HRY_DIMENSION=[Marital Status], $
    FIELDNAME=Marital_Status11, ALIAS='Marital Status', USAGE=A1, ACTUAL=A1,
      TITLE='Marital Status',
      WITHIN='*[Marital Status]',
      PROPERTY=CAPTION,  $
 DIMENSION=[Product], CAPTION='Product', $
  HIERARCHY=[Product], CAPTION='Product', HRY_DIMENSION=[Product], $
    FIELDNAME=Product_Family, ALIAS='Product Family', USAGE=A14, ACTUAL=A14,
      TITLE='Product Family',
      WITHIN='*[Product]',
      PROPERTY=CAPTION,  $
    FIELDNAME=Product_Department, ALIAS='Product Department', USAGE=A19, ACTUAL=A19,
      TITLE='Product Department',
      WITHIN=Product_Family,
      PROPERTY=CAPTION,  $
    FIELDNAME=Product_Category, ALIAS='Product Category', USAGE=A20, ACTUAL=A20,
      TITLE='Product Category',
      WITHIN=Product_Department,
      PROPERTY=CAPTION,  $
    FIELDNAME=Product_Subcategory, ALIAS='Product Subcategory', USAGE=A18, ACTUAL=A18,
      TITLE='Product Subcategory',
      WITHIN=Product_Category,
      PROPERTY=CAPTION,  $
    FIELDNAME=Brand_Name, ALIAS='Brand Name', USAGE=A13, ACTUAL=A13,
      TITLE='Brand Name',
      WITHIN=Product_Subcategory,
      PROPERTY=CAPTION,  $
    FIELDNAME=Product_Name, ALIAS='Product Name', USAGE=A43, ACTUAL=A43,
      TITLE='Product Name',
      WITHIN=Brand_Name,
      PROPERTY=CAPTION,  $
$ LEVEL [Product].[Product Name] PROPERTIES
    FIELDNAME=Cases_Per_Pallet, ALIAS='Cases Per Pallet', USAGE=I2, ACTUAL=I4,
      TITLE='Cases Per Pallet',
      REFERENCE=Product_Name, PROPERTY=ATTRIBUTE,  $
    FIELDNAME=Gross_Weight, ALIAS='Gross Weight', USAGE=D6.2, ACTUAL=D8,
      TITLE='Gross Weight',
      REFERENCE=Product_Name, PROPERTY=ATTRIBUTE,  $
    FIELDNAME=Low_Fat, ALIAS='Low Fat', USAGE=I2, ACTUAL=I4,
      TITLE='Low Fat',
      REFERENCE=Product_Name, PROPERTY=ATTRIBUTE,  $
    FIELDNAME=Net_Weight, ALIAS='Net Weight', USAGE=D6.2, ACTUAL=D8,
      TITLE='Net Weight',
      REFERENCE=Product_Name, PROPERTY=ATTRIBUTE,  $
    FIELDNAME=Recyclable_Package, ALIAS='Recyclable Package', USAGE=I2, ACTUAL=I4,
      TITLE='Recyclable Package',
      REFERENCE=Product_Name, PROPERTY=ATTRIBUTE,  $
    FIELDNAME=Shelf_Depth, ALIAS='Shelf Depth', USAGE=D6.2, ACTUAL=D8,
      TITLE='Shelf Depth',
      REFERENCE=Product_Name, PROPERTY=ATTRIBUTE,  $
    FIELDNAME=Shelf_Height, ALIAS='Shelf Height', USAGE=D6.2, ACTUAL=D8,
      TITLE='Shelf Height',
      REFERENCE=Product_Name, PROPERTY=ATTRIBUTE,  $
    FIELDNAME=Shelf_Width, ALIAS='Shelf Width', USAGE=D6.2, ACTUAL=D8,
      TITLE='Shelf Width',
      REFERENCE=Product_Name, PROPERTY=ATTRIBUTE,  $
    FIELDNAME=Sku, ALIAS=Sku, USAGE=D12, ACTUAL=D8,
      TITLE='Sku',
      REFERENCE=Product_Name, PROPERTY=ATTRIBUTE,  $
    FIELDNAME=Srp, ALIAS=Srp, USAGE=D5.2, ACTUAL=D8,
      TITLE='Srp',
      REFERENCE=Product_Name, PROPERTY=ATTRIBUTE,  $
    FIELDNAME=Units_Per_Case, ALIAS='Units Per Case', USAGE=I2, ACTUAL=I4,
      TITLE='Units Per Case',
      REFERENCE=Product_Name, PROPERTY=ATTRIBUTE,  $
 DIMENSION=[Promotion Media], CAPTION='Promotion Media', $
  HIERARCHY=[Promotion Media], CAPTION='Promotion Media', HRY_DIMENSION=[Promotion Media], $
    FIELDNAME=Media_Type, ALIAS='Media Type', USAGE=A23, ACTUAL=A23,
      TITLE='Media Type',
      WITHIN='*[Promotion Media]',
      PROPERTY=CAPTION,  $
DIMENSION=[Promotions], CAPTION='Promotions', $
  HIERARCHY=[Promotions], CAPTION='Promotions', HRY_DIMENSION=[Promotions], $
    FIELDNAME=Promotion_Name, ALIAS='Promotion Name', USAGE=A23, ACTUAL=A23,
      TITLE='Promotion Name',
      WITHIN='*[Promotions]',
      PROPERTY=CAPTION,  $
 DIMENSION=[Store], CAPTION='Store', $
  HIERARCHY=[Store], CAPTION='Store', HRY_DIMENSION=[Store], $
  HIERARCHY=[Store Size in SQFT], CAPTION='Store Size in SQFT', HRY_DIMENSION=[Store], $
  HIERARCHY=[Store Type], CAPTION='Store Type', HRY_DIMENSION=[Store], $
    FIELDNAME=Store_Country, ALIAS='Store Country', USAGE=A6, ACTUAL=A6,
      TITLE='Store Country',
      WITHIN='*[Store]',
      PROPERTY=CAPTION,  $
    FIELDNAME=Store_State, ALIAS='Store State', USAGE=A9, ACTUAL=A9,
      TITLE='Store State',
      WITHIN=Store_Country,
      PROPERTY=CAPTION,  $
    FIELDNAME=Store_City, ALIAS='Store City', USAGE=A13, ACTUAL=A13,
      TITLE='Store City',
      WITHIN=Store_State,
      PROPERTY=CAPTION,  $
    FIELDNAME=Store_Name, ALIAS='Store Name', USAGE=A8, ACTUAL=A8,
      TITLE='Store Name',
      WITHIN=Store_City,
      PROPERTY=CAPTION,  $
$ LEVEL [Store].[Store Name] PROPERTIES
    FIELDNAME=Store_Manager, ALIAS='Store Manager', USAGE=A8, ACTUAL=A8,
      TITLE='Store Manager',
      REFERENCE=Store_Name, PROPERTY=ATTRIBUTE,  $
    FIELDNAME=Store_Sqft, ALIAS='Store Sqft', USAGE=A5, ACTUAL=A5,
      TITLE='Store Sqft',
      REFERENCE=Store_Name, PROPERTY=ATTRIBUTE,  $
    FIELDNAME=Store_Type, ALIAS='Store Type', USAGE=A19, ACTUAL=A19,
      TITLE='Store Type',
      REFERENCE=Store_Name, PROPERTY=ATTRIBUTE,  $
    FIELDNAME=Store_Sqft1, ALIAS='Store Sqft', USAGE=A5, ACTUAL=A5,
      TITLE='Store Sqft',
      WITHIN='*[Store Size in SQFT]',
      PROPERTY=CAPTION,  $
    FIELDNAME=Store_Type11, ALIAS='Store Type', USAGE=A19, ACTUAL=A19,
      TITLE='Store Type',
      WITHIN='*[Store Type]',
      PROPERTY=CAPTION,  $
DIMENSION=[Time], CAPTION='Time', $
  HIERARCHY=[Time], CAPTION='Time', HRY_DIMENSION=[Time], $
    FIELDNAME=Year, ALIAS=Year, USAGE=I4, ACTUAL=I4,
      TITLE='Year',
      WITHIN='*[Time]',
      PROPERTY=CAPTION,  $
    FIELDNAME=Quarter, ALIAS=Quarter, USAGE=A2, ACTUAL=A2,
      TITLE='Quarter',
      WITHIN=Year,
      PROPERTY=CAPTION,  $
    FIELDNAME=Month, ALIAS=Month, USAGE=I2, ACTUAL=I4,
      TITLE='Month',
      WITHIN=Quarter,
      PROPERTY=CAPTION,  $
 DIMENSION=[Yearly Income], CAPTION='Yearly Income', $
  HIERARCHY=[Yearly Income], CAPTION='Yearly Income', HRY_DIMENSION=[Yearly Income], $
    FIELDNAME=Yearly_Income11, ALIAS='Yearly Income', USAGE=A13, ACTUAL=A13,
      TITLE='Yearly Income',
      WITHIN='*[Yearly Income]',
      PROPERTY=CAPTION,  $
 MEASUREGROUP=Sales, $
   MEASGRPDIM=[Customers], $
   MEASGRPDIM=[Education Level], $
   MEASGRPDIM=[Gender], $
   MEASGRPDIM=[Marital Status], $
   MEASGRPDIM=[Product], $
   MEASGRPDIM=[Promotion Media], $
   MEASGRPDIM=[Promotions], $
   MEASGRPDIM=[Store], $
   MEASGRPDIM=[Time], $
   MEASGRPDIM=[Yearly Income], $
 MEASUREGROUP=Undefined, CAPTION='(Undefined)', $
Note: Master Files should not be altered. Manipulating the Master File causes incorrect query results.
The Measures dimension can contain calculated and non-calculated members. Calculated members in the Measures dimension will contain a Reference defining the calculated member and a Property. Some properties are mandatory while others may be user-defined.
Generated Access File
SEGNAME=SALES,
  CUBENAME=Sales,
  SCHEMA=,
  CATALOG=FoodMart,
  DATASOURCE=CON1, $
Reference: Selecting Valid Dimensions for a Measure
A data source view may have multiple fact tables as well as multiple dimension tables. Each fact table contains records for a specific set of measures called a measure group. A particular measure group may not have a relationship to every dimension table, and if you select a measure/dimension combination where there is no relationship, the returned data might be meaningless.
Starting in Version 7 Release 7.04, when you create a synonym, each measure group and its related dimensions are listed at the bottom of the synonym. In addition, the FIELD declaration each measure in the Master File has a MEASURE_GROUP attribute identifying the measure group to which it belongs. Using this information, the WebFOCUS tools will gray out the dimensions that are not valid for each measure group so that you can make a valid measure/dimension selection for your report.
For example, the following portion of the Adventure_Works Master File shows the Internet_Sales FIELD declaration with its MEASURE_GROUP attribute:
FIELDNAME=Internet_Sales_Amount, ALIAS='Internet Sales Amount', USAGE=P20.2MB, ACTUAL=P16,
      MISSING=ON,
      TITLE='Internet Sales Amount', MEASURE_GROUP=Internet Sales,
      PROPERTY=MEASURE,  $
The following portion of the Adventure_Works Master File shows the Internet_Sales measure group along with the dimensions that are valid for this measure group:
  MEASUREGROUP=Internet Sales, $
   MEASGRPDIM=[Customer], $
   MEASGRPDIM=[Date], $
   MEASGRPDIM=[Delivery Date], $
   MEASGRPDIM=[Internet Sales Order Details], $
   MEASGRPDIM=[Product], $
   MEASGRPDIM=[Promotion], $
   MEASGRPDIM=[Sales Reason], $
   MEASGRPDIM=[Sales Territory], $
   MEASGRPDIM=[Ship Date], $
Reference: Managing Synonyms
Once you have created a synonym, you can right-click the synonym name in the Adapter navigation pane of either the Web Console or the Data Management Console to access the following options.
|
Option |
Description |
|---|---|
|
Open |
Opens the Master File for viewing and editing using a graphical interface. If an Access file is used it will be also available. |
|
Test Query |
Opens the Data Assist tool with the specified synonym selected. |
|
Edit as Text |
Enables you to view and manually edit the Master File. Note: To update the synonym, it is strongly recommended that you use the graphical interface provided by the Open option, rather than manually editing the Master File. |
|
Edit Access File as Text |
Enables you to view and manually edit the Access File. Note: This option is available only when an Access File is created as part of the synonym. |
|
Sample Data |
Retrieves up to 50 rows from the associated data source. |
|
Quick Copy |
Opens the Quick Copy page to select the properties for the copy. |
|
Custom Copy |
Opens the Data Assist tool with the specified synonym selected. |
|
Impact Analysis |
Generates a report showing where this synonym is stored and used, with links to the synonym instances. Impact Analysis reports enable you to evaluate changes before they are made by showing which components will be affected. See the Server Administration manual for details about Impact Analysis reports. |
|
Dependencies Analysis |
Generates a report showing information about the synonym and other synonyms and objects that are referenced within it. |
|
Download |
Enables you to open the Master File or Access File in a text editor or save it. |
|
Copy |
Copies the synonym to the clipboard. |
|
Delete |
Deletes the synonym. You are asked to confirm this selection before the synonym is deleted. |
|
Cut |
Deletes the synonym and places it on the clipboard. |
|
Rename |
Allows you to rename the synonym. |
|
Properties |
Displays the properties of the synonym, including physical location, last modified date, description, and privileges. |
Reference: Access File Keywords
|
Keyword |
Description |
|---|---|
SEGNAME |
Value must be identical to the SEGNAME value in the Master File. |
CUBENAME |
Name of the OLAP cube. |
SCHEMA |
Schema that describes the cube. |
DATASOURCE |
SQL Server Analysis Services name. |
CATALOG |
Name of the data source (catalog) the OLAP cube is using. |
Converting Alphanumeric Dates to WebFOCUS Dates
|
Topics: |
Microsoft Analysis Server natively stores data (such as, member names and captions) in time dimensions in alphanumeric format without applying any particular standard, and it allows you to create members with names consisting of any combination of components such as year, quarter, and month, with any delimiter and in many languages. In a sorted report, if such data is sorted alphabetically, the sequence does not make business sense. To ensure adequate sorting, aggregation, and reporting on date fields, WebFOCUS converts the alphanumeric dates into standard WebFOCUS date format using a conversion pattern that you can specify in the Master File attribute called DATEPATTERN.
Each element in the pattern is either a constant character which must appear in the actual input or a variable that represents a date component. You must edit the USAGE attribute in the Master File so that it accounts for the date elements in the date pattern. The maximum length of the DATEPATTERN string is 64 characters.
Note: You can use the Synonym Editor to edit a date pattern. This is recommended in order to avoid inadvertant syntax errors in the pattern.
Specifying Variables in a Date Pattern
|
How to: |
|
Reference: |
The valid date components (variables) are year, quarter, month, day, and day of week. In the date pattern, variables are enclosed in square brackets (these brackets are not part of the input or output. Note that if the data contains brackets, you must use an escape character in the date pattern to distinguish the brackets in the data from the brackets used for enclosing variables).
Syntax: How to Specify Years in a Date Pattern
- [YYYY]
-
Specifies a 4-digit year.
- [YY]
-
Specifies a 2-digit year.
- [yy]
-
Specifies a zero-suppressed 2-digit year (For example, 8 for 2008).
- [by]
-
Specifies a blank-padded 2-digit year.
Reference: Specify Month Numbers in a Date Pattern
- [MM]
-
Specifies a 2-digit month number.
- [mm]
-
Specifies a zero-suppressed month number.
- [bm]
-
Specifies a blank-padded month number.
Syntax: How to Specify Month Names in a Date Pattern
- [MON]
-
Specifies a 3-character month name in uppercase.
- [mon]
-
Specifies a 3-character month name in lowercase.
- [Mon]
-
Specifies a 3-character month name in mixed-case.
- [MONTH]
-
Specifies a full month name in uppercase.
- [month]
-
Specifies a full month name in lowercase.
- [Month]
-
Specifies a full month name in mixed-case.
Syntax: How to Specify Days of the Month in a Date Pattern
- [DD]
-
Specifies a 2-digit day of the month.
- [dd]
-
Specifies a zero-suppressed day of the month.
- [bd]
-
Specifies a blank-padded day of the month.
Syntax: How to Specify Julian Days in a Date Pattern
- [DDD]
-
Specifies a 3-digit day of the year.
- [ddd]
-
Specifies a zero-suppressed day of the year.
- [bdd]
-
Specifies a blank-padded day of the year.
Syntax: How to Specify Day of the Week in a Date Pattern
- [WD]
-
Specifies a 1-digit day of the week.
- [DAY]
-
Specifies a 3-character day name, uppercase.
- [day]
-
Specifies a 3-character day name, lowercase.
- [Day]
-
Specifies a 3-character day name, mixed-case.
- [WDAY]
-
Specifies a full day name, uppercase.
- [wday]
-
Specifies a full day name, lowercase.
- [Wday]
-
Specifies a full day name, mixed-case.
For the day of the week, the WEEKFIRST setting defines which day is day 1.
Syntax: How to Specify Quarters in a Date Pattern
- [Q]
-
Specifies a 1-digit quarter number (1, 2, 3, or 4).
For a string like Q2 or Q02, use constants before [Q], for example, Q0[Q].
Specifying Constants in a Date Pattern
Between the variables, you can insert any constant values.
If you want to insert a character that would normally be interpreted as part of a variable, use the backslash character as an escape character. For example:
- Use \[ to specify a left square bracket constant character.
- Use \\ to specify a backslash constant character.
For a single quotation mark, use two consecutive single quotation marks ('').
Example: Sample Date Patterns
If the date in the data source is of the form CY 2001 Q1, the DATEPATTERN attribute is:
DATEPATTERN = 'CY [YYYY] Q[Q]'
If the date in the data source is of the form Jan 31, 01, the DATEPATTERN attribute is:
DATEPATTERN = '[Mon] [DD], [YY]'
If the date in the data source is of the form APR-06, the DATEPATTERN attribute is:
DATEPATTERN = '[MON]-[YY]'
If the date in the data source is of the form APR - 06, the DATEPATTERN attribute is:
DATEPATTERN = '[MON] - [YY]'
If the date in the data source is of the form APR '06, the DATEPATTERN attribute is:
DATEPATTERN = '[MON] ''[YY]'
If the date in the data source is of the form APR [06], the DATEPATTERN attribute is:
DATEPATTERN = '[MON] \[[YY]\]' (or '[MON] \[[YY]]'
Note the right square bracket does not have to be escaped.
Example: Sorting By an Alphanumeric Date
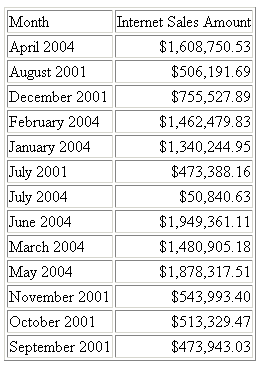
The following request against the Adventure Works cube sorts by the Month field:
TABLE FILE adventure_works_mixed_case
SUM
Internet_Sales_Amount
BY Month
WHERE Calendar_Year EQ 'CY 2001' OR 'CY 2004'
ON TABLE SET PAGE-NUM OFF
ON TABLE NOTOTAL
ON TABLE SET HTMLCSS ON
END
The default synonym has the following declaration for the Month field:
 FIELDNAME=Month, ALIAS=Month, USAGE=A14, ACTUAL=A14,
      TITLE='Month',
      WITHIN='Calendar_Quarter',
      PROPERTY=CAPTION,  $
The output shows that the months also have a year component and are sorted in alphabetical order, not month order:

Now, make the following changes to the declaration for the Month field:
- Change the USAGE to a WebFOCUS date format with the same date components as the alphanumeric date (MtrYY).
- Add a DATEPATTERN attribute that describes the alphanumeric
date stored in the field.
- Variable: mixed case full month name, [Month].
- Literal: blank space.
- Variable: four-digit year, [YYYY].
FIELDNAME=Month, ALIAS=Month, USAGE=MtrYY, ACTUAL=A14,
      TITLE='Month',
      WITHIN='Calendar_Quarter',
      PROPERTY=CAPTION,
      DATEPATTERN = '[Month] [YYYY]',$
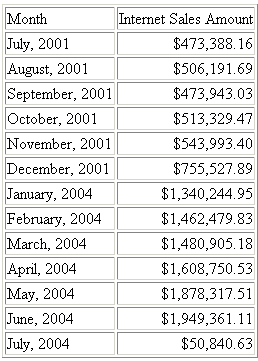
Re-running the request with these changes produces the following output in which the months are sorted correctly:

Example: Sorting By an Alphanumeric Date Containing Calendar Quarter
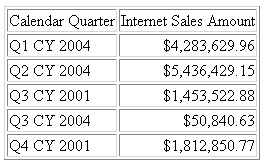
The following request against the Adventure Works cube sorts by the Calendar_Quarter field:
TABLE FILE adventure_works_mixed_case
SUM
Internet_Sales_Amount
BY Calendar_Quarter
WHERE Calendar_Year EQ 'CY 2001' OR 'CY 2004'
ON TABLE SET PAGE-NUM OFF
ON TABLE NOTOTAL
ON TABLE SET HTMLCSS ON
END
The default synonym has the following declaration for the Calendar_Quarter field:
FIELDNAME=Calendar_Quarter, ALIAS='Calendar Quarter', USAGE=A10,
  ACTUAL=A10,
  TITLE='Calendar Quarter',
  WITHIN='Calendar_Semester',
  PROPERTY=CAPTION,$
The output shows that the quarters are sorted in alphabetical order, not quarter and year order:

Now, make the following changes to the declaration for the Calendar_Quarter field:
- Change the USAGE to a WebFOCUS date format containing the quarter and year (QYY).
- Add a DATEPATTERN attribute that describes the alphanumeric
date stored in the field:
- Literal value, Q: Q
- Variable Quarter: [Q]
- Literal value, space followed by CY followed by space: CY
- Variable four-digit year: [YYYY]
FIELDNAME=Calendar_Quarter, ALIAS='Calendar Quarter', USAGE=QYY,
  ACTUAL=A10,
  TITLE='Calendar Quarter',
  WITHIN='Calendar_Semester',
  PROPERTY=CAPTION,
  DATEPATTERN = 'Q[Q] CY [YYYY]',$
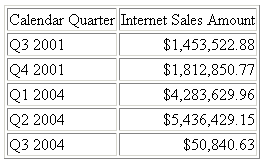
Re-running the request with these changes produces the following output in which the quarters are sorted correctly. Note that the displayed value uses the WebFOCUS date format, not the original alphanumeric date format:

| WebFOCUS | |
|
Feedback |