Notification
|
Topics: |
|
How to: |
Event Routing and a customized Login Message can be configured from the Notification menu on the Workspace ribbon.
Event Routing allows you to launch procedures or send email based on different server events (agent or listener crashes, server configuration errors, disk space limitations, and others). All events are classified by type as information, warning, or error. These can be pre-defined or custom-defined events.
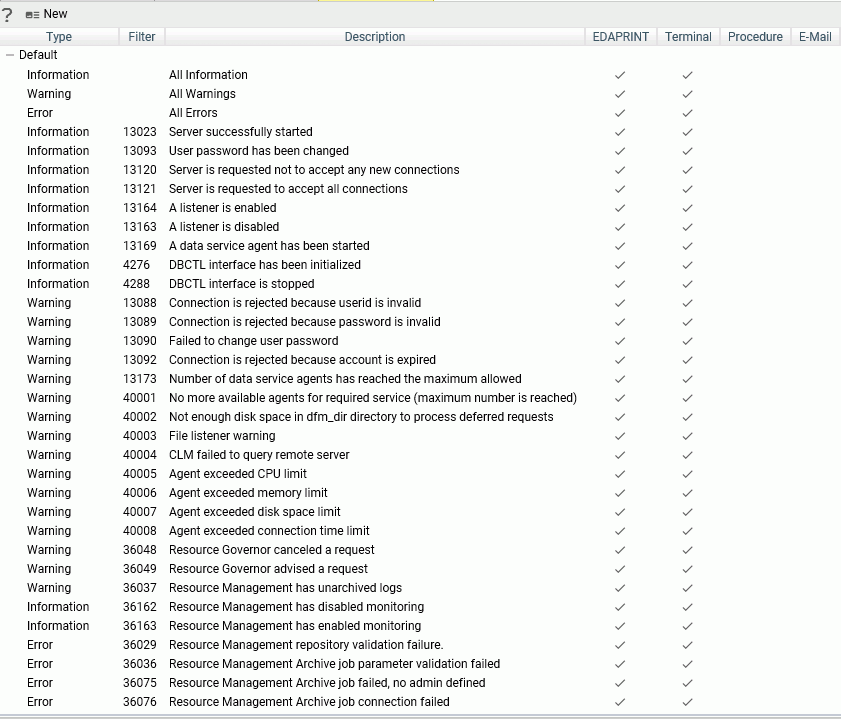
The Event Routing page shows the Default and Customized Event Routing.
The Default routings are shown in the following image.
Procedure: How to Customize an Event Routing
By customizing event routing, you can launch a procedure or send email based on server events.
For each event, you can also select whether to write the event to the EDAPRINT log or the terminal.
- From the sidebar, click Workspace.
- From the ribbon, click Notification, then Event Routing.
- Right-click an event and click Customize Event Routing, or click New on the menu bar.
The Customize Event Routing page opens, as shown in the following image.
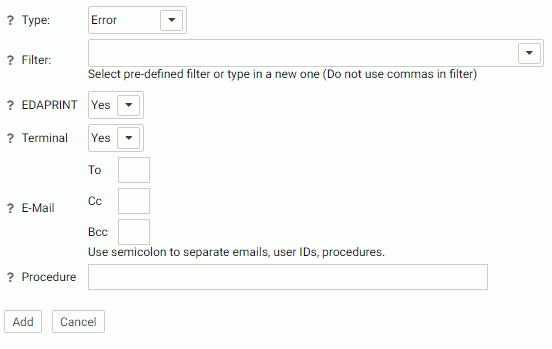
- From the Type drop-down menu, select a message type. The choices are Information, Error, Warning, and Any.
- Enter the event criteria in the Filter field, or select a predefined event from the drop-down menu.
- From the
EDAPRINT drop-down menu, select Yes if you
want to write the selected event message to the server log.
In z/OS, the selected server messages can be also written to the z/OS system log by selecting Yes from the JESLOG drop-down menu.
- From the Terminal drop-down menu, select Yes if you want to write the selected event message to the terminal.
- Optionally, enter email addresses to send an email when the event occurs.
- Optionally, enter a procedure to execute in the Procedure field, including the application name, for example, utility/movefiles.
- Click Add for a new event, or Change for an existing event.
The event is added to the Customize Event Routing Page.
- Click Save and Restart Server.
Example: Suppressing an EDAPRINT Log Message
This example shows how to suppress the following EDAPRINT log message by customizing an event routing:
request by edapsmr to expire foccache session
- Open the Event Routing page.
- Select Warning from the Type drop-down list.
- Enter the following event in the Filter text box:
request by edapsmr to expire foccache session
- Select No from the EDAPRINT and Terminal drop-down lists.
- Leave the E-Mail parameters blank, so that an email will not be sent when the event occurs.
- Click Add. The event is added, but not yet saved.
- Click Save and Restart.
When the server restarts, this custom event will suppress the request by edapsmr to expire foccache session message in the edaprint.log file.
Procedure: How to Set Workspace Log Properties for Event Routing
The Workspace Log Properties page controls both event routing email and the edaprint log by allowing you to specify a suppression interval for email notifications from event routing, and to include a number of lines from the edaprint log file in the email body. The edaprint log file provides information about the events occurring on the server before a triggered event.
For information on the edaprint log, see How to Set Workspace Log Properties to Control the Edaprint Log.
- From the sidebar, click Workspace.
- Open Logs and Traces.
- Right-click Workspace
Logs and click Properties.
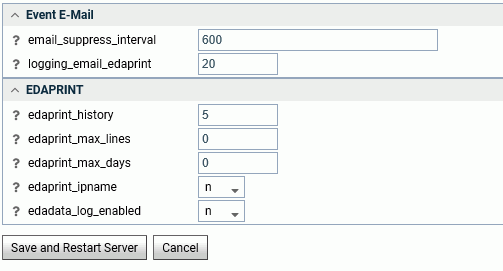
The Workspace Logs Properties page opens, as shown in the following image.
- Enter or
select values for the Event Email parameters.
The Event Email parameters are:
- email_suppress_interval
-
Suppresses duplicate email notifications if the same event occurs again during this time interval (in seconds). Zero disabled suppression. The default value is 600 (10 minutes).
- logging_email_edaprint
-
Defines the maximum number of server messages from edaprint.log are included in the email. The default value is 20.
- Click Save and Restart Server.
EVENT_TEXT and EVENT_ID
|
Topics: |
When a procedure is triggered by an event, the ID of the routing event and the text of the event message are automatically available to the procedure as the EVENT_ID and EVENT_TEXT parameters, respectively. The EVENT_TEXT parameter needs to be decrypted using the following user subroutine:
B64DECODE('XXXXXXXXXX', 'Ann');Login Message
|
How to: |
Server administrators can customize the login and connection result screens with custom messages. The Login Message option is available from the Notification button on the ribbon.
Procedure: How to Customize the Login Screen With a Message
To customize the login screen:
- Click Workspace on the sidebar.
- From the ribbon, click Notification, then Login Message.
The Login Message page opens, as shown in the following image.
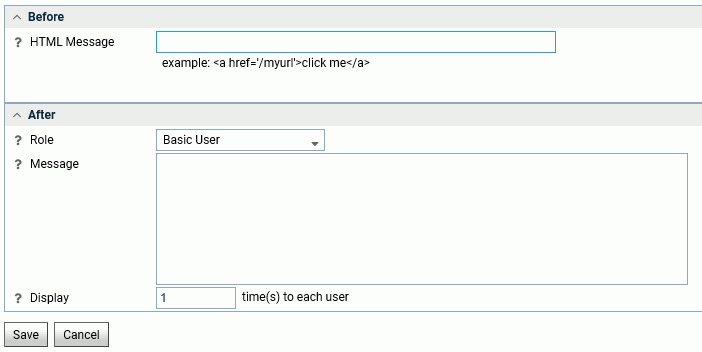
- Enter the message in the HTML Message field
in the Before section. It can have plain text as well as HTML tags.
For example, enter the following text.
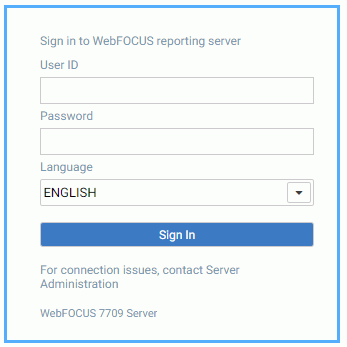
For connection issues, contact Server Administration
- Click Save.
The message is added to the login page, as shown in the following image.
Procedure: How to Customize the Connection Result Screen With a Message
Server administrators can customize the connection result screen for each user type.
- Click Workspace on the sidebar.
- From the ribbon, click Notification then Login Message.
The Login Message page opens.
- Select a user type from the Role drop-down menu. The options are Server Administrator, Application Administrator, Server Operator, Basic User, and All Users.
- Enter the text of the message in the Message field of
the After field:
Please sign off by 6pm tonight.
Optionally, you can set the number of times the message will appear by entering a value in the Display field.
- Click Save.
The message is displayed after a successful connection, as shown in the following image.

| WebFOCUS | |
|
Feedback |