Network Installation Steps
This section explains a network installation of WebFOCUS App Studio. In a network installation, App Studio is installed on a single shared machine, rather than each developer desktop. Developers then launch App Studio on their desktops by executing files that have been installed on the shared machine. This simplifies administration, installation, and upgrading, and allows all developers to use a common preconfigured environment.
A network installation of App Studio does not include full WebFOCUS Client connectivity. After installing App Studio, you must configure it to access a WebFOCUS environment somewhere on your network. App Studio then uses the web server configuration, application server configuration, WebFOCUS Client connectivity, and WebFOCUS Reporting Server of that WebFOCUS environment.
An App Studio network installation involves the following steps:
Ensuring Requirements Are Met
A network installation of App Studio can consist of three types of machines. Each machine has its own requirements.
-
WebFOCUS Machine Requirements
WebFOCUS requirements and installation steps are provided in the WebFOCUS and ReportCaster Installation and Configuration manual for your platform.
Note: The release of WebFOCUS must be the same release number as App Studio.
- App Studio (Shared) Machine Requirements
App Studio can be installed on the same machine as WebFOCUS or on a separate machine. The requirements for a network installation of App Studio are the same as those of a non-networked installation. For more information on requirements, see Installing App Studio.
Note: You must provide a license for a network edition.
Since this machine will be accessed by multiple users over the network, you should use a machine that supports multiple connections and frequent network access.
- App Studio End User (Remote) Machine Requirements
Machines from which you run App Studio off the network should meet the following requirements:
- Windows 10, Windows 8.1, Windows 7 Enterprise, Professional or Ultimate editions, Windows 2016, 2012, 2012 R2, 2008, or 2008 R2 Server editions.
- Microsoft Internet Explorer. Internet Explorer components are required for App Studio. Internet Explorer 11 is certified for App Studio.
- Adobe Reader. Adobe Reader XI (11) and Adobe Reader X (10) are certified with App Studio.
- Administrator Rights. Administrator rights are required during the initial launch of the network version from the client machine to set up required registry entries in the local machine area.
-
Enabling Multiple Browser Support in
App Studio.
Developers can use Chrome™, Firefox®, Edge®,
Internet Explorer®, or the internal viewer when running reports. To
use Chrome, Firefox, or Edge, the product requires components that
are delivered with the .NET Framework version 4.0. This version of
.NET is preinstalled on most machines. If your machine does not
have this .NET version it can be installed by downloading the
latest Microsoft .NET Framework 4.x Developer Pack from https://www.microsoft.com/en-us/download/details.aspx?id=42637
To verify that the required .NET Framework is installed on the Client machine, confirm that the following directory exists:
%SystemRoot%\Microsoft.NET\Framework64\v4.0.30319\
where:
- %SystemRoot%
- Is the location of the Windows folder on your machine (for example, C:\Windows).
Note: This directory should contain the RegAsm.exe file.
The program can’t start because mfc110.dll is missing from your computer. Try reinstalling the program to fix this problem.
or
This application has failed to start because the application configuration is incorrect. Reinstalling the application may fix the problem.
To correct this issue, download and install the latest update Visual C++ Redistributable for Visual Studio 2012 x64 version from https://www.microsoft.com.
Installing App Studio
Install App Studio as explained in Installing App Studio. Be aware that when providing a network installation license, you will not have the option to install or configure Tomcat, or other supported configurations.
You must install using the proper license code for a network installation.
Configuring App Studio
|
How to: |
To configure a network installation of App Studio, you must set up access to instances of WebFOCUS that are installed on your network. You do this by defining WebFOCUS environments.
Procedure: How to Define a WebFOCUS Environment
- If WebFOCUS and App Studio are on the same machine, start the WebFOCUS Reporting Server and ensure that the web and/or application servers are started.
- Click the Start button on the taskbar.
- In the list of installed applications, expand the Information Builders app.
- Select the WebFOCUS 82 App Studio folder.
This opens a new File Explorer window, with all of the product shortcuts.
- Launch WebFOCUS App Studio.
- On the Home tab,
in the Utilities group, click Environments to
open the Environments List dialog box, as shown in the following
image.
The Environments List dialog box lets you define connections to WebFOCUS environments.
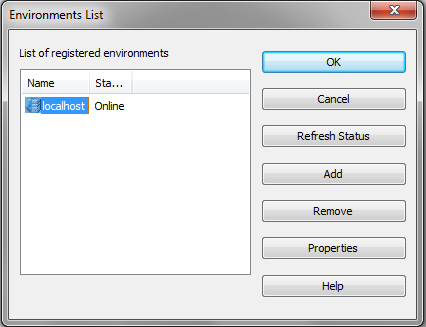
The Environments List dialog box shows all WebFOCUS environments that have been defined for App Studio. If you have previously defined a WebFOCUS environment, it will be shown here. Otherwise, only the localhost environment displays.
- Click the localhost environment
and then click Properties to edit the default
settings.
The WebFOCUS Environment Properties window opens.
- Change the Description field to a name end users should see when they launch App Studio from remote machines. The name localhost will be misleading, since they are on their local machines.
- Change the Host Name and Port to access the web server where WebFOCUS is configured. Do not use localhost for the Host Name, even if WebFOCUS is installed on the same machine as App Studio. When end users launch App Studio, localhost will resolve to the end users machine, and not the App Studio machine.
- Select Allow Host Aliases if you need to configure multiple WebFOCUS instances that have been installed on the same host machine.
- Optionally, you can specify the connection timeout, in seconds. You can specify a connection timeout between 120 seconds and 240 seconds if you are experiencing connection failure because of timeouts. The default connection timeout is 60 seconds.
- Optionally, you can specify the Login Timeout to indicate how long App Studio should wait for the login credentials to be validated. The default time is 15 seconds. You can set this to a higher value, if necessary. You can configure this setting for each environment.
- Click through
the panes of the WebFOCUS Environment Properties window to change
any default options that are customized in your environment.
- Click OK when
you have set up the default environment.
If you wish to define additional WebFOCUS environments, click Add on the Environments List.
- Click OK on the Environments List when you have defined all your environments.
- If prompted, sign in to the WebFOCUS Reporting Server.
- Ensure that your WebFOCUS environments are accessible through the Environments Tree panel.
- Stop and start the product again to ensure that you can reconnect to the environment and to confirm operability.
Note: The WebFOCUS Reporting Server in the WebFOCUS environment should not be the WebFOCUS Reporting Server installed as part of App Studio. The WebFOCUS Reporting Server installed as part of App Studio supports a very limited number of users (agents) at one time.
Setting Up Access to the Network Installation
|
How to: |
For developers to run App Studio off the network, you must complete the following on the App Studio machine:
Procedure: How to Set Up Network Shares
You must set up a network share before launching App Studio from another machine. If this is not practical for security reasons, then turn the AppStudio82 directory into a network share.
Note: If the share name is different from ibi, ensure that the new share name is used in the runfocshell.dat configuration file, as described in How to Configure the Network Settings.
To turn the ibi directory into a network share:
- In Windows, open File Explorer.
- Navigate to and right-click the ibi directory.
- Choose Properties.
- Select the Sharing tab.
- Click Advanced Sharing.
- Select Share this folder and type a Share name.
- Click Permissions and
assign permissions for the ibi share directory to Read
& Execute and set permissions for the App Studio
temp folder to Write access. The App Studio temp
folder is
drive:\ibi\AppStudionn\temp
where:
- drive
-
Is the directory in which App Studio is installed.
- nn
-
Is the App Studio release number.
- Grant access to the share locations for users accessing the network install. You can add users individually or you can add users to a group. A group is easier to maintain, and you can grant the required privileges to the group.
- Click OK.
Procedure: How to Copy the WebFOCUS Environments File (wfscom.xml)
Copy the WebFOCUS environment settings (wfscom.xml) into the AppStudio82\bin directory so they are available to remote App Studio users.
When you define WebFOCUS environments, settings are stored in the following location for Windows:
drive:\Users\user_id\AppData\Roaming\Information Builders\wfscom.xml
where:
- user_id
-
Is your Windows user ID.
Note: This file and directory may not be visible by default. To see this directory, open File Explorer, click Tools, select Folder Options, and then select the View tab. Select Show hidden files and folders and click OK.
For remote machines to access the wfscom.xml file, you must copy it to a shared directory. The default location to use is:
drive:\ibi\AppStudio82\bin
When running App Studio off the network, a developer can use settings in this file or settings stored on the developer machine. The first time App Studio is run off the network, the settings in this file are used. When settings in this file are used, this wfscom.xml file is placed in the end user /Application Data/Information Builders/ directory on the remote machine each time App Studio is run off the network. If all developers use the settings in this file, they always see the same WebFOCUS environments.
- If a previous copy of wfscom.xml is on the machine of a remote user, it is overwritten.
- If a remote user changes WebFOCUS environment settings while accessing App Studio from the network, those changes are only saved to the end users machine. They will not be available to other users. They will also be overwritten the next time App Studio is launched, unless the user chooses not to update the environments from the network as explained in Customizing WebFOCUS Environments.
- To change WebFOCUS environment settings for all users, you must change them on the shared App Studio machine and not from a remote machine. Then, you must recopy the wfscom.xml file to the AppStudio82\bin directory so it is available when App Studio is run from a remote machine.
Procedure: How to Configure the Network Settings
Settings for when App Studio is launched off the network are in the following file:
drive:\ibi\AppStudio82\bin\runfocshell.dat
You must edit this file before launching App Studio from another machine.
- Open the runfocshell.dat file in a text editor, such as Notepad.
- Find the
following line:
REGSTRING:LastUsedServer=Name to be supplied by Administrator
- Change this
line to specify the name of the default WebFOCUS environment. For
example:
REGSTRING:LastUsedServer=WFEnvironment
You should have set up this environment, as explained in How to Define a WebFOCUS Environment.
- Ensure that
the correct host name, share name, and UNC directory path appears
for accessing the AppStudio80 directory. The host name is set by
the installation, but you should confirm it and ensure the share
name is correct. Several lines contain this. For example:
WFSCOM:\\hostname\Ibi\AppStudio82\bin\wfscom.xml
SHLPATH:\\hostname\Ibi\AppStudio82\bin
If the host name is incorrect or you changed the share name, update all lines where the host name appears.
Be aware that the WFSCOM value specifies where remote machines look for the wfscom.xml file. You can change the name and location of this file if needed, but the file name must end in.xml. The file specified is copied to a remote users /Application Data/Information Builders/ directory on the remote machine. The file name on the remote machine will always be wfscom.xml regardless of the file specified by the WFSCOM value.
- Save and exit the file.
Most of the settings in this file are created by the installation and should not be edited unless directed by Customer Support.
Caution: The DLL and OCX files listed in runfocshell.dat are loaded on remote machines when App Studio is loaded on those machines.
Installing App Studio Network Shortcuts
|
How to: |
An installation program is provided to create shortcuts to launch App Studio. Since no disk space is needed on the remote machine, this is referred to as a Zero-Footprint WebFOCUS App Studio deployment.
Procedure: How to Install App Studio Network Shortcuts
To install shortcuts, perform the following on machines from which you wish to run App Studio off the network:
- Open File Explorer.
- In the Address
bar, type the host name of the machine where App Studio is installed
using the Universal Naming Convention (UNC). This has the form:
\\hostname
where:
- hostname
-
Is the host name or IP address of the machine where App Studio is installed.
You should see a list of shared directories including the ibi shared directory you created.
- Navigate
the shared directory to:
\\hostname\ibi\AppStudio82\Utilities\Local_setup
- Run the
setup.exe application to install App Studio shortcuts.
The installation wizard launches and a Welcome window opens.
- Click Next at
the Welcome window.
You are prompted to create shortcuts.
- Select which
shortcuts to create and click Next.
Shortcuts are created.
- Click Finish.
Note: To remove the shortcuts from the remote machine, use the Control Panel. The shortcuts appear as Zero-Footprint WebFOCUS App Studio. Be aware that this does not remove the registry settings or files described in Network App Studio Settings on Remote Machines.
Launching App Studio
|
Reference: |
After installing the App Studio shortcuts, you can start App Studio from the Start menu by selecting Zero-Footprint WebFOCUS App Studio.
If the WebFOCUS Reporting Server runs with security OPSYS, you may be prompted to log on.
If you receive other errors, review the steps in Setting Up Access to the Network Installation and ensure that WFSCOM is defined correctly in runfocshell.dat.
The program can’t start because mfc110.dll is missing from your computer. Try reinstalling the program to fix this problem.
or
This application has failed to start because the application configuration is incorrect. Reinstalling the application may fix the problem.
To correct this issue, download and install the latest update Visual C++ Redistributable for Visual Studio 2012 x64 version from https://www.microsoft.com.
Reference: Network App Studio Settings on Remote Machines
The first time you launch App Studio on a remote machine, the wfscom.xml file is copied from the shared networked machine to the remote machine. The file is normally placed in the following location for Windows:
drive:\Users\user_id\AppData\Roaming\Information Builders\wfscom.xml
where:
- user_id
-
Is your Windows user ID.
Other files are also created in this directory. This directory may not be visible, by default. To see this directory, open File Explorer, select the View tab, and then select Hidden items.
When you launch App Studio on a remote machine, registry settings are created under:
HKEY_LOCAL_MACHINE\SOFTWARE\Information Builders
HKEY_CURRENT_USER\SOFTWARE\Information Builders
In addition, DLL and OCX files listed in the \\hostname\ibi\AppStudio82\bin\runfocshell.dat file are loaded.
Customizing WebFOCUS Environments
There are two ways to handle WebFOCUS environment settings when running App Studio off the network. Developers can use the common settings on the network or use settings specific to the developer machine.
- Option 1: Use
the common WebFOCUS environment settings on the network (default).
With this option, whenever a developer launches App Studio, the wfscom.xml file on the network installation is copied to the developer machine from the following location.
\\hostname\ibi\AppStudio82\bin\wfscom.xml
where:
- hostname
-
Is the host name or IP address of the machine where App Studio is installed.
This means all developers who launch App Studio from this network location use the same environment settings. It also means that any WebFOCUS environment settings that developers change on their machines will not appear the next time they launch App Studio.
- Option 2: Use
customized WebFOCUS environment settings on the local machine of
a developer.
With this option, the first time a developer launches App Studio, the wfscom.xml file is copied from the network to the developer machine. However, after App Studio is started on the developer machine, you can allow the developer to prevent the wfscom.xml file from being copied over in the future. By default, developers have the option to choose whether to copy over wfscom.xml or not.
On the machine of a developer, after App Studio has started:
- Click the Application button.
- On the Application menu, click Options.
- On the General tab, under Other Settings, clear Remote Update Server Environment from Network.
This creates a registry setting on that machine that tells App Studio not to copy over wfscom.xml when App Studio is launched from the network.
You can control whether the Remote Update Server Environment from Network appears and whether wfscom.xml is automatically copied by editing the runfocshell.dat file. This file was introduced in How to Configure the Network Settings. The runfocshell.dat file specifies registry entries that great created on developer machines. The registry entries are created each time a developer launches App Studio off the network and will overwrite any previous entries.
By default, the following lines appear:
REGISTRY:HKEY_CURRENT_USER\SOFTWARE\Information Builders\AppStudio
REGDWORD:IsRemote=1
With these lines, wfscom.xml is copied and developers can choose whether or not to continue copying the file in the future.
You can choose not to show the option by changing the lines to:
REGISTRY:HKEY_CURRENT_USER\SOFTWARE\Information Builders\AppStudio REGDWORD:IsRemote=0 With these lines, wfscom.xml is always copied and developers do not have the option to change this behavior.
You can add the following line if you want to force the copying of wfscom.xml regardless of what a developer has chosen in the past:
REGISTRY:HKEY_CURRENT_USER\SOFTWARE\Information Builders\AppStudio
REGDWORD:IsRemote=0 REGDWORD:BypassWFSUpdate=0
With these lines, wfscom.xml is always copied, even if a developer has chosen not to copy it in the past. This is a good way to force all developers to use a new version of wfscom.xml if you make a major change in the environment settings.
If you never want wfscom.xml to be copied from the network, use the following line:
REGISTRY:HKEY_CURRENT_USER\SOFTWARE\Information Builders\AppStudio
REGDWORD:IsRemote=0 REGDWORD:BypassWFSUpdate=1
With these lines, wfscom.xml is never copied and developers do not have the option to change this.
Limiting Access to App Studio
There are several ways to limit access to App Studio.
- You can restrict access to the file system of the App Studio machine by setting NTFS permissions on the shared directory.
- You can specify which
user IDs can run App Studio by editing the following file on the
App Studio machine:
drive:\ibi\AppStudio82\bin\devstdpw.dat
By default, this file contains an asterisk (*) indicating that any user ID can run App Studio. If you wish to restrict which user IDs can run App Studio, remove the asterisk (*). Then specify each user ID that is allowed to run App Studio. Each user ID should be entered on a single line (one line per user ID). These are the user IDs used to sign in to Windows. This file is case sensitive. Do not enter the domain as part of your user ID.
Creating App Studio Traces From a Client Machine in App Studio Network Edition
drive:\AppStudio82\bin\focshell.dat file from the network machine to any location on
the client machine. Run this utility prior to performing the task that is having issues and needs to be analyzed by Information Builders. From the trace utility, enable traces. Save the trace file when done, turn traces off, and close the Communications Layer Trace utility.| WebFOCUS | |
|
Feedback |