About Tasks in the Advanced Scheduling Tool
|
Topics: |
The Tasks option allows you to select what the schedule will run to obtain the report to be distributed and for WebFOCUS procedures (FEXs), such as whether or not to burst the report. In the Advanced Scheduling tool, you can set multiple tasks for the Email and Printer distribution methods. For more information, see About Tasks in the Basic Scheduling Tool.
Note: The WebFOCUS Client Universal Profile is executed by ReportCaster when a WebFOCUS Repository procedure or WebFOCUS Reporting Server procedure is run. For more information, see the WebFOCUS Security and Administration manual.
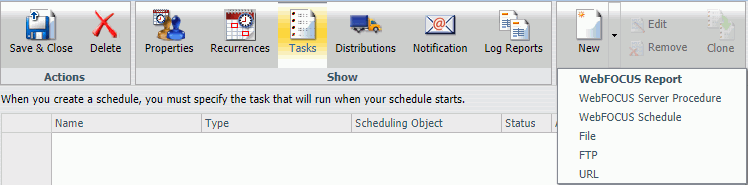
The following image shows the Task tab in the Advanced Scheduling tool. When you click the New tab, the WebFOCUS Report Task Type dialog box displays by default. When you click the drop-down arrow of the New tab, you can select from all Task Types, including WebFOCUS Report, WebFOCUS Server Procedure, WebFOCUS Schedule, File, FTP, and URL.
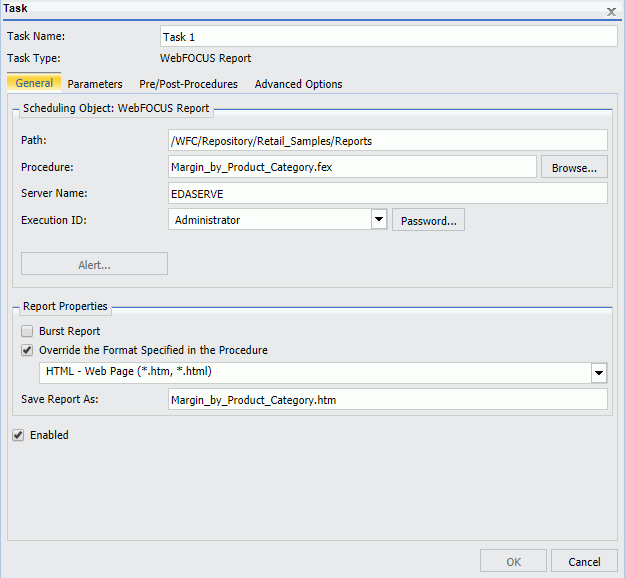
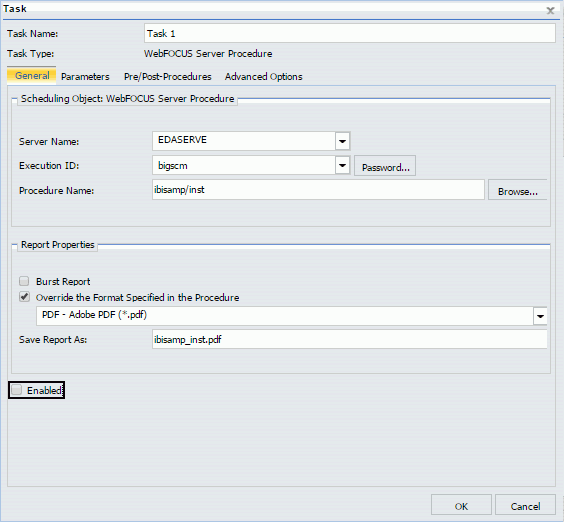
To create a task, if applicable, verify the Path, Procedure, Server Name, Execution ID, and Password. For Report Properties, indicate if you want to burst the report (FEX) output. Optionally, select the Override the Format Specified in the Procedure check box to override the format specified in the procedure with a selection from the drop-down list. The following image shows the Task dialog box for a WebFOCUS Report task.
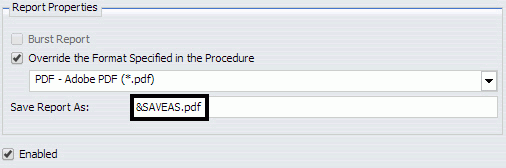
Note: You can use parameters (amper variables) when specifying a value in the Save Report As field of a schedule. These parameters can be system variables, such as &YYMD or any amper variable for which a value is returned by the Reporting Server when the scheduled procedure is executed. To use the dot file extension separator after a variable terminate the variable with the '|' character, for example, &YYMD|.htm. Similarly, to use the ampersand character itself, follow the ampersand with the '|' character (for example, Smith&|Jones). If a value for a parameter specified in a schedule is not returned by the Reporting Server when the procedure executes, the schedule will fail with a "No report to distribute" error. If the scheduled task is burst, you can also use the '%BURST' symbol to include the burst value in the Save Report As field.
The Task dialog box for a WebFOCUS Report and a WebFOCUS Server Report displays three tabs.
-
General tab.
Specifies the Path, Procedure, Server Name, Execution ID, and Password. Also
allows you to specify Report Properties, including the option to burst the
report (FEX) output format. Optionally, select the
Override
the Format Specified in the Procedure check box to override the
format specified in the procedure with a selection from the drop-down list.
Note:
- If the scheduled report is a compound report that uses the stabilized SET COMPOUND OPEN syntax, you must select the Override the Format Specified in the Procedure check box and specify the format in the schedule when scheduling this report. Otherwise, the report will not be distributed. Compound reports produced by the WebFOCUS and App Studio reporting tools do not require that the Override the Format Specified in the Procedure check box be checked.
-
FLEX, VISDIS, and VISDISAE report output formats are no longer supported. If you are editing a task that uses one of these formats within a schedule, you can change the output format in the dialog box that opens.
- If you click OK, and the output format of the report is set to FLEX, the task output is saved as AHTML.
- If you click OK, and the output format of the report is set to VISDIS or VISDISAE, the task output is saved as HTML.
- If you click Exit, the output format will not be changed, and any changes that you made to the task will not be saved.
-
When an existing WebFOCUS Server Procedure or WebFOCUS Report task is opened in the Advanced Scheduling tool, if the Override the Format Specified in the Procedure check box was selected, the list of formats displays. If you clear the Override the Format Specified in the Procedure check box, the list of formats does not display.
- When an existing WebFOCUS Server Procedure or WebFOCUS Report task is opened in the Advanced Scheduling tool, if the Override the Format Specified in the Procedure check box was not selected, the list of formats does not display. If you select the Override the Format Specified in the Procedure check box, the list of formats displays.
-
Parameters
tab. Specifies values for parameters that are required at run time by the
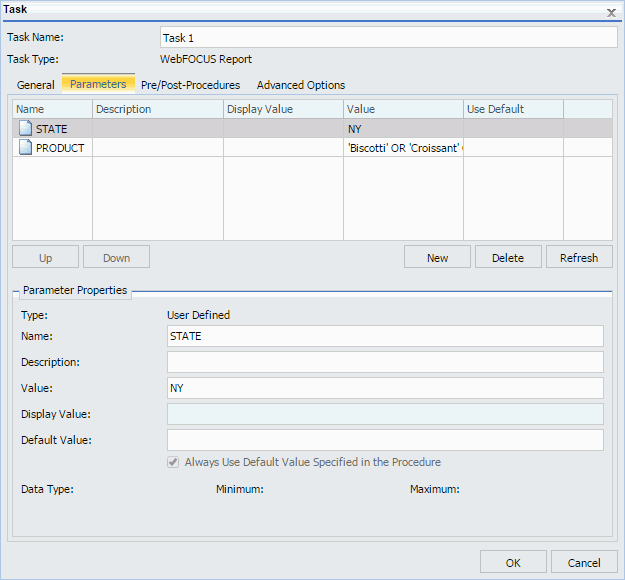
report procedure (FEX) being scheduled. The following image shows the
Parameters tab selected and two parameters, STATE and PRODUCT, with values
selected that will be saved for the schedule.
The functionality within the Advanced Scheduling tool Task Parameters tab is the same as the Basic Scheduling tool Parameters option that displays in the Task Parameters dialog box. For more information about creating new parameters or specifying parameter values for a simple, static list, or a dynamic list parameter that allows single or multiple values, see Specifying Parameter Values.
For more information about creating a new parameter, see Creating a New Parameter. For more information about deleting a parameter, see Deleting a Parameter.
- Pre/Post-Procedures tab. Allows you to specify that a WebFOCUS Server Procedure should be run before or after the scheduled task is run.
- Advanced Options tab. Provides access to the Additional FOC Errors to be Processed as Warnings dialog box, where you can specify one or more FOCUS error message numbers, separated by a comma. If one of these FOCUS error numbers is encountered during schedule execution, ReportCaster will process it as a warning rather than an error. This means that if a report is produced, it will be distributed in spite of the FOCUS error number. It also means that this FOCUS error number will not trigger error notification if the schedule is configured to notify on error.
Disabling Tasks Within a Schedule
|
How to: |
When working with an established schedule, you can disable one or more tasks within that schedule. You can also create a new schedule with multiple tasks and then disable one or more of those tasks, as needed. For more information, see How to Create a Schedule in the Advanced Scheduling Tool.
Note: This procedure applies to schedules that have multiple tasks. If you disable all tasks in a schedule, the schedule is disabled.
Procedure: How to Disable Tasks Within a Schedule
- Using the Advanced Scheduling tool, create or open a schedule with multiple tasks.
- On the
ribbon, in the Show group, click
Tasks.
- If you are creating a schedule with new tasks, click New. For more information, see About Tasks in the Advanced Scheduling Tool.
- If you are editing an existing schedule that already has multiple tasks defined, select a task from the list and click Edit.
- In the
Task dialog box, clear the
Enabled check box, as shown in the following image.
- Click OK.
Cloning Tasks
|
How to: |
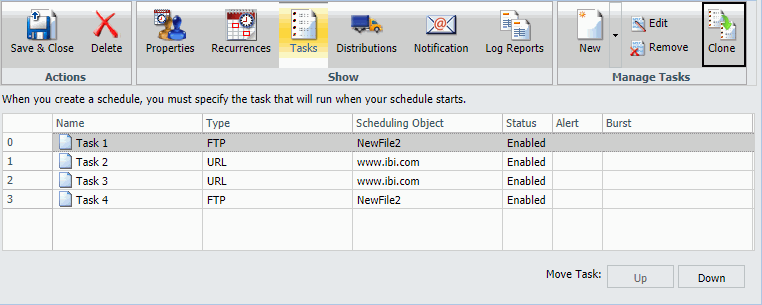
When you select an existing task in the Tasks tab, the Clone button becomes active. Clicking the Clone button creates a copy of the selected task. All entered values and selected options are identical for both the cloned task and the selected task.
The following image shows the Clone button in the Manage Tasks group.
Procedure: How to Clone a Task
- In the
Advanced Scheduling tool, click the
Tasks tab.
In the Manage Tasks group, the Clone button becomes active.
- Choose
a task to clone, and then click
Clone.
A copy of the selected task is created.
- Repeat step 2 to clone another task.
Using the WebFOCUS Schedule Task Type to Schedule Other Schedules
|
Topics: |
|
How to: |
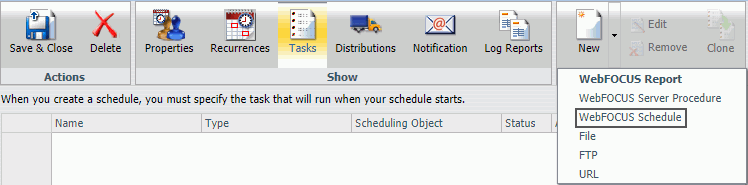
You can use the WebFOCUS Schedule task type to configure a schedule to initiate one or more separate schedules. On the Advanced Scheduling ribbon, in the Show group, click the Tasks tab, and then click the drop-down arrow on the New button to access the WebFOCUS Schedule task type, as shown in the following image.
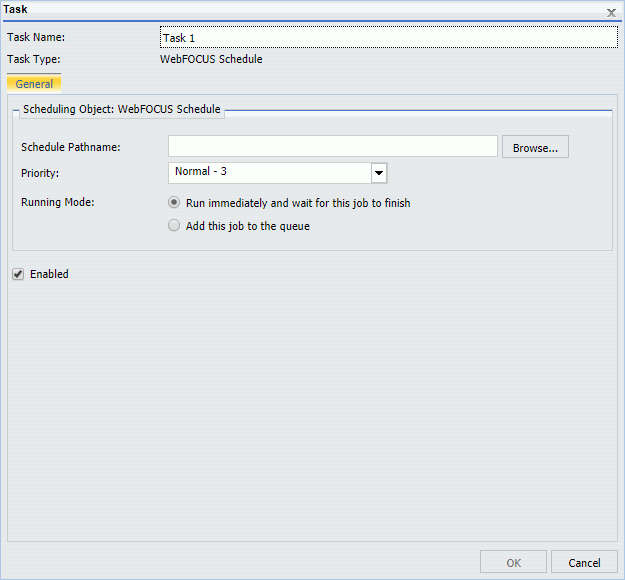
Click WebFOCUS Schedule to display the WebFOCUS Schedule Task dialog box, as shown in the following image.
Note: In order to use the WebFOCUS Schedule task type, you must be authorized to schedule other schedules. For more information, see the WebFOCUS Security and Administration technical content.
The WebFOCUS Schedule Task dialog box includes the following options:
- Schedule Pathname. Contains the pathname of the schedule that you select to be called by the task. Click the Browse button to select a schedule from the Repository. You will only see schedules that you are authorized to see, such as your own private schedules or any schedules that have been published.
- Priority. Displays the level of priority the schedule will have when it is processed by the Distribution Server. Priority value 1 is the highest priority and 5 is the lowest priority.
- Running Mode.
Provides options that define how the Distribution Server handles the selected
schedule you use in this task. This includes:
- Run immediately and wait for this job to finish. Schedules the called schedule to run immediately. The Distribution Server runs the called schedule immediately before any other queued jobs. The calling schedule waits for the called schedule to complete before running the next task.
- Add this job to the queue. Schedules the called schedule to run independent of any other schedules. The Distribution Server adds the schedule to the queue, respective of its priority. The calling schedule does not wait for the called schedule to complete before running the next task. If workload distribution is configured, the selected Distribution Server makes a console call to the manager.
- Enabled. When selected, enables the task. This is selected by default.
Note: The Distribution Server verifies that a WebFOCUS Schedule task is not running itself to avoid infinite recursion. If the Distribution Server detects that infinite recursion will occur, it stops the schedule and records the task as an error in the schedule job log.
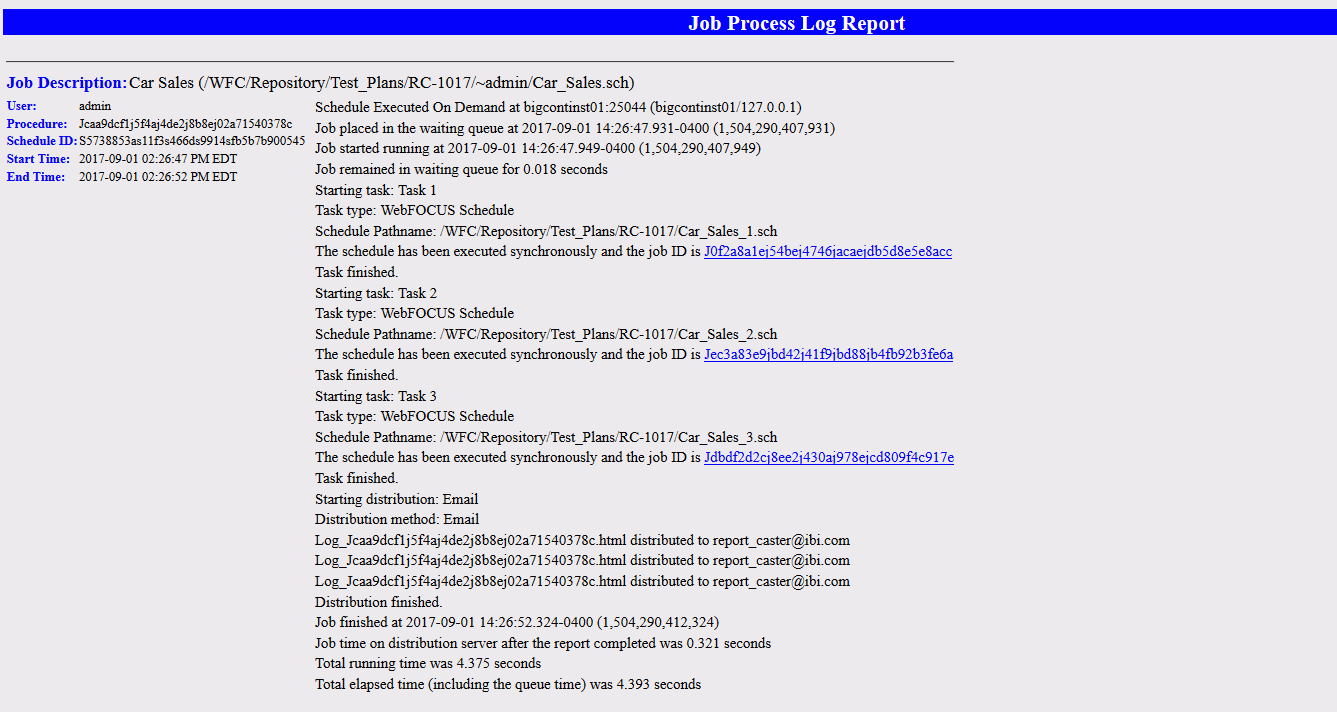
WebFOCUS Schedule tasks that distribute schedules create log reports of the task. These log reports are distributed in HTML format. For each distributed schedule, the job log records the job submission, job name, and a link to the job log. A sample log is shown in the following image.
Note: Although a schedule that contains only WebFOCUS Schedule tasks does not distribute reports, a distribution method must still be selected before the schedule can be saved.
Running Mode Options for WebFOCUS Schedule Tasks
You can use one of two Running Mode options in a WebFOCUS Schedule task. You can set WebFOCUS Schedule tasks to run immediately before other schedules in the distribution server queue, or run independent of other schedules in the Distribution Server queue, as shown in the following image.

For example, if you select the Run immediately and wait for this job to finish running mode, and your schedule is set to call two subsequent schedules, both schedules will run consecutively. Conversely, if you select the Add this job to the queue running mode, both schedules will run concurrently.
Procedure: How to Create a WebFOCUS Schedule Task in the Advanced Scheduling Tool
Note: In order to use the WebFOCUS Schedule task type, you must be authorized to schedule other schedules. For more information, see the WebFOCUS Security and Administration technical content.
- Open the Advanced Scheduling tool. For more information, see Creating a ReportCaster Schedule in the Advanced Scheduling Tool.
- Click the Tasks tab.
- In the
Manage Tasks group, click the
New drop-down arrow button, and then click
WebFOCUS Schedule.
The WebFOCUS Schedule Task dialog box opens, as shown in the following image.
- Specify the path of the schedule that you want to add to the task, or click Browse to navigate to the location of the schedule, on your system or in the Repository.
- Choose the priority for the called schedule. Priority value 1 is the highest priority and 5 is the lowest priority.
- Select the
running mode of the called schedule:
- Run immediately and wait for this job to finish. Schedules the called schedule to run immediately. The calling schedule waits until the called schedule completes before running the next task.
- Add this job to the queue. Schedules the called schedule to run independent of any other schedules in the Distribution Server queue. The calling schedule does not wait until the called schedule completes before running the next task.
- If you want to disable the task, clear the Enabled check box. This option is selected by default.
- Click
OK.
The task now appears in the list of tasks in the schedule.
- To add
another task, repeat steps 2 through 9.
Once you finish creating your tasks, you can modify the Properties, Recurrences, Distributions, and Notifications for the schedule. For more information, see Creating a Schedule in the Advanced Scheduling Tool.
Note: If the Advanced Schedule contains only WebFOCUS Schedule tasks, a distribution method must still be selected before the schedule can be saved.
- To save the schedule, on the ribbon, in the Actions group, click Save & Close.
| WebFOCUS | |
|
Feedback |