Displaying Multilingual Reports
|
Topics: |
To display data in different languages, you must do one of the following:
- Create a different data source for each language.
- Create one data source for all languages, if they share a common code page. With this technique, each record should contain a key field indicating the language. A report request tests the key field to retrieve a record in the chosen language.
In either case, if you are using a language that has different alphabets (such as Japanese), make sure that the WebFOCUS Reporting Server and WebFOCUS Client are configured for code page 65001 (Unicode).
You do not need to store most kinds of data in different languages. For example, names, addresses, and numerical data do not require translation. In the case of numerical data, you can easily manage the display format used by the locale at the procedure level.
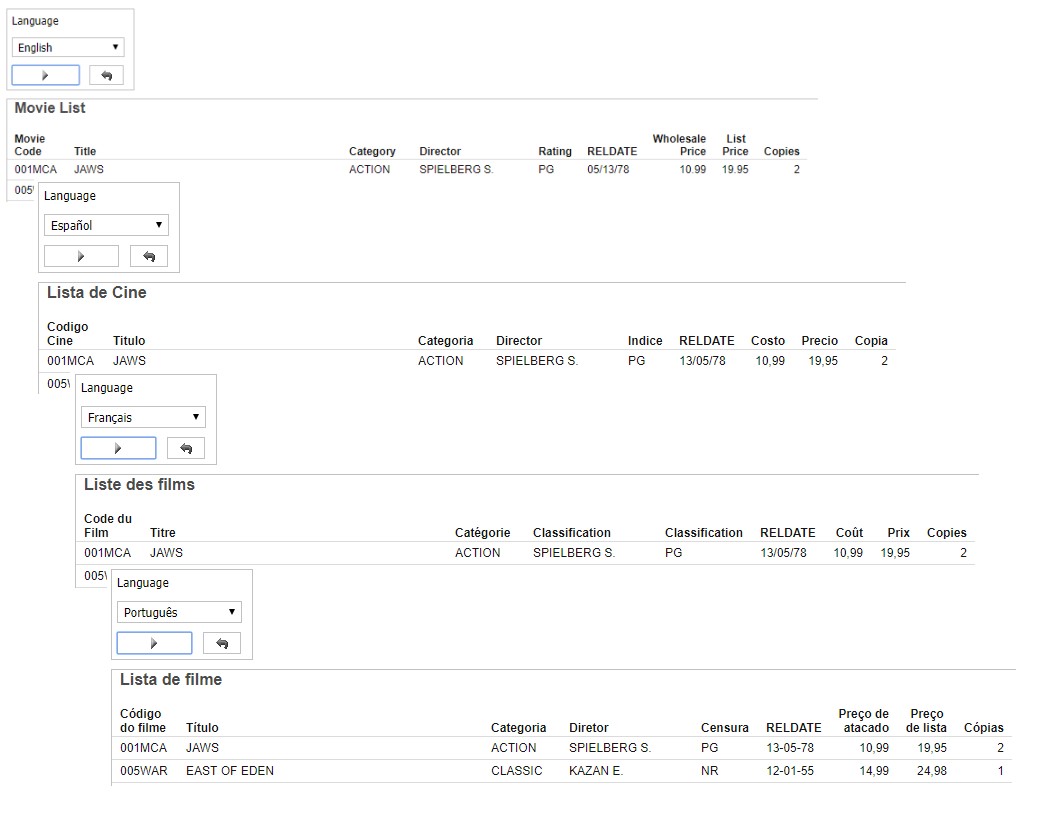
This appendix describes the steps for creating an application that displays page headings and column titles of a report in different languages, based on a user selection. The following illustrates the reports, in four languages, that the user can request. Notice that the dates and numerical data are formatted according to the conventions of the locale.
Proceed to the next topic for instructions on creating this application.
You can also create a localized application using the LNGPREP function as shown in the following image. For more information, see Creating a Multi-Locale Application Using LNGPREP.
How Does the Sample Application Work?
A single, integrated procedure produces the application launch page and the report in different languages. You will mainly use two graphical development tools in App Studio—the Report canvas and the HTML canvas. The Report canvas creates and styles the report, which accesses the MOVIES data source, included in the Legacy Sample Tables and Files tutorial, which you can generate in the WebFOCUS Reporting Server Console. The HTML canvas creates the launch page and links it to the report.
In the sample application, you will prompt the user to select English, French, Spanish, or Portuguese from a drop-down list. The choice corresponds to an amper variable (&LNG) in the procedure. The variable &LNG determines the language of the report.
The procedure will look similar to the following when you are done.
-DEFAULT &LNG = 'EN';
-SET &HEAD = IF &LNG EQ 'EN' THEN 'Movie List' ELSE
- IF &LNG EQ 'FR' THEN 'Liste des films' ELSE
- IF &LNG EQ 'ES' THEN 'Lista de Cine' ELSE
- IF &LNG EQ 'PT' THEN 'Lista de filme';
-SET &FMT = IF &LNG EQ 'EN' THEN '/MDY' ELSE
- IF &LNG EQ 'FR' THEN '/DMY' ELSE
- IF &LNG EQ 'ES' THEN '/DMY' ELSE
- IF &LNG EQ 'PT' THEN '/D-M-Y';
-IF &LNG EQ 'EN' GOTO BEGIN;
SET CDN = DOTS_COMMA
-BEGIN;
USE
nls/movies.foc AS MOVIES_&LNG
END
TABLE FILE MOVIES_&LNG
SUM
     WHOLESALEPR AND
     LISTPR AND
     COPIES
BY  MOVIECODE
BY  TITLE
BY  CATEGORY
BY  DIRECTOR
BY  RATING
BY  RELDATE&FMT
HEADING
"&HEAD"
ON TABLE SET PAGE-NUM NOLEAD
ON TABLE SET ASNAMES ON
ON TABLE NOTOTAL
ON TABLE PCHOLD FORMAT HTML
ON TABLE SET HTMLEMBEDIMG ON
ON TABLE SET HTMLCSS ON
ON TABLE SET STYLE *
     INCLUDE = warm,
$
ENDSTYLE
END
The column titles of the fields are translated in .lng files, which are generated for each language listed in a .cfg file. This enables you to create procedures localized in a variety of languages from a single Master File. In this example, the movies.mas Master File is localized for French, Spanish, and Portuguese.
The language, decimal notation, and date format are determined by SET commands and controlled by amper variables in the procedure.
WebFOCUS provides many features that make it easy to configure National Language Support (NLS) at your enterprise. Because you translate the .lng files yourself and can generate them for any language for which there is a three-character language code, you are not limited to languages for which there is a WebFOCUS localized version. It is easy to produce many different versions of the same report to accommodate international users.
Development Steps
|
How to: |
In the example, you will perform the following tasks:
- Create four synonyms for different languages pointing to the same data source.
- Create a new procedure that provides a report in one of four languages, depending on the user selection.
- Create a launch page that prompts the user for the language of choice.
- Test the project.
Procedure: How to Create Multi-Locale Master Files
- In the Web Console, locate the movies synonym. If you do not have it already, you can generate it. If you do have it, you
can proceed to step 2.
- The movies synonym is included in the Legacy Sample Tables and Files. To create these files on your environment, in the Applications
tab of the Web Console, right-click the application folder that you wish to use (for example, you could use a new application
folder called nls), point to New, and click Tutorials.
The Create Tutorial Framework page opens.
- From the Tutorial drop-down menu, select Create Legacy Sample Tables and Files and click Create.
The Select an Option dialog box opens. Click OK.
A number of sample synonyms are created, including movies.
- The movies synonym is included in the Legacy Sample Tables and Files. To create these files on your environment, in the Applications
tab of the Web Console, right-click the application folder that you wish to use (for example, you could use a new application
folder called nls), point to New, and click Tutorials.
- Create four copies of the movies.mas synonym. Each will be used to provide the column titles for one language.
- In the Applications tab of the Web Console, right-click the movies.mas synonym.The text editor opens, showing the syntax of the movies.mas Master File.
- Specify the DATASET attribute for the Master File. This will specify the data that will be used with this Master File, ensuring
that each localized copy uses the same source data.
On first line of syntax in the Master File, just before the dollar sign that is used to end the line, type the following:
DATASET = app/movies.foc,
where:
- app
-
Is the application folder containing the movies.foc data source. This file was created when you generated the Legacy Sample Tables and Files tutorial.
The full first line of the Master File should now resemble the following:
FILENAME=MOVIES, SUFFIX=FOC, REMARKS='Legacy Metadata Sample: movies (for use with Video Track example)', DATASET= app/movies.foc,$
- In the text editor, click Save As and save the file as moviesEN.mas to signify that this is the English language version of the Master File.
- Repeat step c three more times, but save the Master File as moviesES.mas, moviesFR.mas, and moviesPT.mas.
Your application folder should now contain the following Master Files, all of which are identical:
- moviesEN.mas
- moviesES.mas
- moviesFR.mas
- moviesPT.mas
- Exit the text editor by closing the tab, but stay in the Applications tab of the Web Console.
- In the Applications tab of the Web Console, right-click the movies.mas synonym.
- For each field in each Master File, supply a column title based on the table shown below.
Each column title should be in the language of the associated Master File.
- Right-click the moviesEN.mas synonym and click Open. Data Assist opens.
- Click Create Default to generate the default Business View of your fields.
- Rename each field as shown in the table below, then save the synonym.
To rename a field, right-click the name in the Display Name (Title) column of the Business View pane, click Rename, and type in a new name.
Once you have renamed all fields, open the File menu on the ribbon and click Save to save your changes.
Repeat these steps for each of the four Master Files.
Field Name
moviesEN.mas
moviesES.mas
moviesFR.mas
moviesPT.mas
MOVIECODE
Movie,Code
Codigo,Cine
Code du,Film
Código,do filme
TITLE
Title
Título
Titre
Título
CATEGORY
Category
Categoria
Catégorie
Categoria
DIRECTOR
Director
Director
Directeur
Diretor
RATING
Rating
Indice
Classification
Censura
RELDATE
Release,Date
Fecha de,Estreno
Date de,Parution
Data de,produção
WHOLESALEPR
Wholesale,Price
Costo
Coût
Preço de,atacado
LISTPR
List,Price
Precio
Prix
Preço,de lista
COPIES
Copies
Copia
Copies
Cópias
Once complete, each Master File should now have a TITLE attribute showing the translated column title for each field. You can check by opening each of the modified Master Files as text.
Procedure: How to Create a Procedure for Multi-Locale Reporting
Once your data has been localized, it is easy to use in a procedure, such as a report.
- In App Studio, create
a new report based on the movies.mas synonym.
- In the Environments Tree panel, right-click the folder where you want to create the report, point to New, and click Report.
- In the Select Data Source dialog box, click the application folder containing the movies synonym and open movies.mas. The Report canvas opens.
- Add a Use command to associate the data source (movies.foc) to the procedure.
- In the Procedure View panel, right-click the top component (the Comment component by default), point to New, and click Use. The Use component should appear above the Report component.
- Click the Browse... button for Database Filename, and navigate to and select the movies.foc data source in your application directory.
- In the MASTER File text box, type MOVIESEN.
- Click Add to add the data source.
- Add a Set command to display numeric data with a comma as the decimal separator in the French, Portuguese, and Spanish reports.
Another command will be added later so that the English report ignores this section.
- In the Procedure View panel, right-click the top component (the Comment component by default), point to New, and click Set. The Set component should appear above the Use component.
- From the Available Settings list box, select CDN and click Add. Set the Current Value to DOTS_COMMA, which is the format of continental decimal notation.
- Return to the Report canvas.
- Add every field listed under MOVINFO in the Object Inspector to the report, and style the report however you prefer.
- Add the page heading Movie List to the report.On the Report tab of the ribbon, in the Report group, click Header & Footer and click Page Header. Type Movie List into Page Heading text box.
- Add a command to allow you to skip the Set command for the English version of the application.
- Right-click the Set command, point to New, and click Other.A text editor tab opens.
- Type in the following text:
-BEGIN;
- Right-click the Set command, point to New, and click Other.
- Save and close the report.
- Reopen the report in a text editor to make additional modifications.In the Environments Tree panel, right-click the report and click Open in Text Editor.The report syntax is visible in a text editor in App Studio.
- The fields must be referenced by the fieldname only. If the fields are referenced by a qualified field name, for example,
MOVIES.MOVINFO.MOVIECODE, you must change it to just MOVIECODE so that they match the field names in the localized Master Files.Remove MOVIES.MOVINFO from any field names in the report request.
- Add the following syntax to the top of the procedure to include the amper variable &LNG for the language of the report, &HEAD
for the page heading, and &FMT for the format of the report. This text should go above the SET CDN command.
-DEFAULT &LNG = 'EN';
-SET &HEAD = IF &LNG EQ 'EN' THEN 'Movie List' ELSE
- IF &LNG EQ 'ES' THEN 'Lista de Cine' ELSE
- IF &LNG EQ 'FR' THEN 'Liste des films' ELSE
- IF &LNG EQ 'PT' THEN 'Lista de filme';
-SET &FMT = IF &LNG EQ 'EN' THEN '/MDY' ELSE
- IF &LNG EQ 'ES' THEN '/DMY' ELSE
- IF &LNG EQ 'FR' THEN '/DMY' ELSE
- IF &LNG EQ 'PT' THEN '/D-M-Y';
-IF &LNG EQ 'EN' GOTO BEGIN;
This syntax performs the following functions:- Sets the default language to English. If you do not make a language selection when running the final application, English will be used.
- Creates an amper variable to determine the page heading based on the selected language.
- Creates an amper variable to determine the date format based on the selected language.
- Tells the procedure to skip the SET CDN command if English is the selected language.
- Change MOVIESEN to MOVIES&LNG in the syntax so that making a language selection determines the Master File that is referenced.
The line under USE should now look like this:
app/movies.foc AS MOVIES&LNG
where
- app
-
Is the application folder containing movies.foc. This should already be defined in the report syntax.
and the TABLE FILE declaration should be:
TABLE FILE MOVIES&LNG
- Change the heading from Movie List to &HEAD so that the localized heading defined in the first -SET command is used.
The HEADING block of the report syntax should look like the following:
HEADING
"&HEAD"
- Add &FMT to the end of the RELDATE field name to change the date format based on the selected language.
The line containing RELDATE should now look like the following:
BY RELDATE&FMT
- Save and close the report.
You are now ready to create an HTML page with a control to set the &LNG parameter in the report.
Procedure: How to Create a Launch Page for Multi-Locale Reporting
You will use an HTML page as a launch page for the report where you can select the language that the report will display.
- Create a new HTML page.
- In the Environments Tree panel, right-click a folder, point to New, and click HTML/Document, or click HTML/Document in the Content group on the Home tab on the ribbon.
- Proceed through the HTML/Document Wizard, selecting the settings of your choice.
- In the HTML canvas, create a report container. This is where the report will display when you run the page.
On the ribbon, on the Components tab, in the Reports group, click Report. Drag your mouse across the page to draw the report container.
- Add the report to container.
Right-click the report container and click Reference existing procedure. Navigate to and select the report created in How to Create a Procedure for Multi-Locale Reporting.
You are alerted that there are undefined parameters in the report. Close any warnings until the New Parameters dialog box displays.
- In the New Parameters dialog box, create the controls for the page.
Right-click the value in the Control Type column to change it to Drop Down List if it is not one already. This will allow you to specify the available menu options.
Click OK to create the control.
You can optionally create your own controls using the Controls tab on the ribbon and using the Settings panel to link the control to the &LNG parameter. For more information, see the WebFOCUS App Studio User's Manual.
A group box containing the controls appears on the page. You can modify any of the elements that it contains, such as resizing any of the components.
- Change the display values for the drop-down menu to make it more user friendly.
By default, this menu only shows EN, since this was set as the default. You can add the other values to the menu and set the display values to show the names of each language.
- Select the drop-down menu object on the page.
- Open the Settings panel. EN is the only value, since it was defined as the default.
- Set the Display to English so that the name of the language will appear in the menu but set the &LNG value to EN.
- Above the list of values, click the New icon.
- Add the menu option for the Spanish version of the report. Set the Value to ES to match the value for &LNG and set the Display to Español.
- Add the menu option for the French version of the report. Set the Value to FR to match the value for &LNG and set the Display to Français.
- Add the menu option for the Portuguese version of the report. Set the Value to PT to match the value for &LNG and set the Display to Português.
The drop-down menu is now configured. - Make any further modifications that you wish to the page, then once you are done, save it.
Your page is complete. When you run the page, making a selection from the drop-down menu and clicking the run button on the HTML page should reload the report in the selected language, with localized column titles, date format, and page heading.
| WebFOCUS | |
|
Feedback |