Indexing the Course File
|
Reference: |
This section provides steps to review data and identify how fields will be used for search in order to build a WebFOCUS procedure to create Magnify index libraries.
- Create a procedure to review all available data.
- In App Studio, create an application pointing to the sample directory, ibisamp, if not already created.
- In the ibisamp application,
create a new procedure, as shown
in the following image.

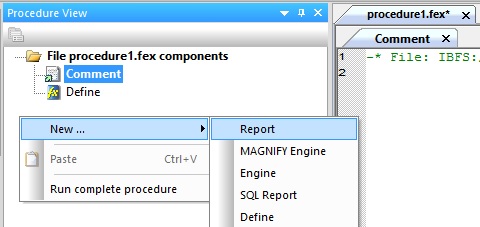
- In the Procedure
View panel, create a Report object.
- Right-click anywhere in the Procedure View panel select New and then click Report from the context menu, as shown
in the following image.

The Select Data Source dialog opens, as shown in the following image.
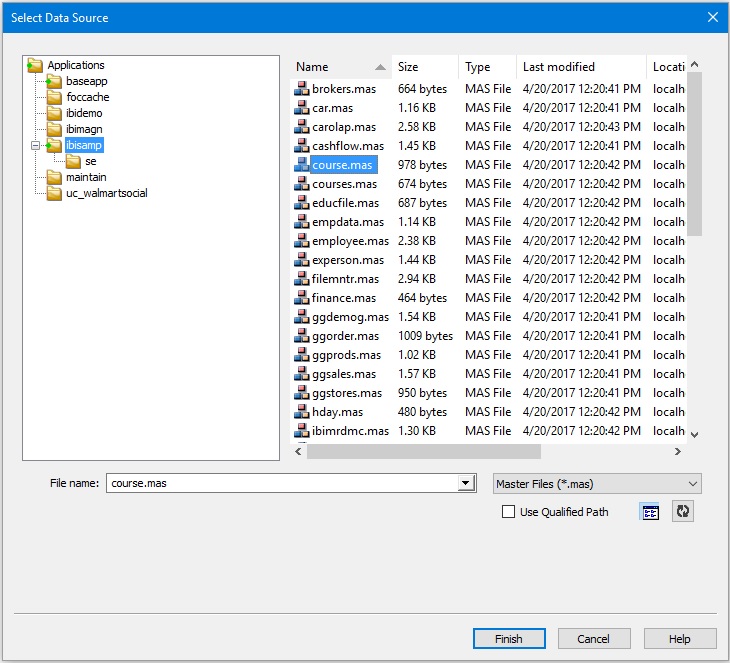
- Select the course.mas Master File and click Finish.
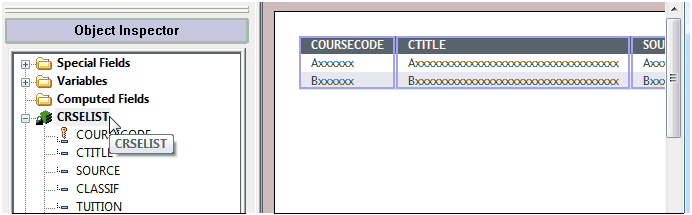
- Double-click the CRSELIST segment to add all the fields to the report canvas, as shown in the following
image.
- Click Save from the Quick Access Toolbar,
as shown in the following image.

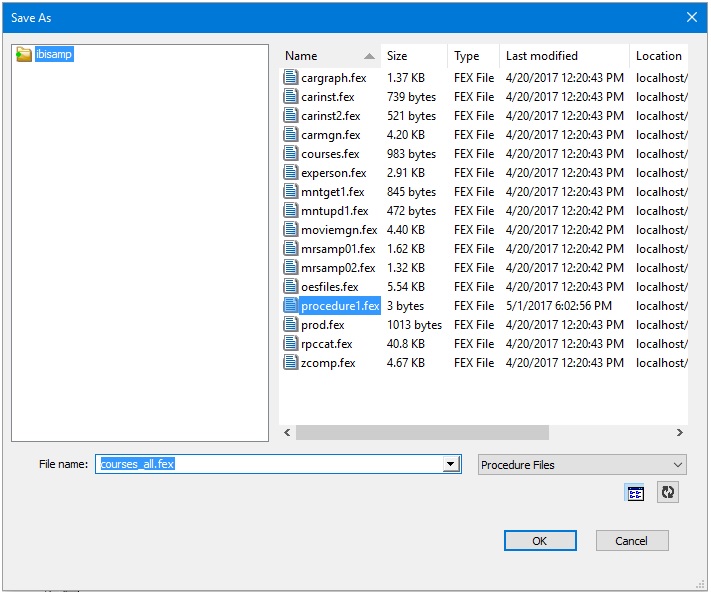
The Save As dialog opens, as shown in the following image.
- Right-click anywhere in the Procedure View panel select New and then click Report from the context menu, as shown
in the following image.
- Specify a name for your procedure (for example, courses_all.fex) and click OK.
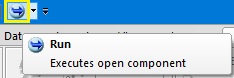
- Click Run from the Quick Access Toolbar,
as shown in the following image.
The report runs and is displayed in a browser window.
- Identify fields to
assign to the Magnify Category Tree, as shown in the following image.
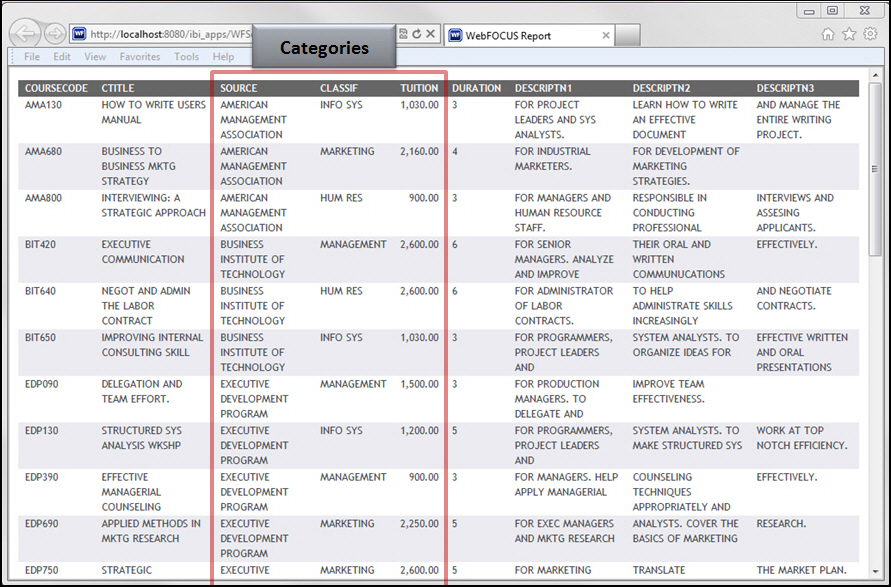
Note: Usually fields that make high-level groupings, typically those used as BY fields, make good categories. Although numerical values, like price, usually do not make good categories as is, they make excellent categories when converted to a range.
- Identify fields to
make searchable from the Magnify search interface, as shown in the
following image.
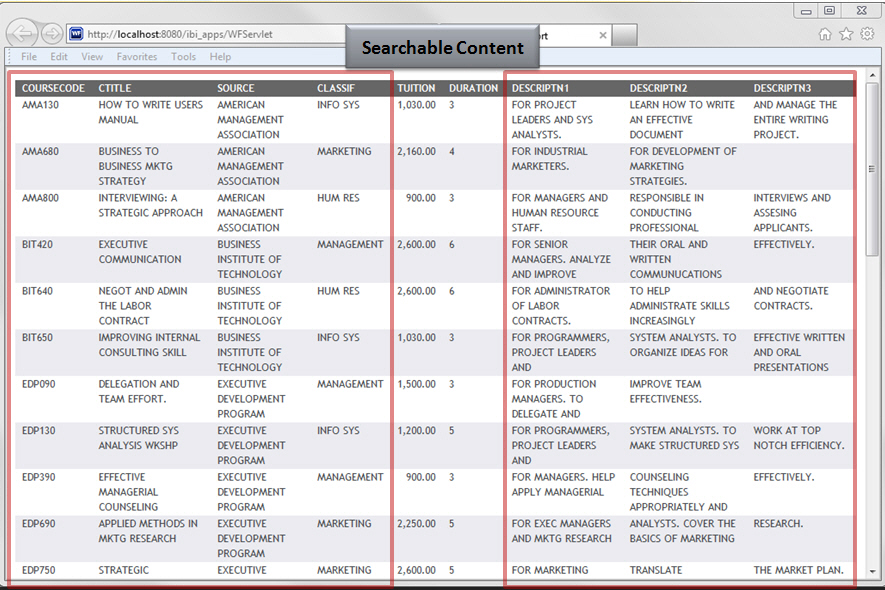
Note: Searchable fields tend to be those that are alphanumeric strings, IDs, or any other data that is to be matched to searched terms.
- Close the browser window that is running the report.
- Close the Report canvas and the Procedure View panel.
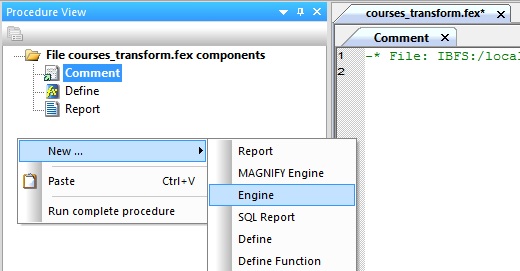
Create a procedure to transform the data into search content.
- In the ibisamp application,
create a new procedure, as shown
in the following image.
- In the Procedure
View panel, create a Define object.
- Right-click anywhere in the Procedure View panel select New and then click Define from the context menu, as shown
in the following image.
The Select Data Source dialog opens, as shown in the following image.
- Select the course.mas Master File and click Finish.
- Right-click anywhere in the Procedure View panel select New and then click Define from the context menu, as shown
in the following image.
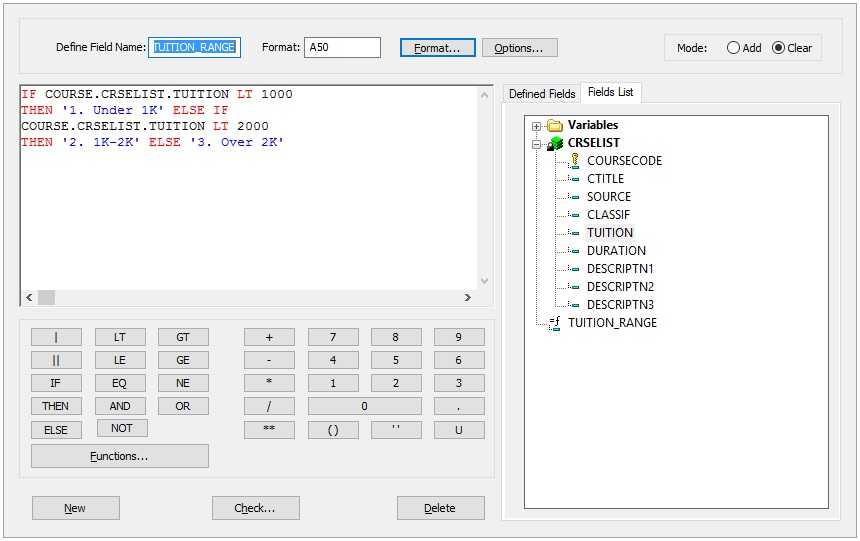
- In the Define dialog that opens,
create fields to enrich the data, as defined in the table below.
- Add each define attribute
using the Field, Format, and Value information shown in the table,
as shown in the following image.
- Confirm that there are no errors by clicking the Check button.
- Create the next Defined field by clicking the New button.
- Repeat for each field
listed below.
Note: You can copy and paste Field, Format, and Value information from the table below into their respective places in the Define dialog.
Field
Format
Value
Purpose
SYSSOURCE
A25
'School Courses'
Hard-coded category value.
TUITION_RANGE
A50
IF COURSE.CRSELIST.TUITION LT 1000
THEN '1. Under 1K' ELSE IF
COURSE.CRSELIST.TUITION LT 2000
THEN'2. 1K-2K' ELSE '3. Over 2K'
Granular data rolled up into a range.
SEARCHTITLE
A2000
'<b>Course Name:' | COURSE.CRSELIST.CTITLE |'('|COURSE.CRSELIST.COURSECODE ||')</b>'Text shown as the search result main title.
TITLE_URL
A2000
'/ibi_apps/WFServlet?' || 'FXK=' || COURSE.CRSELIST.COURSECODE ||'&'||'IBIF_ex=courses_detail' ||'&'|| 'IBIAPP_app=magnify_courses'
The main drill-down link for the main title of the search results. In this case, a BI report passing the course code.
LINK_DISPLAY_NAME1
A2000
'Search Other Department Courses'
Additional drill-down text.
LINK_URL1
A2000
'ibi_apps/search' ||'q='|| COURSE.CRSELIST.SOURCE
Additional drill-down link.
LINK_DISPLAY_NAME2
A2000
'All Courses in this Subject'
Additional drill-down text.
LINK_URL2
A2000
'/ibi_apps/WFServlet?' || 'FXK=' || COURSE.CRSELIST.CLASSIF ||'&'||'IBIF_ex=courses_similar' ||'&'|| 'IBIAPP_app=magnify_courses'
Additional drill-down link.
HARDCODED
A50
'schools course'
Additional searchable content not originally found with the data.
For more information, see Indexing Using FORMAT MAGNIFY Command.
Note: The URL value being referenced for the TITLE_URL and Link_URL2 fields does not exist. Therefore, when executed, the links for the main title link and second additional link of the search results will not drill down to a valid webpage.
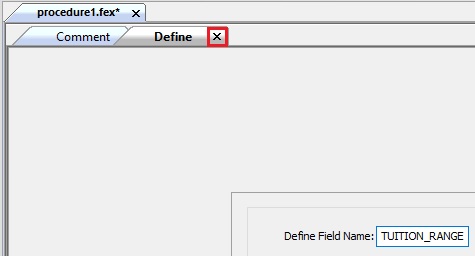
- Close the Define
dialog by closing the Define tab, as shown in the following image.
- Add each define attribute
using the Field, Format, and Value information shown in the table,
as shown in the following image.
- In the Procedure
View panel, create a Report object.
The Select Data Source dialog opens, as shown in the following image.
Select the course.mas Master File and click Finish.
- Add fields to the Report canvas.
- In the Object Inspector, double-click the field name for all fields defined in the following table.
- Update the Column
Title.
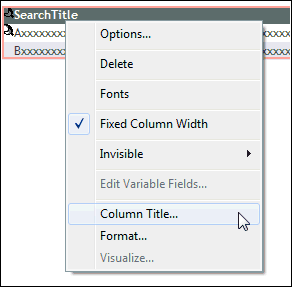
- On the report canvas, select the added field.
- Right-click and select Column
Title, as shown in the following image.
- Enter a new Column Title (case-sensitive), as shown in the table below.
- Click OK.
- Repeat step 5b for
each field listed in the following table.
Field
Column Title (Case-Sensitive)
Purpose
COURSECODE
MagnifyID
Unique identifiers (required)
COURSECODE
WF_INDEX_UNIQUE_KEY
Unique identifiers (required)
SYSSOURCE
C1_Source_System
Category
SOURCE
C2_Department
Category
CLASSIF
C3_Subject
Category
TUITION_RANGE
C4_Tuition_Range
Category
SEARCHTITLE
SearchTitle
Drill-down link information
TITLE_URL
Drill-down link information
LINK_DISPLAY_NAME1
Drill-down link information
LINK_URL1
Drill-down link information
LINK_DISPLAY_NAME2
Drill-down link information
LINK_URL2
Drill-down link information
DESCRIPTN1
S_DESCRIPTN1
Searchable content
DESCRIPTN2
S_DESCRIPTN2
Searchable content
DESCRIPTN3
S_DESCRIPTN3
Searchable content
CTITLE
S_CTITLE
Searchable content
COURSECODE
S_COURSECODE
Searchable content
SYSSOURCE
S_SYSSOURCE
Searchable content
SOURCE
S_SOURCE
Searchable content
CLASSIF
S_CLASSIF
Searchable content
HARDCODED
S_HARDCODED
Searchable content
Note: The resulting column title dictates how the data will be used in the search interface.
For more information, see Indexing Using FORMAT MAGNIFY Command.
- Click Save from the Quick Access Toolbar.
The Save As dialog opens.
Specify a name for your procedure (for example, courses_transform.fex) and click OK.
- Click Run from the Quick Access Toolbar.
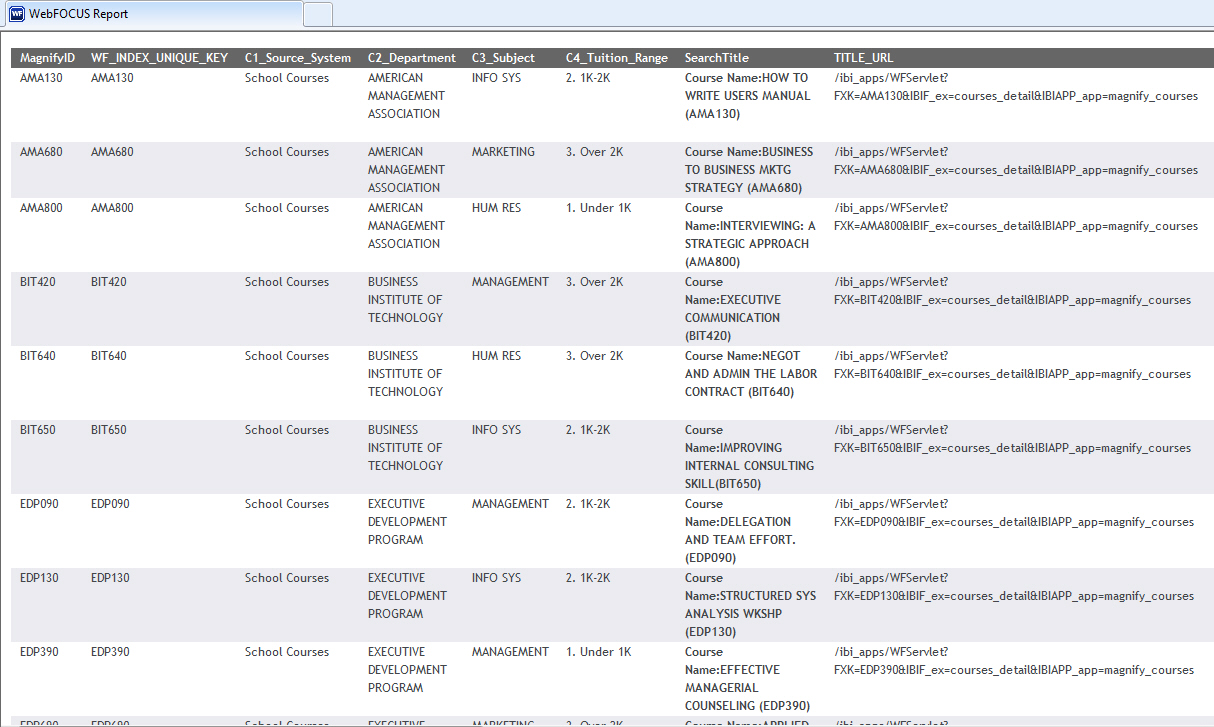
- Review how the data
is applied in their respective column titles, as shown in the following
image.
- Close the browser window that is running the report.
- Close the Report canvas.
- Return to the Procedure View panel.
Update the procedure to feed data to the Magnify index library.
- In Procedure
View panel,
create an Engine object.
- To create each Engine
object, right-click anywhere in the Procedure View panel select New and then click Engine from the context menu, as shown
in the following image. For a list of Engine objects, see Engine
Parameters
- The ENGINE dialog box opens, as shown in the following image. Add each Engine attribute using the Engine, Connection, and SET parameters information in the Engine Parameters table.
- After each entry, click OK.
- Define each Engine
object using the ENGINE dialog box (Engine, Connection, and SET
parameters fields), as shown in the following image.
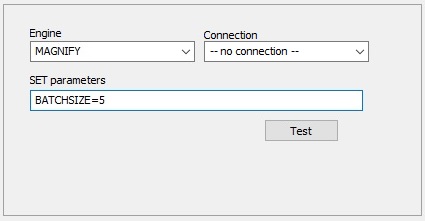
For more information on the individual parameters that you must specify, see Engine Parameters.
Note: If the MAGNIFY engine (case-sensitive) does not display in the list, you must type it in manually. In addition, for connections listed as no connection, you must select no connection in order to activate the SET parameter field. The preceding image shows an Engine entry.
- To create each Engine
object, right-click anywhere in the Procedure View panel select New and then click Engine from the context menu, as shown
in the following image. For a list of Engine objects, see Engine
Parameters
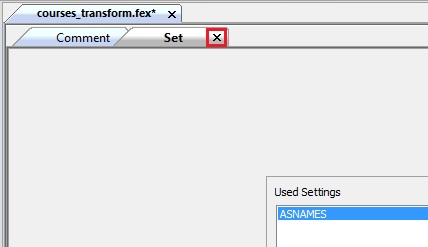
- In the Procedure View panel, create a Set object before the Define object and after the Engine objects.
- Right-click in the Procedure View panel select New and then click Set from the context menu, as shown
in the following image.
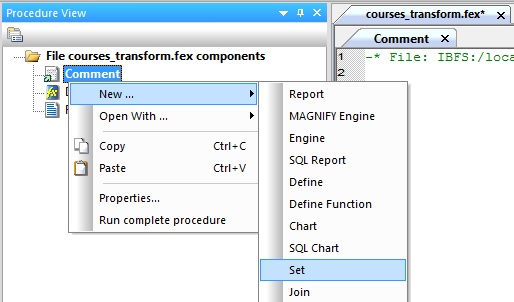
The Set dialog opens, as shown in the following image
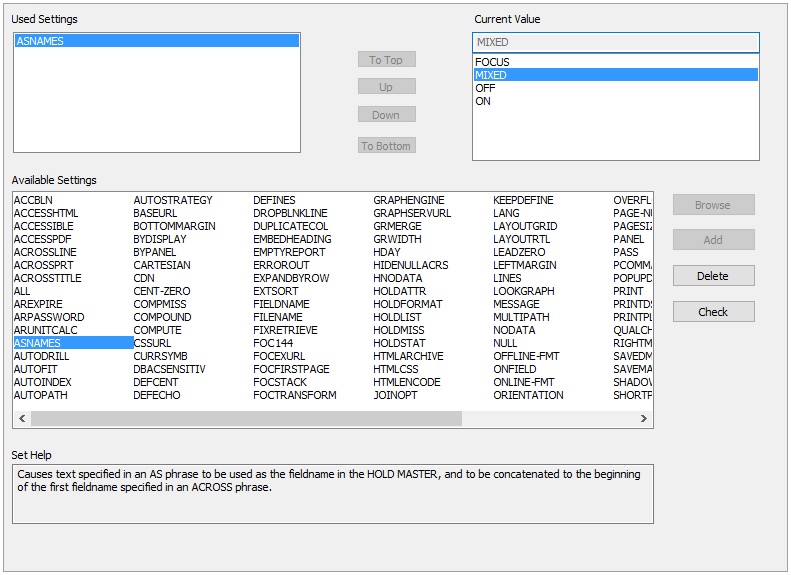
- Under Available Settings, double-click ASNAMES.
- Under Current
Value, select MIXED.
Note: You must set the ASNAMES setting to MIXED in order to preserve case-sensitivity. For more information, see Indexing Using FORMAT MAGNIFY Command.
- Close the Set dialog by closing the Set tab, as shown in the following image.
- Click Save and then click Run from the Quick Access Toolbar.
- Confirm that there were no errors.
- Confirm that raw data is modeled and enriched accordingly.
- Close the browser.
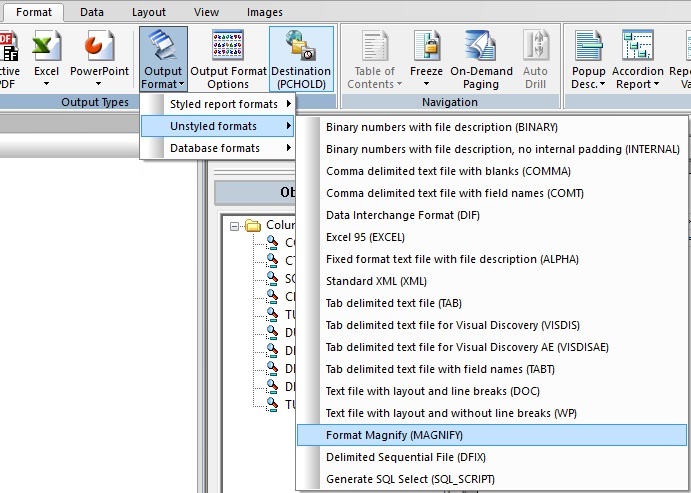
- Change the output
type in the Report object.
- Double-click the Report object to open the Report canvas.
- Click the Format tab.
- Select the Output Format drop-down.
- Expand the Unstyled
formats menu and select Format
Magnify (MAGNIFY), as shown in the following image.
- Click Save and then click Run from the Quick Access Toolbar.
- Confirm that there
are no errors, such as the following.
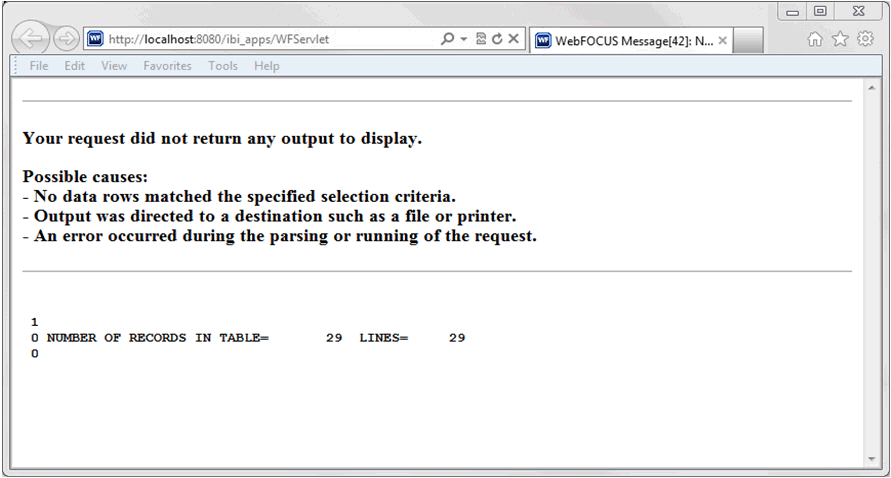
Note: If you receive an error message indicating that your Magnify server is not licensed for indexing, please contact your WebFOCUS Administrator. For more information on this error message, see Magnify Error Handling.
Once complete, review the search-based application generated.
- Open a web browser.
- Navigate to the Magnify
search page:
http://host:port/wfcontext_root/search
where:
- host:port
-
Is the machine name and port number where WebFOCUS is installed.
- wfcontext_root
-
Is the WebFOCUS application root.
Notes:
- By default, this can be http://localhost:8080/ibi_apps/search. However, this link can vary based on your WebFOCUS configuration.
- Sample or default URLs are for informational purposes only and may not resolve correctly, if at all.
- Perform a search
test by typing school in the Search box and clicking Search,
as shown in the following image.
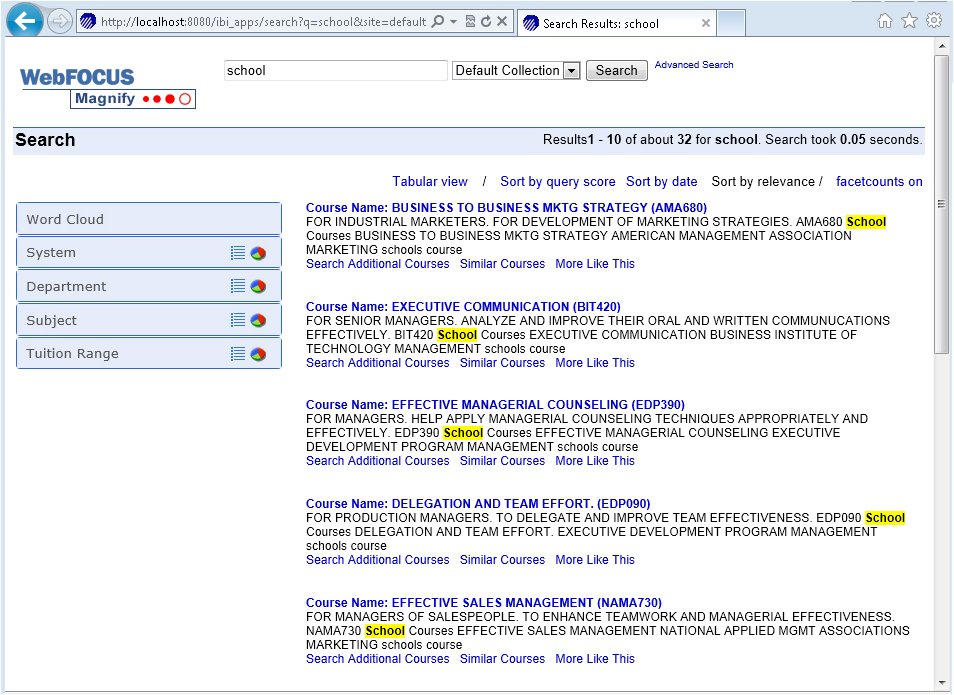
- Review the results returned and search to identify how the data has been applied to the Magnify search interface.
- Close the browser window.
- Close the Report canvas.
- Close the Procedure View panel.
Reference: Engine Parameters
You can copy and paste Engine, Connection, or SET parameter information from the following table to their respective places in the Engine object.
|
Engine |
Connection |
SET parameter |
Purpose |
|---|---|---|---|
MAGNIFY |
MY_PC 'http://localhost:8080/ ibi_apps/saxfeed' |
Connection string Note: Sample or default URLs are for informational purposes only and may not resolve correctly, if at all. |
|
MAGNIFY |
-- no connection -- |
BASEURL=http://localhost:8080/ |
Feed URL ID |
MAGNIFY |
-- no connection -- |
DATASOURCE=school_courses |
Index library name |
MAGNIFY |
-- no connection -- |
BATCHSIZE=5 |
Feed increment |
For more information, see Indexing Using FORMAT MAGNIFY Command.
| WebFOCUS | |
|
Feedback |