Application Main Menu
|
Topics: |
|
Reference: |
In the upper-left corner of the InfoAssist+ interface,
click the IA button ![]() to open the Application main menu.
to open the Application main menu.
You can run the following commands from the Application main menu:
- New. Opens the InfoAssist+ splash screen, where you
can create a new report, chart, document, or visualization. The
exact functionality of the New command depends on your current InfoAssist+
session.
If you open a Reporting Object through InfoAssist+, and then click New, a new report is generated from the Reporting Object. You are prompted to choose the type of report you want to create from the Reporting Object.
When you open a new session of InfoAssist+ and then click New, a new report is created. You are prompted to choose a data source.
- Open. Opens an existing report, chart, document, or visualization.
- Save. Saves a report, chart, document, or visualization.
- Save As. Saves a report, chart, document, or visualization
with a new name.
Note: When saving a read-only, non-writable procedure (.fex) in the Save As dialog box, the first writable folder will be selected, by default.
- Run. Runs a report, chart, document, or visualization.
- Run Deferred. Submits a report, chart, document, or visualization for processing in the background while you continue to work on other tasks.
- Close. Closes the currently active report, chart, document, or visualization.
- Recent Items. Displays recent reports, charts, documents,
or visualizations, and those items that have been pinned to the
menu. The Recent Items area of the InfoAssist+ Application main
menu is shown in the following image.
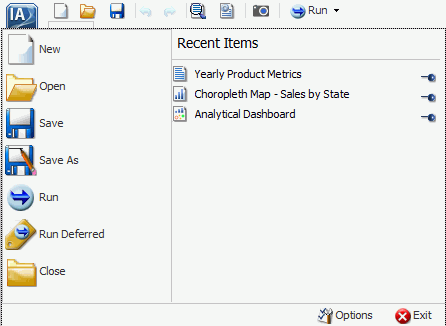
Pinned reports, charts, documents, or visualizations are represented by a blue pin
 icon. Pinned items
appear at the top of the list in alphabetical order.
icon. Pinned items
appear at the top of the list in alphabetical order.
Recent reports, charts, documents, and visualizations are represented by a sideways blue pin
 icon. Recent items
appear below the separator bar in the order in which they were created,
with the most recently created item at the top.
icon. Recent items
appear below the separator bar in the order in which they were created,
with the most recently created item at the top.
You can pin important reports, charts, documents, and visualizations to the top of the Recent Reports section of the Application main menu for quick and easy access. To promote a recent report to pinned report, click the sideways blue pin icon. The icon turns upright and the report is moved to the pinned report area of the Recent Items window, where it stays until it is unpinned.
To demote a pinned report, click the blue pin icon. The icon turns sideways and the report is moved below the separator bar.
A shortcut menu is available when right-clicking a recent item, as shown in the following image.
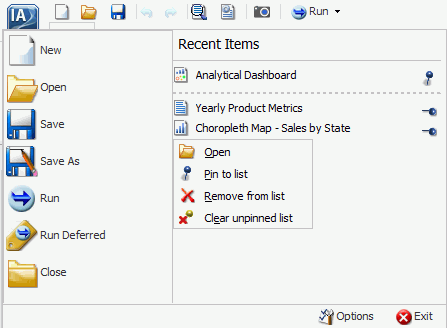
The options in the menu are:
- Open. Opens the selected report, chart, document, or visualization.
- Pin to list. Pins or unpins a recent report, chart, document, or visualization to the pinned reports list above the separator bar.
- Remove from list. Unpins a pinned report, chart, document, or visualization from the pinned reports list.
- Clear unpinned list. Clears all unpinned reports, charts, documents, or visualization from the Recent Items list.
- Options. Opens the Options dialog box to customize your user preferences. For more information, see Changing InfoAssist+ User Preferences.
- Exit. Exits the application.
Reference: Open Dialog Box
The Open dialog box displays when you launch InfoAssist+. It also displays when you join and blend data. You can use this dialog box to do the following:
- Select data sources for creating reports, charts, visualizations, and documents.
- Select data sources for joining and blending data.
- Configure data adapters for connecting to an existing database and creating synonyms.
- Upload user data.
The Open dialog box is shown in the following image.
- Connect to Data
-
Opens the Metadata tool, where you can configure a Data Adapter to connect to an existing database and create synonyms.
- Upload Data
-
Opens the Upload tool, where you can upload user data from a machine to which you have access. This data can be used with reporting.
- Open
-
Opens the selected Master File.
Accessing InfoAssist+ Options
|
Topics: |
On the InfoAssist+ application window, click the Application button to open the InfoAssist+ Application main menu of procedure-related commands. When you click New, a splash screen that contains all available options opens, as shown in the following image.
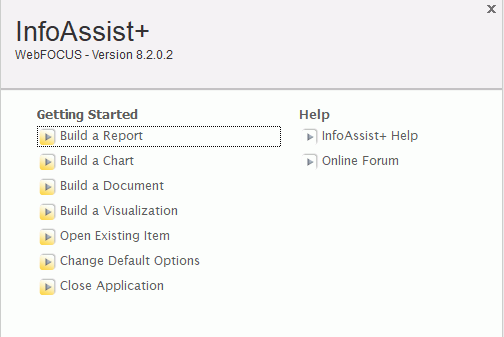
The available options are grouped into Getting Started and Help.
Note: When you launch InfoAssist+ Basic, this splash screen indicates that the application is InfoAssist+ Basic and displays the available options.
Getting Started
The following Getting Started options are available:
- Build a Report. Opens the Open dialog box, where you can select a data source for your report.
- Build a Chart. Opens the Open dialog box, where you can select a data source for your chart.
- Build a Document. Opens the Open dialog box, where you can select a data source for your document.
- Build a Visualization. Opens the Open dialog box, where you can select a data source for your visualization.
- Open Existing Item. Opens the Open dialog box, where you can select an existing item.
- Change Default Options. Opens the Options window, where you can change the default settings to reflect your preferences.
- Close Application. Closes and exits the application.
Help
The Help options provide help for the new user. The following Help options are available when you open InfoAssist+.
- InfoAssist+ Help. Opens the online documentation window for InfoAssist+.
- Online Forum. Opens the Focal Point website in a new browser window.
Changing InfoAssist+ User Preferences
|
Topics: |
You can change the default user preferences to customize the way that InfoAssist+ behaves when you create reports and generate output. The application theme, which is inherited from the BI Portal, customizes the InfoAssist+ interface, including all menus and dialog boxes.
You can style your reports by selecting a document theme independent from the interface. On the InfoAssist+ Application main menu, click Options.
The Options dialog box, as shown in the following image, opens to provide you with a user-friendly interface for customizing the InfoAssist+ application.
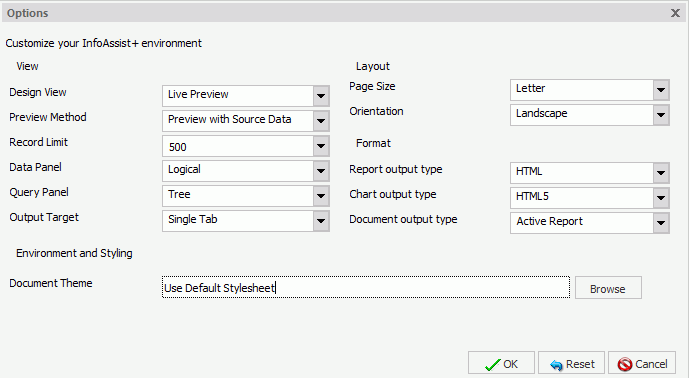
Note: If you make changes to the default selections in the Options dialog box, changes will take effect the next time InfoAssist+ launches.
If any of the options are unavailable, contact your administrator for assistance.
You can also select a document styling theme through the ribbon. Go to the Home tab, then in the Report group, click Theme. For more information, see Home Tab.
View
The View area provides settings for establishing the design view in which you will work, the type of data you will use when you preview your output, the limit you need to set on your record input, how your data and query panels will look, and the output target that you will use.
- Design View. Values are Live Preview and Query. Select Live Preview to activate the Preview Method drop-down menu. The default value is Live Preview.
- Preview Method. Values are Preview with Source Data and Preview with Sample Data. This menu becomes active when you select Live Preview from the Design View drop-down menu. The default value is Preview with Source Data.
- Record Limit. Values are All records, 1, 10, 50, 500, or you can type a numeric value directly in the menu. The default value is 500.
- Data Panel. Values are Logical, List, and Structured. The default value is Logical.
- Query Panel. Values are 2x2 (2 columns by 2 rows), 1x4 (1 column by 4 rows), and Tree. The default value is Tree.
- Output Target. Values are Single Tab, New Tab, Single Window, and New Window. The default value is Single Tab.
Layout
The Layout area provides settings for printing reports and charts.
- Page Size. Values are A4, A3, A5, Letter, Tabloid, and Legal. The default value is Letter.
- Orientation. Values are Portrait and Landscape. The default value is Portrait.
Format
The Format area provides settings for the output types for reports, charts, and documents.
- Report output type. Values are HTML, PDF, PowerPoint (pptx), Excel (xlsx), Excel (xlsx Formula), Excel, Excel (Formula), active report, and active PDF. The default value is HTML.
- Chart output type. Values are HTML, HTML5, PDF, PowerPoint (pptx), Excel (xlsx), Excel, active report, and active PDF. The default value is HTML5.
- Document output type. Values are HTML, PDF, PowerPoint (pptx), Excel (xlsx), Excel (xlsx Formula), Excel, Excel (Formula), active report, and active PDF (for documents containing only reports). The default value is active report.
Environment and Styling
The Environment and Styling area provides settings for styling reports and charts through the specification of a Document Theme. Click the Browse button to open the Templates - Browse predefined template files dialog box, in which you can search for an existing StyleSheet. The default StyleSheet is Warm.sty, but you can select from the other themes that are available (Dark.sty or Flat.sty).
Note: StyleSheets are stored in the following directory of your installation:
drive:\ibi\WebFOCUS82\IBI_HTML\ibi_themes
In addition, you can access a repository of additional themes by accessing the Legacy Templates, under Libraries, as shown in the following image.
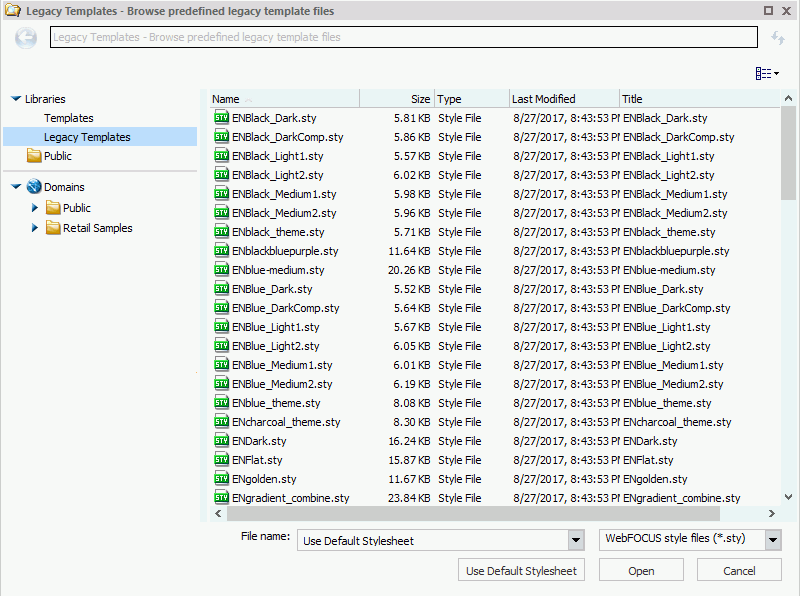
The theme that you select determines the coloring and hues that display within InfoAssist+. The default templates in the Templates section apply to all languages, whereas some of those in the Legacy Templates sections are specific to just one language (for example, EN=English).
Note: If you switch themes when working in Report mode, all custom styling is removed from the procedure.
Changing Global Preferences
You can change global preferences for InfoAssist+ through the Administration Console found on the WebFOCUS Home Page. For more information, see the WebFOCUS Security and Administration manual.
Note: If Microsoft PowerPoint 2000 and Microsoft PowerPoint 2007 are enabled in Global Preferences, the default selection for PowerPoint on the InfoAssist+ Home tab is PowerPoint, as opposed to PowerPoint (pptx).
| WebFOCUS | |
|
Feedback |