Creating Portals
|
Topics: |
|
How to: |
The new generation Business Intelligence (BI) Portal is an analytical content management system that provides a flexible and interactive environment for both authors and consumers of data analytics. It allows users to access and share content, customize their portal experience, collaborate, and build sophisticated structures for data storytelling.
The key benefits of the BI portal are:
- Multi-level page navigation, which is especially useful in organizing large numbers of pages.
- Flexible page layout options for dashboards and InfoApps.
- Mobile-friendly design that ensures responsive behavior on any device and with any type of content.
- Built-in page filter that is automatically enabled whenever users display parameterized content on a personal page.
- Modern styling featuring clean and streamlined UI and interchangeable themes.
You can create a portal structure in your repository, which you can populate by adding pages and workbooks. You can also configure the option for users to create personal pages.
Procedure: How to Create a Portal
- From the WebFOCUS Home Page, in the Resources tree, select the domain or folder where you want to create the portal, click
the Designer tab in the Content Explorer, and then click Portal.
The New Portal dialog box opens.
- Populate the fields.
The following fields are available:
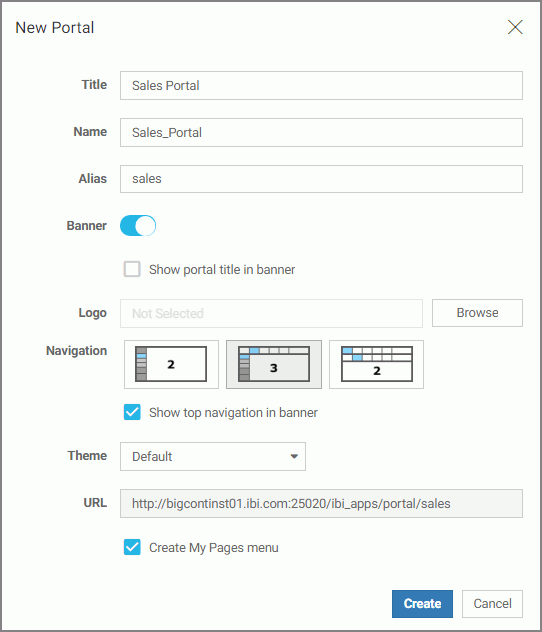
- Title. The title of the portal.
- Name. The name of the portal. This field is populated automatically to match the Title field. You can edit it.
- Alias. Creates an alias for your portal.
- Banner. Activates the banner for your portal. This option is enabled by default.
Note: It is recommended to disable the banner if you plan to embed your portal into a third-party application.
- Show portal title in banner. When selected, displays the title of the portal in the banner.
- Logo. Allows you to customize a logo to customize your portal.
- Navigation. Provides layout selection for your portal. The options are two-level side, three-level, and two-level top.
- Show top navigation in banner. If selected, displays the folder structure as banner links rather than tabs. This option is only available for three-level and two-level top layouts.
- Theme. Allows you to choose themes that can be customized.
- URL. A read-only field that displays the URL for the portal.
Note: When you type an Alias value, the URL field automatically changes to reflect the new location.
- Create My Pages menu. If selected, enables users to create personal pages at run time.
Note: This option is not available in the Edit Portal dialog box.
An example of the filled New Portal dialog box is shown in the following image.
- Click Create.
The new portal structure is created in the specified domain or folder. It is now ready to be populated with folders, workbooks, pages, and shortcuts that serve as links to other workbooks and pages.
- To edit your portal, right-click it in the Resources tree or inside the WebFOCUS Explorer, and then click Edit.
The Edit Portal dialog box opens, where you can change your selections.
Working With Personal Pages
|
How to: |
Personal pages are created at run time by the user and allow the new level of versatility in a way users organize and use portals. Personal pages remain visible only to the user that created them, unless the user shares them. Personal pages reside inside the My Pages folder in the repository.
Procedure: How to Enable Personal Pages
- From the WebFOCUS Home Page, in the Resources tree, select the domain or folder where you want to create the portal, click
the Designer tab in the Content Explorer, and then click Portal.
The New Portal dialog box opens.
- Select Create My Pages menu.
- Make the remaining selections for the new portal, and then click Create.
The new portal is created in the specified domain or folder.
- Publish the portal.
Note: This step is crucial for activating the My Pages menu.
The personal pages are now enabled and can be added by users at run time.
Procedure: How to Use Personal Pages
- Run the portal in which personal pages are enabled.
- Click My Pages, and then click the + icon to add a new page.
Note: Depending on your navigation layout, the My Pages area can display as a tab or as a banner link.
The New Page dialog box opens, as shown in the following image, where you can select a template and link to an existing standalone page in the repository.

- Click a template of your choice.
The page displays a series of interactive panels, as shown in the following image.

- Add content to the panels.
- If parameterized content is added to a page, optionally, click the Show filters button
 to display available filters.
The Selections dialog box opens where you can apply filters to your content.
- Double-click the Page Heading and type a new title for your personal page.
- Optionally, double-click the page title in the sidebar and type a new title.
- To share the page with other users, click the Share button
 .
.The Share with Others dialog box opens.
- Type the names of users and groups with which you want to share your personal page and click OK.
The page is now available to the specified users and the Share button changes color to blue.
- To revoke access to the page, click the Share button
 again.
The Share with Others dialog box opens where you can remove users or groups from the sharing list.
Note: If your sharing privilege does not allow you to open the Share with Others dialog box, you can share or unshare your personal page simply by clicking the Share button. In this case, the page is shared with every user that has access to the domain in which the portal resides.
- To delete the page, click the Delete button
 .
.
Defining a Portal Structure
Each portal is a conglomerate of various parts that you can use to make your portal a comprehensive representation of your data narrative. For example, you can add pages and workbooks to your portal to showcase data. You can create sections and sub-sections to better organize your content. The structure of a portal can be as simple or as complex as required by your specific purpose. There are four content types that you can add to a portal:
- Folder
- Workbook
- Page
- Shortcut to a page or workbook
You can use these elements to define a portal structure by building a simple folder hierarchy.
Procedure: How to Define a Portal Structure Using Content
- Create a portal as described in Creating Portals.
- On the Home Page, in the Resources tree, select the portal you want to modify.
- Using the actions bar, add content to create a portal navigation layout of your choice.
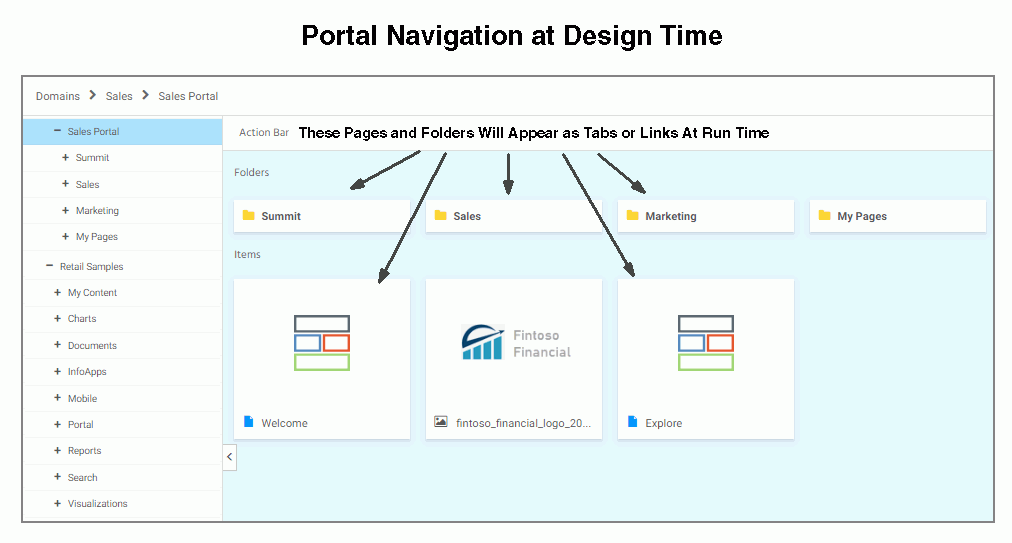
You can create pages, workbooks, and folders to populate your portal. You can also use the Shortcut feature to link existing standalone pages to your portal.
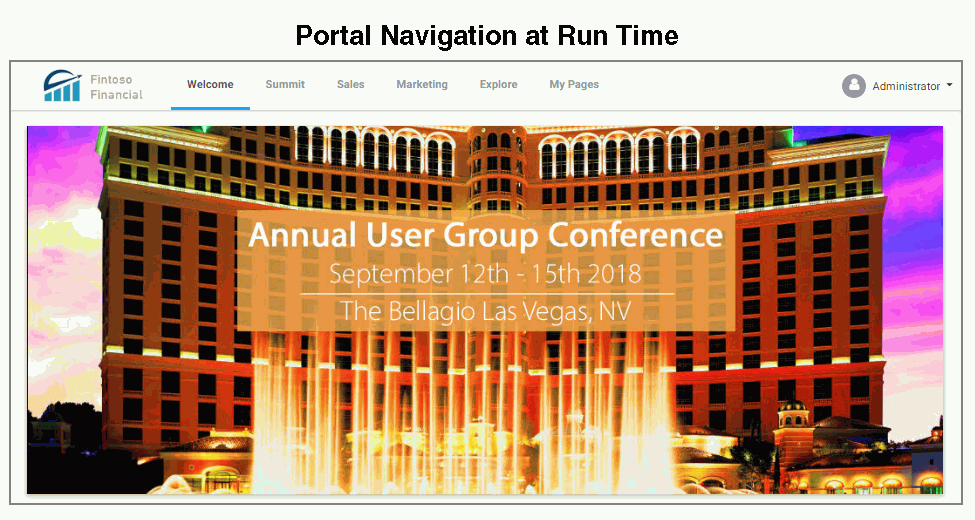
The images below show an example of the initial view of the portal that consists of pages and folders.
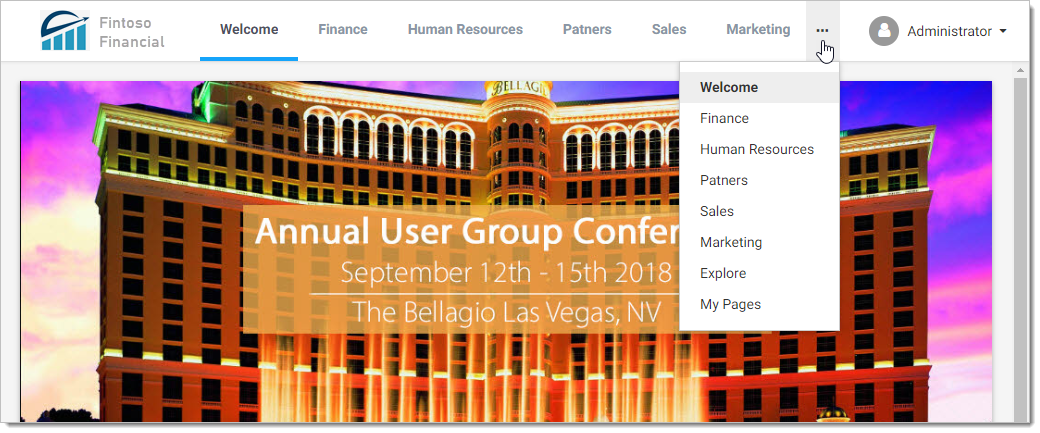
When tabs or links overflow beyond the width of a page, an ellipsis icon displays allowing you to access the entire list of tabs or links, as shown in the following image.
- Optionally, add more folders, subfolders, and pages to your portal.
The images below show an example of how folders, subfolders, and pages make up the structure of a portal.
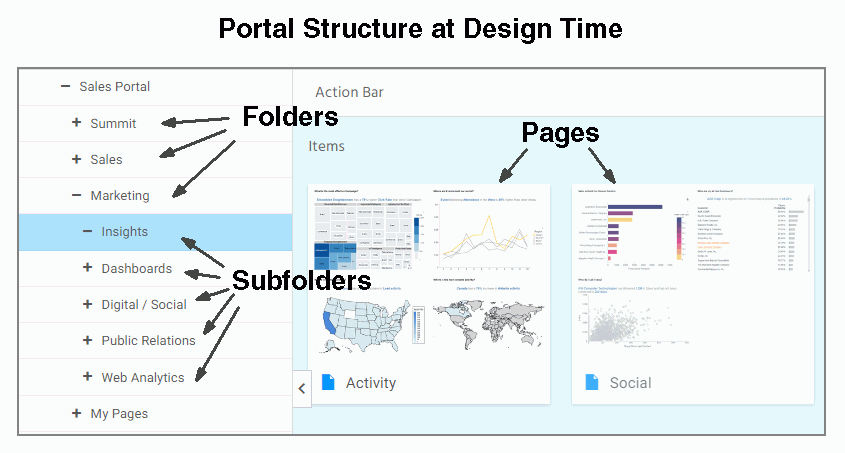
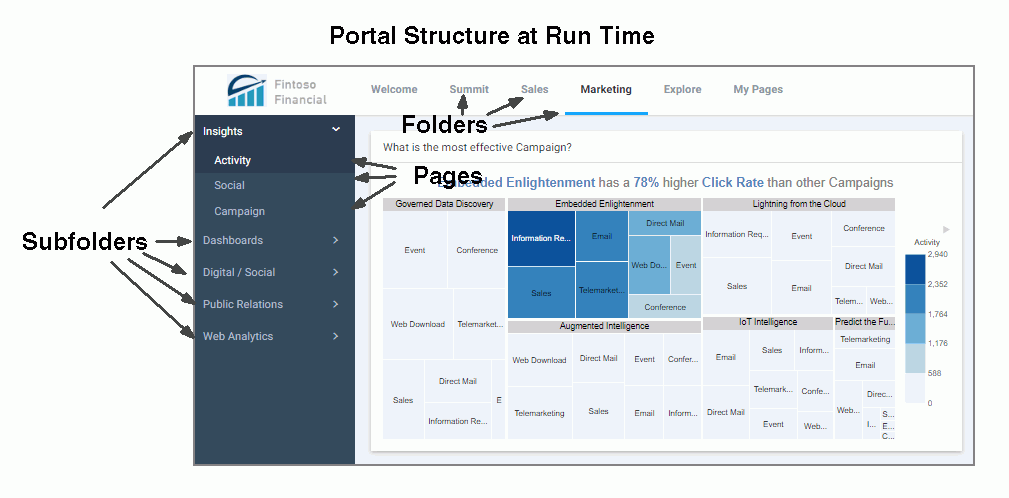
- Once your portal is complete, you can publish it and make it available to other users.
Procedure: How to Use Shortcuts to Add Pages to a Portal
- On the Home Page, select a portal you want to modify.
- Navigate to the level inside the portal where you want to add a page.
- From the actions bar, click Shortcut.
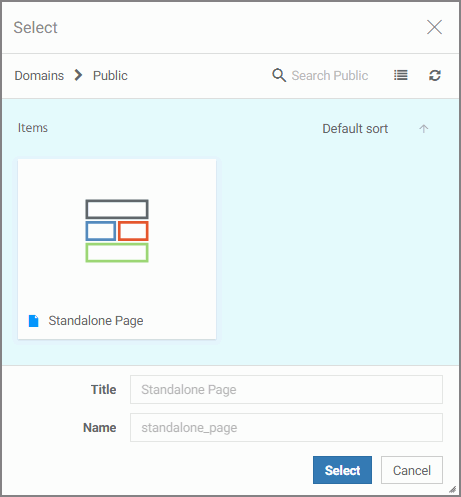
The Select dialog box opens.
- Using the breadcrumb trail, navigate to the page you want to add to your portal and click it.
Notice that the Title and Name fields are inactive, as shown in the following image.
- Click Select.
The page displays inside the portal structure with the Shortcut icon added to its page icon.
- To change the page title, right-click the page, click Properties, edit the Title field in the Properties panel, and then click Save.
The new page title displays.
| WebFOCUS | |
|
Feedback |