Installation and Configuration
This content describes the installation, upgrade, and configuration steps for WebFOCUS Enterprise Usage Monitor (EUM) Release 8.2.04.
WebFOCUS Enterprise Usage Monitor (EUM) requires the following steps:
- Installing WebFOCUS Business User Edition (BUE) Release 8.2.04 GA.
- Importing the EUM content into the repository, using Change Management.
- Configuring EUM Client and Reporting Server settings.
- You must have an existing installation of Resource Management to configure EUM.
- If you are upgrading from a previous release, you can proceed directly to the upgrading EUM topic for your platform.
Installing WebFOCUS Business User Edition
|
How to: |
WebFOCUS Enterprise Usage Monitor (EUM) requires the installation of WebFOCUS Business User Edition (BUE).
Procedure: How to Install WebFOCUS Business User Edition
- Download the WebFOCUS Business User Edition (BUE) Release 8.2.04 GA software for your platform (Windows or Linux) from the download site.
- Install the BUE Release 8.2.04 GA for your platform (Windows or Linux) as described in the Installation topic, under WebFOCUS Business User Edition 8.2.04, in the WebFOCUS BUE Technical Library, Release 8.2.04. You will have to configure an email server for ReportCaster, as it is required for the Enterprise Usage Monitor Alerts feature.
- Type a WebFOCUS Enterprise Usage Monitor license key, which is a 10-user WebFOCUS BUE license.
- When the installation completes, the Sign In dialog box displays.
- Confirm you can sign in to BUE using the manager user ID.
- Depending on your platform, proceed to Importing the Change Management Package for Windows or Importing the Change Management Package for Linux.
Installing and Configuring EUM on a Windows Environment
|
Topics: |
The following section provides the step-by-step instructions that you need to install and configure EUM on a Windows environment.
Importing the Change Management Package for Windows
|
How to: |
Using Change Management, you can import EUM content into the repository.
Procedure: How to Import the Change Management Package
- Sign in to the machine where BUE is installed, with the same user ID used for the installation.
- Copy the CM package, WEUM_8204_Rev2_20190624_140536_manager.zip, from the download site to the BUE Change Management import directory:
drive:\ibi\WebFOCUS_BUE82\WebFOCUS\cm\import
where:
- drive
-
Is the drive where WebFOCUS BUE is installed.
- From the Command prompt, change your current directory to the following path by issuing the following command:
cd /d drive:\ibi\WebFOCUS_BUE82\WebFOCUS\utilities\cm
where:
- drive
-
Is the drive where WebFOCUS BUE is installed.
- Run the Change Management cm_import script using the following command.
Note: Do not use the Change Management utility available from the BUE Resource tree to import this change management, as it will not support the necessary rules.
If you copy and paste the command below, make sure that the command is on a single line. You can do this by first pasting the command in a text editor and removing the new line characters before copying and pasting it into the Command prompt.
cm_import.bat USERNAME=manager PASSWORD=manager_password
IMPORTFROM=drive:\ibi\WebFOCUS_BUE82\WebFOCUS\cm\import
\WEUM_8204_Rev2_20190624_140536_manager.zip
resOverwrite=TRUE importRoles=0 importGroups=2 importUsers=0 importRules=TRUE
where:
- manager_password
-
Is the manager user ID password set during the BUE installation procedure.
- drive
-
Is the drive where WebFOCUS BUE is installed.
- Navigate back to the browser where you signed in to BUE and click the browser refresh button to see the updated EUM portal
and repository content.
Note: If the browser is closed, type the following to return to the browser:
http://machinename:26000/ibi_apps
where:
- machinename
-
Is the name of the machine where BUE is running.
Configuring EUM on the Client for Windows
|
Topics: |
This section covers the steps to configure EUM on the Client.
Configuring Resource Management Reports
|
How to: |
The Resource Management (RM) reports are accessible through the EUM portal. This section covers the steps to configure this feature.
Procedure: How to Configure Resource Management Reports
- On the BUE machine, copy the file:
drive:\ibi\WebFOCUS_BUE82\data\apps\weum\ibi_html.xml
to:
drive:\ibi\WebFOCUS_BUE82\tomcat\conf\Catalina\localhost
where:
- drive
-
Is the drive where WebFOCUS BUE is installed.
- Edit the ibi_html.xml file, as appropriate, as follows:
<Context docBase="drive:\ibi\WebFOCUS_BUE82\WebFOCUS\ibi_html" path="/ibi_html">
where:
- drive
-
Is the drive where WebFOCUS BUE is installed.
- From the Start menu, navigate to the WebFOCUS Business User Edition shortcut, under the Information Builders program group, right-click Stop WebFOCUS_BUE Services, and click Run as Administrator to stop the WEBFOCUS BUE application server.
- From the Start menu, navigate to the WebFOCUS Business User Edition shortcut, under the Information Builders program group, right-click Start WebFOCUS_BUE Services, and click Run as Administrator to start the WebFOCUS BUE application server.
Autoprompt Parameter Prompting
|
How to: |
In order to support the Resource Management reports, the Autoprompt Parameter Prompting setting must be Off.
Procedure: How to Set Autoprompt Parameter Prompting
- Sign in to BUE using the manager user ID or navigate back to the browser where you signed in to BUE.
- On the menu bar, click Administration, and then select Administration Console.
- On the Configuration panel, click Parameter Prompting.
- From the Managed Reporting drop-down list, select Off, as shown in the following image.

- Click Save, and then click OK.
- Click Close to close the Administration Console.
Configuring EUM on the Reporting Server for Windows
This section covers the EUM configuration steps required on the Reporting Server.
Copying Resource Management Configuration Files to EUM
|
How to: |
It is necessary to copy the Resource Management configuration files from the WebFOCUS environment where Resource Management is configured to the EUM environment.
Note: You must have an existing installation of Resource Management already configured to perform this procedure. For more information on Resource Analyzer configuration, see the Resource Analyzer Administrator's and User's Manual for your release.
Procedure: How to Copy the RMLDB.FEX and RMLDATA.FEX Files
On the machine where Resource Management is configured, copy the following files.
For Release 7.7 Version 08, Release 7.7 Version 07, and Release 7.7 Version 06:
drive1:\ibi\srvxx\server\catalog\rm\rmldb.fex
drive1:\ibi\srvxx\server\catalog\rm\rmldata.fex
to:
drive2:\ibi\WebFOCUS_BUE82\srv\wfs\catalog\rm\rmldb.fex
drive2:\ibi\WebFOCUS_BUE82\srv\wfs\catalog\rm\rmldata.fex
For Release 7.7 Version 05M:
drive1:\ibi\srvxx\server\catalog\rmldb.fex
to:
drive2:\ibi\WebFOCUS_BUE82\srv\wfs\catalog\rm\rmldb.fex
where:
- drive1
-
Is the drive where Resource Management is configured.
- xx
-
Is the Reporting Server release.
Note: The type of server you install determines the default names for the program folder and product directory. If you install the WebFOCUS Reporting Server Release 8.2, then the default names will indicate 82. For example:
C:\ibi\srv82
If you install DataMigrator Server Release 7.7 Version 07, then the default names will indicate 77. For example:
C:\ibi\srv77
- server
-
Depends on the license key. Possible values are:
For a 100 Full Function Server license key, the value is ffs.
For a 200 WebFOCUS Server license key, the value is wfs.
For a 300 DataMigrator Server license key, the value is dm.
- drive2
-
Is the drive where WebFOCUS BUE is installed.
Procedure: How to Copy the RMPROF.FEX File (Release 8.2 or 7.7.07 Reporting Servers or Release 8.2.04 or 7.7.08 Reporting Servers)
On the machine where Resource Management is configured, copy the following file:
drive1:\ibi\srvxx\server\catalog\rm\rmprof.fex
to:
drive2:\ibi\WebFOCUS_BUE82\srv\wfs\catalog\rm\rmprof.fex
where:
- drive1
-
Is the drive where Resource Management is configured.
- xx
-
Is the Reporting Server release.
Note: The type of server you install determines the default names for the program folder and product directory. If you install the WebFOCUS Reporting Server Release 8.2, then the default names will indicate 82. For example:
C:\ibi\srv82
If you install DataMigrator Server Release 7.7 Version 07, then the default names will indicate 77. For example:
C:\ibi\srv77
- server
-
Depends on the license key. Possible values are:
For a 100 Full Function Server license key, the value is ffs.
For a 200 WebFOCUS Server license key, the value is wfs.
For a 300 DataMigrator Server license key, the value is dm.
- drive2
-
Is the drive where WebFOCUS BUE is installed.
Procedure: How to Copy RMPROF.PRF (Release 8.0 or 7.7.05 and 8.1 or 7.7.06 Reporting Servers)
On the machine where Resource Management is configured, copy the following file:
drive1:\ibi\srvxx\server\etc\rmprof.prf
to:
drive2:\ibi\WebFOCUS_BUE82\srv\wfs\catalog\rm\rmprof.fex
where:
- drive1
-
Is the drive where Resource Management is configured.
- xx
-
Is the Reporting Server release.
Note: The type of server you install determines the default names for the program folder and product directory. If you install the WebFOCUS Reporting Server Release 8.2, then the default names will indicate 82. For example:
C:\ibi\srv82
If you install DataMigrator Server Release 7.7 Version 07, then the default names will indicate 77. For example:
C:\ibi\srv77
- server
-
Depends on the license key. Possible values are:
For a 100 Full Function Server license key, the value is ffs.
For a 200 WebFOCUS Server license key, the value is wfs.
For a 300 DataMigrator Server license key, the value is dm.
- drive2
-
Is the drive where WebFOCUS BUE is installed.
Configuring EUM to Use the Resource Management Metadata Files
|
How to: |
EUM is based on Release 8.2.04. However, it can support Resource Management files from any 8.x release. This section describes how to use the correct version of the metadata files.
Note: You must have an existing installation of Resource Management already configured to perform this procedure. For more information on Resource Analyzer configuration, see the Resource Analyzer Administrator's and User's Manual for your release.
Procedure: How to Use the Correct Resource Management Files
On the machine where WebFOCUS Business User Edition and Enterprise Usage Monitor are configured, copy the correct version of the files into the baseapp application directory.
Note: For Release 8206, use the same files used by Release 8205, as noted in step 3.
- Copy the files:
drive:\ibi\WebFOCUS_BUE82\data\apps\baseapp\weum\rmldataNN.mas
drive:\ibi\WebFOCUS_BUE82\data\apps\baseapp\weum\rmldataNN.acx
drive:\ibi\WebFOCUS_BUE82\data\apps\baseapp\weum\rmldbNN.mas
drive:\ibi\WebFOCUS_BUE82\data\apps\baseapp\weum\rmldbNN.acx
to each of the following directories:
drive:\ibi\WebFOCUS_BUE82\data\apps\baseapp\
drive:\ibi\WebFOCUS_BUE82\srv\wfs\catalog\rm\
where:
- drive
-
Is the drive where WebFOCUS BUE is installed.
- NN
-
Is the Reporting Server version where Resource Management is configured.
- Depending on your server release, rename the corresponding rmldataNN files to rmldata.mas and rmldata.acx in both locations. For example, if you install the WebFOCUS Reporting Server Release 8.2, rename rmldata82.mas to rmldata.mas, rmldata82.acx to rmldata.acx, rmldb82.mas to rmldb.mas, and rmldb82.acx to rmldb.acx.
- Additionally, for releases 8205 and 8206, copy all of the files from:
drive:\ibi\WebFOCUS_BUE82\data\apps\baseapp\weum\rmldb_8205_8206
to the following directory:
drive:\ibi\WebFOCUS_BUE82\srv\wfs\catalog\rm\
There is no renaming necessary for these files.
Configuring Access to the Resource Management Log File (RMLDATA.LOG)
|
How to: |
Access to the Resource Management log files is defined through a FILEDEF command that is defined in the Reporting Server profile, edasprof.prf.
Procedure: How to Define a FILEDEF to Access the RMLDATA.LOG File
- Sign in to BUE as manager or navigate back to the browser where you signed in to BUE.
- On the menu bar, click Administration, and then select Reporting Server Console.
- Click the Workspace button
 on the sidebar.
 - Navigate to the Configuration Files folder, right-click Server Profile - edasprof.prf, and select Edit, as shown in the following image.
- Add both FILEDEF commands at the end of the server profile, for example:
FILEDEF baseapp/rmldata DISK drive:\srvxx\wfs\rmldata.log
FILEDEF rmldata DISK drive:\srvxx\wfs\rmldata.log
Note:
- If you are using a network drive, use the following FILEDEF commands:
FILEDEF baseapp\rmldata DISK \\machinename\directory\rmldata.log
FILEDEF rmldata DISK \\machinename\directory\rmldata.log
Note: Make sure the directory located on your network drive is shared so that it is accessible from the computer where BUE/EUM is installed.
- If you have multiple rmldata files, use the CONCAT command. For example:
FILEDEF baseapp\rmldata DISK \\machinename\directory\rmldata.log
FILEDEF baseapp\rmldata1 DISK \\machinename\directory1\rmldata.log
FILEDEF baseapp\rmldataN DISK \\machinename\directoryN\rmldata.log
FILEDEF baseapp\rmldata CONCAT baseapp\rmldata1 baseapp\rmldataN
where:
- drive
-
Is the location of your rmldata.log file.
- xx
-
Is the Reporting Server release.
Note: The type of server you install determines the default names for the program folder and product directory. If you install the WebFOCUS Reporting Server Release 8.2, then the default names will indicate 82. For example:
C:\ibi\srv82
If you install DataMigrator Server Release 7.7 Version 07, then the default names will indicate 77. For example:
C:\ibi\srv77
- machinename
-
Is the name of the network machine.
- directory1...directoryN
-
Are the names of the network directories.
- rmldata1
-
Is the first WebFOCUS Resource Management file.
- rmldataN
-
Is the Nth WebFOCUS Resource Management file.
- If you are using a network drive, use the following FILEDEF commands:
- Click Save.
Configuring Access to RMLDB
|
How to: |
Resource Management historical data is stored in the RMLDB database. This section describes how to configure EUM to access the RMLDB. This configuration may need assistance from your Resource Management administrator.
The Adapter configuration on the WebFOCUS environment where Resource Management is configured needs to be replicated on the EUM environment.
Configure the Adapter to the Resource Management repository. If you have more than one Resource Management repository, each will require a separate installation of EUM.
Procedure: How to Configure the RMLDB Adapter
Gather connection information from the Resource Management server environment.
Note: If you configured the adapter as Trusted, the database administrator must set up a Read Only user ID on the Resource Management repository database. The Resource Management repository database credentials for the Read Only user ID will be used in step 9.
- From the Resource Management Web Console, click the Adapters tab or, if you are running Release 8.2.03 and higher, click the Connect to Data button
 on the sidebar.
 - Expand the Configured folder, or view the Configured Adapters panel, to see the list of configured adapters.
- Right-click the adapter used for the Resource Management repository database and select Properties.
- Use this information to replicate this adapter on the EUM server.
Note: It is critical the connection name is identical.
- Sign in to BUE using the manager user ID.
- From the menu bar, click Administration, and then select Reporting Server Console.
- Click the Connect to Data button.
- In the Adapter panel, find the same adapter being used for the RMLDB database, as shown in the following image.
- Once you locate the correct adapter, right-click it and select Configure. Type the same properties as you have on your Resource Management Reporting Server.
Note: If the RMLDB adapter is Trusted, select Explicit from the Security drop-down list and type the user credentials of the Read Only user ID.
- Click Test to verify the connection.
- Click Configure to finish configuring your adapter.
Granting Access to Server Roles to Read Data Outside of Installation Directories
|
How to: |
The rmldata.log file to be monitored is typically located outside of the EUM machine. In order for developers and basic users to access the file, it will be necessary to change their file privileges on the EUM Reporting Server.
Procedure: How to Grant Access to Server Roles to Read Data Outside of Installation Directories
- Sign in to BUE using the manager user ID.
- From the menu bar, click Administration, and then select Reporting Server Console.
- On the Reporting Server Console, click the Access Control button
 on the sidebar.
 - On the Access Control panel, navigate to Roles, and expand the Application Administrator folder.
- Right-click modelgrp/Developers (Customized), and then select Directory/File Privileges, as shown in the following image.
The Directory/File Privileges pane opens.
- Select the Read option on the first row (*). This will automatically enable developers to have read access to files outside the EUM environment,
as shown in the following image.
- Click Save and then click OK.
- On the Access Control panel, navigate to Roles, and then expand the Basic User folder.
- Right-click modelgrp (Customized), and then select Directory/File Privileges.
The Directory/File Privileges pane opens.
- Select the Read option on the first row (*). This will automatically enable basic users to have read access to files outside the EUM environment.
- Click Save and then click OK.
Configuring Access to the Mid-Tier Log File
|
How to: |
This section describes the remaining steps to configure EUM to access the mid-tier log file. It may be necessary to share or redirect the mid-tier log files to a drive that is accessible from the EUM machine.
Procedure: How to Configure Access to the Mid-Tier Log File
- Sign in as the manager user ID.
- On the menu bar, click Administration, and then select Reporting Server Console.
- Click the Applications button
 on the sidebar.
 - Expand the baseapp application folder and click weum.
- Right-click the requestsprof.fex file and select Copy.
- Right-click the baseapp folder and select Paste.
- In the baseapp folder, right-click the requestsprof.fex file and select Open.
Note: If the file is not visible, click Preferences in the toolbar and select the Show Files on Application Tree check box. Click Update to save your changes.
- Edit the file so the following line contains the location of the WebFOCUS environment requests.*.log files, as follows:
-SET &&DSN = 'drive:\ibi\WebFOCUSnn\logs\' | 'requests.' | &DT | '.log';
where:
- drive
-
Is the drive where the WebFOCUS Client application server is installed.
- nn
-
Is the WebFOCUS release.
- Click Save.
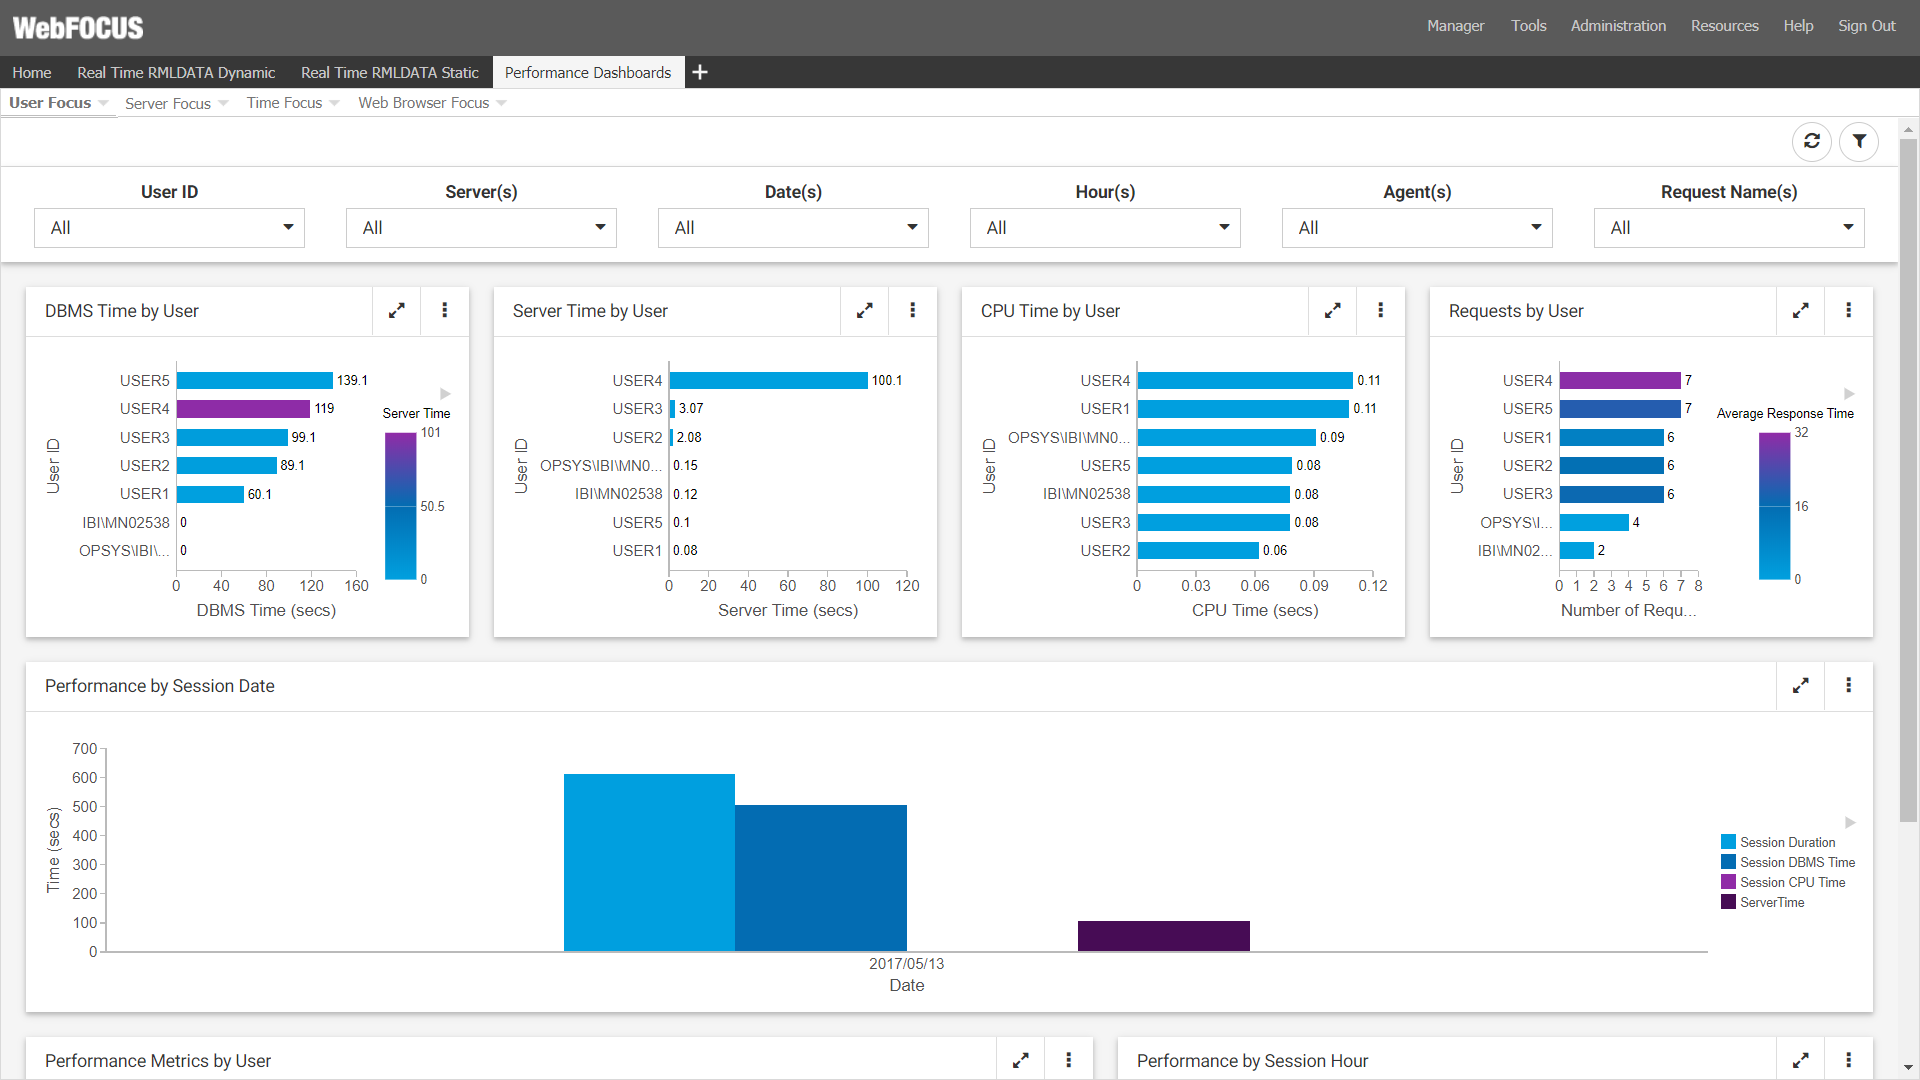
At this point, EUM is fully installed and configured. The dashboard pages in the EUM portal should be populated with real time (RMLDATA.LOG), historical (RMLDB), and performance data, as shown in the following image.
Enabling Logging on a Windows Environment
|
How to: |
This section describes how to enable logging on the WebFOCUS Client application server that you wish to monitor. This is not the WebFOCUS Client associated with the BUE/EUM install.
Note: These steps are not performed on the BUE/EUM environment.
Procedure: How to Enable Logging on the WebFOCUS Client Application Server
- Navigate to
the Tomcat directory for your WebFOCUS release. For example:
C:\ibi\tomcat\bin
- Depending on the WebFOCUS release, run the Tomcat program, for example, tomcat8WFw.exe, as administrator.
The Apache Tomcat for WebFOCUS Properties dialog box opens.
- Click the Java tab.
- Type the following two lines
in the Java Options section, as shown in the following image. To enter the blank line, hit the Enter key to move the cursor
to the next line.
-DIBI_Request_Logging=ON
 <Blank line>

- Click OK.
Upgrading EUM from Release 8.201 to Release 8.2.04 on a Windows Environment
|
How to: |
The following section provides the step-by-step instructions that you need to upgrade your current EUM 8.2.01 installation to 8.2.04 for a Windows environment.
Note: Before you begin your upgrade, note if any domain or personal portal pages that have been added to the EUM environment. These will have to be recreated after the upgrade.
Procedure: How to Upgrade Your Previous EUM Installation to Release 8.2.04
To upgrade EUM to Release 8.2 Version 04, you must perform the following steps:
- Upgrade your BUE environment from Release 8.2.01 to Release 8.2.04 by downloading the latest BUE software for Windows, as described in the Installation topic, under WebFOCUS Business User Edition 8.2.04 in the WebFOCUS BUE Technical Library, Release 8.2.04.
- Copy the CM package, WEUM_8204_20181211_225939_manager.zip, from the download site to the BUE Change Management import directory:
drive:\ibi\WebFOCUS_BUE82\WebFOCUS\cm\import
where:
- drive
-
Is the drive where WebFOCUS BUE is installed.
- From the Command prompt, change your current directory to the following path by issuing the following command:
cd /d drive:\ibi\WebFOCUS_BUE82\WebFOCUS\utilities\cm
where:
- drive
-
Is the drive where WebFOCUS BUE is installed.
- Run the Change Management cm_import script using the following command.
Note: Do not use the Change Management utility available from the BUE Resource tree to import this change management, as it will not support the necessary rules.
If you copy and paste the command below, make sure that the command is on a single line. You can do this by first pasting the command in a text editor and removing the new line characters before copying and pasting it into the Command prompt.
cm_import.bat USERNAME=manager PASSWORD=manager_password
IMPORTFROM=drive:\ibi\WebFOCUS_BUE82\WebFOCUS\cm\import\WEUM_8204_20181211_225939_manager.zip
resOverwrite=TRUE importRoles=0 importGroups=2 importUsers=0 importRules=TRUE
where:
- manager_password
-
Is the manager user ID password set during the BUE installation procedure.
- drive
-
Is the drive where WebFOCUS BUE is installed.
- Sign in to BUE to see the updated EUM portal and repository content.
Note:The BUE sign on URL is:
http://machinename:26000/ibi_apps
where:
- machinename
-
Is the name of the machine where BUE is running.
Your EUM environment is now successfully upgraded to Release 8.2.04.
Installing and Configuring EUM on a Linux Environment
|
Topics: |
The following section provides the step-by-step instructions that you need to install and configure EUM on a Linux environment.
Importing the Change Management Package for Linux
|
How to: |
Using Change Management, you can import EUM content into the repository.
Procedure: How to Import the Change Management Package for Linux
- Sign in to the machine where BUE is installed, with the same user ID used for the installation.
-
Copy the CM package, WEUM_8204_20181211_225939_manager.zip, from the download site to the BUE Change
Management import directory:
/install_directory/ibi/WebFOCUS_BUE82/WebFOCUS/cm/import
where:
- install_directory
-
Is the directory where WebFOCUS BUE is installed.
- From the Command prompt, change your current directory to the following path:
/install_directory/ibi/WebFOCUS_BUE82/WebFOCUS/utilities/cm
where:
- install_directory
-
Is the directory where WebFOCUS BUE is installed.
- Run the Change Management cm_import script using the following command.
Note: Do not use the Change Management utility available from the BUE Resource tree to import this change management, as it will not support the necessary rules.
If you copy and paste the command below, make sure that the command is on a single line. You can do this by first pasting the command in a text editor and removing the new line characters before copying and pasting it into the Command prompt.
./cm_import.sh USERNAME=manager PASSWORD=manager_password
IMPORTFROM=/install_directory/ibi/WebFOCUS_BUE82/WebFOCUS/cm/import
/WEUM_8204_20181211_225939_manager.zip
resOverwrite=TRUE importRoles=0 importGroups=2 importUsers=0 importRules=TRUE
where:
- manager_password
-
Is the manager user ID password set during the BUE installation procedure.
- install_directory
-
Is the directory where WebFOCUS BUE is installed.
- Sign in to BUE to see the updated EUM portal and repository content.
Note: The BUE sign on URL is:
http://machinename:26000/ibi_apps
where:
- machinename
-
Is the name of the machine where BUE is running.
Configuring EUM on the Client for Linux
|
Topics: |
This section covers the steps to configure EUM on the Client.
Configuring Resource Management Reports
|
How to: |
The Resource Management reports are accessible through the EUM portal. This section covers the steps to configure this feature.
Procedure: How to Configure Resource Management Reports for Linux
- On the BUE machine, copy the file:
/install_directory/ibi/WebFOCUS_BUE82/data/apps/weum/ibi_html.xml
to:
/install_directory/ibi/WebFOCUS_BUE82/tomcat/conf/Catalina/localhost
where:
- install_directory
-
Is the directory where WebFOCUS BUE is installed.
- Edit the ibi_html.xml file, as appropriate, as follows:
<Context docBase="/install_directory/ibi/WebFOCUS_BUE82/WebFOCUS/ibi_html" path="/ibi_html">
where:
- install_directory
-
Is the directory where WebFOCUS BUE is installed.
- Stop the WebFOCUS BUE Application Server,
using the following command:
/install_directory/ibi/WebFOCUS_BUE82/tomcat/bin/shutdown.sh
where:
- install_directory
-
Is the directory where WebFOCUS BUE is installed.
- Start the WebFOCUS BUE Application Server,
using the following command:
/install_directory/ibi/WebFOCUS_BUE82/tomcat/bin/startup.sh
where:
- install_directory
-
Is the directory where WebFOCUS BUE is installed.
Autoprompt Parameter Prompting
|
How to: |
In order to support the Resource Management reports, the Autoprompt Parameter Prompting setting must be Off.
Procedure: How to Set Autoprompt Parameter Prompting
- Sign in to BUE using the manager user ID or navigate back to the browser where you signed in to BUE.
- On the menu bar, click Administration, and then select Administration Console.
- On the Configuration panel, click Parameter Prompting.
- From the Managed Reporting drop-down list, select Off, as shown in the following image.
- Click Save, and then click OK.
- Click Close to close the Administration Console.
Configuring EUM on the Reporting Server for Linux
This section covers the EUM configuration steps required on the Reporting Server.
Copying Resource Management Configuration Files to EUM
|
How to: |
It is necessary to copy the Resource Management configuration files from the WebFOCUS environment where Resource Management is configured to the EUM environment.
Procedure: How to Copy the RMLDB.FEX and RMLDATA.FEX Files
On the machine where Resource Management is configured, copy the following files:
/install_directory1/ibi/srvxx/server/catalog/rm/rmldb.fex
/install_directory1/ibi/srvxx/server/catalog/rm/rmldata.fex
to:
/install_directory2/ibi/WebFOCUS_BUE82/srv/wfs/catalog/rm/rmldb.fex
/install_directory2/ibi/WebFOCUS_BUE82/srv/wfs/catalog/rm/rmldata.fex
where:
- install_directory1
-
Is the directory where Resource Management is installed.
- xx
-
Is the Reporting Server release.
Note: The type of server you install determines the default names for the program folder and product directory. If you install the WebFOCUS Reporting Server Release 8.2, then the default names will indicate 82. For example:
/install_directory/ibi/srv82
If you install DataMigrator Server Release 7.7 Version 07, then the default names will indicate 77. For example:
/install_directory/ibi/srv77
- server
-
Depends on the license key. Possible values are:
For a 100 Full Function Server license key, the value is ffs.
For a 200 WebFOCUS Server license key, the value is wfs.
For a 300 DataMigrator Server license key, the value is dm.
- install_directory2
-
Is the directory where WebFOCUS BUE is installed.
Procedure: How to Copy the RMPROF.FEX File (Release 8.2 or 7.7.07 Reporting Servers or Release 8.2.04 or 7.7.08 Reporting Servers)
On the machine where Resource Management is configured, copy the following file:
/install_directory1/ibi/srvxx/server/catalog/rm/rmprof.fex
to:
/install_directory2/ibi/WebFOCUS_BUE82/srv/wfs/catalog/rm/rmprof.fex
where:
- install_directory1
-
Is the directory where Resource Management is installed.
- xx
-
Is the Reporting Server release.
Note: The type of server you install determines the default names for the program folder and product directory. If you install the WebFOCUS Reporting Server Release 8.2, then the default names will indicate 82. For example:
/install_directory/ibi/srv82
If you install DataMigrator Server Release 7.7 Version 07, then the default names will indicate 77. For example:
/install_directory2/ibi/srv77
- server
-
Depends on the license key. Possible values are:
For a 100 Full Function Server license key, the value is ffs.
For a 200 WebFOCUS Server license key, the value is wfs.
For a 300 DataMigrator Server license key, the value is dm.
- install_directory2
-
Is the directory where WebFOCUS BUE is installed.
Procedure: How to Copy RMPROF.PRF (Release 8.0 or 7.7.05 and 8.1 or 7.7.06 Reporting Servers)
On the machine where Resource Management is configured, copy the following file:
/install_directory1/ibi/srvxx/server/etc/rmprof.prf
to:
/install_directory2/ibi/WebFOCUS_BUE82/srv/wfs/catalog/rm/rmprof.fex
where:
- install_directory1
-
Is the directory where Resource Management is installed.
- xx
-
Is the Reporting Server release.
Note: The type of server you install determines the default names for the program folder and product directory. If you install the WebFOCUS Reporting Server Release 8.2, then the default names will indicate 82. For example:
/install_directory/ibi/srv82
If you install DataMigrator Server Release 7.7 Version 07, then the default names will indicate 77. For example:
/install_directory/ibi/srv77
- server
-
Depends on the license key. Possible values are:
For a 100 Full Function Server license key, the value is ffs.
For a 200 WebFOCUS Server license key, the value is wfs.
For a 300 DataMigrator Server license key, the value is dm.
- install_directory2
-
Is the directory where WebFOCUS BUE is installed.
Configuring EUM to Use the Resource Management Metadata Files
|
How to: |
EUM is based on Release 8.2.04. However, it can support Resource Management files from any 8.x release. This section describes how to use the correct version of the metadata files.
Procedure: How to Use the Correct Resource Management Files
On the machine where WebFOCUS Business User Edition and Enterprise Usage Monitor are configured, copy the correct version of the files into the baseapp application directory.
Note: For Release 8206, use the same files used by Release 8205, as noted in step 3.
- Copy the files:
/install_directory/ibi/WebFOCUS_BUE82/data/apps/baseapp/weum/rmldataNN.mas
/install_directory/ibi/WebFOCUS_BUE82/data/apps/baseapp/weum/rmldataNN.acx
/install_directory/ibi/WebFOCUS_BUE82/data/apps/baseapp/weum/rmldbNN.mas
/install_directory/ibi/WebFOCUS_BUE82/data/apps/baseapp/weum/rmldbNN.acx
to each of the following directories:
/install_directory/ibi/WebFOCUS_BUE82/data/apps/baseapp/
/install_directory/ibi/WebFOCUS_BUE82/srv/wfs/catalog/rm/
where:
- install_directory
-
Is the directory where WebFOCUS BUE is installed.
- NN
-
Is the Reporting Server version where Resource Management is configured.
- Depending on your server release, rename the corresponding rmldataNN files to rmldata.mas and rmldata82.acx in both locations. For example, if you install the WebFOCUS Reporting Server Release 8.2, rename rmldata82.mas to rmldata.mas, rmldata82.acx to rmldata.acx, rmldb82.mas to rmldb.mas, and rmldb82.acx to rmldb.acx.
- Additionally, for releases 8205 and 8206, copy all of the files from:
/install_directory/ibi/WebFOCUS_BUE82/data/apps/baseapp/weum/rmldb_8205_8206
to the following directory:
/install_directory/ibi/WebFOCUS_BUE82/srv/wfs/catalog/rm/
There is no renaming necessary for these files.
Configuring Access to the Resource Management Log File (RMLDATA.LOG)
|
How to: |
Access to the Resource Management log files is defined through a FILEDEF command that is defined in the Reporting Server profile, edasprof.prf.
Procedure: How to Define a FILEDEF to Access the RMLDATA.LOG File
- Sign in to BUE as manager or navigate back to the browser where you signed in to BUE.
- On the menu bar, click Administration, and then select Reporting Server Console.
- Click the Workspace button on the sidebar.
- Navigate to the Configuration Files folder, right-click Server Profile - edasprof.prf, and select Edit, as shown in the following image.
- Add both FILEDEF commands at the end of the server profile, for example:
FILEDEF baseapp/rmldata DISK /srvxx/wfs/rmldata.log
FILEDEF rmldata DISK /srvxx/wfs/rmldata.log
Note:
- If you are using a network drive, use the following FILEDEF command:
FILEDEF baseapp/rmldata DISK //machinename/directory/rmldata.log
FILEDEF rmldata DISK //machinename/directory/rmldata.log
Note: Make sure the directory located on your network drive is shared so that it is accessible from the computer where BUE/EUM is installed.
- If you have multiple rmldata files, use the CONCAT command. For example:
FILEDEF baseapp/rmldata DISK //machinename/directory/rmldata.log
FILEDEF baseapp/rmldata1 DISK //machinename/directory1/rmldata.log
FILEDEF baseapp/rmldataN DISK //machinename/directoryN/rmldata.log
FILEDEF baseapp/rmldata CONCAT baseapp/rmldata1 baseapp/rmldataN
where:
- xx
-
Is the Reporting Server release.
Note: The type of server you install determines the default names for the program folder and product directory. If you install the WebFOCUS Reporting Server Release 8.2, then the default names will indicate 82. For example:
/install_directory/ibi/srv82
If you install DataMigrator Server Release 7.7 Version 07, then the default names will indicate 77. For example:
/install_directory/ibi/srv77
- machinename
-
Is the name of the network machine.
- directory1...directoryN
-
Are the names of the network directories.
- rmldata1
-
Is the first WebFOCUS Resource Management file.
- rmldataN
-
Is the Nth WebFOCUS Resource Management file.
- If you are using a network drive, use the following FILEDEF command:
- Click Save.
- Navigate to the Miscellaneous Files folder, right-click Environment - edaenv.cfg, and select Edit.
- Add the following command:
computername=hostname
where:
- hostname
-
Is the host name of the machine where EUM is installed.
- Click Save.
- Click Restart on the ribbon for the change to take effect.
Configuring Access to RMLDB
|
How to: |
Resource Management historical data is stored in the RMLDB database. This section describes how to configure EUM to access the RMLDB. This configuration may need assistance from your Resource Management administrator.
The Adapter configuration on the WebFOCUS environment where Resource Management is configured needs to be replicated on the EUM environment.
Configure the Adapter to the Resource Management repository. If you have more than one Resource Management repository, each will require a separate installation of EUM.
Procedure: How to Configure the RMLDB Adapter
Gather connection information from the Resource Management server environment.
Note: If you configured the adapter as Trusted, the database administrator must set up a Read Only user ID on the Resource Management repository database. The Resource Management repository database credentials for the Read Only user ID will be used in step 9.
- From the Resource Management Web Console, click the Adapters tab or, if you are running Release 8.2.03 or higher, click the Connect to Data button on the sidebar.
- Expand the Configured folder, or view the Configured Adapters panel, to see the list of configured adapters.
- Right-click the adapter used for the Resource Management repository database and select Properties.
- Use this information to replicate this adapter on the EUM server.
Note: It is critical the connection name is identical.
- Sign in to BUE using the manager user ID.
- From the menu bar, click Administration, and then select Reporting Server Console.
- Click the Connect to Data button.
- In the Adapter panel, find the same adapter being used for the RMLDB database, as shown in the following image.
- Once you locate the correct adapter, right-click it and select Configure. Type the same properties as you have on your Resource Management Reporting Server.
Note: If the RMLDB adapter is Trusted, select Explicit from the Security drop-down list and type the user credentials of the Read Only user ID.
- Click Test to verify the connection.
- Click Configure to finish configuring your adapter.
Granting Access to Server Roles to Read Data Outside of Installation Directories
|
How to: |
The rmldata.log file to be monitored is typically located outside of the EUM machine. In order for developers and basic users to access the file, it will be necessary to change their file privileges on the EUM Reporting Server.
Procedure: How to Grant Access to Server Roles to Read Data Outside of Installation Directories
- Sign in to BUE using the manager user ID.
- From the menu bar, click Administration, and then select Reporting Server Console.
- On the Reporting Server Console, click the Access Control button on the sidebar.
- On the Access Control panel, navigate to Roles, and expand the Application Administrator folder.
- Right-click modelgrp/Developers (Customized), and then select Directory/File Privileges, as shown in the following image.
The Directory/File Privileges pane opens.
- Select the Read option on the first row (*). This will automatically enable developers to have read access to files outside the EUM environment,
as shown in the following image.
- Click Save and then click OK.
- On the Access Control panel, navigate to Roles, and then expand the Basic User folder.
- Right-click modelgrp (Customized), and then select Directory/File Privileges.
The Directory/File Privileges pane opens.
- Select the Read option on the first row (*). This will automatically enable basic users to have read access to files outside the EUM environment.
- Click Save and then click OK.
Configuring Access to the Mid-Tier Log File
|
How to: |
This section describes the remaining steps to configure EUM to access the mid-tier log file. It may be necessary to share or redirect the mid-tier log files to a drive that is accessible from the EUM machine.
Procedure: How to Configure Access to the Mid-Tier Log File
- Sign in as the manager user ID.
- On the menu bar, click Administration, and then select Reporting Server Console.
- Click the Applications button on the sidebar.
- Navigate to the baseapp/weum application folder.
- Right-click the requestsprof.fex file and select Copy.
- Right-click the baseapp folder and select Paste.
- In the baseapp folder, right-click the requestsprof.fex file and select Open.Note: If the file is not visible, click Preferences in the toolbar and select the Show Files on Application Tree checkbox. Click Update to save your changes.
- Edit the file so the following line contains the location of the WebFOCUS environment requests.*.log files, as follows:
-SET &&DSN = ' /install_directory/ibi/WebFOCUSnn/logs/' | 'requests.' | &DT | '.log';
where:
- install_directory
-
Is the directory where the WebFOCUS Client application server is installed.
- nn
-
Is the WebFOCUS release.
- Click Save.
At this point, EUM is fully installed and configured. The dashboard pages in the EUM portal should be populated with real time (RMLDATA.LOG), historical (RMLDB), and performance data, as shown in the following image.
Enabling Logging on a Linux Environment
|
How to: |
This section describes how to enable logging on the WebFOCUS Client application server that you wish to monitor. This is not the WebFOCUS Client associated with the BUE/EUM install.
Note: These steps are not performed on the BUE/EUM environment.
Procedure: How to Enable Logging on the WebFOCUS Client Application Server
- Navigate to
the Tomcat directory for your WebFOCUS release. For example:
/ibi/tomcat/bin
- Edit catalina.sh by adding the -DIBI_Request_Logging=ON argument to the JAVA_OPTS definition, as follows:
JAVA_OPTS="-Xms256m -Xmx512m -Djava.awt.headless=true
-DIBI_Request_Logging=ON"
- Save the file.
Upgrading EUM from Release 8.201 to Release 8.2.04 on a Linux Environment
|
How to: |
The following section provides the step-by-step instructions that you need to upgrade your current EUM 8.2.01 installation to 8.2.04 for a Linux environment.
Note: Before you begin your upgrade, note if any domain or personal portal pages that have been added to the EUM environment. These will have to be recreated after the upgrade.
Procedure: How to Upgrade Your Previous EUM Installation to Release 8.2.04
To upgrade EUM to Release 8.2 Version 04, you must perform the following steps:
- Upgrade your BUE environment from Release 8.2.01 to Release 8.2.04 by downloading the latest BUE software for your Linux platform, as described in the Installation topic, under WebFOCUS Business User Edition 8.2.04 in the WebFOCUS BUE Technical Library, Release 8.2.04.
- Copy the CM package, WEUM_8204_20181211_225939_manager.zip, from the download site to the BUE Change Management import directory:
/install_directory/ibi/WebFOCUS_BUE82/WebFOCUS/cm/import
where:
- install_directory
-
Is the drive where WebFOCUS BUE is installed.
- From the Command prompt, change your current directory to the following path by issuing the following command:
/install_directory/ibi/WebFOCUS_BUE82/WebFOCUS/utilities/cm
where:
- install_directory
-
Is the drive where WebFOCUS BUE is installed.
- Run the Change Management cm_import script using the following command.
Note: Do not use the Change Management utility available from the BUE Resource tree to import this change management, as it will not support the necessary rules.
If you copy and paste the command below, make sure that the command is on a single line. You can do this by first pasting the command in a text editor and removing the new line characters before copying and pasting it into the Command prompt.
./cm_import.sh USERNAME=manager PASSWORD=manager_password
IMPORTFROM=/install_directory/ibi/WebFOCUS_BUE82/WebFOCUS/cm/import
/WEUM_8204_20181211_225939_manager.zip
resOverwrite=TRUE importRoles=0 importGroups=2 importUsers=0 importRules=TRUE
where:
- manager_password
-
Is the manager user ID password set during the BUE installation procedure.
- drive
-
Is the drive where WebFOCUS BUE is installed.
- Sign in to BUE to see the updated EUM portal and repository content.
Note: The BUE sign on URL is:
http://machinename:26000/ibi_apps
where:
- machinename
-
Is the name of the machine where BUE is running.
Your EUM environment is now successfully upgraded to Release 8.2.04.
Working With the Resource Management Shadow Log
The Resource Management shadow file is a mirror image log file of the RMLDATA log file. Resource Management creates the mirror image so that EUM can read multiple files from a single path. The RMLDATAT shadow log file is written out at the same time the Resource Management archive is run. There are several reason why you may want to configure the Shadow log feature:
- To allow your production WebFOCUS Resource Management application to write a shadow log to a location outside of the production environment that is accessible to the EUM machine.
- If you have multiple WebFOCUS Resource Management environments you can consolidate them to a single location that is accessible to the EUM machine.
- To provide a way for Information Builders to analyze your historical Resource Management data if required.
If you are running Resource Management Release 7.7 Version 08, or higher, you have access to a shadow file capability.
You can enable this feature by editing the edaenv.cfg file with the following line:
RMLOG_SHADOW = fullpath
where:
- fullpath
-
Is the location of the Resource Management server.
On a Windows machine:
If you have a single Resource Management server configured, the path is:
drive:\shadow_log_folder
where:
- drive
-
Is the drive where Resource Management is installed.
- shadow_log_folder
-
Is the location of the shadow drive.
If you have multiple Resource Management servers configured, the path is:
drive:\shadow_log_folder\servern
where:
- drive
-
Is the drive where Resource Management is installed.
- shadow_log_folder
-
Is the location of the shadow drive.
- servern
-
Is one of the multiple WebFOCUS Resource Management environments.
Note:- If you have more than one folder, you need to create these folders before enabling this feature.
- Make sure the directory located on your network drive is shared so that it is accessible from the computer where BUE/EUM is installed.
On a Linux machine:
If you have a single Resource Management server configured, the path is:
../shadow_log_folder
where:
- shadow_log_folder
-
Is the location of the shadow drive.
If you have multiple Resource Management servers configured, the path is:
../shadow_log_folder/servern
where:
- shadow_log_folder
-
Is the location of the shadow drive.
- servern
-
Is one of the multiple WebFOCUS Resource Management environments.
Note:- If you have more than one folder, you need to create these folders before enabling this feature.
- Make sure the directory located on your network drive is shared so that it is accessible from the computer where BUE/EUM is installed.
| WebFOCUS | |
|
Feedback |