Working With Alerts
|
Topics: |
|
How to: |
Alerts convey important information related to the state of your EUM environment. By creating an alert or scheduling one of the default alerts that come with your EUM environment, you automate reporting when a certain condition is met. An Alert report can be run interactively or by authorized users. Burst capability can send targeted information to the people who need it, so that there is less information for each person to analyze.
Alerts work with all email clients. They are supported on the following mobile devices: iPhone®, iPad®, and email enabled mobile phones. Alerts can also be sent to any PC or laptop computer with email capability.
Alerts provide the following:
- Alert tools. Using Alert Assist, you can quickly set up test conditions (rules) that determine if an Alert condition should be triggered (true). This is called the Alert test. When the Alert test is triggered (true), the Alert result is run. An Alert result can be an existing report procedure or you can create the Alert result using InfoAssist.
- Scheduling flexibility. Optionally, you can schedule an Alert to run as often as every minute to evaluate the Alert test conditions.
Components of an Alert
An Alert consists of the following:
- Alert test. A procedure that tests whether a specific condition is met. For example, an alert test can measure is a metric goes above or beyond a certain value.
- Alert result. A report that is distributed when the alert test triggers a response.
In the Enterprise Usage Monitor domain of your EUM environment, inside the Alerts folder, there are three default alerts that you can view, edit, and schedule. To view an alert, right-click it and click Edit. An Alert Assist window opens, displaying the test and result for this alert, as shown in the following image.
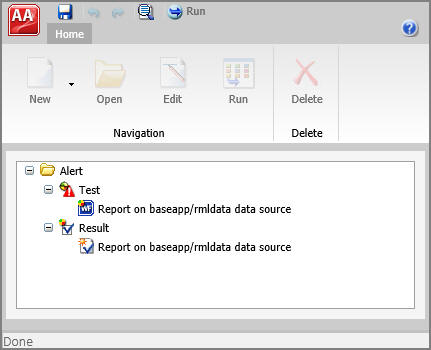
- The average response time is greater than 30 seconds.
- The time interval is less than or equal to 5 seconds.
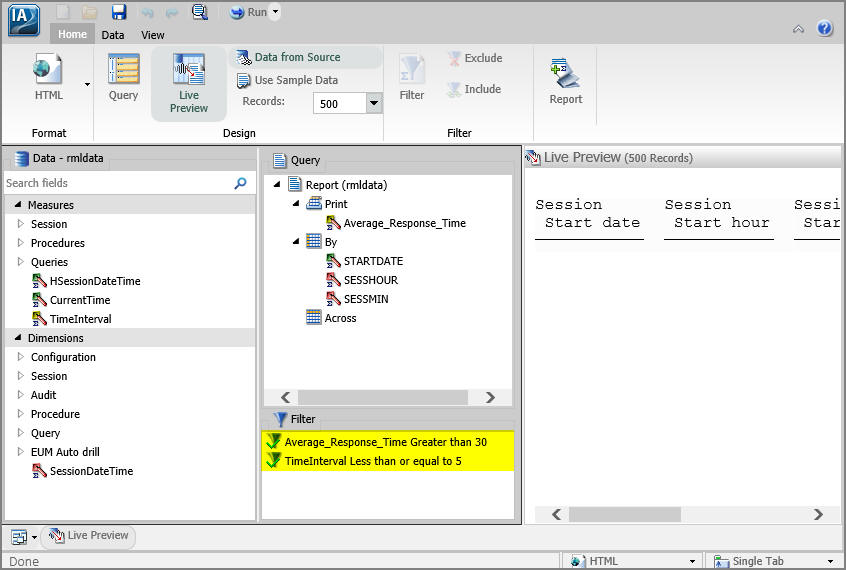
These conditions are created with filters, as shown in the following image.
The result for the Average Responsive Time alert is a simple report that is distributed to the users of your choice at the scheduled times.
Procedure: How to Edit an Existing Alert
- Log on to the EUM environment as a manager or developer.
- In the Resources tree, expand the Enterprise Usage Monitor domain, click the Alerts folder, right-click an alert, and then click Edit.
In this example, you are editing the Average Responsive Time alert.
The Alert Assist window opens.
- Expand the Test node, right-click the test report, and then click Open.
The report opens in InfoAssist.
- Right-click a filter, and click Edit to edit filter parameters. For example, click the average response time constant value and type a value of your choice, as
shown in the following image.
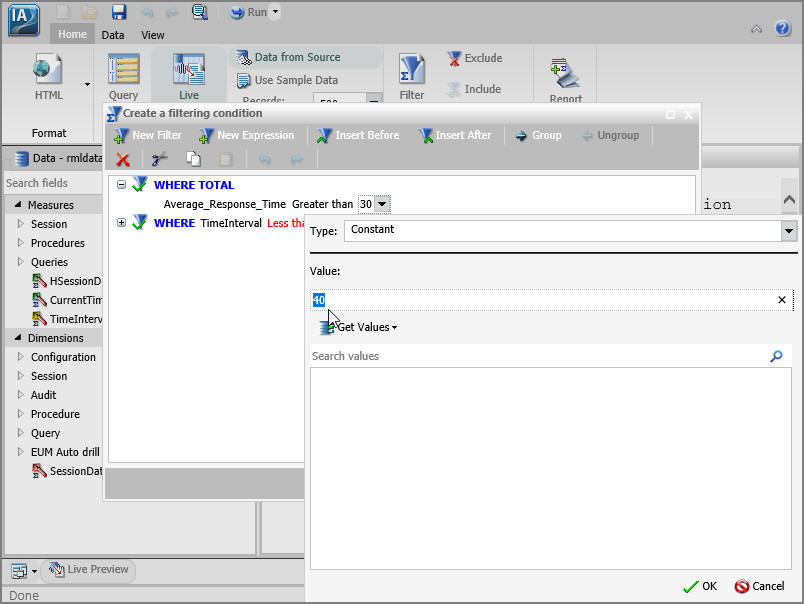
You can also change the number of conditions, add or remove fields, and further customize existing filters.
- When you are finished applying edits to the test report, click Save and close InfoAssist.
- Expand the Result node, right-click the result report, and then click Open.
InfoAssist opens.
- Edit the result report to fit your criteria. For example, edit filter conditions to match the test report.
It is customary to expand the result report and make it more detailed, since it is the only report that the users will see. With this in mind, you can add more fields by dragging them from the Data pane to the Query pane. Your edits are visible in the Live Preview section.
- When you are finished applying edits to the result report, click Save and close InfoAssist.
- Click the Main Menu button in the Alert Assist window, and then click Save As.
The Save As dialog box opens with the My Content folder selected by default.
Note: You can either use the My Content folder for saving the modified content, or you can save it to a new domain.
- Click Save.
Your updated version of the alert is saved and can be scheduled.
Procedure: How to Schedule an Alert
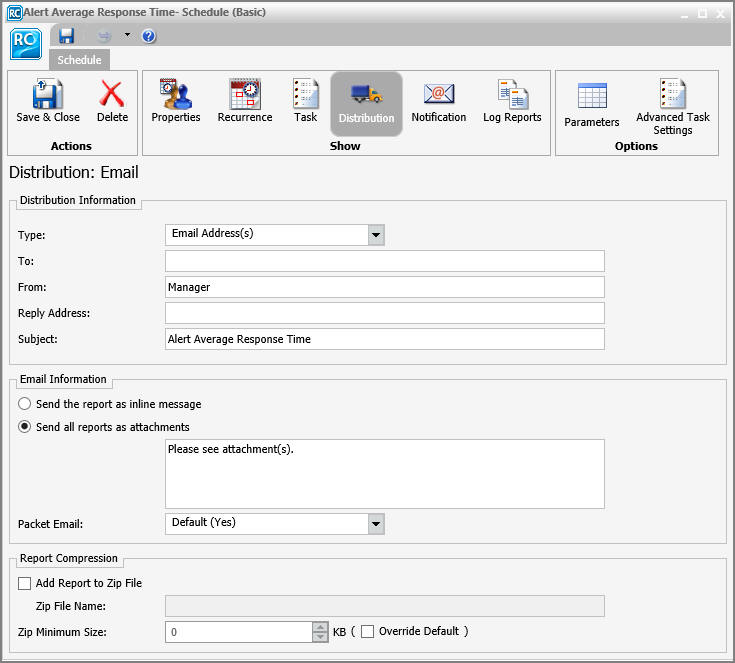
- From the Alerts folder in the Enterprise Usage Monitor domain, right-click the Alert, point to Schedule, and select how the Alert report will be distributed when the Alert test is triggered (true). In this example, you are creating an email distribution.
- Click Email.
The ReportCaster Basic Scheduling tool opens in a new browser window, as shown in the following image.
For more information on the Basic Scheduling tool and distribution options, see the Creating Schedules topic of the Business User Edition Help.
- Specify the destination information for where you want the report
to be distributed.
For more information on specifying schedule distribution information, see the Creating Schedules topic of the Business User Edition Help.
- Click Task, and then click Alert.
The Alert Options dialog box opens, as shown in the following image.
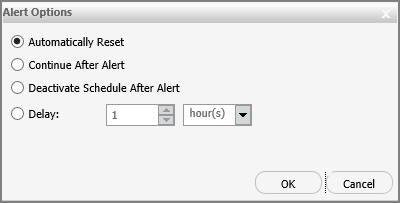
- Select one
of the following Alert Options:
- Automatically Reset. This option continues to run the schedule at the specified time and checks to confirm that the Alert test is no longer true before the Alert test is evaluated again. It is best to use this option when you do not want to receive the Alert result until after the exception condition has been addressed and occurs again. For example, when the average response time is greater than 60 seconds, the Alert is triggered. You do not want to receive the report until after the average response time is less than or equal to 60 seconds and then goes beyond 60 seconds again.
- Continue After Alert. This option continues to run the schedule at the specified time and distribute the report each time that the Alert test is true. It is best to use this option when you want to be notified at the interval specified in the schedule that the Alert test is true.
- Deactivate Schedule After Alert. This option deactivates the schedule after the Alert is triggered. The schedule has to be activated again for the Alert test to run after the Alert is triggered. It is best to use this option for one-time Alert tests. This is the default value.
- Delay. This option is best used when you want to allow a specific period of time to address the Alert test, but want to be notified again if the Alert test has not been met. You can restart the Alert after a maximum of 99 hours, days, weeks, months, or years.
As you complete the creation of the schedule, remember to consider the burst option to distribute specific report values, instead of the entire report. When a report is burst, the distribution information must be provided in a distribution list, distribution file, or dynamic list for email distribution, and an access list for library distribution. The email and library distribution options are the most effective for Alert reports because of the push versus pull notification through email. For more information on using the burst option in ReportCaster, see the Creating Schedules topic of the Business User Edition Help.
- Select the Properties tab and type a title and summary for the scheduled report.
- Click Recurrence and
specify when and how often to run the schedule.
For more information on Recurrence options, see the Creating Schedules topic of the Business User Edition Help.
- If you wish to receive notifications of the Alert distribution, click Notification and specify the destination information for where you want the notification to be sent.
- If your Alert uses parameters, select the Parameters check box to review and specify parameter values. Ensure that you have the correct Path, Procedure, and Server Name. For more information on specifying parameter values when scheduling a report procedure (FEX), see the Creating Schedules topic of the Business User Edition Help.
- Click Save and Close.
The Save As dialog box opens with the My Content folder selected by default.
- Click Save.
The new schedule appears in the My Content folder, as shown in the following message.
| WebFOCUS | |
|
Feedback |