Using Multi Drill
|
How to: |
The Multi Drill functionality enables you to create multiple drill down links on a data field in a report or chart. This is useful when you want to define custom links to other reports or websites.
Using the Multi Drill functionality, you can define conditions for drilling down or through the data element that you select. Once drill down information is saved and you run the report or chart, the drill down options display when you click or hover over the defined area of a report or chart, respectively.
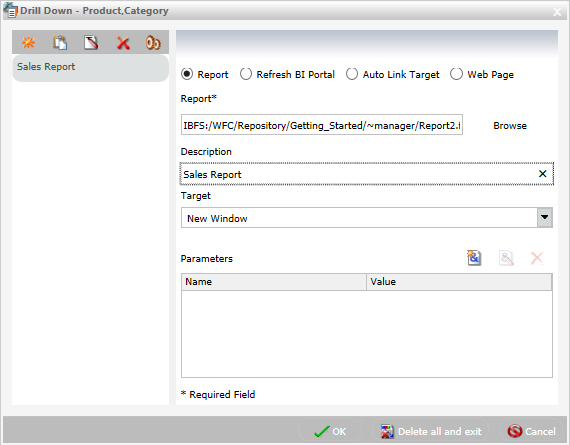
You can create drill down links by selecting a field in the Query pane. On the Field tab, in the Links group, click Drill Down to open the Drill Down dialog box. You can also right-click a field in the Query pane, and click Drill Down. The Drill Down dialog box is shown in the following image.

When you access the Drill Down dialog box, the name of the field that you selected displays in the title bar. This enables you to identify the current field and is useful when working with Drill Down parameters.
In the Drill Down dialog box, you can configure a hyperlink or drill-down procedure. When you run the report, you can click the link that is created, which would take you to the specified URL or execute the specified procedure.
You can also create multiple drilldowns for a selected field. The drill down links that you define display as separate entries in the drill down list, also known as the drill menu, at run-time. The display of these entries is based on the naming conventions that you applied when creating the multi-drill scenario.
These links enable you to drill directly through to an external procedure or URL.
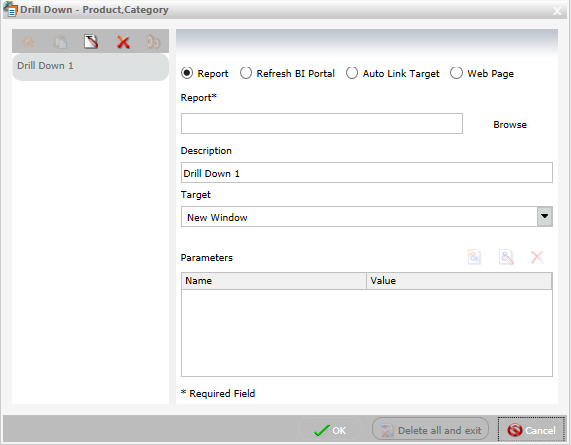
For example, you can create one drill down link for an existing procedure, and another for a webpage. Both drill downs are stored for the underlying field that you selected. Once you define the first drill down, additional options display on the toolbar, as shown in the following image.
Note: You can rename a drill down using the Description field in the right pane of the Drill Down dialog box.
The following icons are available on the Drill Down dialog box toolbar:
- Create a new drill down. This option is enabled when all required information is provided for the first drill down. When you click Create a new drill down, a new drill down item is created. This switches the drill down functionality from a regular drill down to multi-drill. By default, the name of the drilldown is Drill Down n, where n is a consecutive integer, such as Drill Down 1, Drill Down 2, etc. This option is initially disabled, but is enabled after you have created at least one drill down link.
-
Duplicate the selected drill down. When an
existing drill down item is selected, clicking this option duplicates
the item. A (Copy n) is appended to the name of the drill down,
where n is the consecutive number assigned to the duplicated drill down.
Once assigned, the name can subsequently be changed in the Description
field. Consecutive copies can also be rearranged by dragging the
drill down items into the desired order.
Note: The Duplicate button is only active when sufficient information is available for the selected drill down item.
- Rename the selected drill down. This option enables you to rename an existing drilldown and is active by default. When this option is selected, the Description field is selected, allowing you to provide a new name for the drill down link. You can enter a description up to 100 characters long. If you remove the description, the drilldown is renamed to the default name.
- Remove the selected drill down. If you have a drill down item selected, the Remove the selected drill down option is active. When you select this option, the current drilldown is deleted. If a drill down item is removed, the next drill down item is automatically selected. If you remove the last drill down item, the Drill Down dialog box resets to its initial state, restoring Drill Down 1 as the default value.
-
Options. The Options functionality enables
you to change the order of your drill down items. This allows you
to control the order in which the items are presented in the drill
menu when you run your report and click on a hyperlink. You can change
the order by selecting a defined drill down in the list that is
presented under Edit Order and then clicking the Move Up or Move
Down button. You can also remove one or more drill down items from
the list by selecting the desired items and then clicking the Remove
from List button. If you multi-select your drill down items
using the CTRL key, the Move Up and Move Down buttons are disabled.
Note: Move Up, Move Down, and Delete are also available as context menu options when you right-click a drill down item in the Edit Order list.
The Drill Down dialog box contains the following options for specifying drill down information for the selected field:
Note: When specifying parameters for your drill down, click Add Parameter to add them to your parameters list.
-
Report. Select this option to choose a report for
the current drill down. This option is selected by default.
- Report. Enables you to browse to a stored report.
- Description. Provides a field in which to describe the report. If you selected a report by browsing, this field is automatically populated with the title of the procedure or the name where procedure titles are not accessible. This field is also used to rename a specified drill down.
- Target. Allows you to specify a target for the drill down. Options include: New Window, Same Window, or a value that you specify. The default value for report is New Window.
- Parameters. Displays the parameters that you have indicated for the current drill down.
-
Refresh BI Portal. Select this option to refresh the
components of the BI Portal and pass parameters to them.
- Refresh. Provides options by which to refresh the page. Options include Current Page and All Pages.
- Description. Provides a field in which to describe the refresh process. This field is also used to rename a specified drill down.
- Target. Reflects the target for the drill down. The only applicable value for Refresh BI Portal is Same Window.
- Parameters. Displays the parameters that you have indicated for the current drill down.
-
Auto Link Target. Select this option to create an explicit
list of Auto Link targets. Upon selection, these will be available
in the drill down menu at run time.
Note: When working with reports, the Auto Link Target drill down option is only available for a selected dimension (BY) field. For more information, see Using the Auto Linking Feature to Link Content.
- Auto Link Target. Enables you to browse to a stored target report.
- Description. Provides a field in which to describe the target report. If you originally selected a report by browsing, this field is automatically populated with the report title or the name where titles are not accessible. This field is also used to rename a specified drill down.
- Target. Enables you to specify a target for the drill down. Options include: New Window, Same Window, or a value that you specify. The default value for Auto Link Target is New Window.
-
Parameters. Displays the parameters that meet the column-to-parameter
requirement for the selected target report.
For more information, see Using the Auto Linking Feature to Link Content.
-
Web Page. Select this option to indicate that you want
to drill through to a webpage. Enter a value in the URL field.
- URL. Enables you to specify the URL for the webpage to which to drill down. This option is available only when Web Page is selected.
- Description. Enables you to enter additional comments related to the drill down. This field is also used to rename a specified drill down.
- Target. Enables you to specify a target for the drill down. Options include: New Window, Same Window, or a value that you specify. The default value is New Window.
- Parameters. Displays the parameters that you have indicated for the current drill down.
If you are working with a report that has parameters, the parameter names are automatically retrieved and made available from the Name control in the Parameters section of the Drill Down dialog box, as shown in the following image.
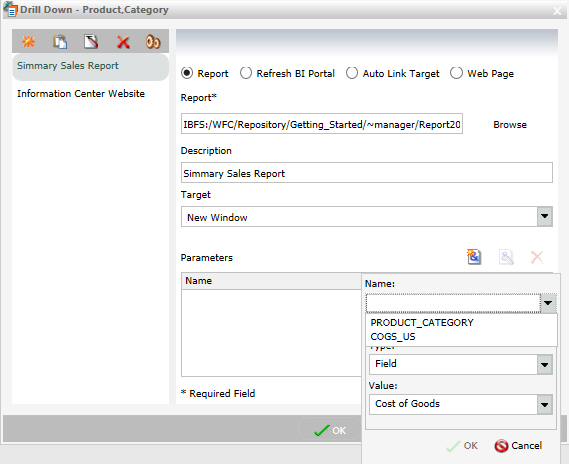
By default, the field is labeled with a value of Name. If there are multiple parameters to choose from, you can use the drop down list to make a selection. You can also manually enter a name to create a new parameter. The parameters that display are populated from the underlying report procedure (.fex) that you selected for your drill down.
The Type field enables you to specify a field or constant value. The options in the Value list are based on the fields that you selected for your report. The item that you select determines the value for the parameter (for example, Discount or Revenue).
Note: If you switch the Type field from Field to Constant or from Constant to Field, the Value field is reset, enabling you to specify a unique value.
Procedure: How to Create a Single Drill Down Link
You can create a single drill down link on a measure field.
- Create a report or chart with at least one measure field.
- In the Query pane, do one of the following:
- Right-click the measure field and click Drill Down.
- Click the measure field and on the Field tab, in the Links group, click Drill Down.
The Drill Down Dialog box displays, as shown in the following image.
- Select one of the following Drill Down options:
- Report
- Refresh BI Portal
- Auto Link Target
- Web Page
- Populate the fields based on the drill down option you
selected.
Note: Descriptions for these fields are provided earlier in this topic.
- Optionally, rename the Drill Down using the Description field. This dictates how the Drill Down will appear in the left pane of the Drill Down dialog box.
- Click OK.
The drill down link displays when you hover over the defined area of a report or chart, at run time.
Procedure: How to Create Multi Drill Links
You can create a multiple drill down links on a single dimension field.
- Create a report or chart with at least one dimension field.
- In the Query pane, do one of the following:
- Right-click the dimension field and click Drill Down.
- Click the dimension field and on the Field tab, in the Links group, click Drill Down.
The Drill Down Dialog box displays, as shown in the following image.
- Select one of the following Drill Down options:
- Report
- Refresh BI Portal
- Auto Link Target
- Web Page
- Populate the fields based on the drill down option you
selected.
Note: Descriptions for these fields are provided earlier in this topic.
- Optionally, rename the Drill Down using the Description field. This dictates how the Drill Down will appear in the left pane of the Drill Down dialog box.
- Repeat steps 3-5 until you have added all of the drill
down links required.
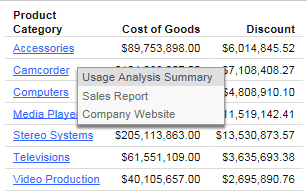
Note: The following image defines three unique drill down links for the selected dimension field.
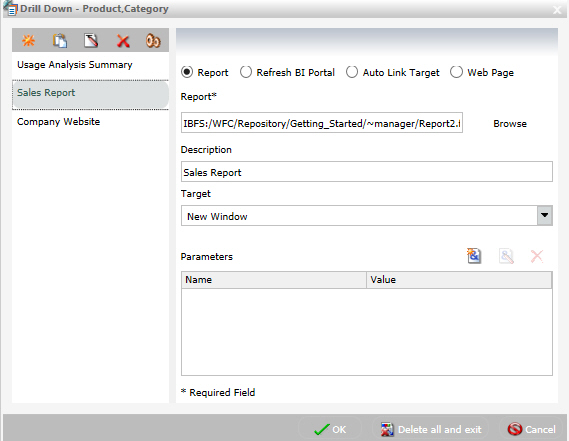
- Click OK.
The links display when you hover over the defined area of a report or chart, at run time, as shown in the following image.
| WebFOCUS | |
|
Feedback |