Creating Matrix Charts
|
How to: |
Matrix charts are powerful, comparative tools. They provide enough detail to show a trend and they organize information in a categorical fashion.
Matrix charts display data in a grid, showing the comparative values on either axis. They provide you with a quick glance at trends over time, giving you a succinct synopsis of a situation (for example, sales or investment trends).
You can use various formats in your matrix chart (for example, pie or line chart).
In the following example, quarterly revenue data is reviewed by product category, for a range of years (2014 - 2016, specifically). Using a bar chart for the matrix, you can review how gross profit for each product category shifts over time.
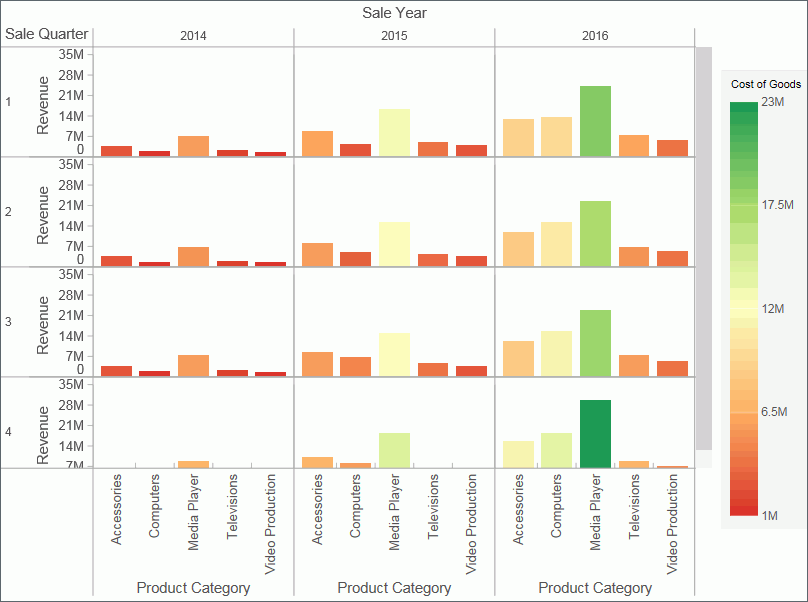
You can plot one value on the X axis and one value on the Y axis. For example, sales against region. You can also plot just one value for the rows or columns in the matrix chart.
Procedure: How to Create a Matrix Bar Chart
- Launch InfoAssist in Chart or Visualization mode.
- In Chart mode, on the Format tab, in the Chart Types group, click Bar chart.
- In Visualization mode, on the Home tab, in the Visual group, click Change and click Bar chart.
- Drag data fields to the canvas or to the Query field
containers to add them to your chart. The following Query field
containers must be populated for this chart:
- Vertical Axis - one or more data fields
- Horizontal Axis - one data field
- Matrix Rows - one data field
- Matrix Columns - one data field
Note: You can also double-click a data field to add it to your Query field containers.
The matrix bar chart displays on the canvas. You can add additional fields for comparative purposes. In Visualization mode, you can also view underlying data by hovering over any particular point on the matrix bar chart.
Procedure: How to Create a Matrix Line Chart
- Launch InfoAssist in Chart or Visualization mode.
- In Chart mode, on the Format tab, in the Chart Types group, click Line chart.
- In Visualization mode, on the Home tab, in the Visual group, click Change and click Line chart.
- Drag data fields to the canvas or to the Query field
containers to add them to your chart. The following Query field
containers must be populated for this chart:
- Vertical Axis - one or more data fields
- Horizontal Axis - one data field
- Matrix Rows - one data field
- Matrix Columns - one data field
Note: You can also double-click a data field to add it to your Query field containers.
The matrix line chart displays on the canvas. You can add additional fields for comparative purposes. In visualizations mode, you can also view underlying data by hovering over any particular point on the matrix line chart.
Procedure: How to Create a Matrix Area Chart
- Launch InfoAssist in Chart or Visualization mode.
- In Chart mode, on the Format tab, in the Chart Types group, click Area chart.
- In Visualization mode, on the Home tab, in the Visual group, click Change and click Area chart.
- Drag data fields to the canvas or to the Query field
containers to add them to your visual. The following Query field
containers must be populated for this visual:
- Vertical Axis - one or more data fields
- Horizontal Axis - one data field
- Matrix Rows - one data field
- Matrix Columns - one data field
Note: You can also double-click a data field to add it to your Query field containers.
A matrix area chart displays on the canvas. You can add additional data fields for comparative purposes. In Visualization mode, you can also view underlying data by hovering over any particular point on the matrix area chart.
Procedure: How to Create a Matrix Pie Chart
- Launch InfoAssist in Chart or Visualization mode.
- In Chart mode, on the Format tab, in the Chart Types group, click Pie chart.
- In Visualization mode, on the Home tab, in the Visual group, click Change and click Pie chart.
- Drag data fields to the canvas or to the Query field
containers to add them to your chart. The following Query field
containers must be populated for this chart:
- Measure - one data field
Note: Each unique measure field is represented by a separate pie chart.
- Color - one data field
- Matrix Rows - one data field
- Matrix Columns - one data field
Note: You can also double-click a data field to add it to your Query field containers.
The matrix pie chart displays on the canvas. You can add additional data fields for comparative purposes, or to create another pie chart unique to the additional measure fields you select. In Visualization mode, you can also view underlying data by hovering over any particular point on the matrix pie chart.
- Measure - one data field
Procedure: How to Create a Matrix Ring Pie Chart
- Launch InfoAssist in Chart or Visualization mode.
- In Chart mode, on the Format tab, in the Chart Types group,
click Other. In the Select a chart dialog box,
click Pie, then click Ring Pie.
Click OK.
- In Visualization mode, on the Home tab, in the Visual group, click Change and click Ring Pie.
- In Chart mode, on the Format tab, in the Chart Types group,
click Other. In the Select a chart dialog box,
click Pie, then click Ring Pie.
- Drag data fields to the canvas or to the Query field
containers to add them to your chart. The following Query field
containers must be populated for this chart:
- Measure - one data field
Note: Each unique measure field is represented by a separate ring pie chart.
- Color - one data field
- Matrix Rows - one data field
- Matrix Columns - one data field
Note: You can also double-click a data field to add it to your Query field containers.
The matrix ring pie chart displays on the canvas. You can add additional fields for comparative purposes, or to create another pie chart unique to the additional measure fields you select. In Visualization mode, you can also view underlying data by hovering over any particular point on the matrix ring pie chart.
- Measure - one data field
Procedure: How to Create a Matrix Circular Gauge
- Launch InfoAssist in Chart or Visualization mode.
- In Chart mode, on the Format tab, in the Chart Types group,
click Other. In the Select a chart dialog box,
click Special, then click Gauge.
Click OK.
- In Visualization mode, on the Home tab, in the Visual group, click Change and click Gauge.
- In Chart mode, on the Format tab, in the Chart Types group,
click Other. In the Select a chart dialog box,
click Special, then click Gauge.
- Drag data fields to the canvas or to the Query field
containers to add them to your chart. The following query field
containers must be populated for this chart:
- Measure - one data field. Data in this category is
used to indicate the value of the selected measure, which displays
within the gauge.
Note: Since the gauge relies on a constant (measure field), each intersection of the matrix chart is calculated using that measure along with the various matrix rows and columns in the matrix chart.
- Matrix Rows - one data field.
- Matrix Columns - one data field.
- Tooltip - one or more data fields. The fields that you add provide you with the ability to review additional related, underlying data for different measures. Tooltips are optional.
Note: You can also double-click a data field to add it to your Query field containers.
The matrix circular gauge displays on the canvas. You can select additional measure fields for which to include in the tooltip.
- Measure - one data field. Data in this category is
used to indicate the value of the selected measure, which displays
within the gauge.
| WebFOCUS | |
|
Feedback |