Customizing Domain Portal Pages
|
Topics: |
This section describes page customization features, such as configuring responsive behavior, using the Easy Selector, working with comments, and removing customizations.
Using the Easy Selector
|
How to: |
The Easy Selector provides a simple way to add content to a page at run time, without opening the Resources tree. It also allows you to control which items users can access.
You can enable the Easy Selector feature on a container or a column level.
Procedure: How to Use the Easy Selector Container
- Sign in to the portal as a developer or a manager.
- On the Home page, select a domain, and then click Folder.
- Populate this folder with the content that you intend
to make available through the Easy Selector at run time, such as reports, charts or pages.
Note: Ensure that the folder only includes file content and no subfolders.
- Publish the folder.
- On the Home page, and click Portal Page.
The Page Designer opens.
- Select a columnar template from the Add Page dialog box, and click Create.
- On the Insert tab, in the Containers group,
click Easy Selector.
The Easy Selector container is inserted into the page, and the Browse For Folder dialog box opens, where you can select a target folder.
- Optionally, navigate to the folder that you that want
to display inside the Easy Selector at run time, and then click OK.
If no target folder is selected, the entire repository is displayed
at run time, allowing the user to explore all available domains
and folders.
Note: You can also change the folder location by clicking Select Folder in the Properties panel, and navigating to a different folder. It is not recommended to change the folder location after the end users have begun using the Easy Selector.
- Repeat steps 7 and 8 to create more Easy Selector containers,
if needed.
Note: You can multiselect the containers by holding the Ctrl key.
- Click Save and close the Page Designer.
Note: You must publish your portal page and add it to the portal before adding content using the Easy Selector.
- On the portal page you created, click the Add content button.
The Select Item dialog box opens.
- Navigate to an item that you want to show on the portal page and click Add,
as shown in the following image.

The item opens inside the Easy Selector container.
Procedure: How to Use Easy Selector in a Column
- Sign in to the portal as a developer or a manager.
- On the Home page, select a domain, and then click Folder.
- Populate this folder with the content that you intend
to make available through the Easy Selector at run time.
Note: Ensure that the folder only includes file content and no subfolders.
- Publish the folder.
- On the Home page, click Portal Page.
The Page Designer opens.
- Select a columnar template from the Add Page dialog box, and click Create.
- With the page canvas selected, in the Properties panel,
clear the Lock Page check box and select
the Prevent Layout Change check box.
Note: This configuration allows users to add new content to a page at run time, while preventing them from changing the column layout, which is important for the Easy Selector.
- In the Properties panel, click Container Defaults.
The Container Defaults dialog box opens. Here, you can customize the drop-down menu for the items that are displayed on the page at run time. Click OK to close the Container Defaults dialog box.
- Select a column.
- In the Properties panel, select the Show Easy Selector check
box.
The Browse For Folder dialog box opens, where you can select a target folder.
- Click the folder you that want to display inside the
Easy Selector at run time, and then click OK.
Note: You can change the folder location by clicking the Select Folder button and navigating to a different folder. It is not recommended to change the folder location after the end users have begun using the Easy Selector.
- Repeat steps 9-11 for each columns .
Note: You can multiselect the columns by holding the Ctrl key.
- Click Save and close the Page Designer.
Note: You must publish your portal page and add it to the portal before adding content using the Easy Selector.
- On the portal page you created, click the Add content button.
The Select Item dialog box opens.
- Select an item from the list and click Add.
The selected item opens and a new Add content button displays in the next column, automatically, as shown in the following image. This allows you to add the remaining items that are available to you. You can also multiselect items inside the Select Item dialog box.

Additionally, you can replace an item on the page with any item from the Select Item dialog box. You can access the Replace menu option by clicking the arrow in the upper-right corner of the container panel.
Note: The Add content button disappears and the Replace option becomes inactive after the last item in the Select Item dialog box is added to the page.
Building a Responsive Layout
|
How to: |
A responsive layout resizes dynamically to any width based on screen size, device, and orientation, thus eliminating the need to design for a specific device preference. This approach takes your content beyond the desktop and delivers a quality experience to users, on any display. The Page Designer offers you a series of versatile presets, that make the task of creating a responsive portal a quick and straightforward process.
A user must have the privileges of a developer or manager to be able to build a responsive layout.
Procedure: How to Build a Responsive Layout
- Sign in to the portal as a developer or a manager.
- On the Home page, and click Portal Page.
The Page Designer opens.
- Select the 1 Column template from the Add Page dialog box, and click Create.
All responsive layouts are created using a one column page layout.
- Click inside the column that you just created. On the Properties panel, set the Container Padding to 5px and select the Same for All check box, if it is not already enabled.
- On the Insert tab, in the Containers group,
click Responsive.
The Responsive container is inserted, taking up the full width of the page.
- On the Insert tab, in the Content group, click WebFOCUS Resources.
- Populate the responsive container with content from the
folder of your choice, by dragging them to the container.
When you drag items sequentially, you can choose the order in which they display, using the shaded placement indicator as a guide. When you drag items simultaneously, using the multiselect option (Ctrl key), they display in the order in which they are selected.
- Multi-select the panels to which you want to assign the
Custom CSS Classes by holding the Ctrl key and clicking a title bar of each panel.
For example, if you were going to create a responsive portal that contained four items in the first row, and two items in the second row, you would select the first four panels.
Note: You can only multi-select panels by clicking its title bars. If the title bars are hidden, you cannot multi-select these panels.
- On the Properties tab of the Properties panel, click
the Responsive Properties button.
The Advanced Responsive Item Properties dialog box opens.
- In the Custom CSS Classes field,
type bip-responsive-n.
where:
- n
-
Is the responsive folding behavior that you want to apply the content on your page.
For example, bip-responsive-4-2-1 means that the content will display four items across on wide screens, two items across on medium screens, and one item across on narrow screens. If you use bip-responsive-3-2-1, the content will display three items across, then two items across, then one item across. If you use bip-responsive-2-1, content will display two items across, then one item across. If you choose bip-responsive-1, the item will fill the entire row.
Note: When one of the built-in responsive classes is used in the Custom CSS Classes field, it sets the width of the panel as a percentage of the page width, based on media queries. The percentage width setting made in these built-in responsive classes overrides any width settings defined on the panel.
- Click OK to close the Advanced
Responsive Properties dialog box.
The first row of panels are now stretched evenly across the Responsive container.
- Multiselect the remaining panels by holding the Ctrl key and clicking each panel.
- On the Properties panel, click the Responsive Properties button.
The Advanced Responsive Item Properties dialog box opens.
- In the Custom CSS Classes field,
type bip-responsive-2-1. This will enable the remaining two panels to go
from two across to one across on a smaller screen.
- Set Minimum Height to 440px.
- Click OK to save the properties.
The remaining panels now stretch across the Responsive container, in the second row.
Note: You can create multiple layouts using this principle and varying the CSS classes to reflect the desired percentage.
- With the Responsive container selected, make the following
changes:
- On the Properties tab of the Properties panel, set Height to Dynamic.
- On the Title tab of the Properties panel, select the Hide Title Bar check box.
- On the Style tab of the Ribbon, in the Border group, click Style, and then select None.
Note: These changes render the Responsive container invisible on the page at runtime, and in the Page Designer. To edit the content in your Responsive container or access its properties, you can use the breadcrumb trail below the Property sheet to select it.
- Click the Save button and close the Page Designer.
- Publish your page, and add it to the portal.
- Change the size of your browser window to observe the
responsive behavior.
All items rearrange perfectly to fill the page.
Working With Comments
|
Topics: |
|
How to: |
In domain portal pages, you can use comments to interact with your peers in a multi-user environment. Developers and managers can enable comments in the Page Designer. You can enable comments on portal pages, containers, and individual content items.
Procedure: How to Enable Comments on a Domain Portal Page
- Sign in to the portal as a developer or manager.
- On the Home page, click Portal Page.
The Page Designer opens.
- In the Add Page dialog box, choose a page template and, optionally, add new page information.
- Click Create.
- In the Properties panel, click the Comments drop-down menu and update the style of your comments to reflect any standards.
- Save the portal page and close the Page Designer.
Procedure: How to Enable Comments on a Container
- Sign in to the portal as a developer or manager.
- On the Home page, click Portal Page.
The Page Designer opens.
- In the Add Page dialog box, choose a page template and, optionally, add new page information.
- Click Create.
- On the
Insert tab, in the
Containers group, click any container button.
The container is placed on the page canvas.
- In the
Properties panel, select
the Show
Comments check box.
When enabled, this option allows you to show and hide comments on a container or item at run time.
- Save the portal page and close the Page Designer.
Using Comments at Run Time
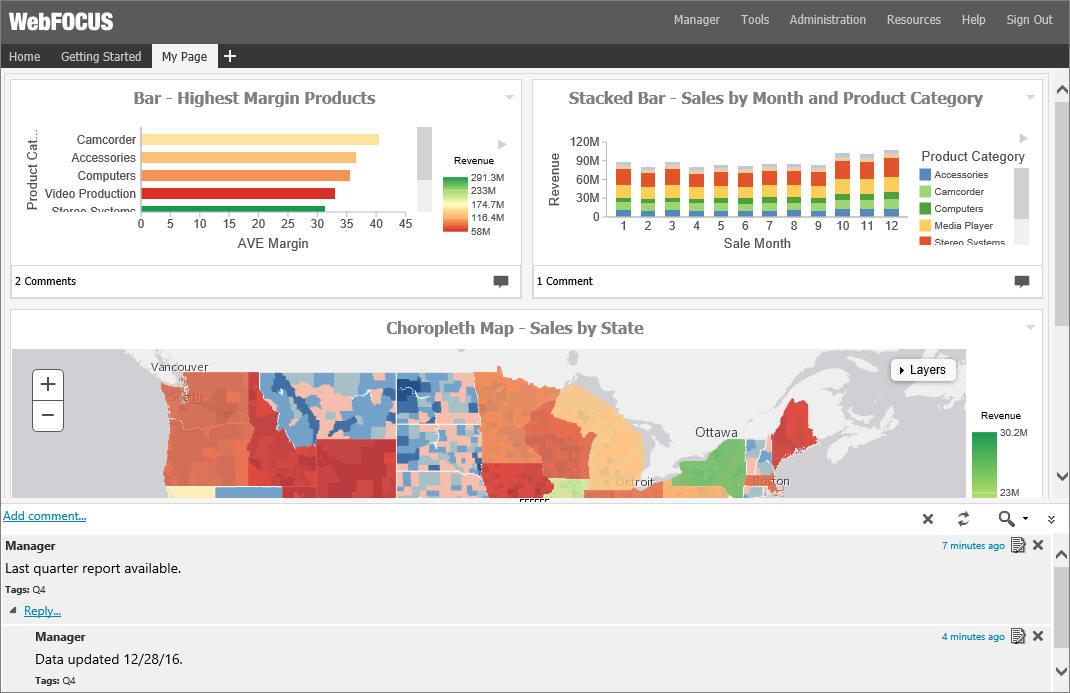
When enabled, comments display at run time, as shown in the following image.
Additionally, you can use the following controls to interact with comments:
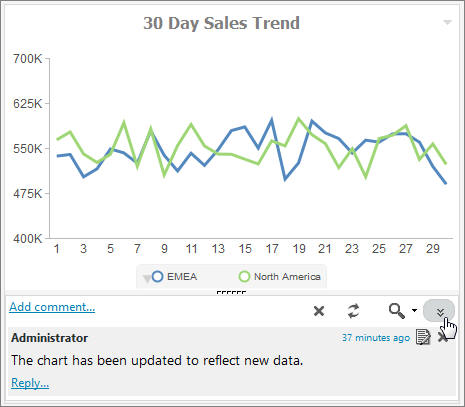
- Click the
Minimize button
 in
the upper-right corner of the comment area, to minimize comments, as shown in
the following image.
in
the upper-right corner of the comment area, to minimize comments, as shown in
the following image.
Click the Restore button
 in the
lower-right corner of the container, to restore the comments area.
in the
lower-right corner of the container, to restore the comments area.
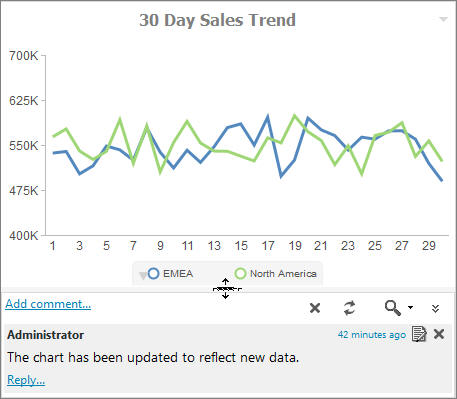
- Customize the height of
the comments area by dragging the height indicator to achieve a desirable size,
as shown in the following image.
- Click the
Refresh button
 in the comments menu, to refresh comments.
- Click the
Search button
 in the
comments menu, and type a key word or words in the search field, to search
through comments. You can specify the search criteria by clicking the arrow
next to the Search button and selecting search criteria, such as user name,
content, or meta tags.
in the
comments menu, and type a key word or words in the search field, to search
through comments. You can specify the search criteria by clicking the arrow
next to the Search button and selecting search criteria, such as user name,
content, or meta tags.
- Click the
Remove All button
 to
remove all comments from all users. The Remove All option is only available to
managers, developers, and group administrators.
to
remove all comments from all users. The Remove All option is only available to
managers, developers, and group administrators.
Removing Customizations
|
How to: |
If the domain portal page is unlocked and added to the portal, users are able to customize it and remove their customizations at run time.
Procedure: How to Remove Customizations From a Base Portal Page at Run Time
- Inside the portal, right-click a page tab of a base portal page.
- Click
Remove My Customizations, as shown in the following image.
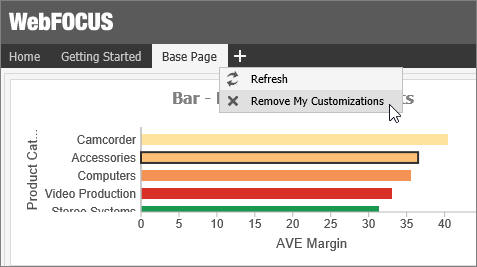
The page refreshes. The customizations are removed from the modified portal page.
Note: This option is not available when the Lock Page option is selected.
| WebFOCUS | |
|
Feedback |