Managing Users
|
Topics: |
The Users pane of the Security Center lists all users. The Search field in this tab allows you to search the name and description fields for users. Simple wildcard searches are supported. The full range of features that manage users is available only to Managers. Group Administrators can see the Security Center, but can only assign existing users to groups. Basic Users, Advanced Users, and Developers cannot see the Security Center, nor can they create, update, or delete users or assign users to groups.
The toolbar above the User pane allows Managers to perform the following actions:
- Create, edit, or delete users.
- Import users.
- View when users last signed in.
Understanding Users
|
Topics: |
|
How to: |
Users are those individuals who have access to the WebFOCUS Business User Edition (BUE). Managers and Group Administrators can assign users with similar responsibilities to one of the user type groups that the BUE automatically creates within a domain. This assignment allows users to take advantage of those features and content that supports their daily activities, but prevents them from using features or content that are beyond the range of their responsibilities and authority. The four user types are:
- Basic Users. Can view reports and content in the domains accessible to them. They can save deferred reports to their My Content folders, or copy parameters from a previously created report. They cannot share, publish, copy, or paste any folder or content.
- Advanced Users. Can do everything that Basic Users can do, and can also create original reports, charts and other content for their My Content folders. They can share folders and the content they contain with everyone or with selected users or groups.
- Developers. Can do everything that Advanced Users can do, and can view and publish content in their Hidden Folder. They can also copy and paste folders and content from their domain to another domain, but they must be sure that the domain they target for this operation maintains the same metadata as that used to create the content they are copying.
- Group Administrators. Can assign users to groups. They can also switch to Manager Mode and manage private resources.
Each user in the repository is defined by a unique name and may also be assigned a description, an email address, and a password. The user must be placed in a group at account creation and assigned a status. By default, the user is placed in the EVERYONE group, which is the group of all users in the system, and assigned the Active status.
Any of these characteristics, except the unique user name, may be edited later by an administrator.
Understanding User Name Requirements
Because user names are defined within the repository, they need to conform to the format rules and character limitations it imposes. If your installation supports external authentication, such as that provided by Microsoft Active Directory, user names also exist in an external repository, and must conform to the format rules defined in it.
The set of characters you can use to create user names is defined by the current character encoding setting established in the application server and the Client Code pages assigned to your NLS setting. For example, if the application server is configured to support UTF-8 encoding, and the NLS Setting is also configured to support the US Unicode (UTF) code page, you can use characters in the double-byte character set (DBCS) to create user names.
Given these considerations, when creating user names, take the following rules into account:
- User names may contain alphanumeric characters, spaces, and underscores.
- Depending upon the Client Code Page assigned to your NLS setting, user names can also include single-byte or double-byte NLS characters.
- The following characters are not supported in user names: “|;/*,?
- It is recommended that you limit user names to 64 characters. Longer user names may cause problems during migration.
- If you support external authentication, avoid including characters in user names that your external authentication repository does not support. For more information about which characters to avoid, contact Customer Support Services.
Procedure: How to Create a User
Only a Manager can create a user.
- In the BUE Portal, on the Menu bar, click Administration, and then click Security Center.
- On the Users & Groups tab, click the New
User button
 .
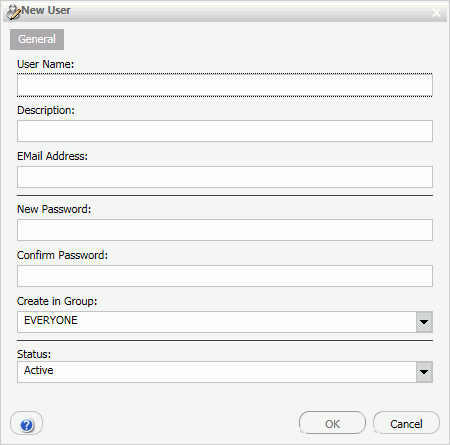
.The New User dialog box opens, as shown in the following image.

- Type the user name, description, email address, password,
and password confirmation, and if desired, select a group and a
status for the user, and then click OK.
If you do not enter a description, the description defaults to the name. If you do not select a group and status for the user, the user will be created in the EVERYONE group and assigned the Active status by default.
Procedure: How to Import Users
A Manager can import a .csv file containing multiple users. This can be quicker and more efficient than individually creating multiple users with the New User dialog box.
The import file must contain the following columns: user name, password, description, email address, user status, and groups. A sample .csv import file, getting_started_sample_users.csv, is provided in the BUE file installation directory for your use as a template.
- Values are separated by commas.
- To use a comma in a description, enclose the description within double quotes.
- Multiple groups are separated by semicolons.
Note: Do not include a header in the user .csv file.
- In the BUE Portal, on the Menu bar, click Administration, and then click Security Center.
- On the Users & Groups tab, click the Import Users button
 .
.The Import Users dialog box appears.
- Browse to find the desired .csv file and click Import.
The new users are created within the specified groups.
Procedure: How to Edit User Details
Only a Manager can edit user details.
- In the BUE Portal, on the Menu bar, click Administration, and then click Security Center.
- On the Users & Groups tab, double-click a user, or
right-click the user and select Edit, or
click the user and then click the Edit User button
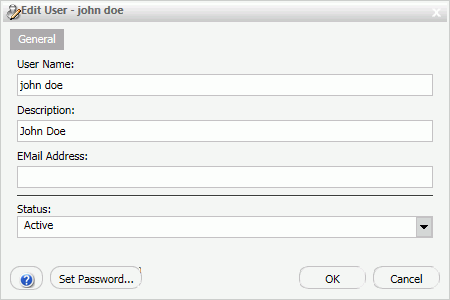
 . The Edit User
dialog box opens, as shown in the following image.
- If desired, type new information in the User Name, Description, or EMail Address field.
- To change the status of a user, select Active, Inactive,
or Must Change Password from the Status drop-down
list.
Note: If you select Must Change Password, users will be prompted to change their password when they attempt to sign in.
Procedure: How to Delete a User
Only a Manager can delete a user. The action of deleting a user also deletes that user's private content. Be sure to publish or share any private content assigned to that user if it supports ongoing activities.
- In the BUE Portal, on the Menu bar, click Administration, and then click Security Center.
- On the Users & Groups tab, right-click a user and
select Delete, or select the user and click
the Delete User button
 .
. A confirmation dialog box opens. Click Yes to delete the user.
| WebFOCUS | |
|
Feedback |