Creating a Change Management Package
|
How to: |
Many organizations do not grant developers write access to the user acceptance test and production environments. Access to these environments is strictly controlled and granted only to administrators, production control personnel, or automated change management processes.
Only developers know which changes are ready to be moved into the test environment. The Change Management Export facility presents developers with a graphical view of the resources they manage and allows them to build a change management package. This package is then loaded into another environment by production control personnel or automated processes.
Procedure: How to Create a Change Management Extract Package
Only members of the BUE Managers group have access to the Change Management feature, which is available on the Resources tree as a node that contains two subfolders: Import and Export.
The steps required to create a Change Management Package are:
- Create a Scenario. Utilizing the Change Management Export facility, an authorized user will create a scenario by selecting the resources to be exported. A scenario is a description of all the resources that will be exported into a Change Management Export Package.
-
Export a Scenario. After a scenario is created,
a user can export this scenario into a Change Management Export
Package. This Change Management Export Package is placed in the drive:\ibi\WebFOCUS_BUE82\WebFOCUS\cm\export
directory in two formats: a zip file and a folder, which contains
the expanded contents of the zip file.
The zip file or the exported folder is then copied to the target environment and placed in the drive:\ibi\WebFOCUS_BUE82\WebFOCUS\cm\import directory. For convenience the CM zip file can be downloaded from the BUE using a web browser and similarly uploaded to the target BUE where its content can then be imported and accessed.
Procedure: How to Access the Change Management Export Facility to Create a Scenario
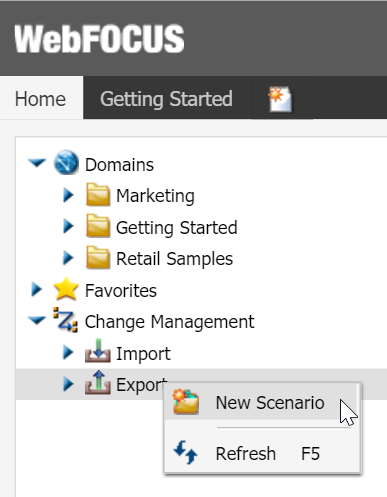
- In the Resources tree, expand the Change Management node.
- Right-click Export and click New Scenario,
as shown in the following image.
- You will then be prompted to enter the scenario name.
The Scenario Creation dialog box appears, as shown in the following image.
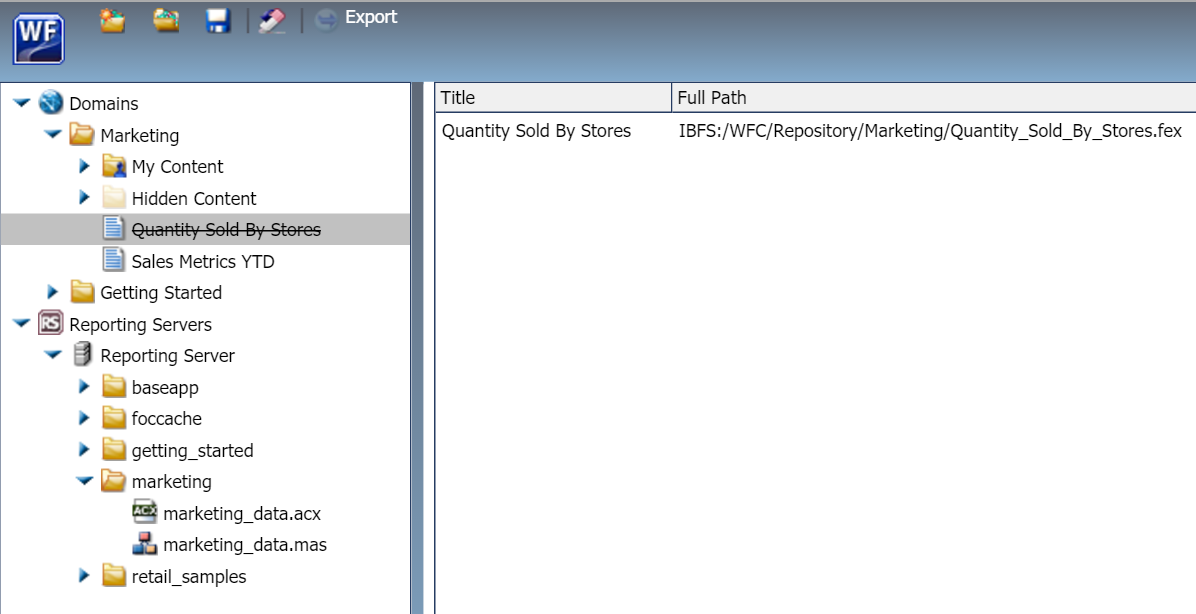
Selecting Resources
- You can select resources
by dragging content from the Resources tree to the right pane. You
can also right-click the content you want to move and select Select
With Subtree or Select Folder Only.
- Select With Subtree selects that folder and all subfolders.
- Select Folder Only selects the specific folder, with no content. Typically, this is done to move rules on the folder.
- If a private resource is selected, the With Private Content check box is automatically selected and cannot be cleared.
- If a published folder is selected, you can include private content within that folder by selecting the With Private Content check box for that resource. This will export ALL of the private content in that folder and its subfolders, including user My Content folders, even if you do not have the privileges necessary to view that private content.
- Select resources only from a version that is equal to or greater than the currently established Change Management minimum version, typically 8.2.00.
Note:- If private content is selected, it will only be imported if the owner of that private content already exists in the target environment.
- If a subfolder is selected, its parent folder must exist in the target system.
Now that resources are selected, click Save to save the scenario.
- You can select resources
by dragging content from the Resources tree to the right pane. You
can also right-click the content you want to move and select Select
With Subtree or Select Folder Only.
- Click Export to create a Change Package based on the saved scenario file. You can do this from within the interface or by right-clicking the scenario file item in the Resources tree.
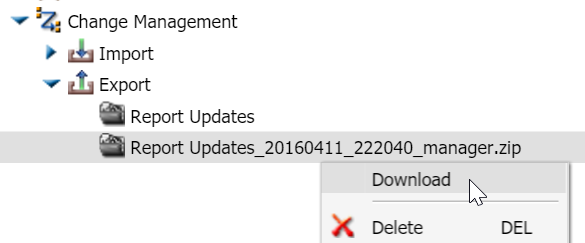
- From the Resources tree, refresh the Export node under
Change Management. If you do not see the zip file, refresh the Export
node again. You can now download the zip file, so that it can be
moved to the target system, as shown in the following image.
Procedure: How to Import a Change Management Package
Only members of the BUE Managers group can import Change Packages.
This procedure assumes that a change management zip package has been previously created on another system, the Manager is signed in to the target BUE environment, and the CM zip file is available to the Manager.
- In the Resources tree, expand the Change Management node, then expand the Import node.
- Right-click the package that you just uploaded and click Import.
If you receive a message stating that the resources in the Change Management Package are from a version that is below the minimum level, click OK and cancel the import.
You can recreate the Change Management Package using resources from a version that is greater than or equal to the version identified in the message.
The Import Package dialog box appears, as shown in the following image.
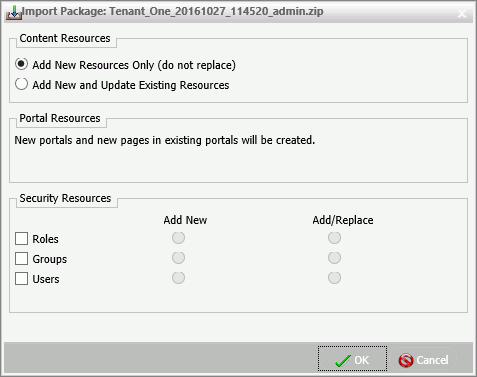
- Select one of the following options:
Add New Resource Only (do not replace). This option will only add new resources to the target environment. For newly created items, the Created On and Last Modified On fields will be updated with the time at which they were imported. To view the Created On and Last Modified On fields, right-click an item and click Properties.
If an item already exists in the target environment but is also part of the change management export package, the target resource will be left alone and the Last Modified On field will not be updated.
Add New and Update Existing Resources. This option will add new resources to the target environment if they do not exist and update existing resources if they already exist. For newly created items, the Created On and Last Modified On fields will be updated with the time at which they were imported. For updated items, the Created On value for the target will be retained, but the Last Modified On field will be updated with the time at which it was imported.
The other options on this panel are not used in BUE and can be ignored.
- Click OK.
| WebFOCUS | |
|
Feedback |