Topics: How to: |
WebFOCUS Quick Data add-in allows you to bring a large amount of enterprise information to the familiar Excel environment, and interact with this information without learning any additional software. You can install the WebFOCUS Quick Data Add-in on your desktop, and you can create and edit queries by accessing predefined data sources. You can save a query in an Excel document, and you can refresh it at any time.
Because all WebFOCUS connection and report information can be saved in an Excel workbook, users with the proper security and access rights can share spreadsheets throughout an organization. As a result, you spend less time recreating reports and more time analyzing information for effective decision-making.
Note: Quick Data is a WebFOCUS Business User Edition option, which requires a separate license and installation. For more information about licensing Quick Data, contact your Information Builders representative.
To distribute and enable the Quick Data Add-in in your environment, follow the procedures below.
-
Copy the wfquickdata.xla add-in file
and the configuration file, wfquickdata.cfg, located in one of the
following directories:
- For Windows, drive:\ibi\WebFOCUS_BUE82\WebFOCUS\utilities\quickdata
- For Unix, /ibi/WebFOCUS_BUE82/utilities/quickdata
-
Add the files to the following directory on the machines
that use Quick Data.
C:\Users\userid\AppData\Roaming\Microsoft\AddIns\
where:
- userid
-
Is the name of the user logged on to the PC.
After the WebFOCUS Quick Data Add-in file is in the proper directory, you must open Excel and select the WebFOCUS Quick Data option in the Add-Ins dialog box, as described in the following procedure.
Note: If you already have Quick Data installed in your environment, be sure to beckup your existing wfquickdata.cfg file to preserve all your customizations. You can then copy your edits from the existing wfquickdata.cfg file to the new file.
Use the following steps to enable the Quick Data Add-in in Excel 2016:
- Launch Microsoft Excel 2016.
- Click the File tab, click Options, and then click the Add-Ins category.
-
From the Manage dialog box, select Excel Add-ins,
and then click Go.
The Add-Ins dialog box opens, as shown in the following image.
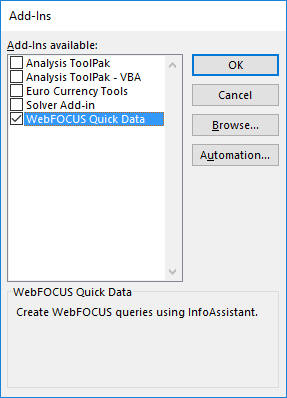
Note: If WebFOCUS Quick Data is not listed in the Add-Ins dialog box, make sure that the add-in is installed and placed in the correct directory.
- Select the WebFOCUS Quick Data check box and click OK.
Use the following steps to enable the Quick Data Add-In in Excel 2013:
- Launch Microsoft Excel 2013.
- Click the File tab, click Options, and then click the Add-Ins category.
-
In the Manage dialog box, select Excel Add-ins, and
then click Go.
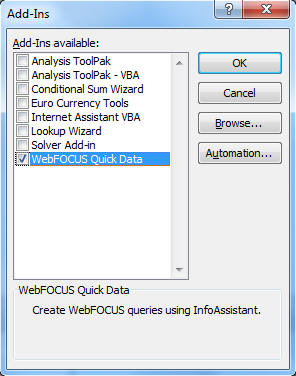
The Add-Ins dialog box opens, as shown in the following image.
Note: If WebFOCUS Quick Data is not listed in the Add-Ins dialog box, make sure that the add-in is installed and placed in the correct directory.
If the Quick Data Add-in was installed in a different directory, use the Browse button in the Add-Ins dialog box to locate it.
- Select the WebFOCUS Quick Data check box and click OK.
Use the following steps to enable the Quick Data Add-In in Excel 2010:
- Launch Microsoft Excel 2010.
- Click the File tab, click Options, and then click the Add-Ins category.
-
In the Manage dialog box, click Excel Add-ins, and
then click Go.
The Add-Ins dialog box opens, as shown in the following image.
Note: If WebFOCUS Quick Data is not listed in the Add-Ins dialog box, make sure that the add- in is installed and placed in the correct directory.
If the Quick Data Add-in was installed in a different directory, use the Browse button in the Add-Ins dialog box to locate it.
- Select the WebFOCUS Quick Data check box and click OK.
Use the following steps to enable the Quick Data Add-In in Excel 2007:
- Launch Microsoft Excel 2007.
-
Click the Microsoft Office Button
 in
the top-left corner.
in
the top-left corner.
- Click Excel Options and then click Add-Ins in the Excel Options dialog box.
-
From the Manage drop-down list, select Add-ins,
and click Go.
The Add-Ins dialog box opens, with WebFOCUS Quick Data listed as an add-in option, as shown in the following image.
Note:
- If WebFOCUS Quick Data is not listed in the Add-Ins dialog box, make sure that the add-in is installed and placed in the correct directory.
- If the Quick Data Add-in was installed in a different directory, use the Browse button in the Add-Ins dialog box to locate it.
-
Select WebFOCUS Quick Data, and
click OK.
A WebFOCUS menu opens in the Add-Ins tab. The following image shows an example of the WebFOCUS menu in Excel 2016.
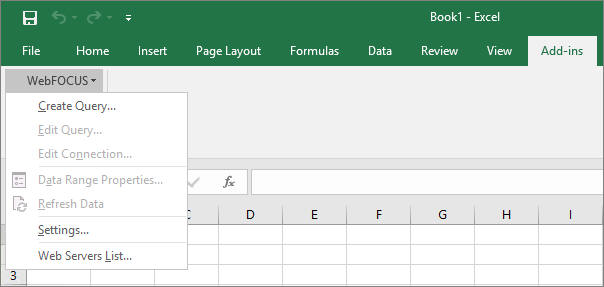
Once you have distributed the Quick Data Add-in, you can access the WebFOCUS Quick Data Options, which are described in this topic. Except for Settings and Web Servers List, these options are also available from Excel right-click context menus.
- Create Query. Available for new queries only, this option opens the Web Server Connection dialog box so that you can connect to WebFOCUS BUE. It continues by opening the Data Source Selection dialog box so that you can select a Master File. It then opens InfoAssist+, where you can create a query.
-
Edit Query. Available for existing queries
only, this option opens InfoAssist+, where you can edit a query.
Edit Query is not enabled for password-protected cells.
- Edit Connection. Available for existing queries only, this option opens the Web Server Connection dialog box, where you can edit the connection settings including the Web Server URL, the HTML Alias, and the Client Path. The ability to edit connection information saves time when you are reusing reports and helps facilitate the sharing of workbooks across an organization.
- Data Range Properties. Available for existing queries only, this option opens the External Data Range Properties dialog box, where you can set Excel query properties.
-
Refresh Data. Available for existing queries
only, this option refreshes the data in the existing report query.
Refresh is not enabled for password-protected cells.
-
Settings. This option opens the WebFOCUS Quick
Data Settings dialog box, as shown in the following image.
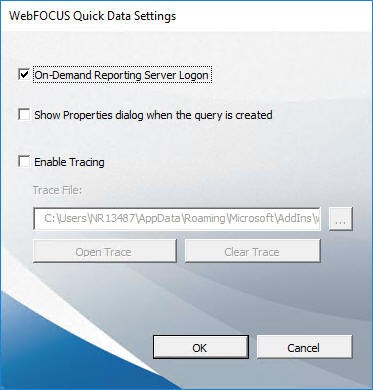
The WebFOCUS Quick Data Settings dialog box provides the following settings:
- On-Demand Reporting Server Logon. This setting determines if the user will be prompted to log on to the Reporting Server the first time that a connection to the server is made during an Excel session (check this setting), or each time that a request is made to the Reporting Server during an Excel session (do not check this setting).
- Show Properties dialog when the query is created. When this setting is selected, a dialog box with options on how to insert data into Excel opens each time that a new query is executed.
-
Enable Tracing. This option allows you
to capture WebFOCUS Quick Data information in a trace file to troubleshoot
communication problems and issues that may occur when you attempt
to create and run report requests.
The captured information includes tasks performed by the tool when it attempts to connect to the web server and Reporting Server, when requests are made for data, and when data is retrieved. The default name of the trace file is wfquickdata.txt. It is created in the same directory as the WebFOCUS Quick Data Add-in file, for example:
C:\Users\user_id\AppData\Roaming\Microsoft\Addins\Traces are captured for the duration of a single active Excel session. Tracing is automatically turned off when you close an Excel session. The trace file content is cumulative. Added to the file is trace information from each session in which tracing is enabled.
When you select Enable Tracing, the Trace File field is automatically populated with the full path to the trace file. The path includes the trace file name. You can change the location and name of the trace file by either typing the changes in this field, or by clicking the ellipsis and browsing to a new trace file location.
To view the current trace file, click Open Trace.
To delete the contents of the current trace file, click Clear Trace.
You can forward your trace file to Information Builders Customer Support Services (CSS) for analysis by the technical support team.
-
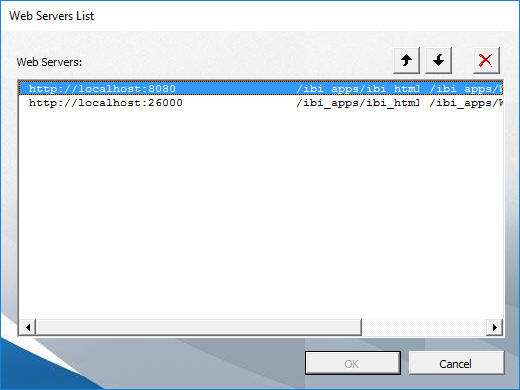
Web Servers List. This option opens a dialog
box that displays a list of the configured web servers, as shown
in the following image. You can move the servers up or down in the
list to change the order of appearance, and delete servers from
the list.
A configuration file is provided with the Quick Data add-in for the Administrator to use as a template when designing a default WebFOCUS BUE environment. The configuration file defines items such as the WebFOCUS BUE web server port number, alias, and client path.
Providing users with a default WebFOCUS BUE environment allows them to bypass the additional step of manually defining web server connection parameters.
The configuration file is named wfquickdata.cfg. It is originally located in the following directory: ..\ibi\WebFOCUS_BUE82\WebFOCUS\utilities\quickdata. After you have distributed the Quick Data Add-in in your environment, the configuration file is placed in the new directory, such as: C:\Users\userid\AppData\Roaming\Microsoft\AddIns.
The configuration file can contain multiple WebFOCUS configurations. Keep in mind that if the configuration file contains more than one WebFOCUS configuration, the last one appearing in the file is the configuration that is used when Quick Data is opened.
The configuration file provided as a template with the Quick Data add-in contains examples of configurations and instructions to help you create your own configuration. The following example displays a typical configuration:
SERVER_START
     PROTOCOL=”http”
     HOST=”localhost”
     PORT=”26000”
     HTML_ALIAS=”/ibi_apps/ibi_html”
     CLIENT_PATH=”/ibi_apps/WFServlet.ibfs”
SERVER_END
Note:
- The use of double quotation marks around a parameter value, as shown in the example, is optional.
- Begin a comment line in the file with a number sign (#).
Use the following guidelines to create the configuration file:
- The configuration file must have the same name as the Quick Data Add-in file, and must have the extension .cfg, such as wfquickdata.cfg
- The configuration file must reside on the machine running the Quick Data Add-in, in the same directory as the .xla file.
- Each WebFOCUS configuration must begin with the delimiter, SERVER_START, and end with the delimiter, SERVER_END.
- Each configuration must contain the following parameters in
order to connect to WebFOCUS BUE:
- PROTOCOL. The protocol used in the environment running WebFOCUS BUE. If WebFOCUS BUE is running in a Secure Sockets Layer (SSL) environment, you must specify https as the protocol value. The default value is http.
- HOST. The name of the server on which the WebFOCUS BUE web application is installed.
- PORT. The port number of the application server on which WebFOCUS BUE is installed.
- HTML_ALIAS. The alias of the web server
or application server on which the WebFOCUS BUE static pages are
located. The default value is /ibi_apps/ibi_html.
Note: The leading slash is required.
- CLIENT_PATH. The path to the WebFOCUS BUE
Servlet, as defined in the WebFOCUS BUE web application file, web.xml.
The default value is
/ibi_apps/WFServlet.ibfs
where:
- /ibi_apps
-
Is the default context root of the WebFOCUS BUE web application. The leading slash is required. You can configure this value.
- WFServlet.ibfs
-
Is the name of the WebFOCUS BUE Servlet.
| WebFOCUS |
Feedback |