Configuring the Adapter for Caché
|
Topics: |
|
How to: |
|
Reference: |
Configuring the adapter consists of specifying connection and authentication information for each of the connections you want to establish.
In order to connect to the Caché database server, the adapter requires connection and authentication information. You supply this information using the SET CONNECTION_ATTRIBUTES command. You can:
- Enter connection and authentication information in the Web Console or the Data Management Console configuration panes. The consoles add the command to the profile you select: the global server profile (edasprof.prf), a user profile (user.prf), or a group profile (if supported on your platform).
- Manually add the command in the global server profile (edasprof.prf), in a user profile (user.prf), or in a group profile (if supported on your platform).
You can declare connections to more than one Caché database server by including multiple SET CONNECTION_ATTRIBUTES commands. The actual connection to the Caché Server takes place when the first query that references the connection is issued. If you issue multiple SET CONNECTION_ATTRIBUTES commands:
- The connection named in the first SET CONNECTION_ATTRIBUTES command serves as the default connection.
- If more than one SET CONNECTION_ATTRIBUTES command contains the same connection name, the adapter uses the attributes specified in the last SET CONNECTION_ATTRIBUTES command.
Procedure: How to Configure an Adapter
- From the
Web Console sidebar, click Connect to Data.
or
From the Data Management Console, expand the Adapters folder.
In the DMC, the Adapters folder opens. In the Web Console, the Adapters page opens showing your configured adapters.
- In the Web Console, click the New Datasource button on the menu bar and find the adapter on the drop-down list or, in the DMC, expand the Available folder if it is not already expanded.On the Web Console, you can select a category of adapter from the drop-down list or use the search option (magnifying glass) to search for specific characters.
- In the DMC, expand the appropriate group folder and the specific adapter folder. The group folder is described in the connection attributes reference.
- Right-click
the adapter name and/or version and select Configure.
The Add Adapter to Configuration pane opens.
- Enter values for the parameters required by the adapter, as described in the chapter for the specific adapter you want to configure.
- Click Configure.
The configured adapter is added to the Adapters list in the DMC resources tree or the Configured list in the Web Console.
In the Web Console, the adapter remains on the Available Adapters list with a check mark to indicate that at least one connection has been configured. You can configure additional connections from either the Configured or Available list by right-clicking the adapter and clicking Add Connection.
Reference: Connection Attributes for Caché (ODBC)
The Caché adapter is under the SQL group folder.
The following list describes the connection attributes for which you can supply values. To complete the attribute declaration, click the Configure button.
- Connection name
-
Logical name used to identify this particular set of connection attributes. The default is CON01.
- Datasource
-
Caché data source name (DSN). This is no default data source name. You must enter a value.
- Security
-
There are two methods by which a user can be authenticated when connecting to a database server:
- Explicit. The user ID and password are explicitly specified for each connection and passed to the database, at connection time, for authentication.
- Password Passthru. The user ID and password received from the client application are passed to the database, at connection time, for authentication.
- User
-
Primary authorization ID by which you are known to the data source.
- Password
-
Password associated with the primary authorization ID.
- Select profile
-
Select a profile from the drop-down menu to indicate the level of profile in which to store the CONNECTION_ATTRIBUTES command. The global profile, edasprof.prf, is the default.
If you wish to create a new profile, either a user profile (user.prf) or a group profile if available on your platform (using the appropriate naming convention), choose New Profile from the drop-down menu and enter a name in the Profile Name field (the extension is added automatically).
Store the connection attributes in the server profile (edasprof).
Syntax: How to Declare Connection Attributes Manually (ODBC)
ENGINE SQLISM SET CONNECTION_ATTRIBUTES connection
        DSN_name/userid,password
where:
- SQLISM
-
Indicates the adapter. You can omit this value if you previously issued the SET SQLENGINE command.
- connection
-
Is the logical name used to identify this particular set of connection attributes.
Note that one blank space is required between connection and DSN_name.
- DSN_name
-
Is the Data Source Name (DSN) you wish to access. It must match an entry in the odbc.ini file.
- userid
-
Is the primary authorization ID by which you are known to the adapter.
- password
-
Is the password associated with the primary authorization ID.
Example: Declaring Connection Attributes
The following SET CONNECTION_ATTRIBUTES command declares connection CON1 to the Caché DSN named SAMPLESERVER with an explicit user ID (MYUSER) and password (PASS). To ensure security, specify connection attributes from the Web Console, which encrypts the password before adding it to the server profile.
ENGINE SQLISM SET CONNECTION_ATTRIBUTES CON1 SAMPLESERVER/MYUSER,PASS
Reference: Connection Attributes for Caché (JDBC)
The Cache adapter is under the SQL group folder. The following list describes the connection attributes for which you can supply values. To complete the attribute declaration, click the Configure button.
- Connection name
-
Is a logical name used to identify this particular set of connection attributes. The default is CON01.
- URL
-
Is the URL pointing to the location of the JDBC data source.
- Driver name
-
Is the name of the JDBC driver.
For information, see the driver documentation for the specific release you are using.
- IBI_CLASSPATH
-
Defines the additional Java Class directories or full-path jar names that will be available for Java Services. This value may be set by editing the communications file or in the Web Console. Using the Web Console, you can enter one reference per line in the input field.
When the file is saved, the entries are converted to a single string using colon (:) delimiters for all platforms. When editing the file manually, you must maintain the colon delimiter.
- Security
-
There are two methods by which a user can be authenticated when connecting to a database server:
- Explicit. The user ID and password are explicitly specified for each connection and passed to the database, at connection time, for authentication.
- Password Passthru. The user ID and password received from the client application are passed to the database, at connection time, for authentication.
- User
-
Primary authorization ID by which you are known to the data source.
- Password
-
Password associated with the primary authorization ID.
Syntax: How to Declare Connection Attributes Manually (JDBC)
ENGINE SQLISM SET CONNECTION_ATTRIBUTES connection 'url'/userid,password
where:
- SQLISM
-
Indicates the adapter. You can omit this value if you previously issued the SET SQLENGINE command.
- connection
-
Is the connection name.
- 'url'
-
Is the URL to the location of the JDBC data source.
- userid
-
Is the primary authorization ID by which you are known to the target database.
- password
-
Is the password associated with the primary authorization ID.
Example: Declaring Connection Attributes (JDBC)
The following SET CONNECTION_ATTRIBUTES command connects to a data source using the JDBC Driver, with an explicit user ID (MYUSER) and password (PASS). To ensure security, specifying connection attributes from the Web Console or DMC will encrypt the password before adding it to the server profile.
ENGINE SQLISM SET CONNECTION_ATTRIBUTES CON1
'jdbc:xxxxxxx://hostname:port/datasource'/MYUSER,PASS
Reference: Updating the Connection String
The syntax for the CONNECTION_ATTRIBUTES command for this adapter has been enhanced to include a logical connection name that is designed to support the porting of applications from development to production environments. This enhanced syntax may necessitate the migration of existing CONNECTION_ATTRIBUTES commands.
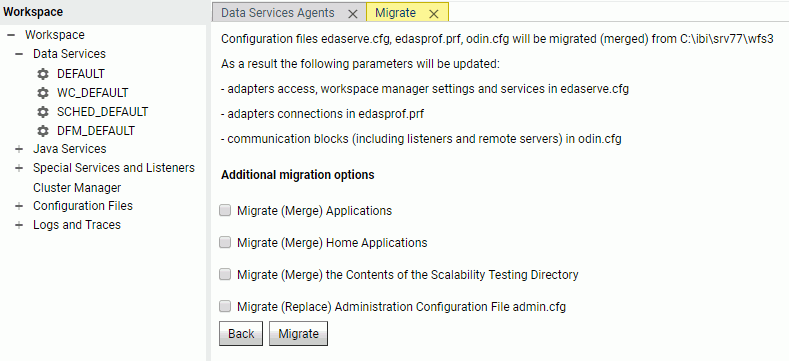
The Web Console Migrate option migrates your server settings to a newer release. To access this option, click Workspace from the sidebar, then Migrate on the ribbon, or right-click Workspace on the resources tree, then click Migrate on the context menu. This is the recommended approach.
On the Migrate pane, type the full path of the configuration instance directory (EDACONF) and click Continue. Select additional migration options, as shown in the following image, and click Migrate
If you choose not to use the Migrate option, please note the following information:
- Connection names declared prior to Version 7 Release 6.1 are supported.
- If you create a new connection for the purpose of creating new synonyms, your existing connections are re-saved in a new format, and the existing synonyms continue to work without any changes.
- If you add a new connection for the purpose of using an existing
synonym, you must change the default logical connection name to
match the value that is stored in the existing Access File attribute
CONNECTION=value.
For example, suppose that prior to Version 7 Release 6.1, the connection was defined as:
ENGINE SQLISM SET CONNECTION_ATTRIBUTES DSN_A/uid,pwd
When synonyms based on objects stored in this DSN_A are created, the Access Files contains the following description:
CONNECTION=DSN_A
If you then add a new connection, you must change the connection name from the default CON01 to DSN_A and save it as DSN_A in order to reuse the existing synonym. The connection is stored in the profile as:
ENGINE SQLISM SET CONNECTION_ATTRIBUTES DSN_A DSN_A/uid,pwd
Overriding the Default Connection
|
How to: |
Once connections have been defined, the connection named in the first SET CONNECTION_ATTRIBUTES command serves as the default connection. You can override this default using the SET DEFAULT_CONNECTION command.
Syntax: How to Change the Default Connection
ENGINE SQLISM SET DEFAULT_CONNECTION connection
where:
You change this setting by expanding the Domains and Reports folders, then right-clicking a subfolder and choosing Metadata. Right-click SQLISM and select Change Settings. The Change Settings pane opens.
- SQLISM
-
Indicates the adapter. You can omit this value if you previously issued the SET SQLENGINE command.
- connection
-
Is the connection defined in a previously issued SET CONNECTION_ATTRIBUTES command. If this name was not previously declared, the following message is issued:
FOC1671, Command out of sequence
- If you use the SET DEFAULT_CONNECTION command more than once, the connection name specified in the last command serves as the default connection.
- The SET DEFAULT_CONNECTION command cannot
be issued while an uncommitted transaction (LUW) is pending. In
that case, the following message is issued:
FOC1671, Command out of sequence.
Example: Selecting the Default Connection
The following SET DEFAULT_CONNECTION command selects the database server named SAMPLE as the default database server:
ENGINE SQLISM SET DEFAULT_CONNECTION SAMPLE
Controlling the Connection Scope
|
How to: |
The SET AUTODISCONNECT command controls the persistence of connections when using the adapter for each of the connections you want to establish.
Syntax: How to Control the Connection Scope
ENGINE SQLISM SET AUTODISCONNECT ON {FIN|COMMAND|COMMIT}where:
You change this setting by expanding the Domains and Reports folders, then right-clicking a subfolder and choosing Metadata. Right-click MS SQL Server 200x and select Change Settings. The Change Settings pane opens.
- SQLISM
-
Indicates the adapter. You can omit this value if you previously issued the SET SQLENGINE command.
- FIN
-
Disconnects automatically only after the session has been terminated. FIN is the default value.
- COMMAND
-
Disconnects automatically after each request. Depending on how often the event occurs, the SET AUTODISCONNECT command may result in considerable overhead. Almost all of this overhead is not related to the server. It is related to the operating system and the data source.
- COMMIT
-
Disconnects automatically only after COMMIT or ROLLBACK is issued as a native SQL command.
| WebFOCUS | |
|
Feedback |