Updating Values in a Table
Normally, when using the Insert/Update load type when a row in the target table is updated, all of the values in the row of the target table except for the key column(s) are replaced with the new values.
However, there are circumstances where it is useful to add an incoming value to the value in the target table. For example, if the source table contains a count of units sold in some time period and you want the target table to contain the total count.
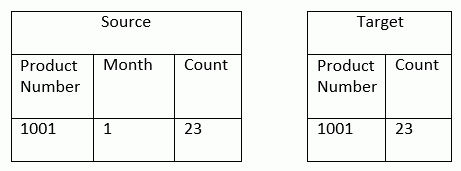
Consider a source file with one row, which is copied to a new target table, as shown in the following image.
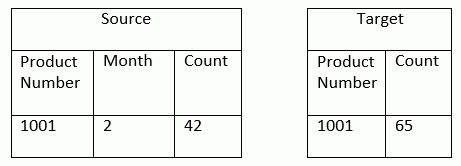
Now consider a new source file with one row, and instead of replacing the existing count with the new count, the new count is added to the existing count, as shown in the following image.
The following examples will walk you through the steps of creating a synonym for a source table, writing a flow to create and load one month of data to a target table, and then writing another flow to add a subsequent month of data to the target table.
Example: Creating a Synonym for a CSV (Comma Separated Values) File
The source table for this tutorial can be found in the application directory where you created the tutorial files. By default, this location is the ibisamp directory.
From the DMC:
- Right-click ibisamp, point to New, and click Synonym (Create or Update).
The Select adapter to configure dialog box opens.
- Under the Delimited Flat File folder, click <local> and click OK.
The Select Data File dialog box opens.
- In the Data Files Location box, enter ibisamp.
- In the Extension box, enter csv.
- Click Next.
The Select Synonym candidates dialog box opens.
- Select the checkbox next to the sales_orders synonym.
To view the CSV file, right-click sales_orders and click Show File. Click the X in the upper right hand corner to close the view.
- Set the following parameters to create the synonym:
- In the Field Delimiter, leave comma selected.
- In the Field Enclosure box, select " (double quote) from the drop-down menu.
- Select the Header row checkbox.
- Expand the Customize Data type mappings section. In the Decompose Data fields into components box, select OFF - Turn Off from the drop-down menu.
- In the Prefix box, enter dm.
- Click Next.
The Status dialog box opens.
- Ensure that the status shows "Created successfully" and no other messages. Click Close.
- To view the data through the synonym, expand the ibisamp directory, right-click dmsales_orders, and click Sample Data.
Example: Creating an Initial Load Data Flow
The next step is to create a Data Flow that creates a new target table and loads the first month of data. In this example, we will be using mysamp as the application directory.
From the DMC:
- Right-click mysamp, point to New, and click Flow.
The Data Flow workspace opens.
- Right-click the left hand side of the workspace and click Add Source.
The Select Synonym dialog box opens.
- Click the ibisamp directory and then click dmsales_orders. Click Select.
The source synonym is added to the workspace.
- Double-click the SQL object to open it.
- Hold the Ctrl key to select and select the PRODUCT_NUMBER and PRODUCT_NAME columns. Click the >> button to add them to the Selected Columns section.
- With both columns selected, select Group By from the Aggregates drop-down menu.
- From the Available Columns section, hold the Ctrl key and select the REVENUE and QUANTITY columns. Click the >> button to add them to the Selected Columns section.
- With both columns selected, select Sum from the Aggregates drop-down menu, as shown in the following image.
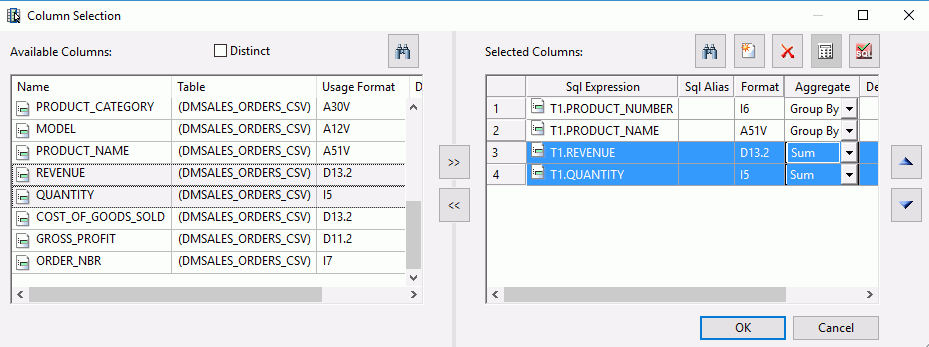
- Click OK to close the Column Selection dialog box.
- Right-click the SQL object and click WHERE Filter.
The WHERE Filter calculator opens.
- Click the Conditions tab.
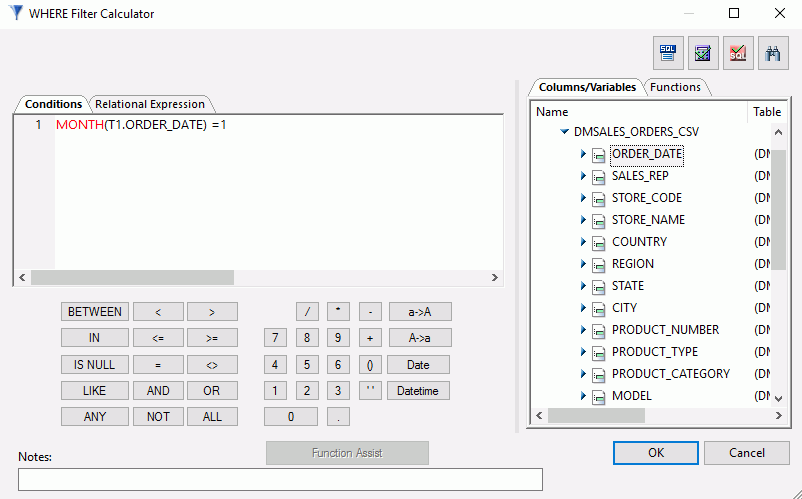
- Right-click the ORDER_DATE column, point to Insert Function, and click Return part month of date from the list of functions.
The expression MONTH(T1.ORDER_DATE) is added.
- Enter =1 at the end of the expression, as shown in the following image.
- Click OK to close the WHERE Filter calculator.
- Right-click the right side of the workspace, point to Add Target, and click New.
- Right-click the target object and click Properties.
The Properties panel for the target opens.
- Enter the following values:
- For Adapter, select any adapter for a relational database.
- For Synonym, enter the name of your application directory and a name for the target table For example, mysamp/dmsales_counts.
- For Load Type, leave it as Insert/Update.
- In the Key box, under the Adapter Specific section, enter or select PRODUCT_NUMBER.
- On the Flow tab, from the Run group, click Run and then click Submit.
- Click OK in the Save changes dialog box.
The Save Procedure As dialog box opens.
- In the Name box, enter create_dmsales_counts.
- Click Save.
You should see a message in the Console Log at the bottom of the DMC that says Request mysamp/create_dmsales_counts complete.
Note: If the Console Log is not visible, on the Home tab, from the View group, click Console Log.
- On the Flow tab, from the Reports group, click View Last Log to view the number of rows that were inserted. Click the X on the tab to close the log view and return to the flow.
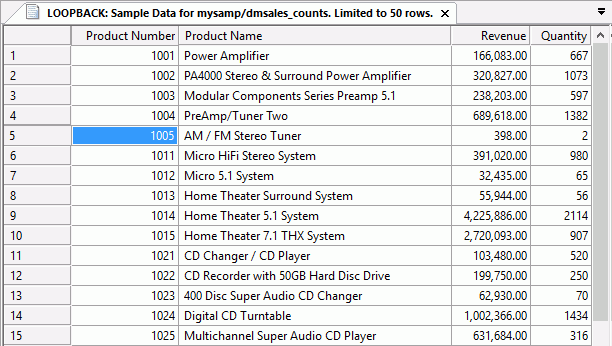
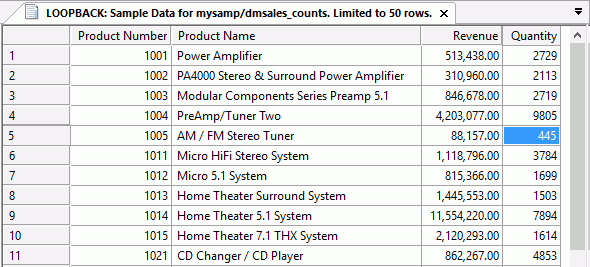
- To view the data that was loaded, right-click the target object, point to Operations, and click Sample Data. The report shows the product information that was loaded, specifically, the quantity of each. For example, Product Number
1005 shows a Quantity of 2, as shown in the following image.
Example: Creating an Update Data Flow
In this step, we will start with the initial load flow and edit it so that it updates values in the target table by adding new to existing values.
- In the Data Flow that was just created, right-click the SQL object and click WHERE Filter.
The WHERE Filter calculator opens.
- Click the Conditions tab.
- In the expression, change the number 1 to a 2.
- Click OK.
- Right-click the target object and click Delete.
- Click Yes to confirm that you want to delete the target object.
- Right-click the right hand side of the workspace, point to Add Target, and click Existing.
The Select Synonym dialog box opens.
- Select the application directory you used to create the target table. In this example, it is mysamp. Then, select the target table in the available list, for example, mysamp/dmsales_counts.
- Click Select.
- Right-click the new target object and click Properties.
The Properties pane opens.
- Select Update the existing record from the If the record exists drop-down menu.
- Double-click the target object.
The Transformations dialog box opens.
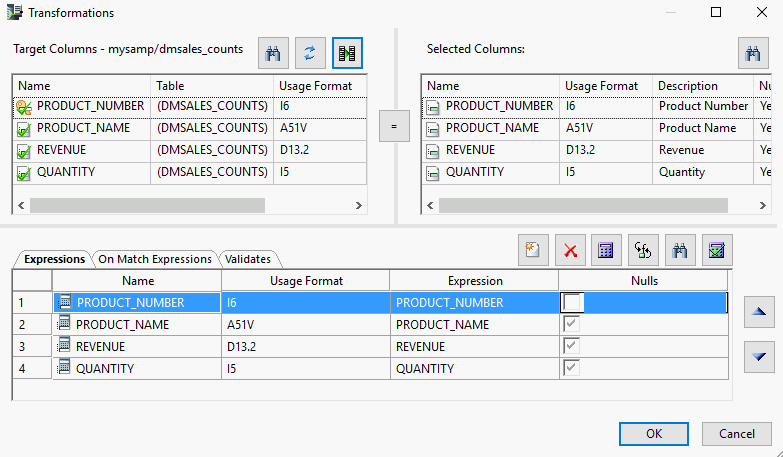
- Click the AutoMap button to automatically map the source to the target columns. This defines the assignments that are done
from source to target when inserting a new row, as shown in the following image.
- Click the On Match Expressions tab.
- In the Target Columns section, double-click PRODUCT_NUMBER.
The On Match Transformation calculator opens.
- Double-click REVENUE to add it to the expression. This is the value from the source table.
- Click the plus sign.
- Expand dmsales_counts and double-click REVENUE. This will add D.REVENUE to the expression, which is the value from the target table.
- Click OK to close the On Match Transformation calculator.
- In the Target Columns section of the Transformations dialog box, double-click QUANTITY .
The On Match Transformation calculator opens.
- Double click QUANTITY to add it to the expression.
- Click the plus sign.
- Expand dmsales_counts and double click QUANTITY. This will add D.QUANTITY to the expression, which is the value from the target table.
- Click OK to close the On Match Transformation calculator.
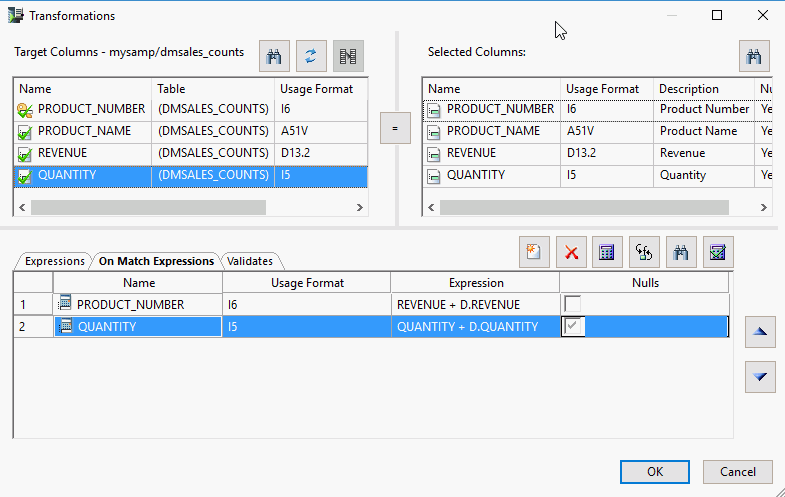
The Transformations dialog box should look like the following image.
- Click OK to close the Transformations dialog box.
- On the Quick Access Toolbar, click the Save As button.
The Save Procedure As dialog box opens.
- Enter a name for the procedure, for example, update_dmsales_counts.
- Click Save.
- On the Flow tab, from the Run group, click Run and then click Submit.
The message "(ICM18763) Request ibisamp/update_dmsales_counts complete" should appear in the console log, confirming that the flow was submitted successfully.
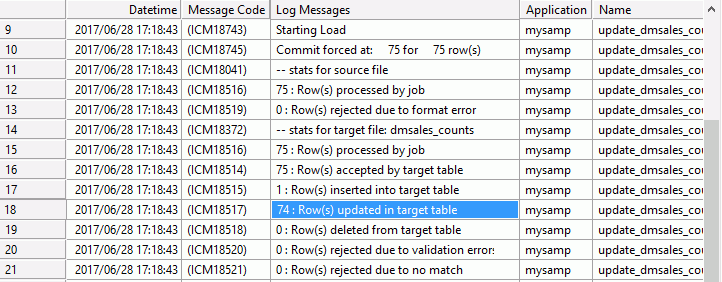
- On the Flow tab, from the Reports group, click View Last Log to view the log. The log shows that 1 row was inserted, and 74 were updated, as shown in the following image.
- To view the data that was loaded, return to the flow, right-click the target object, point to Operations, and click Sample Data. The report shows that product 1005 now has a Quantity of 445, as shown in the following image.
| WebFOCUS | |
|
Feedback |