Installing a Server
|
How to: |
When you install, several server properties are configured automatically. After installation, you can configure additional properties using the Web Console. The DMC Client also has properties that can be adjusted post installation.
Procedure: How to Install and Configure a Server
Using the location to which you unzipped the software:
- Preferably, exit all programs before continuing.
- Execute the following file from the location in which
you unarchived the software:
setup.exe
A User Access Control (UAC) security prompt may appear. Respond yes.
The Choose Setup Language window opens.
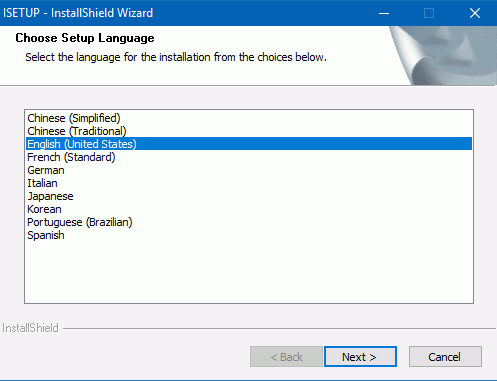
- Select the language to be used during installation and
click Next.
-
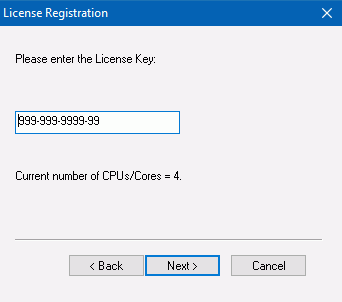
If you have no prior 77 installation, the License Registration window opens:
-
If a prior installation was found, the Prior Installs Found: Choose an Action window opens.
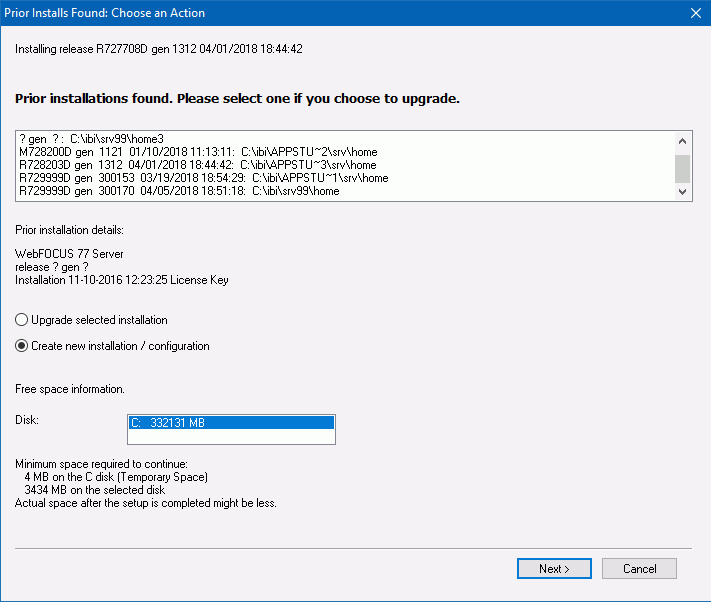
You can choose to upgrade the selected installation or to create a new installation.
- If you choose to upgrade, the upgrade starts immediately, with no further information needed from you.
- If you choose to create a new installation/configuration, the
License Registration window opens prompting for the license key
(similar to when there is no prior software).
However, when there is a prior installation, an additional screen will appear after the license key prompt asking you to choose between a new installation or adding a configuration. If add configuration is chosen, software is not installed, but the highlighted entry from the prior screen is used as a base for adding an additional configuration. Choosing a new installation gives a separate complete new installation and initial configuration, but in this instance, and when adding a new configuration, it is appropriate to not use the default installation paths and server name to avoid overwriting a prior installation or configuration location.
-
- On the License screen, enter your license key and click Next.
The license key should be saved for future reference. You must include the hyphens.
The License Key determines which product you are installing, such as a Full-Function Server, a WebFOCUS Reporting Server, a DataMigrator Server, or a DMC Client. Default settings, such as folder names, are determined by the license key. One part of the license key identifies how many CPUs the license key supports.
Your license key is checked and, if it is valid, an informational Registration Confirmation window opens. Click OK.
- If you typed an invalid License Key, the
setup program displays a warning.
Click OK to correct the key.
- If the CPU portion of the License Key for a server is for less than the actual CPUs/cores found, a
CPU violation message will occur. The user can:
- Continue the installation and virtualize the PC to a correct quantity afterwards.
- Discontinue the installation and reattempt the installation in an environment that is already virtualized correctly.
For more information, see Limiting CPU/Core Use on Machines With Multiple CPUs and Cores.
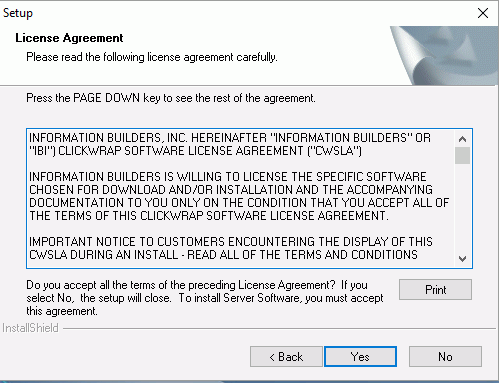
The License Agreement window opens:
- If you typed an invalid License Key, the
setup program displays a warning.
- Click Yes to accept the terms
of the license agreement.
The Select Initial Settings window opens.
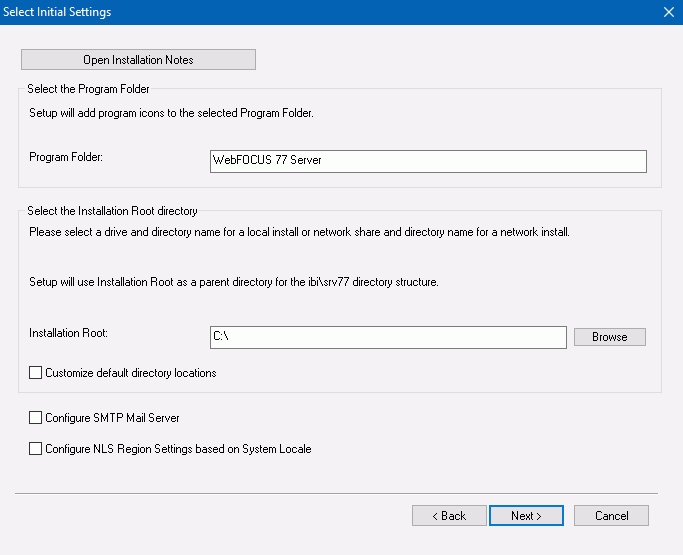
- You can accept the defaults or edit the following settings.
- Program Folder. By default, this is named WebFOCUS 77 Server.
- Installation Root. By default, this is C:\. You can browse to or enter another location.
- Customize default directory locations. Check this box if you want to customize the directory locations. For example, if you are configuring an additional instance of the server, some of the locations, such as EDAHOME and EDACONF must be customized. One way to customize the directories is to just use a different installation root and keep the default location names under that root.
- Configure SMTP Mail Server. If you will use any of the server email features, check this box.
- Configure NLS Region Settings based on System Locale. By default, this box is checked, so that you inherit the regional settings for your system at installation time instead of having to configure them later on the Web Console.
- Click Next.
If you checked the box to customize the default directories, the Select Directories window opens.
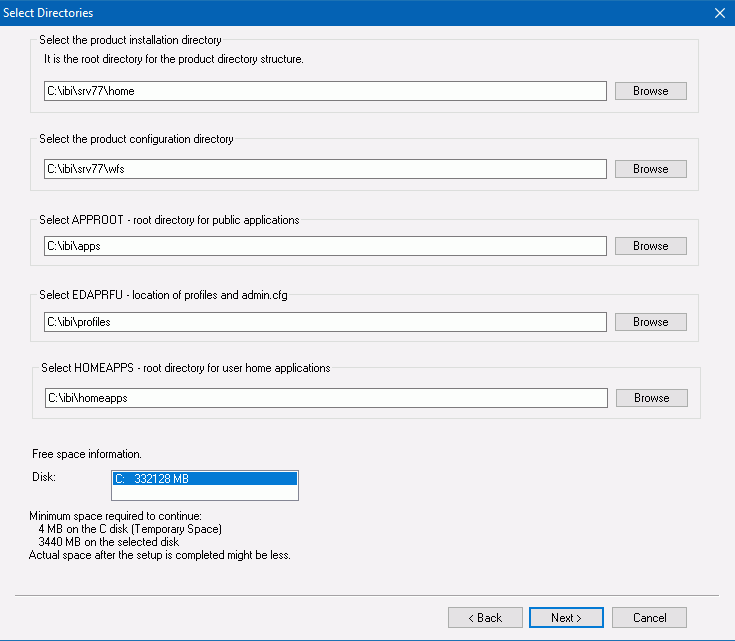
- Specify the following locations, or accept the default
values:
- Product installation directory. This contains
the executable files. We refer to this location as EDAHOME. It must conform
to the pattern:
*\ibi\srv77*\home*
If you are installing new, accept the default directory, or specify a different directory. The new software will be placed in this directory.
If you are configuring an additional instance, using your existing software, accept the default EDAHOME directory. If several 77 installation directories exist, select the one that corresponds to the software home directory for which you are configuring a new instance.
- Product configuration directory. This contains configuration
information for the instance. We refer to this location as EDACONF.
If you changed the EDAHOME value, the default EDACONF value changes to conform to EDAHOME.
EDACONF must be in the same srv77 path as EDAHOME. The lowest-level EDAHOME directory (home) becomes the product type directory in EDACONF. For example, if EDAHOME is
ibi\srv77\home
then EDACONF for a WebFOCUS Reporting Server defaults to:
ibi\srv77\wfs
Each instance must have its own configuration directory. If you are configuring an additional instance, be sure to append characters to the default name of the directory. (Otherwise, the installation will overwrite the existing configuration directory.) For example:
ibi\srv77\wfs2Accept the default value, or click Browse, or type a name to specify a different directory.
- Application directory. This contains the server
application directories. The application directories are folders
under the internal location known as APPROOT.
Accept the default value, or click Browse to select a different directory.
- Profiles directory. This contains the server
user and group profiles and the admin.cfg file, which specifies
the server administrator. We refer to this location as EDAPRFU.
Accept the default value, or click Browse to select a different directory.
- Disk. If there is more than one disk or shared folder to which the software can be installed, select the one on which you want to install.
- Click Next.
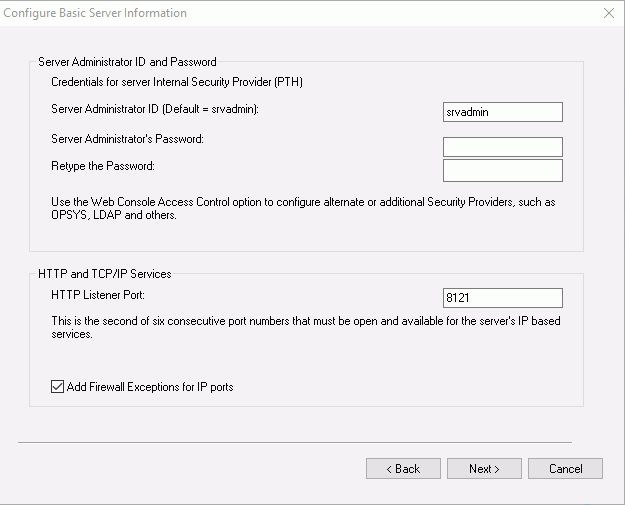
The Configure Basic Information window opens.
- Product installation directory. This contains
the executable files. We refer to this location as EDAHOME. It must conform
to the pattern:
- Enter the following information.
- Server Administrator user ID. The default value is srvadmin. You can change it or accept the default. When the server first starts, it is configured for the server internal security provider, called PTH. You must enter the server administrator user ID and password in order to access the server.
- Server Administrator’s Password. You must configure a password, there is no default.
- Retype the Password. Enter the password again for verification that you typed it correctly.
- HTTP Listener Port. Accept the default (8121) or enter
a new port number. If you are configuring an additional instance
of the server, you need a different port number from any other instances
that may be running at the same time. The server requires three
consecutive ports for the HTTP Listener and other IP-based services.
The TCP Listener port will be the one immediately preceding the HTTP
Listener port.
If you are configuring multiple instances, be sure to specify a different range of ports for each instance.
The default port automatically varies by product to support multiple instances on a particular computer:
- SMTP Host Name. If you will use any of the server email features, enter the host name or TCP/IP number for your SMTP server.
- SMTP Port Number. Accept the default (25) or enter a different port number.
- Sender Email. Enter an email address for the default sender for users receiving email from the server, or accept the default.
- Server Administrator Email. Enter an email address to receive administrative warnings (such as an agent crash) from the server, or accept the default.
- Click Next.
The Review Selected Product Parameters window opens showing all of the selections you have made.
You can now verify your installation, as described in Verifying Installation.
| WebFOCUS | |
|
Feedback |