Viewing a Detailed Flow Report and Log File
|
How to: |
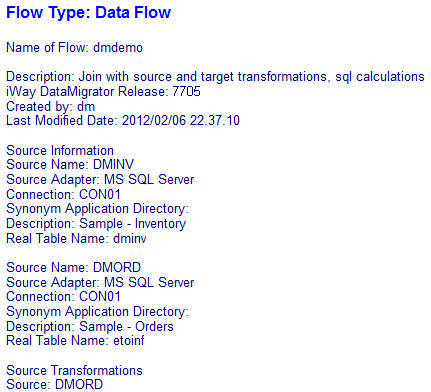
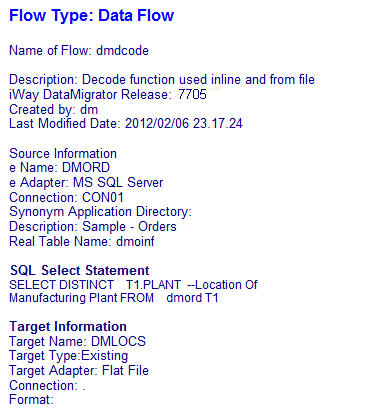
A detailed flow report displays general properties like name, description, DM release, creator, and modify date. It also provides specifics on SQL Select Statements, target information, load options, target transformations, and execution properties. These reports are useful for documentation purposes.
Detailed reports are available for individual flows from the DMC. You also can generate detailed reports for all of the flows in the path of the server, or in a specific application directory from the Web Console.
The log file for a flow is useful in determining problems encountered when running a flow.
Procedure: How to View a Detailed Flow Report
Right-click a flow in the navigation pane and click Flow Report.
The flow report shown in the following image appears in the workspace. It can be printed from that window.
Tip 1: You can also copy the report to the Clipboard and paste it in Word or any other word processing program. To do this, right-click the report and click Select All. Then right-click and select Copy. You can now paste the report into another program.
Tip 2: If you need to export the flow information into an XML file, you can use the stored procedure flow2xml, which is located in the ibisamp application directory. The following steps show how you can use this procedure and send the complete flow information into an XML file.
- Right-click the flow2xml flow in the ibisamp directory and click Run.
- A dialog box opens. In the first line, enter ibisamp as
the name of the application directory. In the second line, enter dmdemo as
the name of the flow.
Note: These values are case-sensitive.
- Click the Run button.
The procedure will run. If it runs successfully, the following message will appear in the Console Log: The XML file fl_xml_*.xml created; located in the same directory where your flow is.
The fl_xml_dmdemo.xml file will be inside the ibisamp directory.
Tip 2: For documentation purposes, you can also send the flow information to an XML file.
The following steps describe how you can use the utility procedure flow2xml to send the complete flow information to an XML file.
- Install the flow2xml utility.
- Right-click your application directory in the navigation pane, point to New, and then click Tutorials.
The Create Tutorial Framework dialog box opens.
- From the Tutorial drop-down menu, select DataMigrator - General.
- Run the flow2xml utility to send the information of your flow to an XML file.
- In the navigation pane, click the flow2xml procedure and click Run.
A dialog box opens.
- For the flow for which you create an XML file, enter the name of the application directory and the name of the flow.
Note: These values are case-sensitive.
The name of the XML file is created with the pattern fl_xml_*.xml. The asterisk (*) is a mask for the name of your flow. For example, for your flow01 that resides in the application directory app01, the name of the XML file will be fl_xml_flow01.xml.
An example message on the Console Log when flow2xml runs successfully is:
"Success: The XML file fl_xml_flow01.xml created in the directory app01".
Procedure: How to View and Print a Set of Detailed Flow Reports
You can generate detailed reports for all of the flows in the server path or in a specific application directory.
Note: If there are many flows in this report, it may take a while to generate.
- Right-click the server or an application directory, select Impact Analysis, and then click Flow Report.
- Select Detailed from the context menu.
For output in default format, the first report is displayed. On the Report tab, in the Run group, click Next Result to view the next report, and continue until you have viewed all the reports.
For pdf output, a single multi-page document is displayed.
The flow reports appear in the workspace, as shown in the following image.
Note: The Next Result common in the Run group, on the Report tab, lets you navigate to the next flow report.
Procedure: How to View the Log File
You can generate a log file for reports that have been run.
- Right-click a flow in the navigation pane, select Logs,
and then click Log and Statistics.
The Log and Statistics dialog box opens.
- From the Report Type drop-down menu, select Log.
Specify what time range you want to run the report for. The options are Last, All, or Specify Time.
- Select View Report.
The log report appears in the workspace.
Example: Sample DataMigrator Log File
This example contains sample lines from log files, and an explanation of the code.
The first lines of a log display DM job initialization.
- This request
was submitted:
------ Start of Log Record for baseapp/one ------
Request - one (Owner: dm) submitted.
The next lines display the data target or file type, and whether it is a new or existing data target.
- The following
is a new table, and DataMigrator attempts to drop and recreate the
target table:
linertps type MS SQL Server New target
PREPARE executed
Create synonym executed for: linertps
Issuing DROP TABLE for linertps
Issuing CREATE TABLE for linertps
- The following
is an existing table:
dmrpts type MS SQL Server Existing target
PREPARE executed
ROWS AFFECTED BY PASSTHRU COMMAND  : 222/DELETE
The log then displays summary data for the request. You can see the number of records that were processed.
- In this example,
there were 200 rows processed, which DataMigrator attempted to insert
into the target table. Of those, 20 were rejected due to duplicate keys,
and 180 were accepted by the data target.
Starting Load-- stats for newtab -------------------------------------
184 : Row(s) processed by job
144 : Row(s) accepted by target table
144 : Row(s) inserted into target table
0 : Row(s) updated in target table
0 : Row(s) deleted from target table
0 : Row(s) rejected due to format errors
40 : Row(s) rejected due to validation errors
0 : Row(s) rejected due to no match logic
0 : Row(s) rejected because duplicate exists
The remaining lines contain summary data and the return code from the flow.
- In the following,
a return code of zero (0) means the request completed successfully:
Ending Load
Return Code = 0
Request: one - finished processing
Finished
| WebFOCUS | |
|
Feedback |