Upgrading DataMigrator from Release 5.2 and Higher
|
Topics: |
|
How to: |
For most prior releases, upgrading to Release 7.7 always results in a new installation of the DataMigrator Server. This allows you to run your new and old server installations in parallel, if needed.
Note: This is not the case when replacing Release 7.6. For more information on upgrading from that release, see Upgrading DataMigrator from Release 7.6.
This section lists some things to consider when upgrading DataMigrator.
Port Number
Each DataMigrator Server listens on a unique series of port numbers for connections from the Data Management Console, a web browser, and other IP services. By default, port 8116 is used for TCP services and 8117 through 8119 are used for HTTP services.
To have multiple servers running on the same system, such as the 7.6 and 7.7 servers, they must each have their own unique set of port numbers.
Configuration Files
A new installation means that you will need to recreate or migrate your configuration information. Consider whether you want the new and old installations to use the same database connections. For instructions on how to migrate the configuration files, see How to Migrate Configuration Information.
Note: If you choose to migrate configuration information from an older release, you should do so before entering any new configuration settings. This prevents overriding existing configuration information by the migration process.
Profiles and Applications
If you have installed your new server installation on a different system from the prior release, you may also need to migrate your APPS directories where flows, procedures, and metadata are stored. You may also need to migrate your PROFILES directory, which is where individual user profiles are stored. This can be done by using operating system copy commands or from Explorer on Windows.
Data Flows
Data flows and procedures that ran in prior release should run in this release without modification. They will be automatically upgraded to take advantage of new functionality when they are opened and resaved from the DMC.
Scheduler
If you have scheduled flows, you should consider whether you want the scheduler on both the new and old releases to initiate scheduled flows from the same application directories.
Data Management Console
The Data Management Console (DMC) and Server releases should both be the same. When upgrading the DataMigrator Server, the new version of the DMC must also be installed for each user that connects to the server.
Note: Two or more installations of the DMC can be on one PC in order to connect to different server releases.
Procedure: How to Migrate Configuration Information
To migrate configuration information from a previous release:
- In the navigation pane of the DMC, expand the server node and then right-click the Workspace folder.
- Click Migrate.
The Migrate dialog box opens.
- Enter the full path of the configuration instance directory (EDACONF). On Windows, for example, this path is C:\ibi\srv76\dm.
- Click Migrate.
Procedure: How to Migrate DataMigrator From One System to Another
Note: If the new DataMigrator Server has been installed with security and data adapters have been configured, you do not need the configuration files from the previous environment.
- Locate the following files:
- edaserve.cfg
- edaenv.cfg (If it exists)
- edasprof.prf
- Backup these files using the DataMigrator Server Web Console:
- Click the Workspace tab.
- Right-click the Configuration Files folder and click New Backup.
- Click OK.
- Copy the following files into a directory path on the new environment so they can be used with the migration process. The
paths used are examples for a Windows system:
From the C:\ibi\srv77\dm\bin directory into the C:\ibi\cnfg\bin directory:
- edaserve.cfg
- edaenv.cfg (If it exists)
From the C:\ibi\srv77\dm\etc directory into the C:\ibi\cnfg\etc directory:
- edasprof.prf
- After migrating the configuration files, start the DataMigrator Server.
- Place the following files from the previous environment into the new environment. They should be manually copied and placed
into the same directories in the new environment:
- From the C:\ibi\profiles directory on the old machine, the admin.cfg file and any user profiles (.prf) files.
- From the C:\ibi\apps directory on the old machine, all of the sub application directories.
- Start the DataMigrator Server.
Upgrading DataMigrator from Release 7.6
If you have a previous installation of DataMigrator Release 7.6 installed on your system, a message like the one below will appear that gives you the opportunity to replace your current installation with Release 7.7.
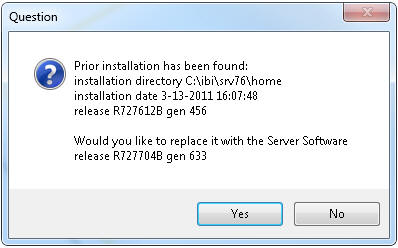
If you click No, then a new installation is performed, as described above. This the preferred option for most users, as it allows for parallel operation if needed.
If you click Yes, then your 7.6 installation is replaced with a 7.7 installation. You will then have a Release 7.7 installation in a directory identified (by default) as SRV76, but you will not be able to use Release 7.6 unless you re-install it.
In this case, there is no need to migrate your configuration files. However, the DataMigrator Log and Statistics table formats have changed and they must be re-created.
| WebFOCUS | |
|
Feedback |