Performing Server Administration Tasks
|
Topics: |
You can control many key aspects of DataMigrator Server operations directly from the DMC.
The DMC allows you to:
- Configure the application path.
- View and run flows by expanding the approot folder and its application directories.
- Create sample procedures and data.
- Set up log and statistics options.
- Run reports.
- View run-time information.
- Schedule flows.
- Set Scheduler settings.
- Set email notification.
Configuring DataMigrator Server Operations
You can set up your DataMigrator Server to send an email message that notifies recipients of the successful completion or failure of every flow execution.
In addition, from the DMC, you can enable the distribution of email messages at any point in a process flow.
However, to enable either variation on the email notifications process, you must first configure a SMTP service. (You need to set up your server for email before it will work anywhere in the flow.)
Note: You must be logged on as a Server Administrator with the appropriate privileges to make these configurations.
Procedure: How to Edit the Scheduler Configuration
- In the DMC, expand the Workspace folder, followed by the Special Services and Listeners folder.
- Right-click SCHEDULER
and click Properties.
The Scheduler Configuration dialog box opens.
- Make your changes, and click Save and Restart Scheduler. For more information on the available options, see Scheduler Configuration Window.
Reference: Scheduler Configuration Dialog Box
The DataMigrator Scheduler runs as a task under the iWay DataMigrator Server. The Scheduler must be running to submit flows and stored procedures and to execute scheduled data flows and flows that run in parallel groups in a process flow. The following image shows the Scheduler Configuration dialog box.
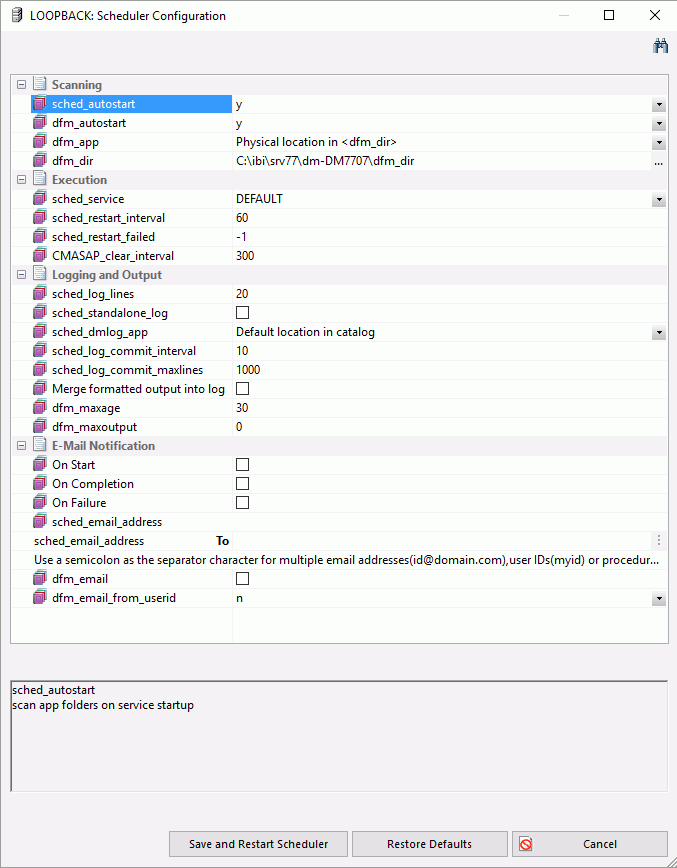
The Scheduler Configuration dialog box contains the following fields/options:
- Scanning
-
- sched_autostart
-
Specifies whether the Scheduler should check for flows automatically. The options are:
- y
-
Automatically starts the Scheduler when the server starts. This is the default value.
- n
-
Does not start the Scheduler when the server starts.
Note: The Scheduler must be running to execute not only scheduled data flows, but also restarted flows and flows run in parallel in a process flow.
- dfm_autostart
-
If this option is enabled, the DFM listener will start with the server.
- dfm_app
-
Specifies the application name of the location of deferred requests and reports.
- dfm_dir
-
Specifies the physical location of the deferred requests and reports, if the dfm_app value is not set.
- Execution
-
- sched_service
-
This is the agent service that the DataMigrator Scheduler will use when running DM flows. If this is not set, the DEFAULT service will be used.
- sched_restart_interval
-
Specifies the time interval in seconds between restart attempts for all restartable flows. The default value is 60.
Note: This value cannot be less than 0.
- sched_restart_failed
-
Specifies the number of times that failed agents will be restarted. If the value is 0, they will not be restarted. If it is -1, they will be restarted indefinitely. The default value is -1.
- CMASAP_clear_interval
-
Specifies how often CMASAP agents are removed from the agents list, in seconds. When set to -1, this is never. The default value is 300.
- Logging and Output
-
- sched_log_lines
-
Maximum number of lines that the DataMigrator Scheduler is to write to the log for each flow. When the maximum number of lines is reached, logging stops. When set to -1, the number of lines is unlimited. When set to 0, there is no logging.
The default value is set to 20.
Note: Some essential lines will still be imposed into the ETL LOG, even when the number of lines (sched_log_lines) is limited to a positive integer.
- sched_standalone_log
-
Select this option to have a separate log file for every job.
- sched_dmlog_app
-
The name of the application in which the individual log and statistics files are located. This option is only applicable if you select sched_standalone_log.
- sched_log_commit_interval
-
Specifies the maximum time interval in seconds that can elapse before log data is committed to the DataMigrator log. The default value is 10.
- sched_log_commit_maxlines
-
Specifies the maximum number of log lines to collect before committing them to the DataMigrator log. The default value is 1000.
- Merge formatted output into log
-
Select this option to set the output from a report to go to the log. Only text output is displayed to a maximum width of 80 characters. This is the prior behavior.
Note: To view report output, in the browser, right-click on the flow name and click Logs. Then, click Last Output to view the output from the last run, or select Log and Statistics. For Report Range select All, and then right-click the job id in the report and click Show Output.
- dfm_maxage
-
Specifies the maximum number of days that deferred reports are kept.
- dfm_maxoutput
-
Specifies the maximum size of a deferred report.
- E-mail Notification
-
- On Start
-
Sends an email when the Scheduler starts.
- On Completion
-
Sends an email when the schedule completes.
- On Failure
-
Sends an email if the schedule fails.
- sched_max_att
-
Specifies the email attachment size limit, in Kb.
- sched_email_address
-
Enter an email address, user ID, or procedure name.
- dfm_email
-
If this option is enabled, the schedule specified for server wide email will be followed.
- dfm_email_from_userid
-
If this option is enabled, the email address associated with the user ID will be retrieved from the security provider.
Note: Before you can use email notification, you must configure an email server. For more information, see How to Configure the Server for E-mail Notification.
Procedure: How to Start or Stop the Scheduler
- From the DMC, connect to the server with an administrator user ID.
- Expand the Workspace folder, and then expand the Special Services and Listeners folder.
- Right-click SCHEDULER.
If the Scheduler is running, select Stop.
If the Scheduler is not running, select Start.
Procedure: How to Update Passwords
APPLICATION-level administrators can change their configured passwords from the DMC.
- In the
DMC, right-click the server name, point to My Console,
and then click Change Password.
The User Information dialog box opens.
- Enter your current operating system password in the Current Password field.
- Enter the password in the New Password and Confirm Password fields.
- Select the Update operating system password or Update password in admin.cfg, server will be restarted check box.
- Click Update.
Note: Changes to the password will take effect the next time the server or scheduler is restarted.
Procedure: How to Configure the Server for Email Notification
To enable email notifications, you must first configure an SMTP service. (You need to set up your server for email before it will work anywhere in the flow.)
- In the
DMC, right-click the Workspace folder, point to Workspace SET, and
click SMTP Server Settings.
The E-mail SMTP Server dialog box opens, as shown in the following image.
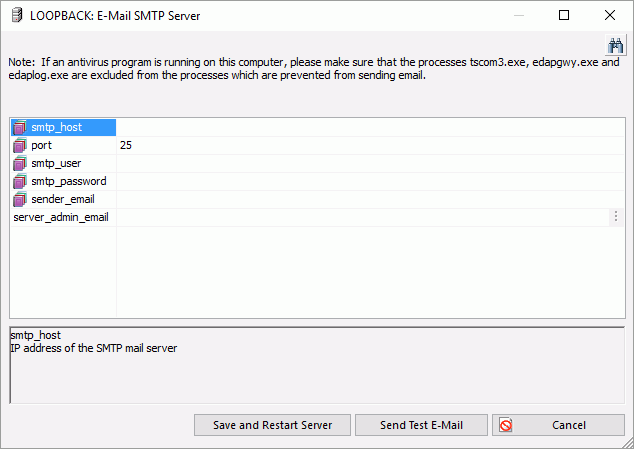
Note: If an antivirus program is running on this computer, please make sure that the tscom3.exe, edapgwy.exe, and edaplog.exe processes are excluded.
- Enter
the following information:
- smtp_host. Defines the IPv4 address of the SMTP email server. The address can be in standard dot notation (for example, smtpmail.yourcompany.com).
- port. Specifies that the mail server is bound to the TCP port that is shown.
- smtp_user. The user ID to the SMTP server. This value is optional.
- smtp_password. The password to the SMTP server. This value is optional.
- sender_email. Defines the email address of the sender, which appears in the 'From' field in emails (for example, yourname@yourcompany.com).
- server_admin_email. Defines the email address of the recipient (for example, yourname@yourcompany.com).
- Click Save and Restart Server.
- After
configuring SMTP services, go to the Web Console Scheduler Configuration
page and select a sched_email option:
- off
-
Never send email.
- completion
-
Send email when a flow finishes.
- failure
-
Send email when a flow fails.
Note: This setting applies to every flow.
Procedure: How to Edit the Server Configuration
- In the
DMC, right-click
the Workspace folder, point to Workspace SET, and then click Miscellaneous
Settings.
The Miscellaneous Settings dialog box opens, as shown in the following image.
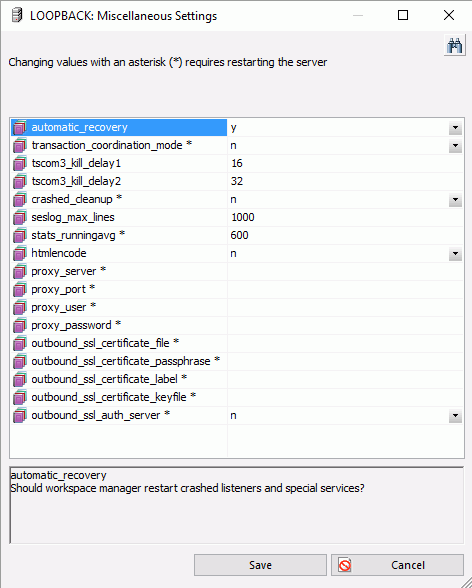

The following Miscellaneous Settings are saved in the edaserv.cfg file:
- automatic_recovery
-
Determines whether the server will automatically recover crashed listeners and/or special services. The default is n.
- transaction_coordination_mode
-
Selecting y, activates the iWay Transaction Coordinator. A Two-Phase Commit will be used when XA-Compliant databases participate in a transaction. The default is n.
- tscom3_kill_delay1
-
Defines the time (in seconds) allowed for an agent to stop before soft kill is sent. The default is 16.
- tscom3_kill_delay2
-
Defines the time (in seconds) allowed for a soft kill to work before a hard kill is sent. The default is 32.
- crashed_cleanup
-
By default, crashed agents are kept in the agents table for diagnostics purposes, and are only removed when they are explicitly killed. When this set to y, crashed agents are automatically removed from agents list when the Workspace Manager detects a crash. The default value is n.
- crashed_max_dump
-
If crashed_cleanup is set to y, this determines the number of memory dump files retained for later diagnosis.
- stats_runningavg
-
Defines the time window in seconds for the calculation of running response time averages. The default is 600.
- htmlencode
-
Specifies whether to encode HTML tags in data as plain text in order to prevent attacks by inserting executable code into data. Valid values are y and n. The default value is n.
- proxy_server
-
Defines a proxy server, which acts as an intermediary on requests for resources from other servers.
- proxy_port
-
Defines the port number of the proxy server.
- proxy_user
-
Defines a user ID for the proxy server.
- proxy_password
-
Defines a password for the user ID connecting to the proxy server.
- outbound_ssl_certificate_file
-
Required for SSL when using self-signed certificates on i5 systems.
- outbound_ssl_certificate_passphrase
-
Required for SSL when using self-signed certificates on i5 systems.
- outbound_ssl_certificate_label
-
Required for SSL when using self-signed certificates on i5 systems.
- outbound_ssl_certificate_keyfile
-
Required for SSL when using self-signed certificates on i5 systems.
- outbound_ssl_auth_server
-
Required for SSL when using self-signed certificates on i5 systems.
- seslog_max_lines
-
Defines the upper limit for the number of rows in a session log. When the limit is exceeded, only the latest records will be kept in the session log and the number of records will equal the limit. The default is 1000.
- popup_timer
-
Defines the time in seconds to wait before the popup timer appears. The default is 5.
- Make your changes, and click Save.
For details on the server configuration, see the Server Administration manual.
Procedure: How to Set a Value for Global Variables
- In the
DMC, right-click
the Workspace folder, point to FOCUS Sets and Info, and then click Core Engine
Global Variables.
The Core Engine Global Variables dialog box opens.
- Click Add New.
- From the Command drop-down menu, select DEFAULT or SET.
- In the Name box, enter the name for the global variable. Do not use ampersands.
- In the Expression box, enter the value of the variable, enclosed in single quotes for character values.
- Click Save.
- Click Cancel.
Procedure: How to Create a Backup of Server Configuration Files
- In the DMC, expand the server and then expand the Workspace folder.
- Right-click the Configuration Files folder and click New Backup.
- Click OK to confirm the backup.
Procedure: How to Restore Server Configuration Files
- In the DMC, expand the server and then expand the Workspace folder.
- Right-click
the Configuration Files folder and click Manage
Backups.
The Configuration Files Backup dialog box opens.
- Right-click the file you want to restore, or expand it and right-click on a specific file. Click Restore.
Procedure: How to Update Application Settings
Application settings control some aspects of use of application directories. You must be a server administrator to change any of these settings, and they require a restart of the server to take effect.
When you connect to the server, a temporary directory called foccache is added as the first directory in the search path. When you want to be able to reuse data within the same session, you can store the data in the form of a HOLD, SAVE, or SAVEB file in the foccache directory. As long as the session remains active, the files stored in the foccache directory can be referenced in requests. Foccache is also used to store some system created temporary files.
To change server application settings:
- From the DMC, log on with a server administrator user ID.
- Right-click
the Workspace folder, point to Workspace SET, and
click Application Settings.
The Application Settings dialog box opens, as shown in the following image.
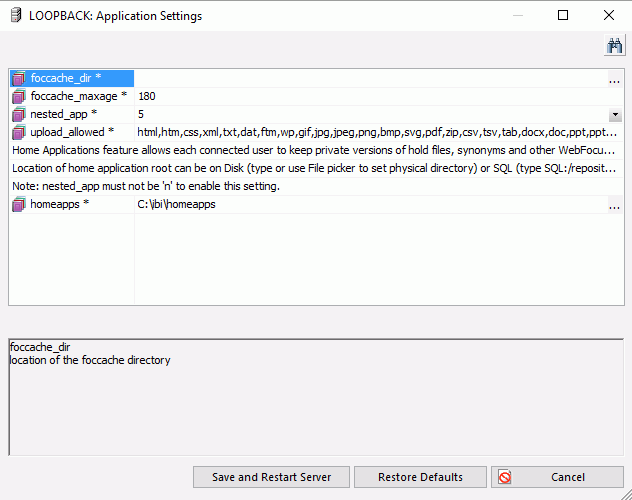
The following options are available:
- foccache_dir
-
Defines the location of the foccache directory. The default location is edatemp/foccache/....
- foccache_maxage
-
Defines the maximum number of minutes that a foccache directory will last. When the maximum foccache retention time is reached, the foccache directory is removed by the server and can no longer be referenced. The default is 180 minutes.
- nested_app
-
When set to y, nested applications are enabled. This is the default value. To disable, set to n.
- upload_allowed
-
Lists the file extensions that are allowed for upload files.
A home application directory provides each user with a private application directory with full access privileges to store private focexecs and data for the test runs and ad hoc reports.
- homeapps
-
The operating system specific pathname. Defines the location of home application root directory. If defined, each connected user will see the My Home applications folder on the Application tree. User can create new applications (home applications) in this folder. These applications will be visible and available only to the connected user and the server administrators. The user will have full access to their home applications. For this setting to work, nested_app should be set to y.
- Make any necessary changes and click Save and Restart Server.
Procedure: How to Make a Global Variable Persistent in a Session
Global variables can be used by various users, regardless of the fact that each user has their own profile, by changing a listener configuration property.
Note: This is available for HTTP Listener only.
- In the DMC, expand the Workspace folder.
- Expand the Special Services and Listeners folder and right-click TCP/HTTP.
- Click Properties of HTTP.
The Listener Configuration dialog box opens.
- Expand the Sessions Control section.
- Select 1 in
the PERSISTENT_GLOBAL drop-down menu, as shown in the following
image.
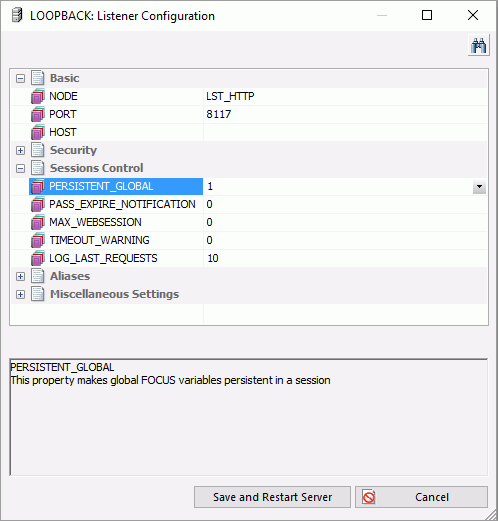
- Click Save and Restart Server.
The values of any global variables will now be kept active as long as you stay connected to the server.
| WebFOCUS | |
|
Feedback |