The Resource Management ribbon provides options for configuring Resource Management, as shown in the following image.

The following sections provide detailed explanations for each option in the ribbon.
The Resource Management ribbon provides options for configuring Resource Management, as shown in the following image.
The following sections provide detailed explanations for each option in the ribbon.
|
|
|
When you enable Resource Management, it automatically turns on monitoring. However, you can disable and re-enable monitoring at any time.
|
|
|
When disabling Resource Management, a confirmation window will be displayed. Click OK to disable Resource Management or Cancel to leave it enabled.
Note: In prior releases of the WebFOCUS Reporting Server, the following line was added to the EDASPROF.prf file when Resource Management is configured and enabled.
SET SMARTMODE=ON
It was possible to remove this line manually to disable the product rather than use the option detailed above. That SET command is no longer used and the only way to Disable/Enable the product is as documented above.
|
|
|
The Reporting Server will write all information regarding monitored sources to a log file. This log file is then archived to the Resource Management repository at predetermined intervals or limits, while the server is running. The current log is also archived when the server starts or when the administrator submits a job from the Web Console of a running server.
The intervals or limits can be configured from the Logging option in the Resource Management Web Console. When configured, the log file of an active server will be archived based on the maximum number of sessions or the days set, or based on a scheduled job configured by the administrator.
|
|
|
Logging properties can be configured in the Resource Management Web Console. When configured, the log files will be archived based on the maximum number of sessions and days set, or based on a scheduled job configured by the administrator.
The Logging Properties pane opens, as shown in the following image.
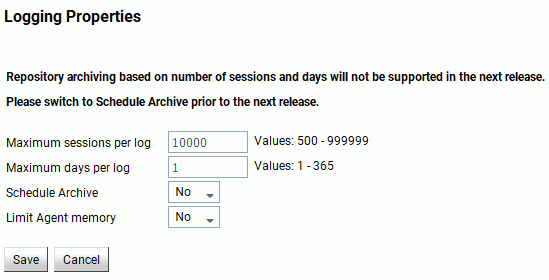
The following options are available:
The number of sessions recorded in the active log file before the log is archived and a new log is started. The default value is 10000. This option is only available if Schedule Archive is set to No.
The number of days an active log file is kept open before it is archived and a new log is started. The default value is 1. This option is only available if Schedule Archive is set to No.
When set to Yes, only the Limit Agent memory option for interim log records is shown and the administrator has to configure the schedule archive settings. For more information, see How to Schedule an Archive.
When set to No, automatic archiving is active and based on the two additional settings. The default value is No.
Note: To use the scheduler feature for archiving the log file, the server Scheduler process must be running. To check this, from the Web Console, click the Workspace option on the sidebar. Expand the Special Services and Listeners folder, right-click SCHEDULER, and click Start. If the Start option is not available, the scheduler is already running. If Resource Management and setting Schedule Archive to Yes are done in the same Web Console session, the Scheduler will need to be restarted. To do so, right-click SCHEDULER and click Stop, followed by Start.
This setting is used for a connection during which multiple procedures are run within the session. This type of connection can cause the Resource Management logging process to use a large amount of memory before the log records are written to the physical disk file (rmldata.log).
When set to Yes, enter a value between 5 and 99 (in megabytes). When this parameter is set to Yes and the specified amount of memory is reached, the connected user log records in memory are written to a temp disk file and the memory is freed.
At this point any new log records generated will be written to disk instead of memory until the end of the session. At this time, all the log records in the temporary disk file are written to the physical disk file (rmldata.log). This setting should only be used if excessive memory usage is observed and users are connected for long periods.
|
|
|
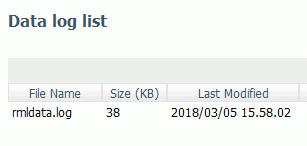
The Data log list pane opens, as shown in the following image.
If you right-click any item in any column, the following options are available:
|
|
|
When this option is selected, a context menu is shown with the following options:
Note: This option is only available when Schedule Archive is set to Yes. For more information on logging properties, see How to Set Logging Properties.
These give the administrator the option to archive the current log file (a new log file is automatically started), as well as view previous archive jobs, including any that were submitted due to server restart or any of the intervals or limits mentioned above having been reached. For more information, see How to Submit an Archive of the Current Log File.
Note: After a successful archive, the log file is deleted. If the archive fails, the log file will remain available for archiving. The failure should be investigated and corrected. Once this is done, the List Unarchived Log Files option can be used to archive the data. For more information, see List Unarchived Log Files.
|
|
|
The archive process uses two steps. The first step will use the Bulk Load facility to move the monitored data to a staging/temporary table and then issue a SQL MERGE syntax to insert the data into the repository. This means that the adapter connection to the repository environment must have correct privileges to create a table.
If the RDBMS repository vendor supported by Resource Management supports bulk load and the environment is correct, the archive process will attempt to issue bulk load commands. If they fail, the archive will fall back to previous methods of inserting monitored data.
Bulk load is transparent except for the following:
See How to Set Monitor Properties for details on how to set the load type to another value other than bulk load.
|
|
|
Note: Only one archive can be scheduled at a time.
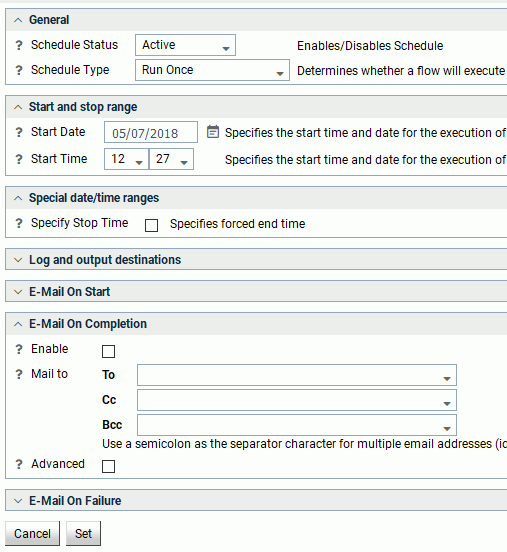
The Manage Schedule and E-Mail for procedure pane opens, as shown in the following image.
The Manage Schedule and E-Mail for procedure pane contains the following fields and options:
Determines if there is a schedule and if so, whether the schedule is active or inactive.
These options control where the log information from the Maintenance Job should be sent when the Job finishes.
The following options are available:
Multiple options can be selected. ETLLOG and E-Mail are selected by default.
Select this to enable when an email should be sent.
The email addresses where the messages will be sent. Place each email address (or user ID configured on the server with an associated email address) on a new line with no separators.
Select this option to get the following options:
The Manage Schedule and E-Mail for procedure pane contains the following additional fields and options:
Determines whether a process flow will execute once, on a recurring basis, on several specific days (multi-day), or when the server starts.
Specifies the interval in which a process flow will be executed. For example, if you select Month as your Interval Type, and select 2 as your Interval Number, the flow will execute every two months. This option is only available if the schedule type is set to Recurring.
Specifies the frequency at which a process flow will be executed. For example, if you select Week as your Interval Type, and select 2 as your Interval Value, the flow will execute every two weeks. This option is only available if the schedule type is set to Recurring.
Specifies the start date for the execution of the process flow.
Specifies the start time for the execution of the process flow using 24-hour time.
Allows you to specify an end time for the execution of the process flow using 24-hour time. This option is only available if the schedule type is set to Run Once or Multi-Day.
Specifies the end date for the execution of the process flow. This option is available if Specify End Date is selected.
Specifies the end time for the execution of the process flow using 24-hour time. This option is available if Specify End Date is selected.
Specifies the day of the week on which the process flow will be executed. This option is only available if the schedule type is set to Recurring or Multi-Day.
Specifies the day of the month on which the process flow will be executed. This option is only available if the schedule type is set to Recurring or Multi-Day.
Specifies the beginning of the daily time span of the process flow using 24-hour time. This option is only available if the schedule type is set to Recurring and the interval type is set to time, such as Minutes.
Specifies the end of the daily time span of the process flow using 24-hour time. This option is only available if the schedule type is set to Recurring and the interval type is set to time, such as Minutes.
Specifies the option to execute the process flow on desired holidays.
The following options are available:
This option is only available if the schedule type is set to Recurring or Multi-Day.
A confirmation dialog box opens.
|
|
|
This report runs for the user whose ID value is stored in the sched_scan_id of a Scheduler. The Scheduler must be active to run the Scheduler Agents report.
The Scheduler Agents pane opens, as shown in the following image.

The following buttons are available on the Scheduler Agents pane:
If you right-click a drill-down item in the Procedure column, the following options are available:
|
|
|
Note: The Scheduler must be active to run the Scheduler Events report.
The Scheduled Events pane opens, as shown in the following image.
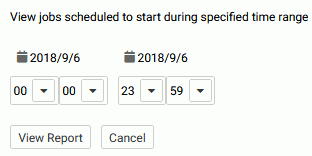
The report opens, as shown in the following image.

This report shows all flows and procedures scheduled to run during the time period you selected. The Run Date and Run Time columns show their scheduled run times. The User ID column shows the user ID used when running the flow or procedure.
|
|
|
The Warning dialog box opens.
|
|
|
The Deferred List opens showing the saved logs, as shown in the following image.

If you right-click an item in the Defer ID column, the following options are available:
|
|
|
Select this option to show a list, if any exist, of previous log files that have not been archived.
|
|
|
The Resource Management unarchived logs list opens, listing the non-archived logs.
|
|
|
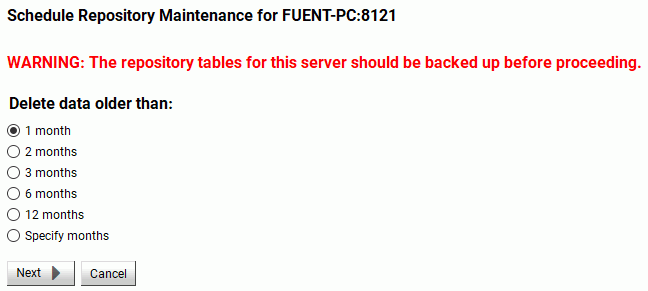
Repository data can be deleted once it has been used or reported on. This deletion can be by date range or, if sufficient data has been stored, the data can be deleted if it is more than one, three, or six months old.
|
|
|
The Resource Management Schedule Repository Maintenance pane opens, as shown in the following image.
The Manage Schedule and E-Mail for procedure pane opens, as shown in the following image.
The Manage Schedule and E-Mail for procedure pane contains the following fields and options:
Determines if there is a schedule and if so, whether the schedule is active or inactive.
These options control where the log information from the Maintenance Job should be sent when the Job finishes.
The following options are available:
Multiple options can be selected. ETLLOG and E-Mail are selected by default.
Select this to enable when an email should be sent.
The email addresses where the messages will be sent. Place each email address (or user ID configured on the server with an associated email address) on a new line with no separators.
Select this option to get the following options:
The Manage Schedule and E-Mail for procedure pane contains the following additional fields and options:
Determines whether a process flow will execute once, on a recurring basis, on several specific days (multi-day), or when the server starts.
Specifies the interval in which a process flow will be executed. For example, if you select Month as your Interval Type, and select 2 as your Interval Number, the flow will execute every two months. This option is only available if the schedule type is set to Recurring.
Specifies the frequency at which a process flow will be executed. For example, if you select Week as your Interval Type, and select 2 as your Interval Value, the flow will execute every two weeks. This option is only available if the schedule type is set to Recurring.
Specifies the start date for the execution of the process flow.
Specifies the start time for the execution of the process flow using 24-hour time.
Allows you to specify an end time for the execution of the process flow using 24-hour time. This option is only available if the schedule type is set to Run Once or Multi-Day.
Specifies the end date for the execution of the process flow. This option is available if Specify End Date is selected.
Specifies the end time for the execution of the process flow using 24-hour time. This option is available if Specify End Date is selected.
Specifies the day of the week on which the process flow will be executed. This option is only available if the schedule type is set to Recurring or Multi-Day.
Specifies the day of the month on which the process flow will be executed. This option is only available if the schedule type is set to Recurring or Multi-Day.
Specifies the beginning of the daily time span of the process flow using 24-hour time. This option is only available if the schedule type is set to Recurring and the interval type is set to time, such as Minutes.
Specifies the end of the daily time span of the process flow using 24-hour time. This option is only available if the schedule type is set to Recurring and the interval type is set to time, such as Minutes.
Specifies the option to execute the process flow on desired holidays.
The following options are available:
This option is only available if the schedule type is set to Recurring or Multi-Day.
A confirmation dialog box opens.
|
|
|
The Schedule Repository Maintenance - Update pane opens, as shown in the following image.

If you right-click a drill-down item in a column, the following options are available:
Log and Statistics. Opens the Log and Statistics pane that enables you to view a log or statistics report.
The following options are available:
The Scheduler must be active to run the Scheduler Events report.
This report shows all flows and procedures scheduled to run during the time period you selected. The Run Date and Run Time columns show their scheduled run times.
The User ID column shows the user ID used when running the flow or procedure.
Older than. Opens the Resource Management Schedule Repository Maintenance - Change pane. Select the new time range of data that you want to delete and click Save.
|
|
|
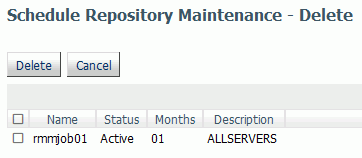
The Schedule Repository Maintenance - Delete pane opens.
|
|
|
The Resource Management Repository Maintenance pane opens, as shown in the following image.
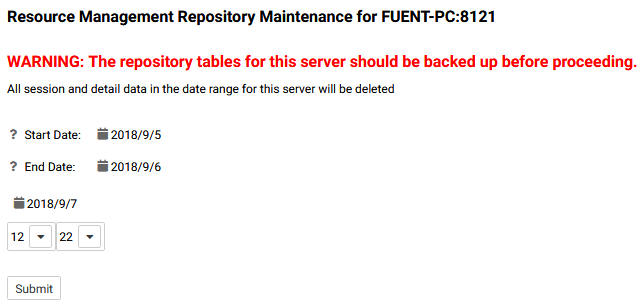
Note: Caution should be used when using this utility. Make sure you have a backup of the data before you proceed.
The Submit Repository Maintenance Job pane opens.
A Deferred Execution pane opens confirming your request.
|
|
|
The list of jobs opens, as shown in the following image.

|
|
|
This option allows you to convert the repository from either FOCUS to Relational or Relational to Relational. Before starting the reconfiguration process, you must create an adapter connection that points to the location of the new repository.
|
|
|
The Repository Reconfiguration pane opens, as shown in the following image.
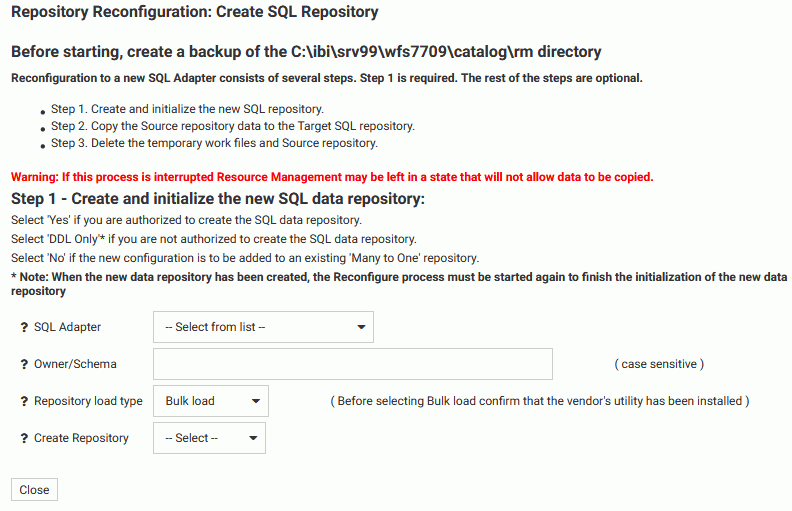
If the tables are to be created in an alternate database that the owner has rights to and the technique is supported by the RDBMS, the database name must be specified as well (for example, database.owner).
When No is selected, the configuration process will not issue DROP TABLE, DROP INDEX, CREATE FILE, and CREATE INDEX commands. Because the configuration process will always initialize the repository with default data and issue the default GRANTS, the repository must exist when the commands are executed or the configuration will fail.
If you are not authorized to create the SQL data repository, select DDL Only.
The Copy Data pane opens.
Once you select Yes, you can select a date range to copy data in smaller portions, instead of all at once, using the calendar fields provided.
Once the data has been copied, a Deferred Execution pane opens showing the request.
|
|
|
Once you have created and initialized a SQL data repository, you can resubmit a copy job. This is done if there were any errors during the initial copy job, if the job did not run to completion, or if you want to select a different data range to copy. To submit a new job:
The Repository Reconfiguration: Copy Data pane opens.
Once the data has been copied, a Deferred Execution pane opens showing the request.
|
|
|
The Deferred List pane opens.
If you right-click an item in the Defer ID column, the following option is available:
|
|
|
Once new repository and support files are created, you can delete temporary and old repository work files. To delete these files:
The Repository Reconfiguration: Delete work files pane opens.
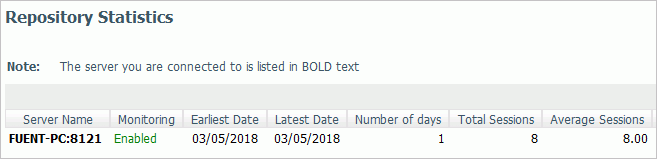
The Repository Statistics pane opens, as shown in the following image.
|
|
|
For more information on how to migrate Resource Management, see Migrating the Resource Management Repository.
|
|
|
The Configuration command has the following options:
These give the administrator the option to see current configuration settings, as well as change the viewable application directories, change a license key, and remove the current Resource Management configuration.
|
|
|
Setting monitor properties enables you to select global settings and the component levels to be monitored. Components are split into two categories, Procedure and Command. The information that Resource Governor monitors is stored in the Usage Monitoring tables. The default setting for Global Data Request monitoring is Off and the default setting for Component Level is Command. Session records are always captured.
|
|
|
To view Resource Management Properties:
The General Properties pane opens.
The Resource Management Properties pane shows the following fields:
The date that Resource Management was configured or reconfigured.
The product that is currently configured to Resource Management. Depending on which license key was used, the configuration type will be Resource Analyzer, Resource Governor, or Resource Analyzer Resource Governor.
The repository that is being used.
The data adapter connection of the current configuration.
The owner/schema name for the relational adapter that Resource Governor will use to create the repository tables.
Indicates whether Data Request Monitoring is on or off. When Global Data Request Monitoring is enabled, or set to On, Resource Governor collects information on all SQL SELECT and FOCUS TABLE, TABLEF, MATCH, GRAPH, MODIFY, and MAINTAIN requests. The default value is Off. Monitoring will be done by individually selected data sources.
Indicates the level of Procedure Request Monitoring.
The number of application data sources and relational pass-thru data sources that have been enabled for monitoring. This will show Global monitor enabled if Data Request Monitoring is on. See the Global Settings section below for more information.
The number of application data sources and relational pass-thru data sources that have been disabled by setting the monitoring setting to OFF.
The number of procedures that have been excluded from monitoring.
The date the repository was modified using the Repository Maintenance pane.
The last time the repository updated to include data from a log file.
|
|
|
To set Resource Management Properties:
The Settings pane opens, as shown in the following image.
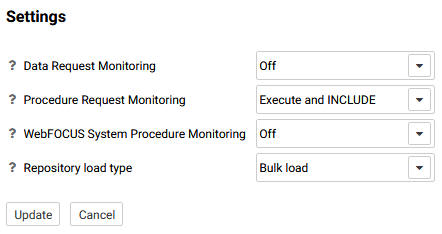
The Settings pane has the following options:
Indicates whether Data Request Monitoring is on or off. When Global Data Request Monitoring is enabled, or set to On, Resource Governor collects information on all SQL SELECT and FOCUS TABLE, TABLEF, MATCH, GRAPH, MODIFY, and MAINTAIN requests. The default value is Off. Monitoring will be done by individually selected data sources.
Indicates the level of Procedure Request Monitoring. The following options are available:
Indicates the load method that will be used to add log data to the data repository. The following options are available:
After the data is loaded into the temporary table using either load method, the MERGE command is then used to merge the data from the temporary table into the data repository.
|
|
|
The amount of data stored in the repository can be controlled by selecting the record types logged for each connected session. Collecting all of the records can give a complete overview of what each connected user is doing and is a good first step in determining what resources are being consumed and which procedures, data sources, and fields are being used and by whom. But collecting everything can stress the data repository, whether a FOCUS or Relational Database Management system is being used. Some of the tables are more geared towards the Resource Governor feature and others are used just for the Resource Analyzer feature. The Functions and WHERE/IF records are mainly used by the Resource Governor, but there are several reports in Resource Analyzer that will report on that data as well. From the Web Console Resource Management tab you have the option to add or remove any record type from the logging process using the Configuration/Properties/Repository menu in the Web Console ribbon or the Resource Management node on the tree.
To set Resource Management Repository Properties:
The Repository Properties pane opens. The pane, as shown in the image below, shows the default record types collected. You can enable or disable any items on the pane to control when they are to be collected. Some records are required for others to be collected, so by selecting one record, it may cause dependent records to be selected automatically.
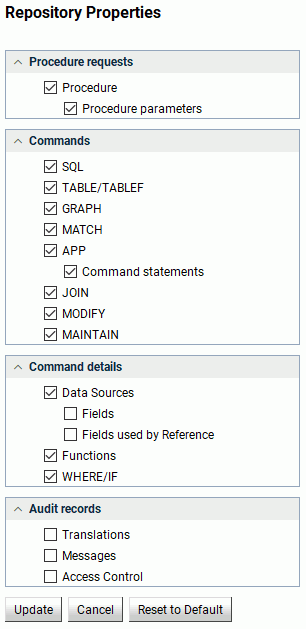
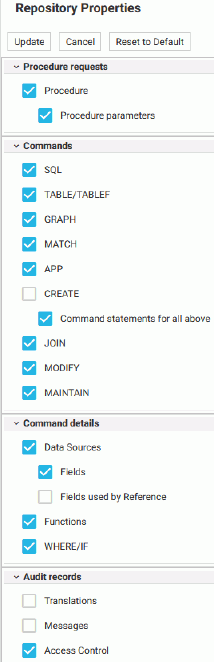
By default all procedures (focexec or SQL Stored Procedure) are monitored unless the Procedure requests log record has been disabled or the procedure has been removed from monitoring using the Remove Procedures from Monitor pane. By default, no data requests are collected unless one or more Data Requests log record types are selected and either Global Monitoring is enabled or at least one data source has been enabled for monitoring using the Add Data Sources to Monitor pane for each application folder. Also, the application must have Monitoring enabled in the Application properties pane.
Note: The All Data option in Release 7.6 also collects SORT and Functions. In Release 7.7, SORT has been included in Fields, and Functions has its own dialog box.
The Commands option in Release 7.7 also collects information about remote requests from a HUB-SUB configuration and, if active, Resource Governor records.
Resource Management will always collect session records and this feature cannot be turned off.
By default, command records (for example, a TABLE command being issued) will also be collected for a data resource that is not being monitored.
The following table shows the relationship between the Repository Properties and the log record types, as well as the corresponding repository entries.
|
Repository Property |
Record Type |
Repository Location |
Comments |
|---|---|---|---|
|
Procedure Requests |
|||
|
Procedure |
RLFX |
SMRPCS |
Each Procedure (for example, FOCEXEC or SQL Stored Procedure) executed will cause a RLFX record to be collected. |
|
RLFW |
SMRPCWF |
The RLFW record will only be collected if the session was started by a connection from the WebFOCUS Client or WebFOCUS self-service application. The RLFW record is added to the SMRPCWF table or segment. Only one RLFW record will be collected for the primary procedure, but several RLFX may be collected for a session. |
|
|
Procedure statements and parameters |
RLFC |
SMRPCREQUESTS (table) SMRPCSCMD (segment) |
Contains the EX statement and the parameters or the -INCLUDE record. The actual command is executed. The RLFC records are collected if enabled and the Procedures are being collected. |
|
Repository Property |
Record Type |
Repository Location |
Comments |
|---|---|---|---|
|
Commands |
|||
|
RLCD |
SMQUERY |
These settings allow for the customization of command data to be collected. The RLCD record is collected and added to the SMQUERY table or segment. Each data request (for example, TABLE FILE… or SQL SELECT…) executed will cause an RLCD record to be collected. The RLCD can generate two additional child records, RLDG (Governor) and RLDE (request using SUFFIX=EDA data source). These two records cannot be disabled and will always be collected if generated. |
|
|
RLDG |
SMGOVERN (table) SMGOVEND (segment) |
||
|
RLDE |
SMREMOTES (table) SMRMTS (segment) |
||
|
Repository Property |
Record Type |
Repository Location |
Comments |
|---|---|---|---|
|
Command details |
|||
|
Data Sources |
RLDS |
SMFROMS |
The Master File Description/Synonym name or RDBMS table or tables used in a request. There is one record for each data source used in a request. This includes cross-referenced data sources or data sources joined using the JOIN or COMBINE command. |
|
Fields |
RLDF |
SMCOLUMNS (table) SMCOLMNS (segment) |
The fields used, the type of field, and whether it was used in a sort or group in a request. There is one record for each field selected to return data in the request or in a BY or ORDER BY/GROUP BY statement. This record is not collected for fields used in functions or relational tests. |
|
Fields used by Reference |
RLDF |
SMCOLUMNS (table) SMCOLMNS (segment) |
Information about any DEFINE fields used or referenced in a request. The Fields used by Reference are indicated when the SMDEFINE field is set to 5 (Referenced). Referenced fields are fields that are used in a DEFINE in the MFD, DEFINE FILE, or COMPUTE statement to create a virtual field, and the virtual field is used in the request. |
|
Functions |
RLDU |
SMFUNCTIONS (table) SMFNCTNS (segment) |
Data about aggregate functions used on fields. There is one record for each function used containing the aggregation function used and the field it was used on. |
|
WHERE/IF |
RLDR |
SMRELATIONS (table) SMRELTNS (segment) |
Data on the Relational tests used in a request, such as the operator, literals, or date and time values used. There is one record for each WHERE/IF/AND/OR and each record contains the right and/or left data source and field used. It also has the literal, if one was used on the left or right-hand side of the clause, and other information pertinent to a relational test clause. |
|
Repository Property |
Record Type |
Repository Location |
Comments |
|---|---|---|---|
|
Audit records |
|||
|
Translations |
RLAU |
SMAUDIT |
Contains the translated request if translation is required. If a WebFOCUS TABLE request is for a relational data source, the translated SQL, which is sent to the RDBMS, will be monitored. The RLAU records are collected if enabled and the data request statements are being collected. |
|
Messages |
RLAU |
SMAUDIT |
Messages that are issued during the processing of a request will be monitored. |
|
Access Control |
RLAU |
SMAUDIT |
Information about the changes to server configuration files, applications, and files. The data shows the timestamp, the user ID of who made the change, and the TCP address the change originated. |
The following table shows the comparisons between the Monitoring settings in 7.6, and earlier releases, and the Command Log Records settings in Release 7.7.
|
Release 7.6 |
Release 7.7 |
|---|---|
|
Monitoring Settings |
Command Log Records |
|
All Data |
Select all |
|
Query, Froms, Relations, and Columns |
Commands, Request, Data Sources, WHERE/IF, and Fields |
|
Query, Froms, and Relations |
Commands, Request, Data Sources, and WHERE/IF |
|
Query and Froms |
Commands, Request, and Data Sources |
|
Query only |
Commands and Requests |
|
|
|
You can configure the application path to set the viewable directories for Resource Governor.
|
|
|
The Application Path Configuration pane opens, as shown in the following image.
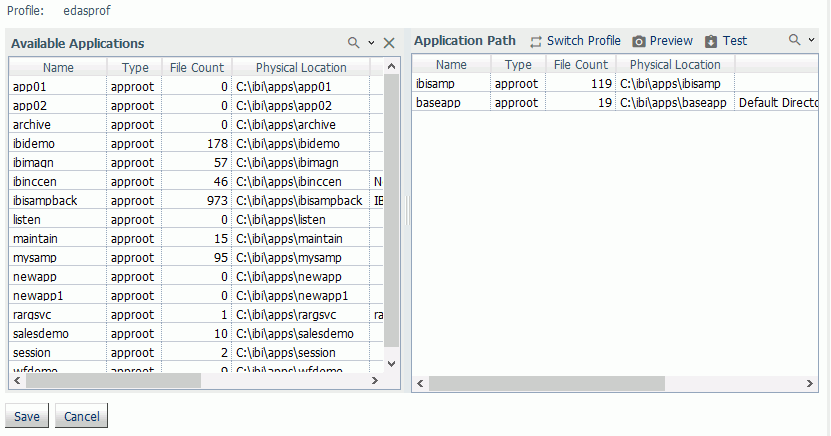
Refresh the navigation pane to see the newly added or removed directory.
|
|
|
For more information on how to migrate Resource Management, see Migrating the Resource Management Repository.
|
|
|
A license key is required to run Resource Governor. You can change the license key you are using from within Resource Management at any time.
|
|
|
The Resource Management Configuration pane opens showing your current license.
|
|
|
You can remove Resource Management from the server from the Resource Management Configuration pane. This is required if you want to change the repository type from FOCUS to relational, or relational to FOCUS.
|
|
|
The Delete Configuration pane opens.