Setting Up Project Metrics
The Project Metrics capability in PMF allows you to:
- Create a project dimension for aggregating metrics data by project.
- Link project metrics to projects in the drill workflow.
- Link project metrics to one or two additional dimensions.
- Keep a history of project data in the PMF metrics history linked to time.
Setting up the capability requires a series of steps to be completed. Many of these steps can be simplified by merging in the pre-built Projects Metrics snapshot.
Procedure: How to Add the Project Metedata Folder to the PMF App Path
Note: This step must be done before any other steps and/or before merging the Product Metrics Snapshot.
You need to map the app path in your tenant profile for PMF. If you have a single-tenant install, which is typical, you need to do this in the pmf_base or pth_pmf_base profile file.
- Map your [drive]:/approot/pmfdbms/pmfdb_system/pmfdb_system_[rdbms] to the logical ddname project_base .
The following shows an example for MS SQL Server in a typical Windows platform installation:
APP MAP project_base "C:\ibi\apps\pmfdbms\pmfdb_system\pmfdb_system_sqlmss"
- In PMF, click the Manage page.
- Click the Settings panel button and click System.
The Edit System Settings: System panel opens.
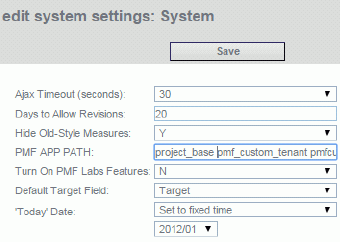
- In the PMF APP PATH box, type project_base to the beginning of the path already specified, as shown in the following image.
- Click Save.
Procedure: How to Create and Harvest Data for a Project Dimension
Note: This step can be skipped if you merge the Product Metrics Snapshot into PMF.
- In the Manage page, click the Dimensions panel button.
- Click New. The New Dimension panel opens.
- Create a new dimension and specify that it is related to Projects. Harvest the data for this new dimension from pm_prj_vw, as shown in the following image.

- Click Save and then click Load to harvest the data for the dimension.
If you click Schedule, you can schedule the data harvest for a regular update.
Note: PMF Dimension names are limited to 30 characters, whereas Project names can be up to 50 characters.
For a Dimension load to be successful, all Project names must be unique within the first 30 characters. Any Projects that are not unique within the first 30 characters must be renamed.
The following SQL can be used to identify non-unique Project names:
  select substr(PROJECT_NAME, 1, 30), count(*) from PM_PRJ group by
substr(PROJECT_NAME, 1, 30) having count(*) > 1 ;
The following FOCUS procedure can also be used to identify non-unique Project names:
DEFINE FILE PM_PRJ
   PROJECT_NAME30/A30 = EDIT(PROJECT_NAME, '999999999999999999999999999999') ;
END
TABLE FILE PM_PRJ
   SUM CNT.PROJECT_ID
   BY PROJECT_NAME30
   WHERE TOTAL CNT.PROJECT_ID GT 1
END
Procedure: How to Configure Additional Dimension Settings
Note: This step must be done if you want additional Dimension support for Project Metrics.
You can configure additional Dimensions for your Project Metrics, which will allow you to:
- Aggregate and summarize Project Metrics by these additional Dimensions.
- Limit display of Project Metrics on Dashboards and reports while a Dimension filter is in force.
To configure additional Dimensions for Projects:
- In the Manage page, click the Settings panel button.
- Click Project.
The Edit System Settings panel opens.
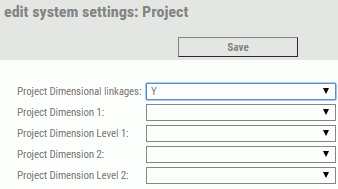
- In the Project Dimensional linkages drop-down menu, select Y. The panel now displays additional options, as shown in the following image.
- In the Project Dimension 1 and Project Dimension 2 drop-down menus, select the desired dimensions.
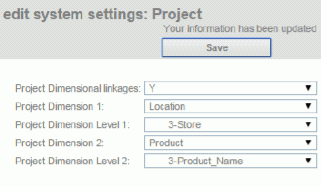
- In the Project Dimension Level 1 and Project Dimension Level 2 drop-down menus, select the dimensions levels to which you
want to link the Project Metrics.
The following image shows an example of the options selected.
 Note:
Note:- Project Metrics can only be linked to a single level on each Project Dimension. All levels above the chosen level will be aggregated. Any levels below the chosen level will be able to be harvested.
- You should not select the Project Dimension that was configured in the previous procedure.
- If you want to configure two Dimensions, they must be different from one another.
- If you only want to configure one additional Project Metrics Dimension, leave the Project Dimension 2 and Project Dimension Level 2 fields blank.
Procedure: How to Link Project to the Additional Dimensions
Note: This step must be done if you want additional Dimension support for Project Metrics, and after completing the previous procedure for configuring additional Dimension settings.
Completing this procedure links each Project to the additional Dimension Level values that are dependent on this Project. The results of this are:
- When PMF harvests the data into the Project Sources, it can link the Metrics data for this Project to the keys for the Dimension Levels you select.
- These values affect filtering on reports and Dashboards. Project metrics not linked to these Dimension level values will be filtered out when you list Project metrics.
To perform linking:
- From the Author page, click the Projects panel button.
- Click a project from the list.
The Edit Project panel opens, as shown in the following image.
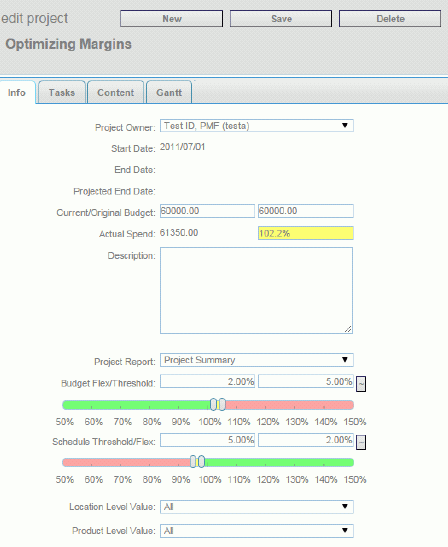
- From the Location Level Value and Product Level Value drop-down menus, select the level values to which you want to link this
Project.Note: This panel shows the Project Dimension 1 name Level, and if you configured two additional Dimensions, the Project Dimension 2 name Level.
- Click Save to complete the linking.
Procedure: How to Configure Project Sources With Needed Datapoints
This step can be partially skipped if you merge in the Product Metrics Snapshot. You will still need to select the additional Dimensions you want to harvest with your Project Metrics.
- Create a new Source for Project Metrics, which harvests data from pmf_prj_vw. The following image is an example of the new source.
 Note:
Note:- The When filters that tell PMF when to count and not count values for each Datapoint.
- The Distinct Count on PROJECT_ID applied to these and that they are configured as Distinct Counts. These prevent double-counting Projects with multiple data records in the same Dimensional Linkage.
- Click the Dimensions Link tab to link up to your additional Project Dimensions and levels. Use the special AUX_DIM_KEY_NATRLn fields available in pm_prj_vw, as shown in the following image.
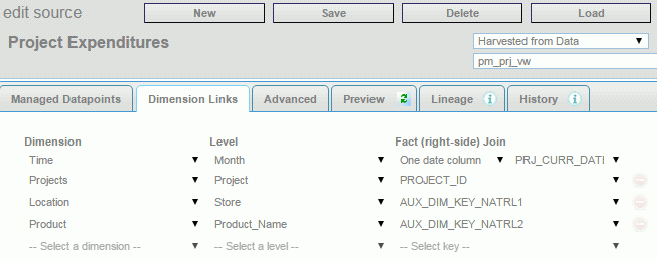
- Click Save to set up the datapoints.
Procedure: How to Create Derived Datapoints and Project Metrics to be fed by the Datapoints
This step can be skipped if you merge in the Product Metrics Snapshot.
Once you’ve set up your Harvested Sources for your Project Metrics in this manner, you can create Derived Datapoints and link Measures up to the Datapoints exposed in the standard way.
Procedure: How to Load the Project Sources Monthly to Keep Your History Up to Date
PMF loads Project Metrics as effective the date of a load. This means that if Project Metrics loads skip any months, the skipped months will remain as gaps in your Project Metrics history.
Due to this, a load must be done at least once a month if you want monthly harvesting with no gaps your Project Metrics. You can choose to load Project Metrics every day to keep them frequently refreshed.
To insure that your Project Metrics are properly loaded each month:
- You can manually load the Project Metrics by going to the Source and clicking Load during any day of each month.
- You can schedule Project Metrics to be loaded at least once each month automatically.
| WebFOCUS | |
|
Feedback |