Summary of Configuration Steps
|
How to: |
This tutorial guides you through the steps that you need to configure the DataDirect ODBC driver for Hyperstage. You must complete the following steps to successfully configure the driver.
- Extract Hyperstage_datadirect.zip.
- Extract DATADIRECT_CONNECT64_ODBC_7.1.6_WIN_64_BRAND.zip.
- The zip file contains the Connect64_for_ODBC71 directory, and about 4674 files and directories, including drivers, utilities, and Help files.
- You can extract Connect64_for_ODBC71 to any directory accessible to the Reporting Server. You can also rename the directory, if needed.
- Configure the driver for Windows using datadirecteg.exe, which is a command line script that updates the Windows Registry for ODBC.
- Remove the existing Hyperstage (PG) Adapter, if configured.
The Reporting Server can only have one Hyperstage (PG) Adapter installed at a time. If Hyperstage (PG) JDBC Adapter or Hyperstage (PG) ODBC PostgreSQL is configured, it must be removed before the ODBC driver can be configured.
- Configure the Hyperstage (PG) ODBC DataDirect Adapter by doing the following:
- Add Hyperstage (PG) ODBC DataDirect Adapter
- Add additional ENGINE settings to the profile where the Adapter is configured.
- Test the Adapter.
Procedure: How to Configure the DataDirect ODBC Driver
The following procedure walks you through a sample configuration for the DataDirect ODBC driver.
- Create a directory that is accessible to the Report Server. This procedure will use the C:\ibi\datadirect directory as an example.
- Extract all of the contents from the Hyperstage_datadirect.zip file into the datadirect directory.
- Extract the Connect_64_for_ODBC71 folder from the DATADIRECT_CONNECT64_ODBC_7.1.6_WIN_64_BRAND.zip file into the C:\ibi\datadirect directory.
- Run the datadirecteg.exe file to configure the ODBC Driver for Windows.
The WinZip Self-Extractor dialog box opens.
- Browse to the C:\ibi\datadirect folder, as shown in the following image.

- Click Unzip, and then click OK, to close the confirmation dialog box.
The data_direct.ps1 and data_direct.bat files are created in the directory.
- Right-click the data_direct.bat file and click Run as Administrator.
- Type the location of the Connect64_for_ODBC_71 directory (for example, C:\ibi\datadirect\Connect64_for_ODBC_71), as shown
in the following image.
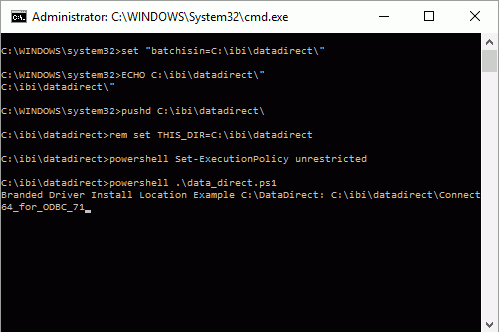
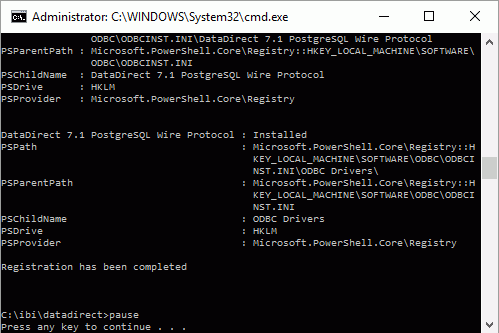
- Press Enter to configure the Driver, as shown in the following image.
- If configured, remove the existing Hyperstage (PG) Adapter by completing the following steps:
- Launch the Reporting Server Console.
- Click the Adapters tab.
- Expand the Configured folder.
The existing Hyperstage (PG) Adapter is shown in the folder, as shown in the following image.
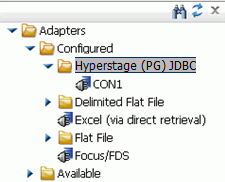
- Right-click the Hyperstage (PG) JDBC folder and click Remove.
- Next, configure the Hyperstage (PG) ODBC DataDirect Adapter by completing the following steps. From the Reporting Server Console:
- Click the Adapters tab.
- Expand the Available folder.
- Expand the SQL folder.
- Expand the Hyperstage (PG) folder.
The ODBC DataDirect option is available, as shown in the following image.
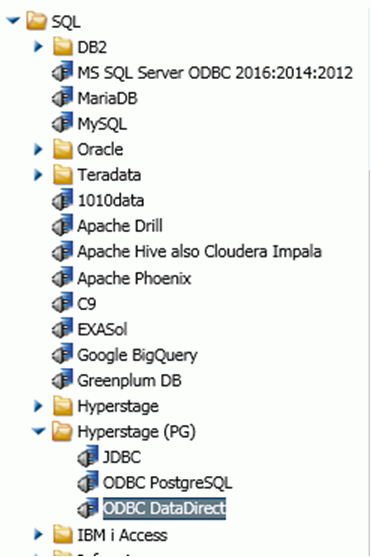
Note: This option is only available if an existing Hyperstage (PG) adapter is removed from your configuration.
- Double-click ODBC DataDirect to add the adapter.
The Add Hyperstage (PG) ODBC DataDirect to Configuration dialog box opens.
- Provide details for the Hyperstage Server to which you are connecting that are specific to your environment. The following
image shows sample parameters.
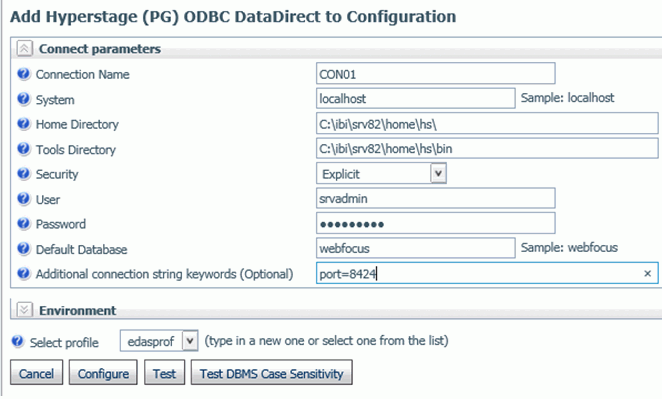
- Click Configure.
A confirmation message opens, indicating that the adapter was successfully added to the configuration.
- Configure additional settings to edasprof. From the Reporting Server Console:
- Click the Workspace tab.
- Expand the Configuration Files folder.
- Double-click the Server Profile - edasprof.prf file, or right-click it and click Open.
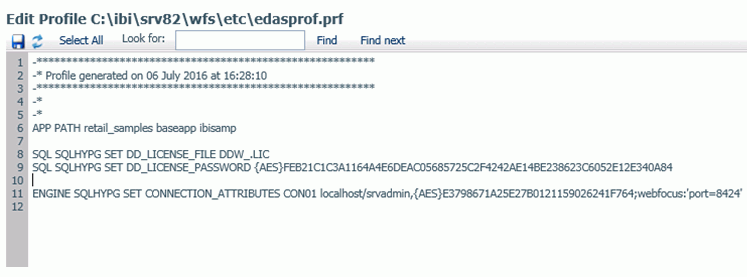
The Edit Profile window opens.
- Add the following text:
SQL SQLHYPG SET DD_LICENSE_FILE DDW_.LIC
SQL SQLHYPG SET DD_LICENSE_PASSWORD {AES}FEB21C1C3A1164A4E6DEAC05685725C2F4242AE14BE238623C6052E12E340A84
Note: This text is also found in the Sample_edasprof_with_DataDirect_ODBC_Settings.txt file that is packaged in the Hyperstage_datadirect.zip folder.
An example of the Edit Profile window with this text is shown in the following image.
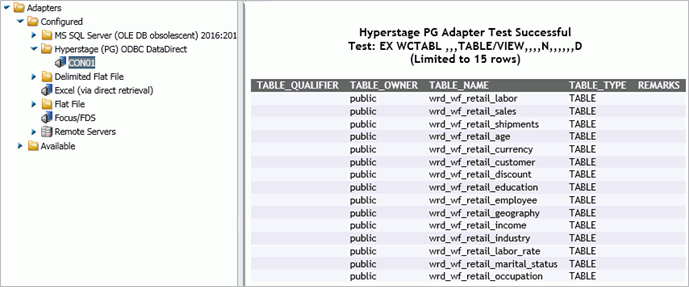
- Test the adapter. From the Reporting Server Console:
- Click the Adapters tab.
- Expand the Configured folder.
- Expand the Hyperstage (PG) ODBC DataDirect folder.
- Right-click CON01 and click Test.
The Hyperstage PG Adapter Test Successful window opens, as shown in the following image.
The DataDirect ODBC driver is ready to be used to retrieve large volumes of data.
| WebFOCUS | |
|
Feedback |