Calling an Update Assist Procedure From an App Studio Report
|
Topics: |
|
How to: |
One way to use an Update Assist procedure is to call it from an App Studio report. You can set up the App Studio report so that a user can click on a row in the report and open the Update Assist procedure with the data from the row of the report.
Procedure: How to Call an Update Assist Maintain Data Procedure From an App Studio Report
- Create an Update Assist procedure.
- In the Update Assist - Navigation Options window, select No key values required for your user interface.
- In the HTML canvas, create a report using the same data source you used for the Update Assist project. The report must contain the key fields in the segment you want to update (if you do not want to view them in the results, you can make them invisible).
- Select the column you want to make clickable on the report,
and on the Appearance tab, click Drill Down in
the Links group.
The Drill Down dialog box opens.
- Click the Add new item icon to create a new drill down.
- From the Drill Down Type drop-down menu, select JavaScript.
- In the Source field, type parent.IbComposer_triggerExecution.
- From the Target Frame drop-down menu, select _parent.
- Double-click in the Parameters field to display the Parameters dialog box.
- Click the Add new item icon to create a parameter.
- From the Parameter Type drop-down menu, select Constant Value and enter taskn.
where:
- taskn
-
Is the number of the task that launches the Maintain procedure.
- Click the Add new item icon, and from the Parameter Type drop-down menu, select Constant Value, and type 1.
- Click the Add new item icon, and from the Parameter Type drop-down menu, select Constant Value, and type segname.segnamestk.keyfield.
where:
- segname
-
Is the name of the segment that contains the key field.
- segnamestk
-
Is the name of the segment with stk added to the end.
- keyfield
-
Is the name of the key field selected for drill down.
- Click the Add new item icon, and from the Parameter Type drop-down menu, select Field.
- Select the name of the key field from the drop-down list, as entered in step c.
- Click Ok to create the drill down.
- From the Parameter Type drop-down menu, select Constant Value and enter taskn.
- Close your procedure and save it.
When you run your report, you will see that all of the items in the selected column of the report are underlined and clickable. Clicking any item on the report opens the Update Assist form with the information for that item already filled in.
Calling an Update Assist Project From an App Studio Report Example
This example describes how to create a report in the HTML canvas and then create a link to a simple Update Assist application that will update information in the report.
This example is broken down into two steps:
- Create an Update Assist application that updates an employee from the empdata data source.
- Create a report in the HTML canvas that contains a simple list of the employees in the empdata data source.
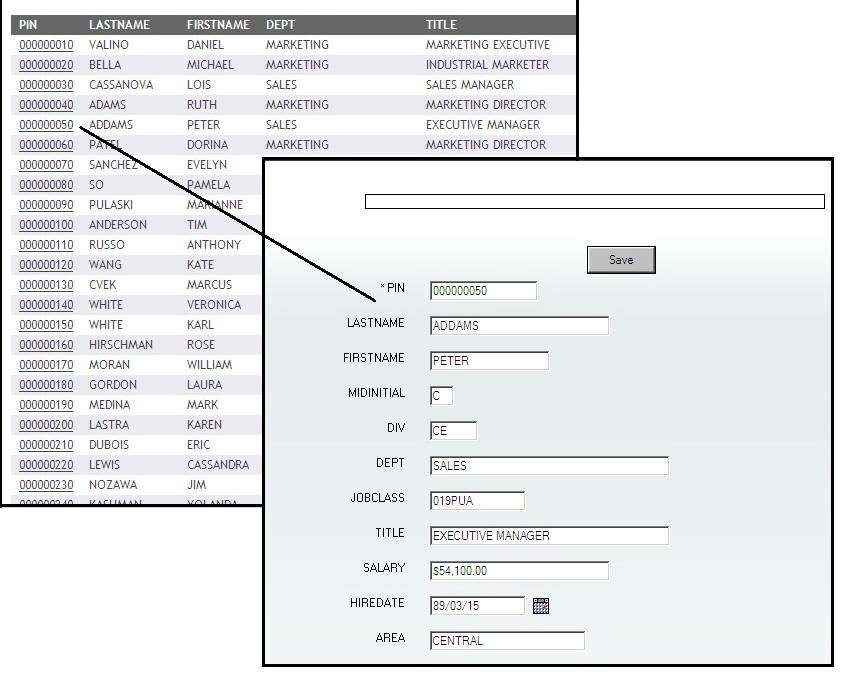
When you are done, you will have an App Studio report that displays a list of customers in the employee data source. Clicking on the PIN adjacent to the last name of someone in this report will bring up a form where you can change information about the employee, or delete the employee from the data source. The result is shown in the following image.
Example: Creating an Update Assist Project For the Empdata Data Source
The following is an example of creating an Update Assist project for the empdata data source.
- In a Domain folder, create a new HTML page, using the HTML/Document wizard.
- Attach the ibisamp app folder to the Domain folder, using the Application Paths property in the File/Folder Properties panel.
- In the Requests & Data Sources panel, from the New drop-down list, select Embedded Request and then select New Maintain Data with Update Assist.
- Select the empdata Master File.
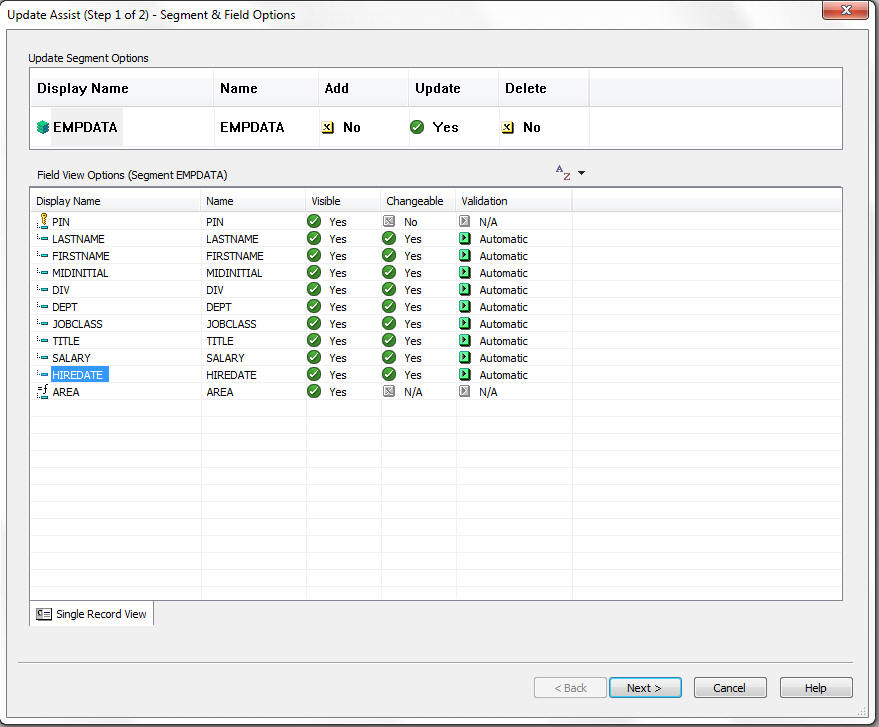
- In the Update Segment Options section, set Update to Yes.
- In the Field View Options section, set Changeable to Yes for
all fields except PIN, which is a key field, as shown in the following
image.
- Click Next.
The Update Assist - Navigation Options window opens.
- Select No key values required and click Finish.
- Click Yes to start Maintain Data right after the page is loaded.
- Click Yes to create a multi-page control.
App Studio Maintain Data displays the first screen of the application you created, as shown in the following image.

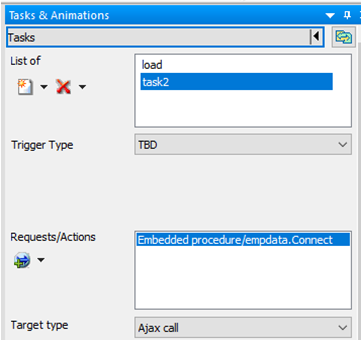
- Open the Tasks & Animations panel.
- Click the New icon to create task2.
- From the Trigger Type drop-down list, select TBD (To Be Determined).
- Click the down arrow, under Requests/Actions.
- Select Run Request, then empdata, and then empdata.Connect.
The Tasks & Animations screen is shown in the following image.
Example: Creating a Report With the Empdata Data Source
- Create a report in the HTML canvas:
- From the Environments tree, right-click the folder that contains the Update Assist procedure, and select New from the pop-up window, then select Report.
- Select empdata and click Finish.
- Place the PIN, LASTNAME, FIRSTNAME, DEPT, and TITLE fields in the report.
- Select the PIN field on the report, and
on the Appearance tab, click Drill Down in
the Links group.
The Drill Down dialog box opens.
- Click the Add new item icon.
- From the Drill Menu Items field, delete DrillDown 1.
- Click the Add new item icon to create a new drill down.
- From the Drill Down Type drop-down menu, select JavaScript.
- In the Source field, type parent.IbComposer_triggerExecution.
- From the Target Frame drop-down menu select _parent.
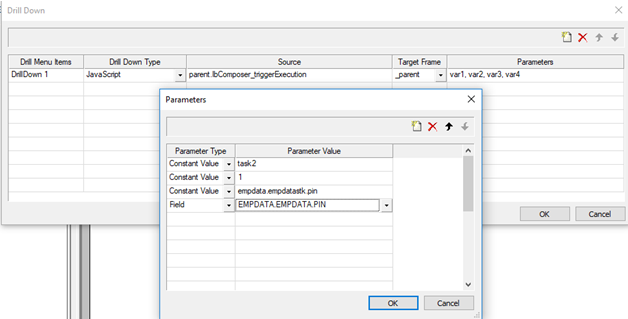
- Double-click in the Parameters field to display the Parameters entry screen.
- Click the Add new item icon to create a parameter:
- From the Parameter Type drop-down menu, select Constant Value and type task2.
- Click the Add new item icon, and from the Parameter Type drop-down menu, select Costant Value, and type 1.
- Click the Add new item Icon, and from the Parameter Type drop-down menu, select Constant Value, and type empdata.empdatastk.pin.
- Click the Add new item icon, and from the Parameter Type drop-down menu, select Field.
- From the Parameter Value drop-down menu, select EMPDATA.EMPDATA.PIN.
- Click Ok to create the drill down.
- Click OK.
- Close your procedure and save it.
When you run your report, you will see all of the PIN values in the report are underlined and clickable, as shown in the following image.
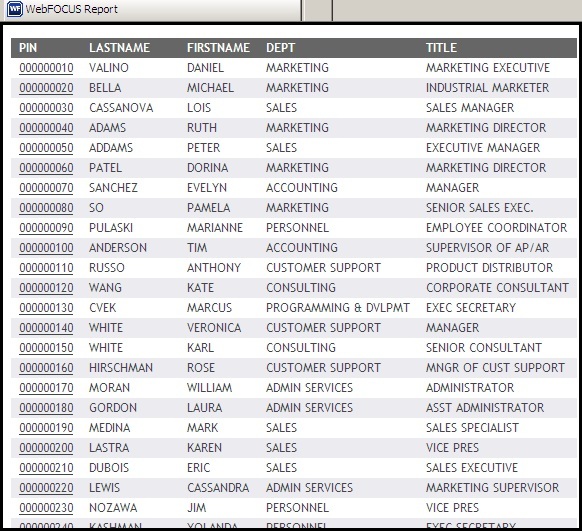
Clicking a PIN on the report opens the Update Assist form with the information for that name already filled in.
| WebFOCUS | |
|
Feedback |