Using the Connect to Data Wizard
|
How to: |
The Connect to Data Wizard provides a step-by-step process for connecting to data, creating a summary table or cluster synonym and running a report. It can be used to create metadata for different types of data sources. Some of options and parameters vary depending on the type of data source. The wizard enables you to:
- Configure an adapter, create a new connection, or change connection parameters.
- Import metadata.
- Edit metadata.
- Generate a test query.
When you complete a task, you can click Next on the ribbon to move to the next step.
To exit the wizard and return to the full console, click X at the top right of the page.
Procedure: How to Access the Connect to Data Wizard
Access the Connect to Data Wizard by clicking Connect to Data Wizard on the sidebar.
Procedure: How to Use the Connect to Data Wizard to Configure an Adapter, Create a New Connection, or Change a Connection
On the Connect to Data page, you can perform one of the following tasks.
Note: Connection parameters for each adapter are described in the Adapter Administration manual.
- To configure a new adapter, right-click an adapter on the Available Adapters list and click Configure.
The Connection Parameters page opens. Enter the connection parameters.
- To add a connection for a configured adapter, right-click an adapter on the Configured list and click Add Connection.
The Add Connection page opens. Enter the connection parameters.
- To change connection parameters, right-click a connection on the Configured list and click Properties.
The Change Connect Parameters page opens. Change the connection parameters.
- To duplicate a connection, right-click a connection and click Duplicate Connection.
The Duplicate Connection page opens with parameters entered for the same adapter and the same server as the original connection. You can use this to connect to a different database than the one in the original connection, or use a different type of security model.
Procedure: How to Use the Connect to Data Wizard to Import Metadata
After completing the Connection step, you can create synonyms for configured adapters and connections.
- To create synonyms, click a connection and click Show local files (for delimited files) or Show DBMS objects from the context menu.
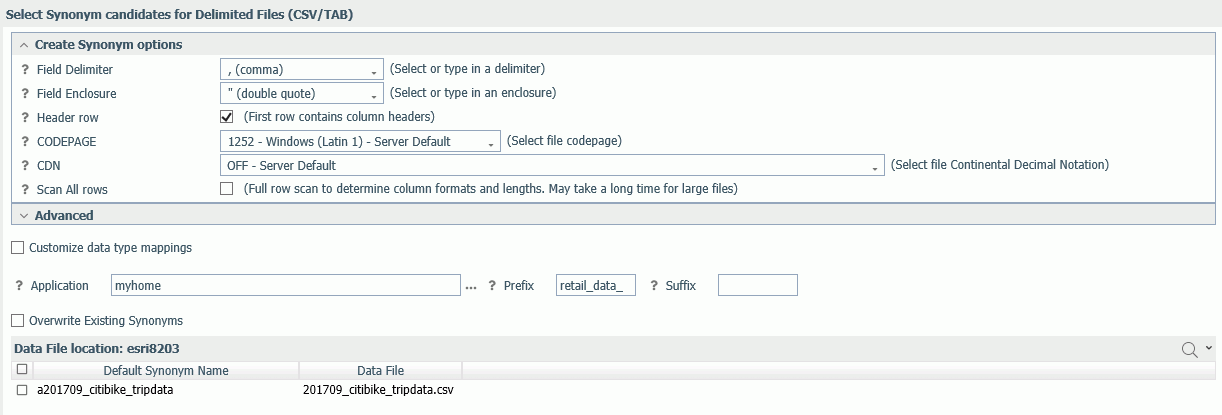
For delimited or Excel files, a file picker dialog box opens. Select a file and click OK. The Select Synonym Candidates page opens, as shown in the following image.
For an SQL adapter, the Available Objects page opens, as shown in the following image. You can edit the default synonym name by clicking a synonym name in that column and entering a new name.
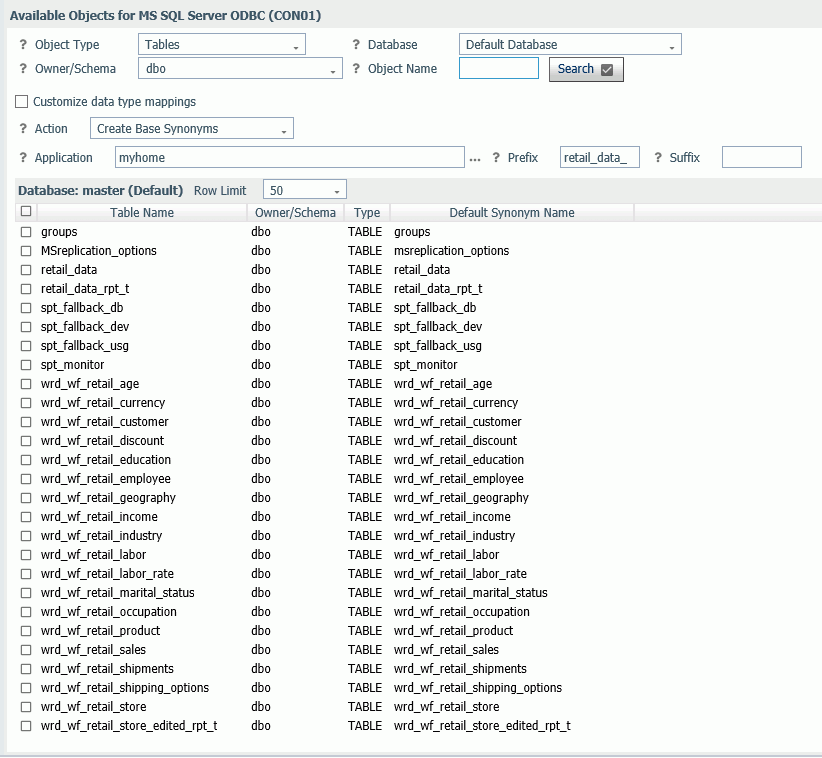
The Show DBMS Objects page has been designed so that you can enter all the parameters needed to create or update base synonyms or create a cluster synonym on a single page.
The options are specific to the type of adapter. Synonym creation parameters for each adapter are described in the Adapter Administration manual.
- For an SQL adapter, select the object type and enter the owner/schema and database from which to show objects.
You can search for objects by entering a term in the search text box and clicking Search, as shown in the following image.

- From the Action drop-down list, you can select Create Base Synonyms (for individual tables or objects) or Update Base Synonyms.
- To create base synonyms, click the check box next to one or more tables for which you want to create a synonym. You can edit
the Default Synonym Name. When you are finished, click Next to Base Synonyms on the ribbon.
The Data Assist page opens for editing metadata.
- To create a cluster synonym with a Business View (BV), select Create Cluster Synonym with BV on the Action list.
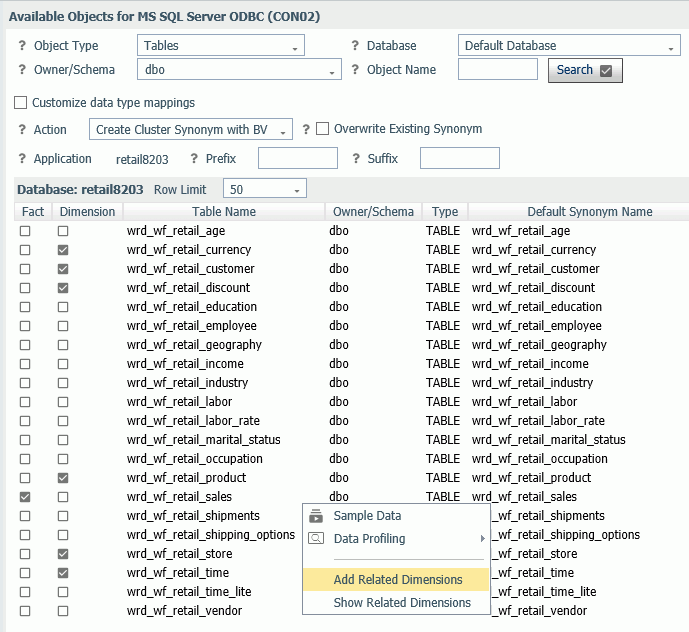
The DBMS objects list changes so that you can both select objects to add to the cluster and assign them as facts or dimensions, as shown in the following image.
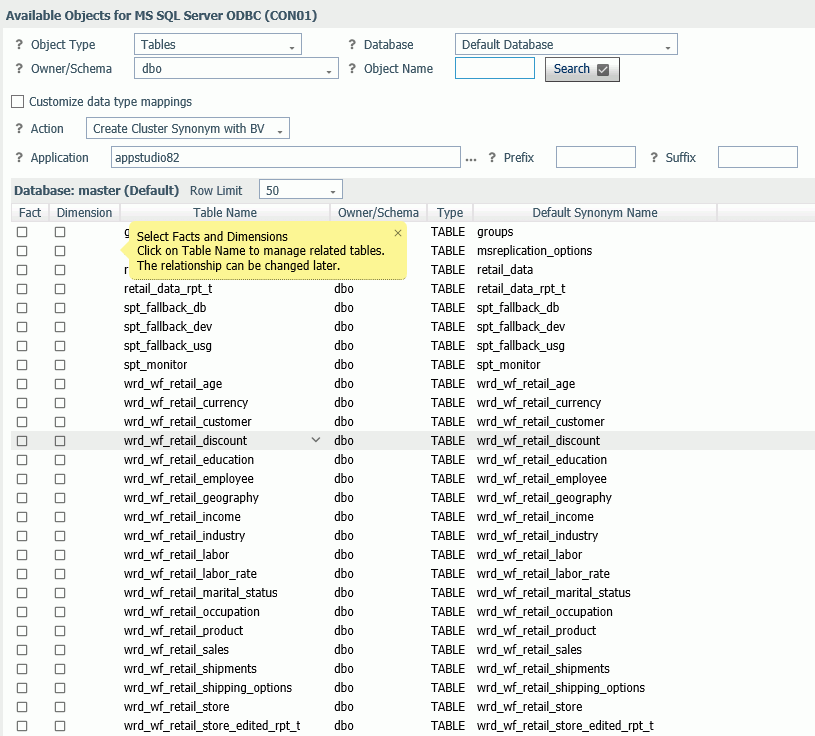
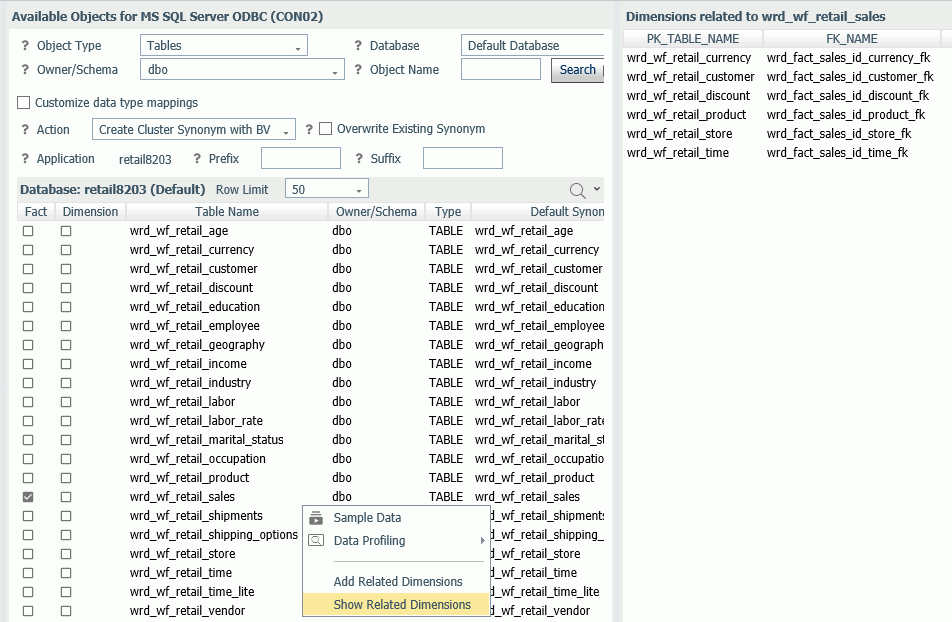
You can select each fact and each dimension manually, or you can right-click a fact or dimension table name or click the down arrow next to a table name and select one of the following options, which are available if foreign key to primary key information is available in the RDBMS:
- Show Related Dimensions. Displays a report of related dimensions, as shown in the following image.
- Add Related Dimensions. Selects all related dimensions automatically, as shown in the following image.
When you have selected the fact and dimension tables, click Next to Cluster Business View on the ribbon.
The Data Assist page opens for editing metadata.
- Show Related Dimensions. Displays a report of related dimensions, as shown in the following image.
- To create base synonyms, click the check box next to one or more tables for which you want to create a synonym. You can edit
the Default Synonym Name. When you are finished, click Next to Base Synonyms on the ribbon.
Procedure: How to Use the Connect to Data Wizard to Edit Metadata
After completing the Import Metadata step, the wizard moves to the Edit Metadata step. If you created a Cluster with BV, this step creates a logical view in the synonym using the Business View pane.
The Edit Metadata page opens, as shown in the following image for a cluster.
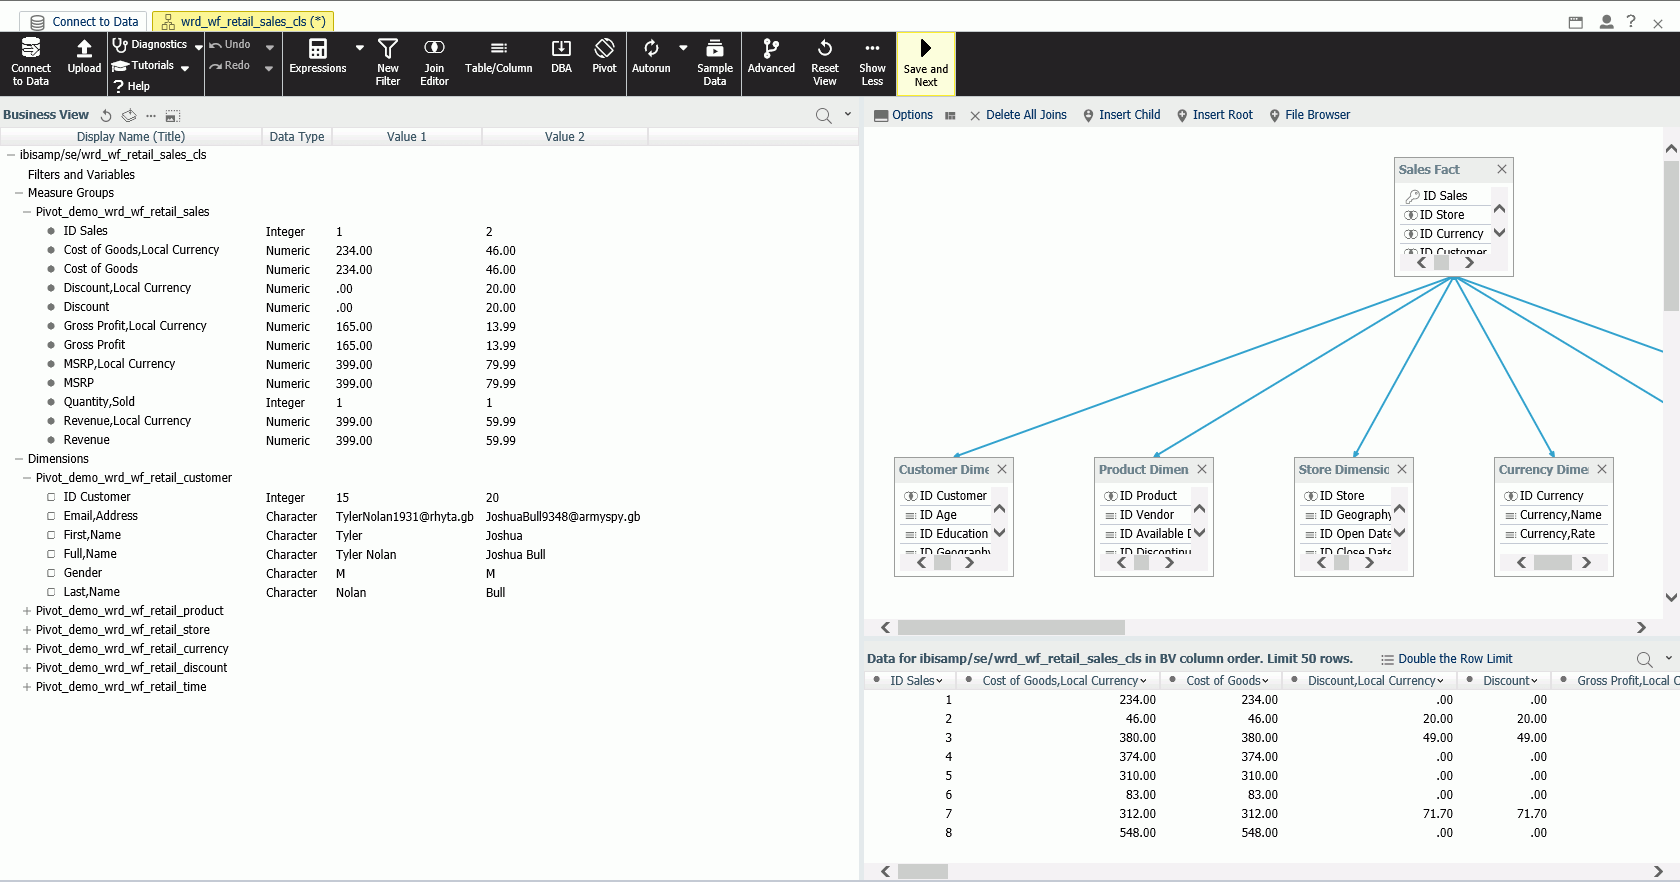
A different screen opens for base synonyms. If multiple base synonyms were selected, multiple tabs will be shown with Table/Columns panes and blank BV panes on each tab.
- Use options on the ribbon and right-click options in the data panes to delete items, insert child tables, add joins, add geographic roles, and see sample data.
- When you are finished editing the metadata, click Save
and Next.
The Save As dialog box opens.
- Enter a name for the synonym in the File Name field
and click OK.
The Test Query pane opens.
Procedure: How to Use the Connect to Data Wizard to Generate a Test Query
The Test Query page has three panes, as shown in the following image.
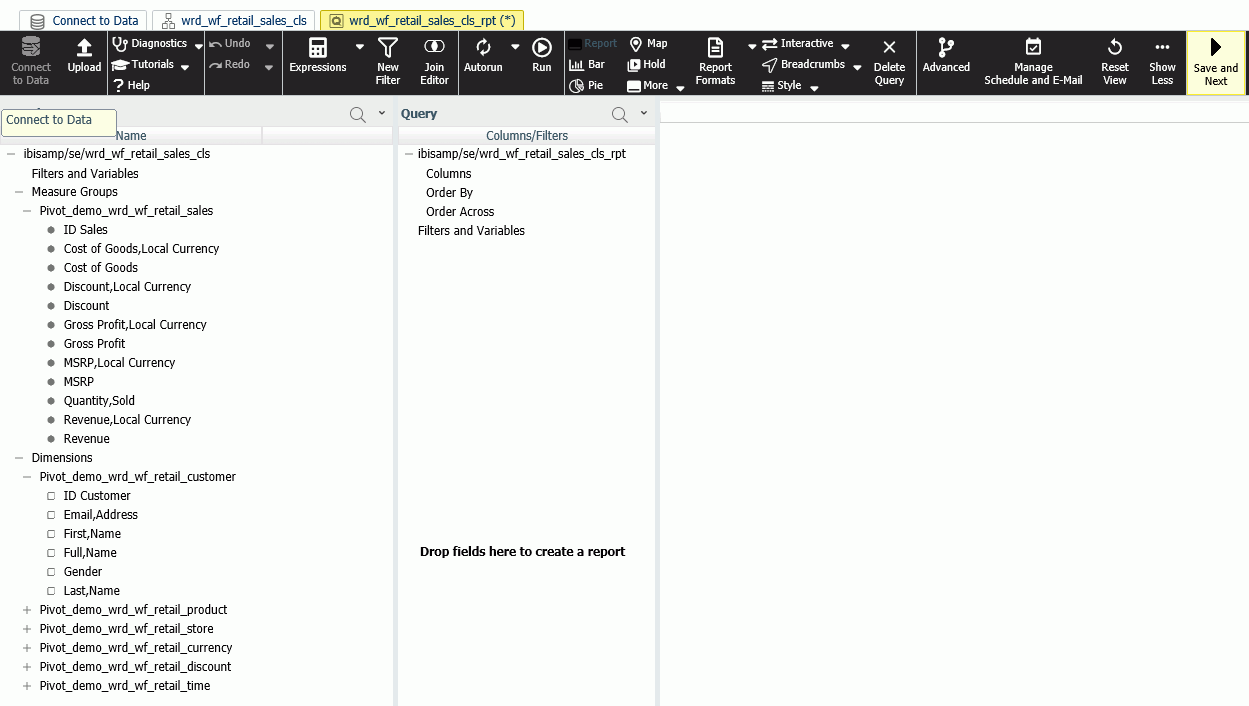
The left pane lists the metadata available for the query. The right pane has categories in which you can place the data for summation, sorting, and filtering.
The ribbon provides Undo and Redo actions.
- Drag fields from the Metadata pane to the Query pane in the appropriate categories for the query you are designing.
- You can select options for the query in the Query section of the ribbon.
- Click Save and Next, to save the query, or choose one of the Run options from the Test option of the Diagnostics button on the ribbon, to run the query immediately.
| WebFOCUS | |
|
Feedback |