Managing Metadata for Remote Servers
|
Topics: |
When the server accesses a data source, it needs to know how to interpret the data stored there. For each data source the server will access, you create a synonym that describes the structure of the data source and the server mapping of the data types.
Creating Synonyms
|
How to: |
|
Reference: |
Synonyms define unique names (or aliases) for each metadata description that is managed by the subserver. Synonyms are useful because they hide the underlying data source location and identity from client applications. They also provide support for extended metadata features of the server, such as virtual fields and additional security mechanisms.
Using synonyms allows an object to be moved or renamed while allowing client applications to continue functioning without modification. The only modification required is a redefinition of the synonym on the server. The result of creating a synonym is a Master File and an Access file that represent the server metadata.
You can use the Adapter for Remote Servers to create synonyms for remote data sources that reside on a subserver. If the data source is remote, the Master File contains the attribute SUFFIX=EDA.
Note: The Adapter for Remote Servers defines a relational data source, so its Master Files are single-segment. When a synonym is created from a multi-segment hierarchical table, like the CAR file, all its segments will be flattened out into one segment in the resulting Master File.
Procedure: How to Create a Synonym
- From the
Web Console sidebar, click Applications or Connect to Data.
The Applications page opens.
- If you started from the Applications page, right-click an application folder, point to New,
and click Synonym on the context menu.
The Connect to Data page opens.
- On the Configured list, click the down arrow next to a
connection for the configured adapter, or right-click a connection.
Depending on the type of adapter you chose, one of the following options appears on the context menu.
- Show DBMS objects. This opens the page for selecting synonym objects and properties.
- Create metadata objects. This opens the page for selecting synonym objects and properties.
- Show files. This opens a file picker. After you choose a file of the correct type, the page for selecting synonym objects and properties opens.
- Show local files. This opens a file picker. After you choose a file of the correct type, the page for selecting synonym objects and properties opens.
- Enter values for the parameters required by the adapter as described in the chapter for your adapter.
- After entering
the parameter values, click the highlighted button on the ribbon.
The button may be labeled Next, Create Synonym, Create Base Synonyms, Create Cluster Synonym, or Update Base Synonyms.
The synonym creation process for most adapters has been consolidated so that you can enter all necessary parameters on one page. However, for some adapters such as LDAP, you must click Next buttons until you get to a page that has a Create Synonym button.
The synonym is created and added under the specified application directory.
Note: When creating a synonym, if you choose the Validate check box (where available), the server adjusts special characters and checks for reserved words. For more information, see Validation for Special Characters and Reserved Words.
Reference: Synonym Creation Parameters for Remote Servers
The following list describes the parameters for which you will need to supply values, and related tasks you will need to complete in order to create a synonym for the adapter. These options may appear on multiple panes. To advance from pane to pane, click the buttons provided, ending with the Create Synonym button, which generates the synonym based on your entries.
- Restrict Object Type to
-
Restrict candidates for synonym creation based on the selected object type(s): tables, views, and any other supported objects.
- Filter by Owner/Schema and Object name
-
Selecting this option adds the Owner/Schema and Object Name parameters to the screen.
- Owner/Schema. Type a string for filtering the selection, inserting the wildcard character (%) as needed at the beginning and/or end of the string. For example, enter: ABC% to select tables or views whose owner/schema begin with the letters ABC; %ABC to select tables or views whose owner/schema end with the letters ABC; %ABC% to select tables or views whose owner/schema contain the letters ABC at the beginning, middle, or end.
- Object name. Type a string for filtering the object names, inserting the wildcard character (%) as needed at the beginning and/or end of the string. For example, enter: ABC% to select all objects whose names begin with the letters ABC; %ABC to select all whose names end with the letters ABC; %ABC% to select all whose names contain the letters ABC at the beginning, middle, or end.
- Application
-
Select an application directory. The default value is baseapp.
- Prefix/Suffix
-
If you have tables with identical table names, assign a prefix or a suffix to distinguish them. For example, if you have identically named human resources and payroll tables, assign the prefix HR to distinguish the synonyms for the human resources tables. Note that the resulting synonym name cannot exceed 64 characters.
If all tables and views have unique names, leave the prefix and suffix fields blank.
- Overwrite Existing Synonyms
-
To specify that this synonym should overwrite any earlier synonym with the same fully qualified name, select the Overwrite existing synonyms check box.
Note: The connected user must have operating system write privileges in order to recreate a synonym.
- Customize data type mappings
-
To change the data type mappings from their default settings, select this check box. The customizable mappings are displayed.
- Cardinality
-
Select the Cardinality check box to reflect the current cardinality (number of rows or tuples) in the table during metadata creation. Cardinality is used for equi-joins. The order of retrieval is based on the size (cardinality) of the table. Smaller tables are read first.
If the cardinality of the tables to be used in the application are dynamic, it may not be beneficial to choose this setting.
- Dynamic columns
-
To specify that the Master File created for the synonym should not contain column information, select the Dynamic columns check box.
If this option is selected, column data is retrieved dynamically from the data source at the time of the request.
- Default Synonym Name
-
This column displays the name that will be assigned to each synonym. To assign a different name, replace the displayed value.
- Select tables
-
Select tables for which you wish to create synonyms:
- To select all tables in the list, select the Select All check box.
- To select specific tables, select the corresponding check boxes.
Example: Synonym for a Remote Data Source
The following diagram illustrates the use of Master Files and Access Files for data sources. A synonym called SALES_EDA was created on a hub server using a SALES file located on a subserver.
- The multiple segments of the SALES file are flattened out in the SALES_EDA Master File, which is now a single-segment table.
- The SALES_EDA Master File contains SUFFIX=EDA to indicate that the data source is remote.
- The SALE_EDA Access File includes the synonym for the data source,
the name of the data source, and the location of the data source:
SEGNAME = SALES_EDA
TABLENAME = SALES
CONNECTION = SUBSRV1
When you connect to the Hub Server, the SALES_EDA Master File and Access File are used to access the remote data source SALES, located on SUBSRV1.
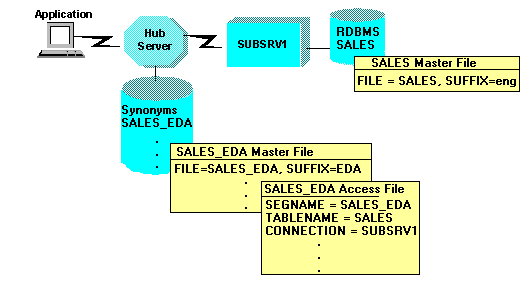
In the above Access File example, the value SUBSRV1 of the CONNECTION parameter must match an outbound node block in the Hub Server communications file.
Here's the original synonym on the sub-server:
Sales.mas
FILENAME=KSALES, SUFFIX=FOC     ,               $
  SEGMENT=STOR_SEG, SEGTYPE=S1,                  $
    FIELDNAME=STORE_CODE, ALIAS=SNO, USAGE=A3,   $
    FIELDNAME=CITY, ALIAS=CTY, USAGE=A15,        $
    FIELDNAME=AREA, ALIAS=LOC, USAGE=A1,         $
$ $
  SEGMENT=DATE_SEG, SEGTYPE=SH1, PARENT=STOR_SEG, $
    FIELDNAME=DATE, ALIAS=DTE, USAGE=A4MD, $
$ $
  SEGMENT=PRODUCT, SEGTYPE=S1, PARENT=DATE_SEG,               $
    FIELDNAME=PROD_CODE, ALIAS=PCODE, USAGE=A3, FIELDTYPE=I,  $
    FIELDNAME=UNIT_SOLD, ALIAS=SOLD, USAGE=I5,                $
    FIELDNAME=RETAIL_PRICE, ALIAS=RP, USAGE=D5.2M,            $
    FIELDNAME=DELIVER_AMT, ALIAS=SHIP, USAGE=I5,              $
    FIELDNAME=OPENING_AMT, ALIAS=INV, USAGE=I5,               $
    FIELDNAME=RETURNS, ALIAS=RTN, USAGE=I3,       MISSING=ON, $
  FIELDNAME=DAMAGED, ALIAS=BAD, USAGE=I3,         MISSING=ON, $
Here's the synonym that is created by the Create Synonym utility:
Sales_eda.mas
FILENAME=SALES_EDA, SUFFIX=EDA     , $
  SEGMENT=SALES_EDA, SEGTYPE=S0, $
   FIELDNAME=STORE_CODE, ALIAS=STORE_CODE, USAGE=A3, ACTUAL=A3, $
   FIELDNAME=DATE, ALIAS=DATE, USAGE=A4MD, ACTUAL=A4MD, $
   FIELDNAME=PROD_CODE, ALIAS=PROD_CODE, USAGE=A3, ACTUAL=A3, $
   FIELDNAME=CITY, ALIAS=CITY, USAGE=A15, ACTUAL=A15, $|
   FIELDNAME=AREA, ALIAS=AREA, USAGE=A1, ACTUAL=A1, $
   FIELDNAME=UNIT_SOLD, ALIAS=UNIT_SOLD, USAGE=I5, ACTUAL=I4, $
   FIELDNAME=RETAIL_PRICE, ALIAS=RETAIL_PRICE, USAGE=D5.2M, ACTUAL=D8, $
   FIELDNAME=DELIVER_AMT, ALIAS=DELIVER_AMT, USAGE=I5, ACTUAL=I4, $
   FIELDNAME=OPENING_AMT, ALIAS=OPENING_AMT, USAGE=I5, ACTUAL=I4, $
   FIELDNAME=RETURNS, ALIAS=RETURNS, USAGE=I3, ACTUAL=I4,  MISSING=ON, $
   FIELDNAME=DAMAGED, ALIAS=DAMAGED, USAGE=I3, ACTUAL=I4,  MISSING=ON, $
Sales_eda.acx
SEGNAME=SALES_EDA, TABLENAME=EDADBA.sales, CONNECTION=server, KEYS=3, $
Notice not only is there no structure, but the three keys (STORE_CODE, DATE and PROD_CODE) were moved to the top.
Reference: Managing Synonyms
Once you have created a synonym, you can right-click the synonym name in the Adapter navigation pane of either the Web Console or the Data Management Console to access the available options.
For a list of options, see Synonym Management Options.
Reference: Access File Keywords
|
Keyword |
Description |
|---|---|
SEGNAME |
Value must be identical to the SEGNAME value in the Master File. |
TABLENAME |
Name of the table or view. This value can include a location or owner name as follows: TABLENAME=[location.][owner.]tablename |
CONNECTION |
Indicates a previously declared connection. The syntax is: CONNECTION=connection CONNECTION=' ' indicates access to the local database server. Absence of the CONNECTION attribute indicates access to the default database server. |
KEYS |
Indicates how many columns constitute the primary key for the table. Range is 0 to 64. Corresponds to the first n fields in the Master File segment. |
WRITE |
Specifies whether write operations are allowed against the table. |
Example: Storing a Server Name in an Access File
The following example shows how to store the server name IBMSERVE in an Access File.
SEGNAME=ONE,TABLENAME=CAR,KEYS=1,WRITE=YES,SERVER=IBMSERVE,$
Note: Regardless of the type of data source to be accessed, the Access File must contain the following attributes:
- SEGNAME. The segment name in the Access File must match the segment name in the Master File.
- TABLENAME. This attribute specifies the name of the Master File on the server.
- SERVER. This attribute specifies the name of the server.
Example: Using a SUFFIX=EDA Synonym
The Master File of the synonym (DIGIT) on the server is:
FILENAME=DIGIT,SUFFIX=FOC,$
 SEGNAME=DIGIT,SEGTYPE=S0,$
  FIELD=THIS_DIGIT ,THIS_DIGIT ,I9    ,I4 ,MISSING=ON,$
  FIELD=SSN        ,SSN        ,A9    ,A9 ,MISSING=ON,$
  FIELD=AMOUNT1    ,AMOUNT1    ,P16.0 ,P8 ,MISSING=ON,$
  FIELD=AMOUNT2    ,AMOUNT2    ,P16.0 ,P8 ,MISSING=ON,$
The Master File of the synonym (DIGITEDA) on the client is:
FILENAME=DIGITEDA,SUFFIX=EDA,$
 SEGNAME=DIGIT,SEGTYPE=S0,$
  FIELD=THIS_DIGIT ,THIS_DIGIT ,I6   ,I4             ,$
  FIELD=SSN        ,SSN        ,A9   ,A9 ,MISSING=OFF,$
  FIELD=AMOUNT1    ,AMOUNT1    ,P8   ,P8 ,MISSING=ON ,$
  FIELD=AMOUNT2    ,AMOUNT2    ,P9.0 ,P8 ,MISSING=ON ,$
The Access File of the synonym (DIGITEDA) on the client points to the file on the server:
SEGNAME=DIGIT,TABLENAME=DIGIT,KEYS=1,SERVER=PMSEDA,$
where:
- SEGNAME=DIGIT matches the segment name in the server Master File.
- TABLENAME=DIGIT specifies the name of the Master File on the server.
- SERVER=PMSEDA specifies the name of the server.
The EDACS3 client communication configuration file contains a NODE block that points to the server. For example:
NAME = EDA CLIENT USING CS/3 TCP/IP
NODE = PMSEDA
 BEGIN
;  TRACE = 31
   PROTOCOL = TCP
   CLASS = CLIENT
   HOST = IBIMVS           ; DNS NAME (PNO 28109)
   SERVICE = 2386          ; TCP/IP PORT FOR SERVER
END
The following requests (SQL and TABLE) reference the local Master File named DIGITEDA. As shown above, the corresponding Access File contains the server name and the Master File name, as it is known at the server. In this case, Server PMSEDA contains a Master File called DIGIT. At the server, the DIGIT Master File describes a FOCUS data source. The communications configuration file contains an entry for server name PMSEDA so that the FOCUS client can establish communications with the server.
|
SQL request |
TABLE request |
|---|---|
SQL SELECT * FROM DIGITEDA
END |
TABLE FILE DIGITEDA
PRINT *
END |
Note: The name of an underlying physical file to which a SUFFIX=EDA Access File points must not start with a number. Using a number at the beginning of a file name:
- Will cause an error (FOC14069) when a request attempts to access data using a SUFFIX=EDA synonym that points to a file starting with a number.
- May cause problems when an external application (such as an API application) that does not accept files starting with numbers interacts with a SUFFIX=EDA synonym that points to a file starting with a number.
- May be problematic for a third-party application that does not work with numeric files names or with file names that start with numbers.
Example: Remote Multi-Segment Master and Access File
The following is a multi-segment Synonym. It describes two tables on the sub-server, JOBHIST and JOBLIST that are joined on the column JOBCLASS:
Jobs_eda.mas
FILENAME=jobs_eda, SUFFIX=EDA     , $
  SEGMENT=JOBHIST, SEGTYPE=S0, $
    FIELDNAME=PIN, ALIAS=PIN, USAGE=A9, ACTUAL=A9, $
    FIELDNAME=JOBSTART, ALIAS=JOBSTART, USAGE=YMD, ACTUAL=DATE, $
    FIELDNAME=JOBCLASS, ALIAS=JOBCLASS, USAGE=A8, ACTUAL=A8, $
    FIELDNAME=FUNCTITLE, ALIAS=FUNCTITLE, USAGE=A20, ACTUAL=A20, $
  SEGMENT=JOBLIST, SEGTYPE=S0, PARENT=JOBHIST,
    JOIN_WHERE=JOBHIST.JOBCLASS EQ JOBLIST.JOBCLASS;, $
    FIELDNAME=JOBCLASS, ALIAS=JOBCLASS, USAGE=A8, ACTUAL=A8, $
    FIELDNAME=CATEGORY, ALIAS=CATEGORY, USAGE=A25, ACTUAL=A25, $
    FIELDNAME=JOBDESC, ALIAS=JOBDESC, USAGE=A40, ACTUAL=A40, $
    FIELDNAME=LOWSAL, ALIAS=LOWSAL, USAGE=D12.2M, ACTUAL=D8, $
    FIELDNAME=HIGHSAL, ALIAS=HIGHSAL, USAGE=D12.2M, ACTUAL=D8, $
    FIELDNAME=GRADE, ALIAS=GRADE, USAGE=A2, ACTUAL=A2, $
    FIELDNAME=LEVEL, ALIAS=LEVEL, USAGE=A25, ACTUAL=A25, $
The following is the corresponding multi-segment Access File:
Jobs_eda.acx
SEGNAME=JOBHIST, TABLENAME=EDADBA.jobhist, CONNECTION=server, $
SEGNAME=JOBLIST, TABLENAME=EDADBA.joblist, CONNECTION=server, $
Note: While this synonym could not be created using the Web Console Create Synonym feature since it points to two different tables, it could be created in the Data Management Console using the Synonym Editor. Starting with a new synonym, each table is added using Insert > Segment via Metadata Import from the remote server. The JOIN_WHERE clause is automatically added to indicate the tables are joined on the JOBCLASS.
Changing the Precision and Scale of Numeric Columns
You can alter the length and scale of numeric columns returned by a SELECT request to the server by creating different specifications in your login profile or in a stored procedure. The conversion settings are reflected in the Master File in the USAGE and ACTUAL formats of the fields generated by CREATE SYNONYM. This affects how the fields are processed and formatted by the server.
Tip: You can change this setting manually or from the Web Console.
For more information, see Override the Default Precision and Scale.
| WebFOCUS | |
|
Feedback |