Redesign of Connect to Data Page
|
Reference: |
The Connect to Data (Adapters) page has been redesigned to have separate lists for configured adapters and available adapters, as shown in the following image.
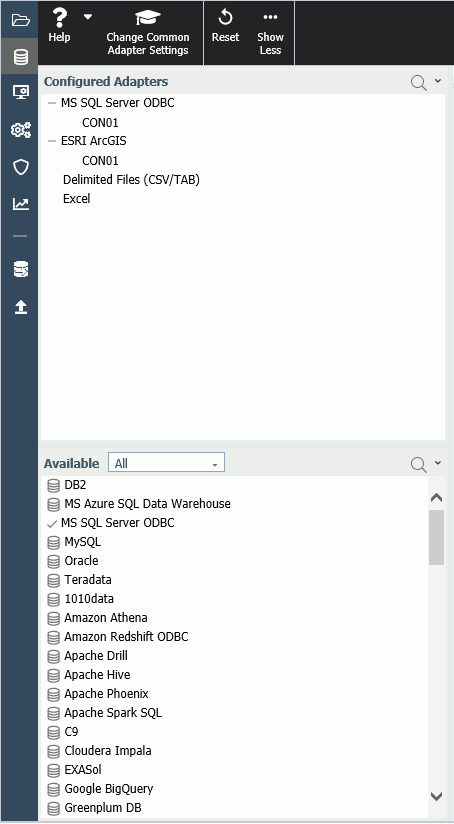
The Configured Adapters list shows all adapters and connections that have been configured.
The Available list shows all available adapters. If a connection has already been configured for an adapter, a check mark is displayed next to the adapter name. A drop-down list enables you to select an adapter category to view on the list.
Many of the options for adapters and connections, such as configuring a new connection or creating a synonym, open in a new panel on the Connect to Data page.
Reference: Configured Adapters List
The Configured Adapters panel lists all adapters and connections that have been configured. You can create synonyms and cluster business views from this panel, add new or duplicate connections, remove connections, and view and edit properties
Adapter Menu
By right-clicking an adapter name or clicking the down arrow on an adapter line on the list, you open a context menu. The items on the menu may differ for different categories of adapters. For an SQL Adapter, the following options are available.
- Add Connection. Opens the Add Connection page to configure a new connection for the adapter.
- Change Settings. Opens the Change Settings page for this adapter so you can edit the settings specific to this adapter.
Note: Once saved in the server profile edasprof, the settings will have global effects.
- Remove. Removes the configuration for this adapter.
- Help. Opens the help file for this adapter.
Connection Menu
By right-clicking a connection name or clicking the down arrow on a connection line on the list, you open a context menu with all or some of the following options, depending on the adapter.
- Show DBMS objects. Opens a panel for creating synonyms using this connection.
Note: For delimited files and Excel files, the corresponding option is to show local files. When you click this option, a file picker dialog box opens. When you select a file, the Create Synonym page opens for the selected file.
- Properties. Opens the Change Connect Parameters page for the connection.
- Test. Tests access to the DBMS. If successful, a report is displayed showing connection information for the DBMS.
- Duplicate Connection. Opens a Duplicate Connection panel with the same connection name, suffixed with _dup, and the same server as the original connection. You can use this to connect to a different database than the one in the original connection, or use a different type of security model.
- Configure Bulk Load. For some adapters, such as the Adapter for Redshift ODBC, opens a bulk load configuration page.
- Test Bulk. Tests whether extended bulk load is available and displays a message.
- Test DBMS Case Sensitivity. Displays a panel with information about case sensitivity for this DBMS.
- Impact Analysis. Displays a list of files that reference this connection.
- Delete. Deletes the connection.
Reference: Available Adapters List
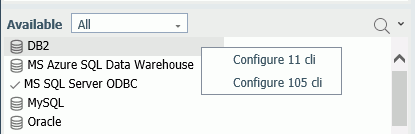
The Available list shows all available adapters, whether already configured or not. If the adapter already has a configured connection, a check mark displays next to its name. If the adapter has multiple versions, when you right-click it or click the down arrow, you select which version to configure, as shown in the following image.
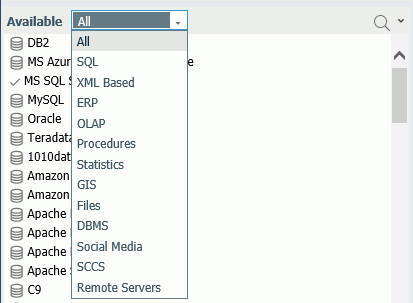
You can select a category of adapter to display on the list, as shown in the following image.
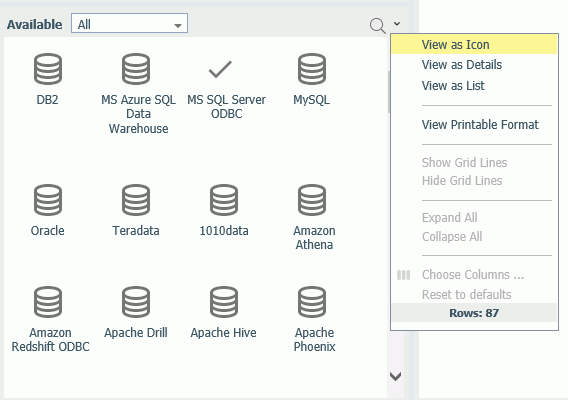
Instead of displaying the available adapters as a list, you can display them as icons by clicking View as Icon on the Available pane menu, as shown in the following image.
Reference: Creating Synonyms
To create synonyms, right-click a connection and click Show local files (for delimited files) or Show DBMS objects from the context menu.
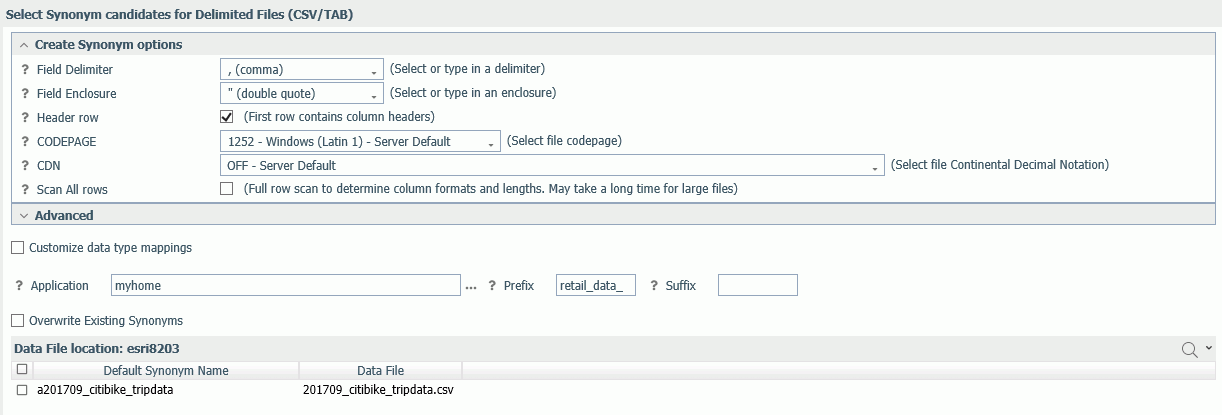
For delimited or Excel files, a file picker dialog box opens. Select a file and click OK. The Select Synonym Candidates page opens, as shown in the following image.
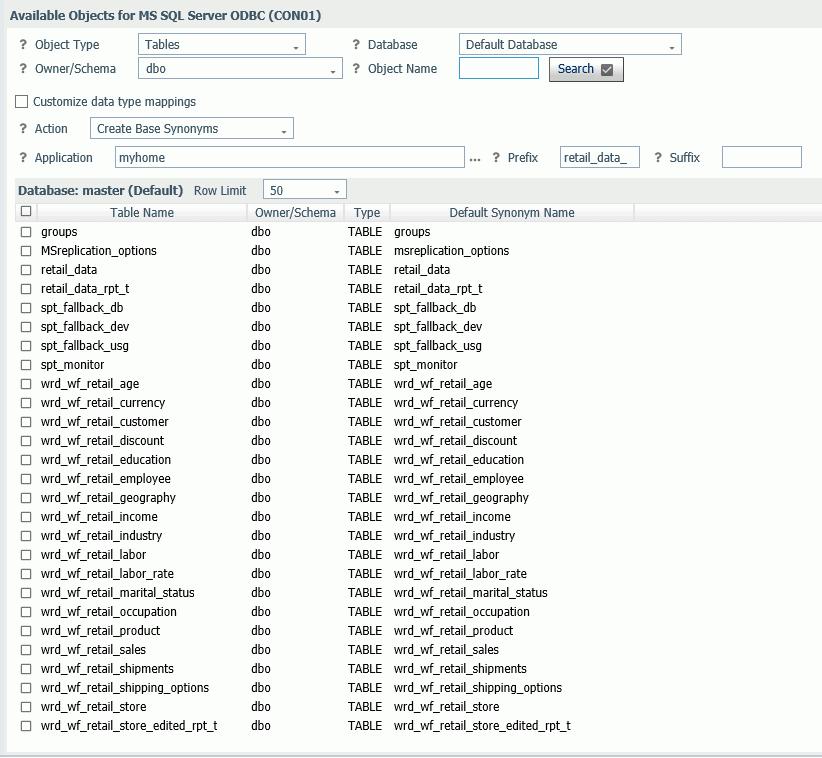
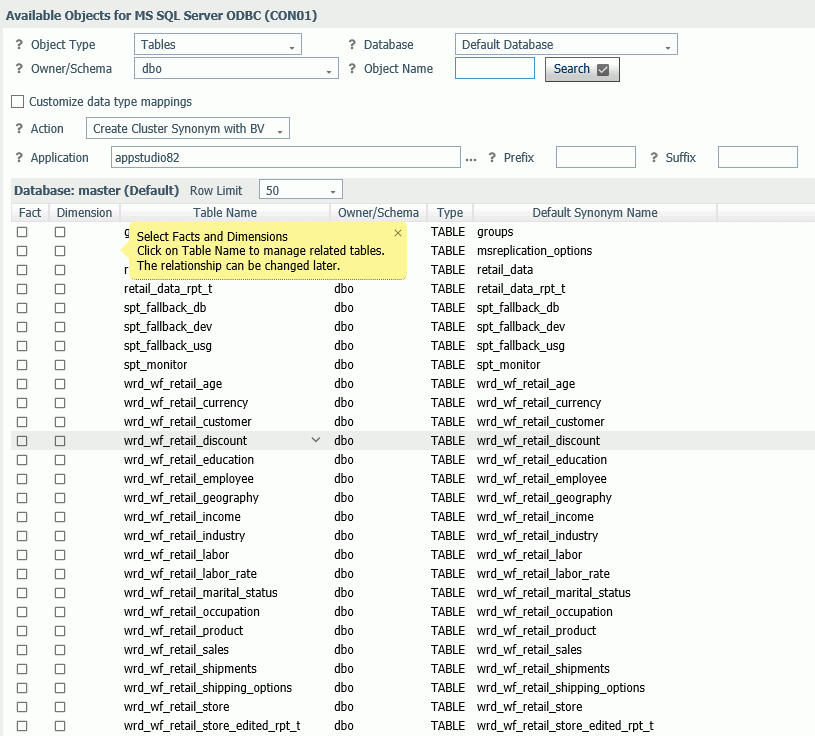
For an SQL adapter, the Available Objects page opens, as shown in the following image.
Creating Synonyms for an SQL Adapter
The Show DBMS Objects page has been designed so that you can enter all the parameters needed to create or update base synonyms or create a cluster synonym on a single page.
Select the object type and enter the owner/schema and database from which to show objects.
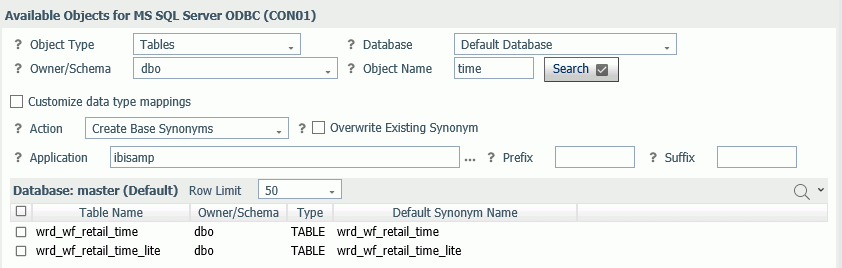
You can search for objects by entering a term in the search text box and clicking Search, as shown in the following image.
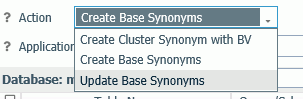
From the Action drop-down list, you can select Create Base Synonyms (for individual tables or objects), Create Cluster Synonym with BV (for creating a synonym that references multiple base synonyms), or Update Base Synonyms, as shown in the following image.
Creating Base Synonyms
To create base synonyms, click the check box next to one or more tables for which you want to create a synonym. You can edit the Default Synonym Name. When you are finished, click Create Base Synonyms on the ribbon. The synonyms are created and added to the Application specified.
Updating Base Synonyms
- Click the check box next to one or more tables for which you want to update the synonym.
You can edit the Default Synonym Name.
- Click Update Base Synonyms on the ribbon.
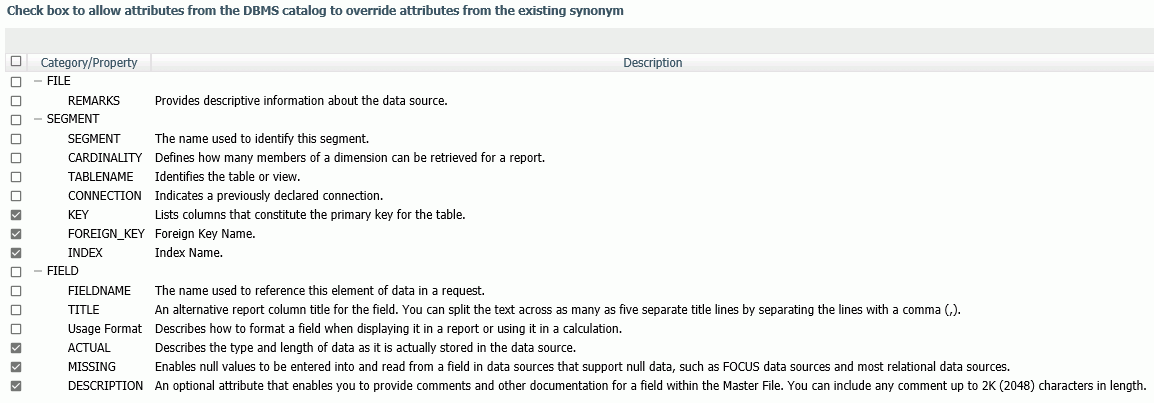
A page opens that enables you to select attributes from the DBMS catalog that will override attributes from the existing synonym, as shown in the following image.
- Click Next.
A status page opens showing messages about the success of the updates. The synonyms are added to the Application specified.
- Click Close.
Creating a Cluster Synonym with a Business View (BV).
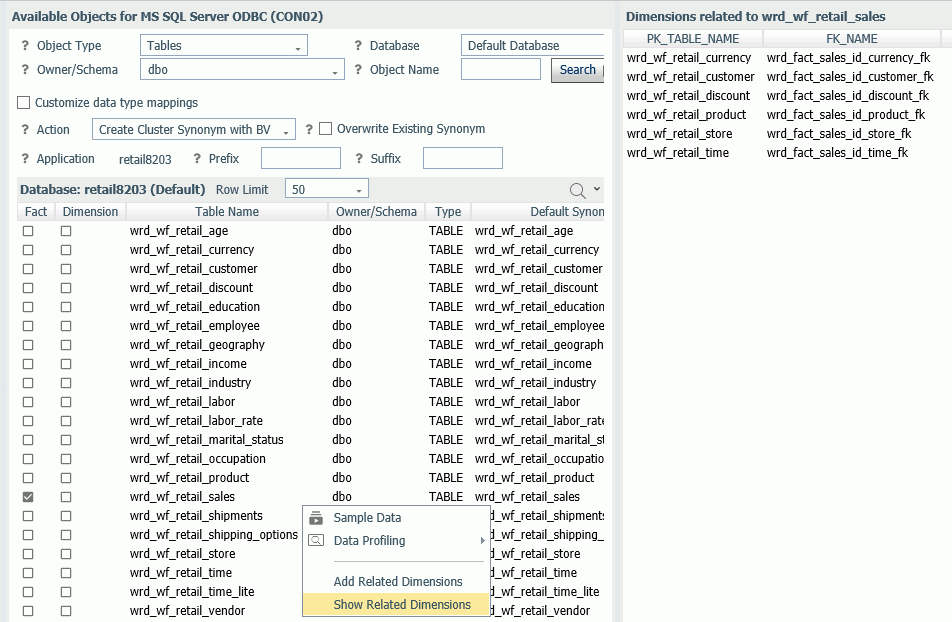
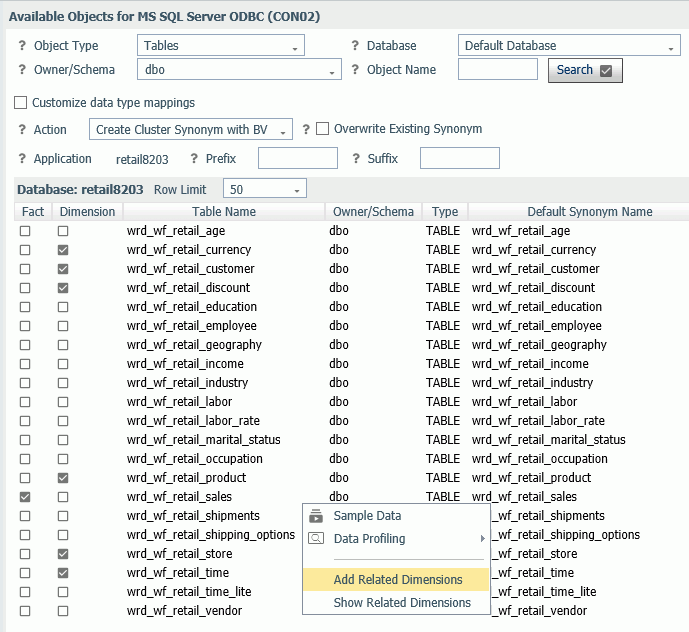
When you select Create Cluster Synonym with BV on the Action list, the DBMS objects list changes so that you can both select objects to add to the cluster and assign them as facts or dimensions, as shown in the following image.
You can select each fact and each dimension manually, or you can right-click a fact table name or click the down arrow next to a fact table name and select one of the following:
- Show Related Dimensions. Displays a report of related dimensions, as shown in the following image.
- Add Related Dimensions. Selects all related dimensions automatically, as shown in the following image.
When you have selected the fact and dimension tables, click Create Cluster Synonym in the Next group on the ribbon.
The Save As dialog box opens with a default name for the cluster in the application directory selected on the Show DBMS Objects page. You can change directories and edit the name.
Click OK to create the cluster.
Reference: Ribbon Options
Tuning and Troubleshooting Group
- Help Menu Options
- Complete Adapter List. Displays a report listing all adapters by category and their properties, such as support for Unicode, bulk load, and change data capture.
- SQL APT Status. Displays a report listing all SQL functions and keywords. The report indicates, for each SQL adapter, whether the function or keyword is passed to the SQL engine as is, converted to the DBMS-specific version of SQL, or not converted or passed so that it will be processed by WebFOCUS.
- SQL Optimization Report. Displays a report identifying whether WebFOCUS functions are optimized for each SQL adapter. You can select an adapter subcategory and a type of function.
- Data Types. Displays a data type report for all SQL adapters, a subcategory of SQL adapters, or a specific adapter. You can also select a specific server data type for the report. The report shows how the DBMS data type is mapped to server USAGE and ACTUAL formats.
- Adapters License Count. Displays a report showing your license code, the number of adapters you are licensed to configure, and the number of configured adapters.
- Change Common Adapter Settings. Opens a page for setting options that apply to all adapters.
View Group
- Reset. Resets the page to its initial view.
- Show Less. Hides the Tuning and Troubleshooting group. The View menu then displays a Show More option for unhiding the hidden group.
| WebFOCUS | |
|
Feedback |