Programming Solutions
Embedding a URL in Salesforce.com (SFDC) to run a WebFOCUS report is a simple example of embedding WebFOCUS BI content. To accomplish more advanced embedding techniques in SFDC (for example, calling multiple web services, checking cookies, and so on), some programming will be required.
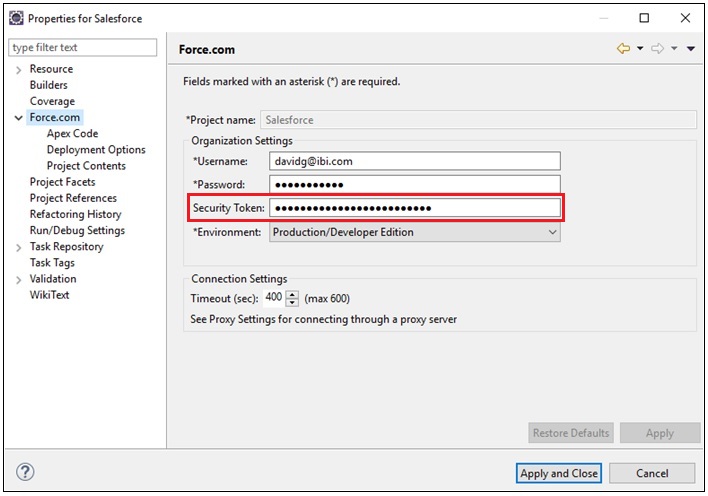
SFDC provides a plug-in for Eclipse called Force.com IDE, which is an integrated development environment for creating, modifying, and deploying SFDC applications.

Force.com IDE allows the development of Apex classes and Visualforce pages, and maintains synchronization with the SFDC environment.
The Security Token is generated on the SFDC website and is required for any API program to access SFDC, such as Force.com IDE.
Apex classes are similar to Java classes, but have special codes for SFDC. Likewise, Visualforce pages are similar to Java Server Pages (JSPs).
If you do not want to integrate SAML, and would prefer to do something like a web service signOn or have a need to run multiple web services, then you need to use what SFDC calls Chained Callouts.
A Callout is the term used by SFDC for calling an external web service.
Chained Callouts means that one Callout will need the response from the previous instance as in a signOn and then an execution of a procedure, schedule, and so on.
For example:
public with sharing class ChainedContinuationController {
    // Unique label for the initial callout request
    public String requestLabel1;
    // Unique label for the chained callout request
    public String requestLabel2;
    // Result of initial callout
    public String result1 {get;set;}
    // Result of chained callout
    public String result2 {get;set;}
    // Endpoint of long-running service
    private static final String LONG_RUNNING_SERVICE_URL1 =
        'http://pmdev.ibi.com/ibi_apps/rs/ibfs';
    private static final String LONG_RUNNING_SERVICE_URL2 =
        'http://pmdev.ibi.com/ibi_apps/rs/ibfs/WFC/Repository/David_SFDC/Car_Report.fex';
    // Action method
    public Object invokeInitialRequest() {
      // Create continuation with a timeout
      Continuation con = new Continuation(60);
      // Set callback method
      con.continuationMethod='processInitialResponse';
      // Create first callout request
      String body1 =
 'IBIRS_action=signOn&IBIRS_userName=david&IBIRS_password=david';
      HttpRequest req = new HttpRequest();
      req.setMethod('POST');
      req.setBody(body1);
      req.setHeader('Content-Type', 'application/x-www-form-urlencoded');
      req.setEndpoint(LONG_RUNNING_SERVICE_URL1);
      // Add initial callout request to continuation
      this.requestLabel1 = con.addHttpRequest(req);
      // Return the continuation
// Callback method for initial request
    public Object processInitialResponse() {
      // Get the response by using the unique label
      HttpResponse response = Continuation.getResponse(this.requestLabel1);
      // Set the result variable that is displayed on the Visualforce page
      this.result1 = response.getBody();
      String cookie = response.getHeader('Set-Cookie');
      Continuation chainedContinuation = null;
      // Chain continuation if some condition is met
      //if (response.getBody().toLowerCase().contains('expired')) {
      // Create a second continuation
      chainedContinuation = new Continuation(60);
      // Set callback method
      chainedContinuation.continuationMethod='processChainedResponse';
      // Create callout request
      HttpRequest req = new HttpRequest();
      req.setMethod('GET');
      req.setHeader('Content-Type', 'application/x-www-form-urlencoded');
      req.setHeader('Cookie', cookie);
      req.setEndpoint(LONG_RUNNING_SERVICE_URL2 + '?IBIRS_action=run');
      // Add callout request to continuation
      this.requestLabel2 = chainedContinuation.addHttpRequest(req);
      //}
      // Start another continuation
      return chainedContinuation;
    }
    // Callback method for chained request
    public Object processChainedResponse() {
      // Get the response for the chained request
      HttpResponse response = Continuation.getResponse(this.requestLabel2);
      // Set the result variable that is displayed on the Visualforce page
      this.result2 = response.getBody();
      // Return null to re-render the original Visualforce page
      return null;
    }
}
The following is an example of the syntax used to define a Visualforce page.
<apex:page controller="ChainedContinuationController" showChat="false" showHeader="false">
<apex:form >
<!-- Invokes the action method when the user clicks this button. -->
<apex:commandButton action="{!invokeInitialRequest}" value="Start Request" reRender="panel"/>
</apex:form>
<apex:outputPanel id="panel">
<!-- Displays the response body of the initial callout. -->
<apex:outputText value="{!result1}" />
<br/>
<!-- Displays the response body of the chained callout. -->
<!-- Need to use "escape=false" so the HTML response is rendered using the tags -->
<apex:outputText value="{!result2}" escape="false" />
</apex:outputPanel>
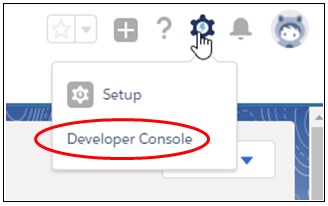
</apex:page>You can access the Developer Console, as shown in the following image.
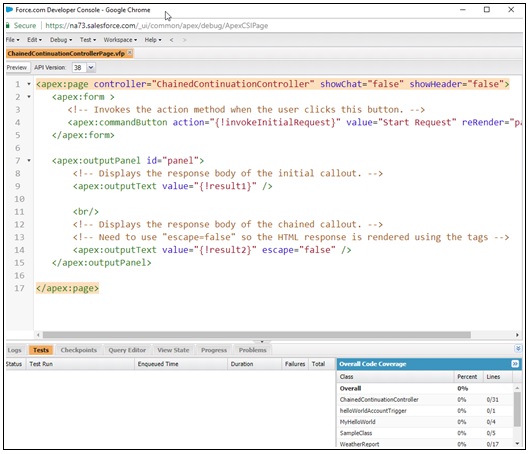
The Developer Console is where you define and configure a Visualforce page, as shown in the following image.
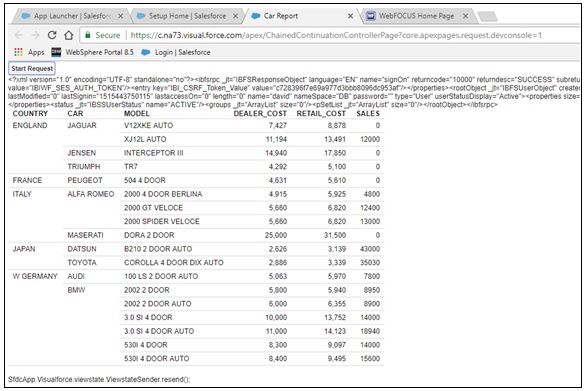
The following image shows sample output that is generated using the Developer Console.
Adding a Visualforce page to your SFDC dashboard is simple:
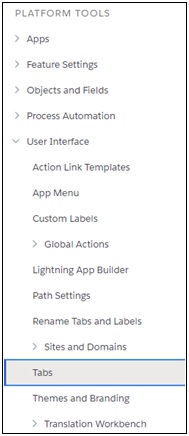
- In the left pane under PLATFORM TOOLS, expand User Interface and then click Tabs, as shown in the following image.
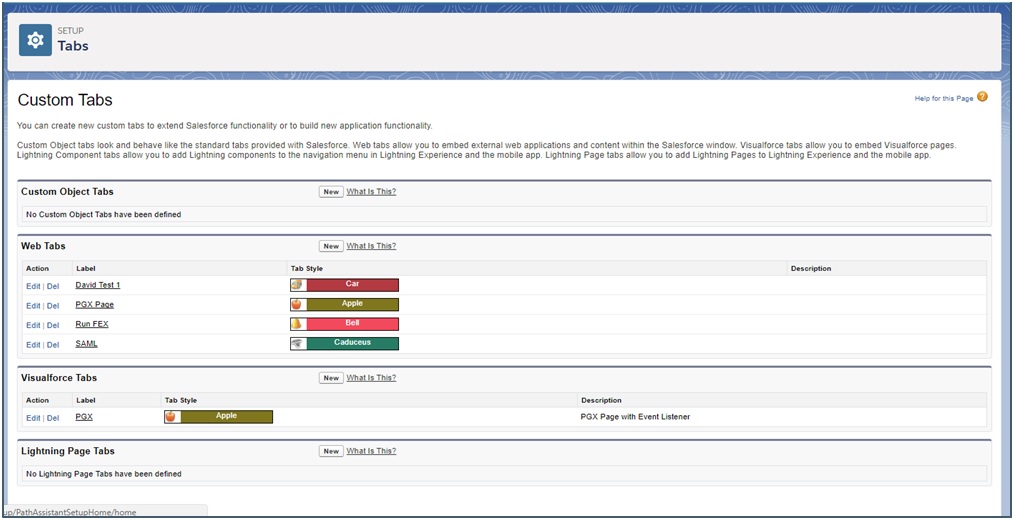
The Tabs pane opens, as shown in the following image.
- On the right side, under the Visualforce Tabs section, click New.
- Select the name of your Visualforce page from the Visualforce Page drop-down list.
- In the Display Properties area, enter a value in the Tab Label field, Tab Name field, and then select a Tab Style from the drop-down list.
- Click Next.
- Do not make any changes for the Add to Profiles and Add to Custom Apps steps that follow.
- Click Save.
- You can now select this new tab containing your Visualforce page when you open a SFDC application in the dashboard, as shown
in the following image.

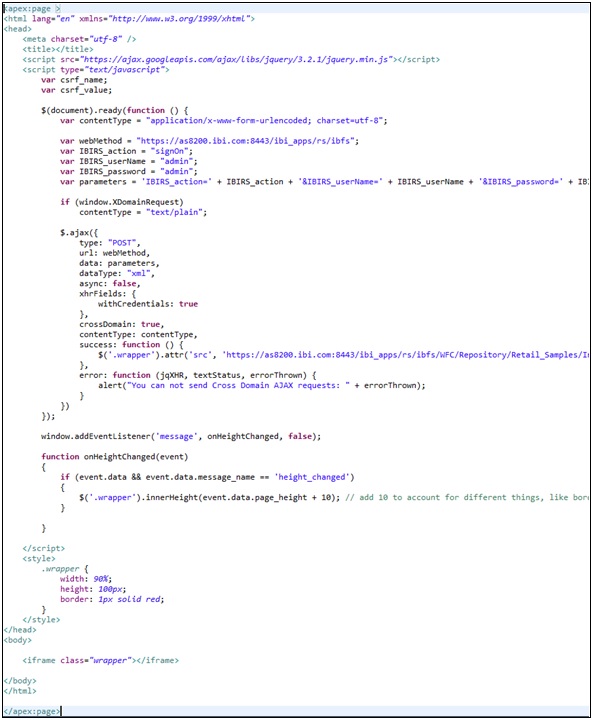
Note: A Visualforce page may also contain HTML and JavaScript. For example:
| WebFOCUS | |
|
Feedback |