Configuring the Embedded Business Intelligence Demonstration Application
|
Topics: |
This section describes the configuration steps for the embedded business intelligence (BI) demo application (Fintoso Financial).
Tip: If you plan to configure the cross-origin scenario (dual web hosts), then it is recommended that you first successfully configure the same origin scenario (single web host).
Configuring a Back Channel Ticket Request
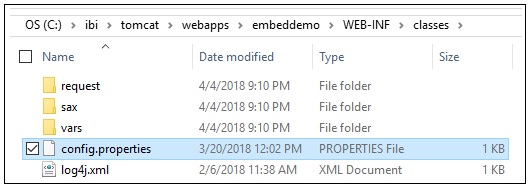
The configuration for the back channel ticket request made by the embedded BI demo application is specified in the config.properties file, which is located in the following folder:
embeddemo\WEB-INF\classes\config.properties
For example, if you deployed the embedded BI demo application (embeddemo.war) file on the Apache Tomcat application server that is available with the WebFOCUS installation, then the config.properties file is located in the folder path, as shown in the following image.
The default file configuration is shown below:
WF_TICKET_PROVIDER_URL=http://localhost:8080/ibi_apps
WF_TRUSTED_APPLICATION_NAME=IBIEmbeddingDemo
WF_HOST=http://localhost:8080/ibi_apps
USERIDS=ffadv
Make the following changes to the WF_TICKET_PROVIDER_URL setting, as required for your installation:
- If your back channel request will need to use HTTPS, rather than HTTP, to access WebFOCUS, then change the protocol value accordingly.
- If you are deploying the embedded BI demo application (Fintoso Financial) on a different machine from WebFOCUS, then change localhost to
the web host that the embedded BI demo application will use to access
WebFOCUS on the back channel.
Note: If you are deploying a same origin scenario, then you can leave the host set to localhost.
- If your back channel request will need to use a port other than
8080 to access WebFOCUS, then change the port value accordingly.
For example, if you are deploying a same origin scenario and you installed Apache Tomcat on port 80, then remove :8080 from the value.
- If you deployed WebFOCUS on a non-standard context path (for example, /ibi_apps82), then change the context path value accordingly.
- Save any changes you made to the config.properties file.
For now, leave the value of WF_TRUSTED_APPLICATION_NAME set to IBIEmbeddingDemo. A trusted application name is passed on the ticket request so WebFOCUS knows which trusted host configuration to reference when verifying the IP address of the request.
Configuring WebFOCUS
|
How to: |
This section describes how to enable Trusted Ticket Authentication in WebFOCUS. Depending on your deployment scenario, you may also need to reconfigure Trusted Ticket Authentication. If you are configuring a cross-origin (dual web host) scenario, then you will need to configure additional cross-origin settings. For more information on configuring and using cross-origin settings in WebFOCUS, see the WebFOCUS Security and Administration content.
Procedure: How to Configure WebFOCUS
- Sign in to WebFOCUS as an Administrator.
- Click Administration in the top
menu and then click Administration Console from
the drop-down list, as shown in the following image.
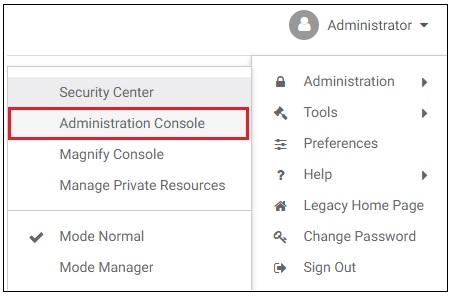
The WebFOCUS Administration Console opens.
- Click the Security tab and then
the Security Zones folder node in the left
pane, as shown in the following image.
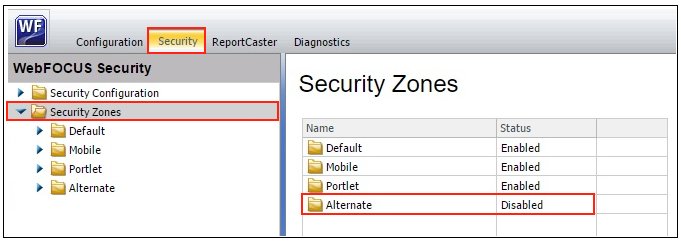
- Verify whether the Alternate security zone (highlighted
in the above image) is Disabled or Enabled.
There is no reason to enable the Alternate Zone to support WebFOCUS embedded BI, but this zone is sometimes enabled to provide an alternative way for administrators to access WebFOCUS.
If the status of your Alternate security zone is Disabled, then skip to Step 5.
If the status of your Alternate security zone is Enabled, then you need to determine if the Alternate security zone will be used to process trusted ticket and trusted sign-on requests. If this is the case, then you need to enable Trusted Ticket Authentication on the Alternate security zone and ensure that it is configured properly to process these requests. The remaining configuration steps in this procedure are provided for the Default security zone. These steps can be applied to the Alternate Zone as well, if it is enabled, and processing requests related to the embedded BI demo application.
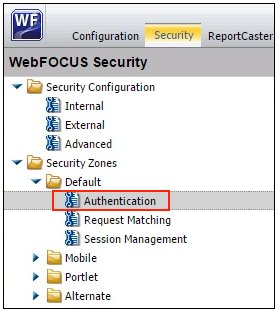
- Expand Security Zones, Default,
and then click Authentication, as shown in
the following image.
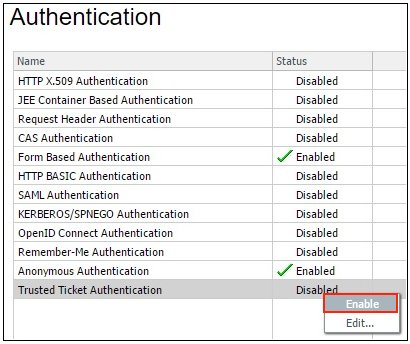
- In the Authentication pane, right-click Trusted
Ticket Authentication and select Enable from
the context menu, as shown in the following image.
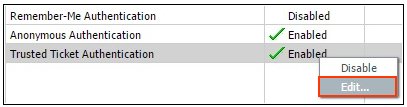
The status of Trusted Ticket Authentication is now Enabled, as shown in the following image.

- Right-click Trusted Ticket Authentication again and
select Edit from the context menu, as shown
in the following image.
The Edit Trusted Ticket Authentication Settings dialog opens, as shown in the following image.
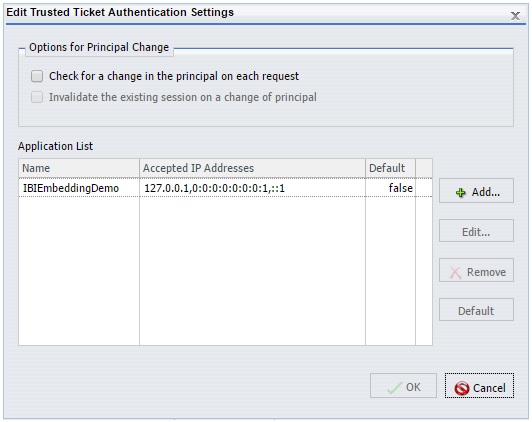
Notice that the trusted application name is IBIEmbeddingDemo and three versions of the localhost IP address (version 4 (IPv4), version 6 (IPv6), and IPv6 loopback) are defined in the Accepted IP Addresses list. These settings are used by WebFOCUS to determine if a trusted ticket request is originating from an authorized server.
- If your config.properties file (as described in Configuring a Back Channel Ticket Request) has localhost specified
as the value for the WF_TICKET_PROVIDER_URL setting
and if IBIEmbeddingDemo is specified as the value
for the WF_TRUSTED_APPLICATION_NAME setting, then
you do not need to make any changes in the Edit Trusted Ticket Authentication
Settings dialog.
Click Cancel and skip to Step 10.
- If you do not have localhost specified
as the value for the WF_TICKET_PROVIDER_URL setting,
then you must determine what IP address the embedded BI demo application
will appear to be running on and add it to the Accepted IP Addresses
list in the Edit Trusted Ticket Authentication Settings dialog.
Tip: If you are not sure what the IP address is, and the wrong value is configured, a message will be displayed after signing on to the embedded BI demo application (Fintoso Financial) indicating that the trusted ticket was not granted. To investigate, you can check the WebFOCUS websecurity log. If the log message indicates that the IP address of the requesting server was not in the Accepted IP Addresses list, then copy the IP address from the log message to the Accepted IP Addresses list in the Edit Trusted Ticket Authentication Settings dialog and try again.
- Click OK to acknowledge the requirement to restart your application server (for example, Apache Tomcat).
- Before closing the WebFOCUS Administration Console, double-click
the Trusted Ticket Authentication provider you just enabled.
The Edit Trusted Ticket Authentication Settings dialog opens, as shown in the following image.
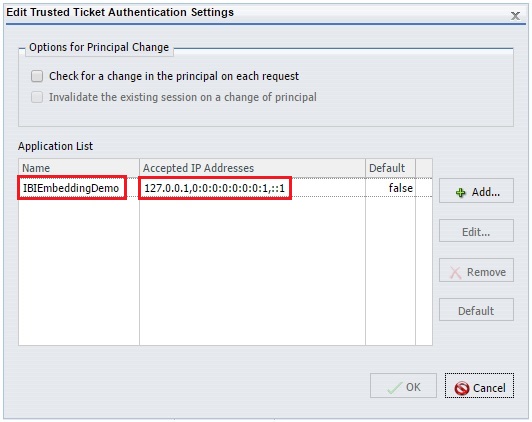
Notice that a trusted application called IBIEmbeddingDemo is pre-configured for you and that this matches the value in the config.properties file of the embedded BI demo application.
While this trusted application information is preconfigured for you in WebFOCUS, it is not used unless you enable it as described in this procedure.
- Click Cancel and then close the WebFOCUS Administration Console.
- Restart your application server (for example, Apache
Tomcat).
WebFOCUS is now ready to accept trusted ticket connections.
Using the Trusted Ticket Test Pages
|
How to: |
This section describes how to use the trusted ticket test pages by using valid arguments and then using an invalid argument to test the functionality of the page.
Procedure: How to Configure the Trusted Ticket Test Page
- Run the Reporting Server on the jagsig VMWare image.
- From the WebFOCUS Administration Console, click the Security tab and select the Trusted Ticket Authentication check box to ensure it is enabled for the Default Zone.
If you are using the Alternate Zone, make sure the option is also enabled there.
- In a new browser tab, enter the following URL:
http://localhost:8080/embeddemo/tester/create_trusted_ticket.jsp
- Enter the following values as shown in the table below:
Parameter
Value
UserID:
<use CTRL-V to paste it from the clipboard> IBIB_appname:
IBIEmbeddingDemo IBIB_destination:
<leave blank> 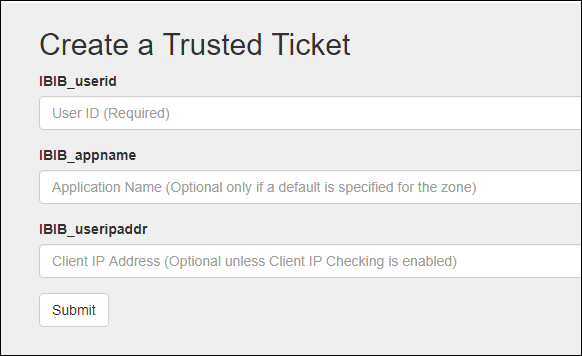
A trusted ticket is returned and displayed in the browser.
- Copy the ticket to the clipboard by pressing CTRL-C.
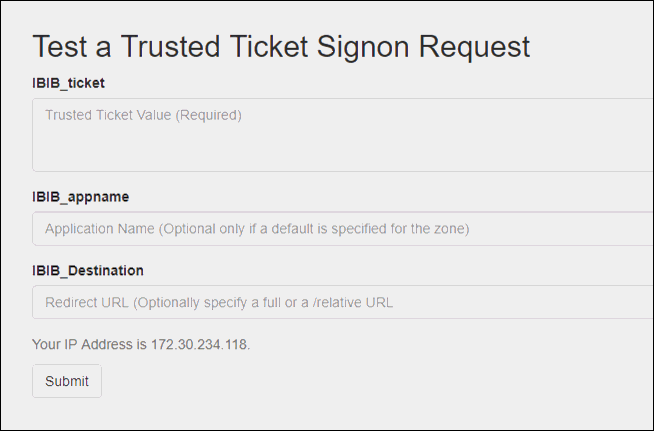
- In your browser, enter the following URL:
http://localhost:8080/embeddemo/tester/test_trusted_ticket.jsp
- Enter the following values as shown in the table below:
Parameter
Value
IBIB_ticket:
<use CTRL-V to paste it from the clipboard> IBIB_appname:
IBIEmbeddingDemo IBIB_destination:
<leave blank> This returns a browser page that shows an XML response with an ibfssession, which means the sign on was successful.
Procedure: How to Test the Trusted Ticket Page Using an Invalid Argument
To test the trusted ticket page using an invalid argument:
- While running the create_trusted_ticket.jsp, enter an invalid name into the IBIB_appname field, as shown in the following
image.
The result, A "-1" will be returned.
- In the next test, in securitysettings.xml, set userIPAddrCheck to true for the TrustedTicketPreferences section, and then recycle Apache Tomcat.
- Enter a non-localhost IP address for IBIB_useripaddr.
Note:
- The ticket is returned as expected.
- You can use CTRL-C to copy the ticket to the clipboard.
- Run test_trusted_ticket.jsp with that ticket.
You will receive a 403 return because it failed. The websecurity.log file will show the following message:
[2017-08-16 13:23:52,512] WARN [http-nio-8080-exec-8:wfsecurity]
:unknown: - [Zone: main]Trusted sign on request rejected, Key
verification failure
| WebFOCUS | |
|
Feedback |