Using a JavaScript Function to Navigate to a Panel
|
Topics: |
You can use a JavaScript function to dynamically navigate to panels within a Designer page and pass parameters from content in one panel to the content in other panels. This makes it possible to create an interactive page where the user can explore the data in different ways.
To create the Navigate to Panel function, you need to perform the following steps:
- Create Hyperlinks. Create hyperlinks within a chart or report, which you will later configure to point to parameterized content.
- Create Parameterized Content. Create charts and reports to which the links will point.
- Determine the CSS Class for the Target Content Item. Inspect the target content item inside the Designer page and determine its CSS class.
- Configure Hyperlinks with the CSS Class. Specify the output location for the links.
Step One: Creating Hyperlinks
|
How to: |
In this step, you will create a simple report with hyperlinks, which you will later configure to point at a specific output in a portal.
Procedure: How to Create Hyperlinks in a Report
- Sign in to WebFOCUS as a developer or administrator.
- Launch in Report mode.
- Select a data source file and click OK.
- Drag fields from the Data pane onto the canvas or into
the Query pane to create a report.
For more information on how to create a basic report, see the Creating and Customizing Reports chapter, in the WebFOCUS InfoAssist User’s Manual.
- Click the field that you want to use for the Navigate to Panel function to highlight it.
- On the Field tab, in the Links group,
click Drill Down.
The Drill Down dialog box opens.
- Select the Refresh BI Portal radio button.
- Click the Add Parameter button.
- Type a name for the parameter.
Note: Remember the name of the parameter. You will use it in the subsequent steps.
- In the Type list, click Field.
- In the Value list, click the field that you have highlighted,
and then click OK.
The following image shows the example of the Drill Down dialog box, where Country is the name of the parameter.

- Click OK.
The hyperlinks are added to the entries of the highlighted field.
Note: The links remain inactive and evoke no error messages until the target value is configured.
- Save the report.
Step Two: Creating Parameterized Content
|
How to: |
In this step, you build parameterized reports and charts that will serve as the target content for the parameters coming from your JavaScript function..
Procedure: How to Create Parameterized Content for Hyperlinks
- From InfoAssist, click the application button, then click New.
- Click Build a Report or Build a Chart.
- Select the same data source file that you used for the initial report, and then click OK.
- Drag fields from the Data pane onto the canvas or into the Query pane to create a report or chart.
- On the Data tab, in the Filter group,
click Filter.
The Create a filtering condition dialog box opens.
- Double-click the Double-click or press F2 to edit! text.
- Set the following values:
- In the Field drop-down list, click the same field for which you have created hyperlinks in the previous report.
- Keep the Equal To default value.
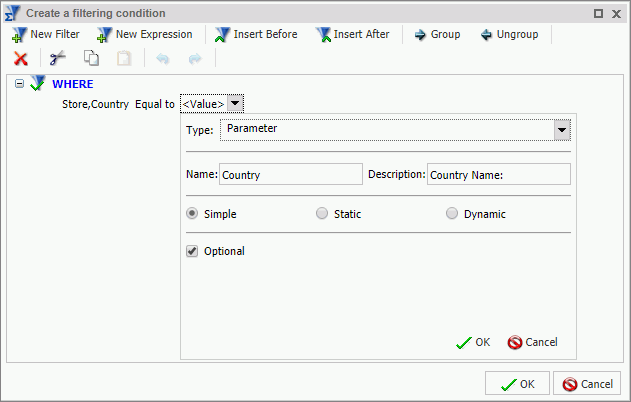
- In the Value dialog box, set Type to Parameter, keep the Simple radio button selected, and type the name of the parameter that matches the parameter in the initial report, select the Optional check box, and then click OK.
The following image shows an example of the filtering condition, where Country is the name of the parameter.

- Click OK.
- Save the second report and close WebFOCUS InfoAssist.
- Repeat steps 1-8 to create more content.
- Close WebFOCUS InfoAssist.
Determine the CSS class for the Target Content Item
|
How to: |
In this step, you create a Designer Page, inspect the target content item inside the page and determine the CSS class for this item.
Procedure: How to Determine CSS Class for a Content Item
- Open a web browser.
- Launch WebFOCUS Designer, as described in Creating Pages in WebFOCUS Designer.
- Add the parameterized content item to the page.
- Press F12 on your keyboard.
The browser debugger interface opens.
- Click the Select and element button, as shown in the following image.

- Click the content item on the canvas.
The CSS classes that belong to this item appear highlighted in the debugger.
- Locate the CSS class starting with CONTENT-, as shown in the following image.

This is the unique identifier of your content item.
- Copy the entire CSS class to the clip editor.
- Optionally, repeat steps 3-8 for other content items that you want to refresh.
- Close the web browser debugger interface but leave the WebFOCUS Designer open.
Configure Hyperlinks with the CSS Class
|
How to: |
In this step, you edit the report containing hyperlinks to specify the output location and test the Navigate to Panel function.
Procedure: How to Configure Hyperlinks
- On the Home Page, open the initial report in the Text Editor.
- Navigate to the line that contains the following code:
JAVASCRIPT=drillRefresh
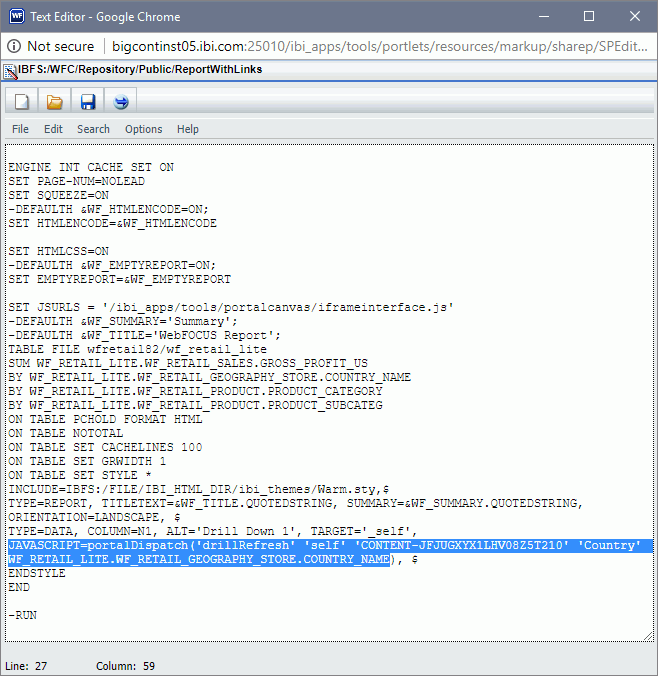
- Change drillRefresh to portalDispatch, place drillRefresh after the parenthesis, change AMPERS_PAGE_ONLY to self, and paste the CSS class that you copied from the web browser debugger interface. Ensure that you enclose these entries in
single
quotation marks.
An example of modified syntax should look similar to this:
JAVASCRIPT=portalDispatch('drillRefresh' 'self' 'CONTENT-JFJUGXYX1LHV08Z5T210' 'Country' WF_RETAIL_LITE.WF_RETAIL_GEOGRAPHY_STORE.COUNTRY_NAME)where:
- portalDispatch
-
Is the JavaScript function.
- self
-
Is an indication that the current page will be refreshed.
- CONTENT-JFJUGXYX1LHV08Z5T210
-
Is the CSS class that you copied from the web browser debugger interface.
Note: If you want to refresh two or more items on the page, paste their CSS classes separated by spaces and enclose them all in single quotation marks, like so: 'CONTENT-JFJUGXYX1LHV08Z5T210 CONTENT-JFJUJUDL12XKUUHTX291'
- Country
-
Is the name of the parameter that is being passed from the hyperlinks.
- WF_RETAIL_LITE.WF_RETAIL_GEOGRAPHY_STORE.COUNTRY_NAME
-
Is the database entry which is tied to the parameter alias.
The following image shows an example of the modified syntax.

When working with more complex content items, such as matrix charts or reports, you might want to pass more than one parameter to your target content. In such cases you need to create a separate drill-down link for another parameter and modify your syntax to include two parameters in a single Java function. An example of syntax for passing two parameters is shown in the following image.

- Click Save and close the Text Editor.
- In WebFOCUS Designer, add the report that you just modified to the canvas.
- Click the Preview button.
The preview mode opens.
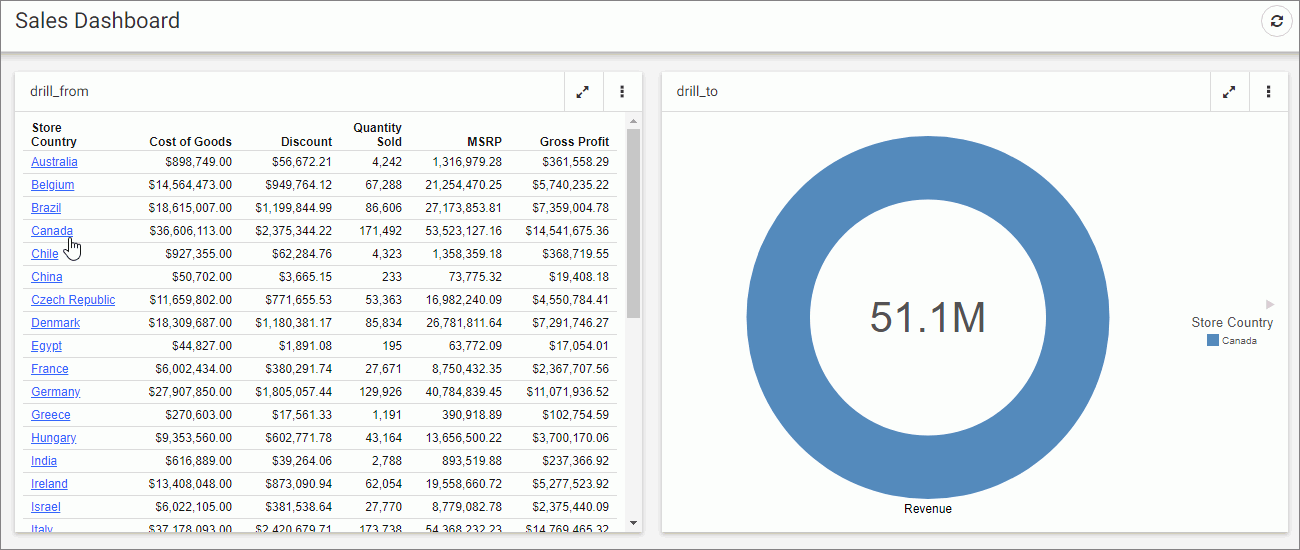
- Click any link in the initial report.
The second content item refreshes to reflect the correct data, as shown in the following image.

| WebFOCUS | |
|
Feedback |