Creating the Retail Samples Database and Metadata
|
How to: |
This section describes how to create the WebFOCUS Retail database and metadata that is used by content in the Retail Samples domain. You may use any of the available WebFOCUS Reporting Server data adapter options that are available to you. For demonstration purposes, Microsoft SQL Server is used in this procedure.
Procedure: How to Create the Retail Samples Database and Metadata
- Create a database where you will load
the sample data.
The example in this procedure uses Microsoft SQL Server Management Studio for this task. You will also need to identify a service account that has read/write access to the database. The following values are used in this example:
- Database Name: Retail_Samples_DB
- SQL Server Account: webfocus
In the Login Properties - webfocus dialog box, shown in the following image, the service account db_owner role is assigned to the Retail_Samples_DB database to ensure that this role can create tables and read the data.

- Sign in to the WebFOCUS Reporting Server Console as an Administrator.
- Open the Connect to Data view and create
a new Adapter, which will be used to access the Retail Samples database.
The Add Connection for MS SQL Server JDBC dialog box opens, as shown in the following image.
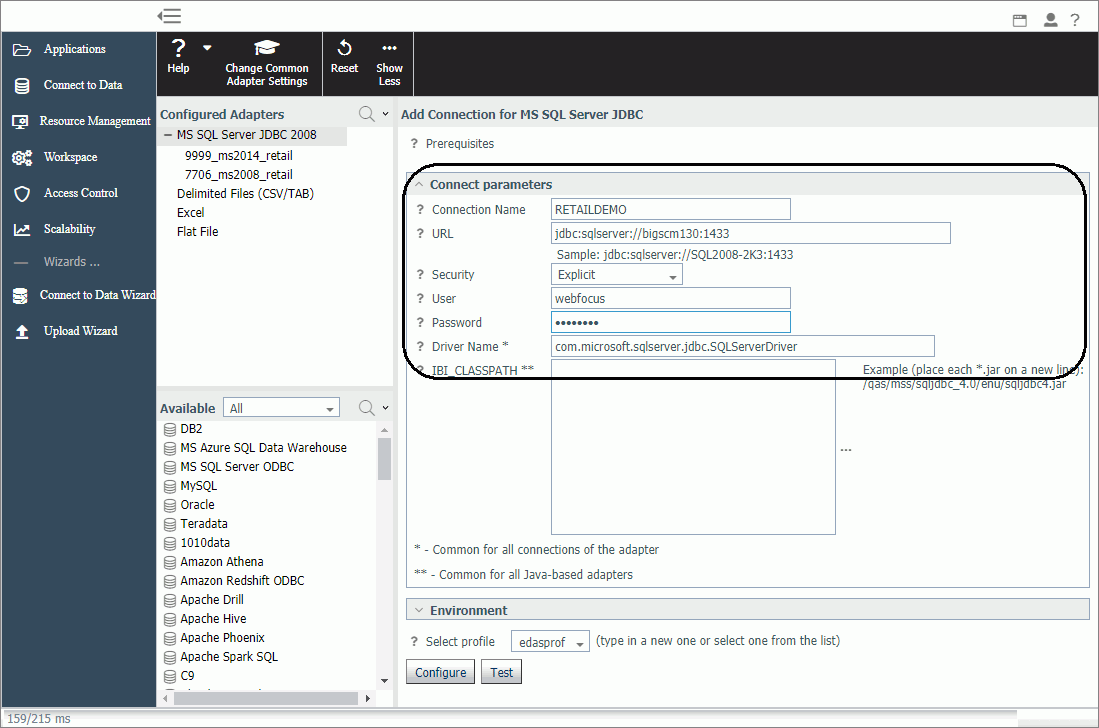
- You can specify any value in the Connection Name field.
- Configure the remaining settings accordingly for your environment and data source.
- Click Test.
A message displays indicating that the adapter test was successful, as shown in the following image.

If you do not see a message displayed confirming success, then you must resolve the issue before continuing.
- Click Configure on the bottom of the screen.
- Open the Applications view.
- In the Ribbon, click New and select Application
Directory.
The Create New Application tab opens.
- Replace the text in the Application Name field with retail_samples, as shown in the following image.
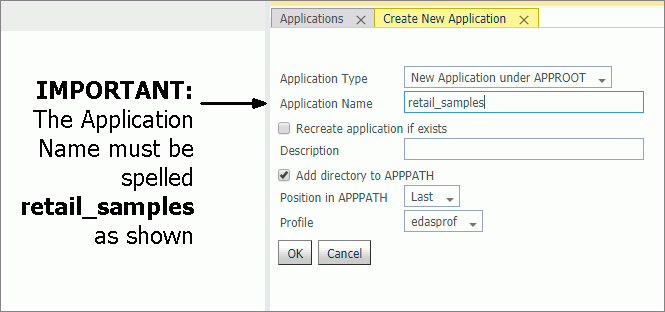
Note: You must enter the Application Name with this exact spelling because the Retail Samples content is referencing metadata from this Application folder. If you are familiar with the APP MAP command, you can use this approach to map a different Application folder to the required name.
You do not need to provide a Description but we recommend leaving the Add directory to APPPATH box checked to simplify the configuration procedure.
- Click OK to create the Application Directory.
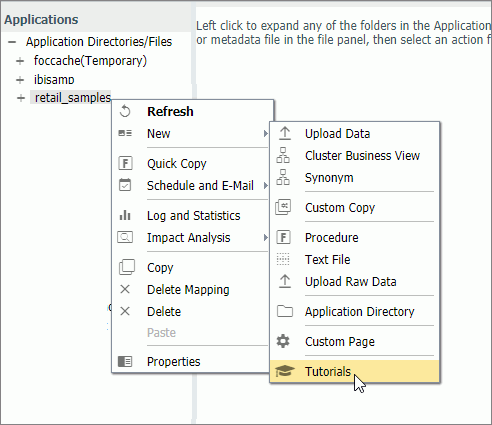
- Expand the Application Directories/Files folder
in the left pane, right-click the retail_samples application,
select New, and then click Tutorials, as shown in the following image.
The Create Tutorial Framework tab opens, as shown in the following image.
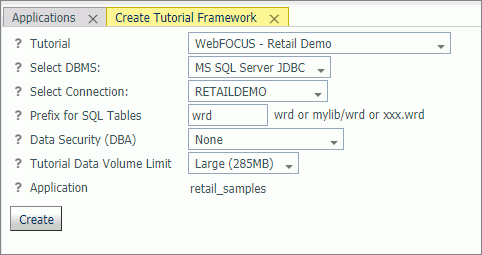
- Perform the following steps:
- Select WebFOCUS - Retail Demo from the Tutorial drop-down list.
- Select RETAILDEMO from the Select Connection drop-down list.
- Optionally, you can change the value in the Prefix for SQL Tables field that will be applied to the tables created in your database.
- It is recommended leaving the value in the Data Security
(DBA) drop-down list set to None for your
initial exploration of Retail Samples.
Later you can rerun this tool and explore the WebFOCUS Dynamic Data Security features including support for row and column-level security.
- It is recommended to leave the value in the Tutorial
Data Volume Limit drop-down list set to Large (285MB) if
you have the space because the Retail Samples content is designed
to be used with the full 285MB load of the database.
Optionally, you can choose the Medium (9MB) load, but your content will look somewhat different than what is shown in this document.
- Click Create.
A confirmation dialog box displays.
- Click OK.
The full data load process generally takes a minute and a half or more to complete.
- When this process has finished, you will see three cluster
synonyms and six subfolders under the retail_samples application
directory, as shown in the following image.
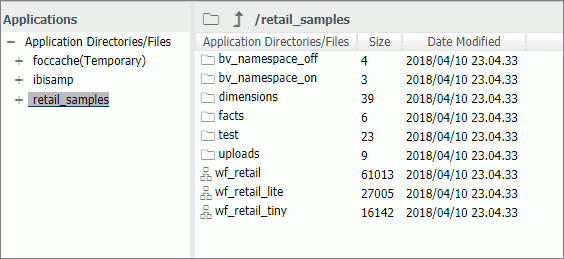
The Retail Samples domain content was created from the wf_retail_lite cluster synonym, which represents a single fact star schema representation of the data. The wf_retail cluster synonym is a more advanced multi-fact schema and wf_retail_tiny is a simpler structure.
- Verify that your sample database was created properly by right-clicking wf_retail_lite and selecting Sample Data from the shortcut menu.
Reference: What’s Next?
- Assuming that you are following the topics in order, you will have already imported the Retail Samples domain content into your WebFOCUS repository. If not, then complete that step now.
- Assuming your WebFOCUS Client is configured to communicate with
the WebFOCUS Reporting Server, you are ready to explore the Retail
Samples demo content and learn more about WebFOCUS. If you are new
to security, then one option you may wish to consider is a trusted
connection to the WebFOCUS Reporting Server.
- In the WebFOCUS
Reporting Server Console, click the Access Control tab.
Right-click your PTH security provider and select Properties. Set the following:
trust_ext=y
Save your change and then restart your server.
- In the WebFOCUS Administration Console, expand Reporting Servers, Server Connections, and double-click your server node. Under Security, select the Trusted option and then save your change. You do not need to restart WebFOCUS.
- This should be sufficient to avoid a server sign in challenge and set you up for exploring other security scenarios. For more information on configuring WebFOCUS Reporting Server security, see the WebFOCUS Reporting Server technical content or contact Information Builders Support.
- In the WebFOCUS
Reporting Server Console, click the Access Control tab.
Right-click your PTH security provider and select Properties. Set the following:
| WebFOCUS | |
|
Feedback |