Portal Designer Overview
|
Topics: |
This topic explains how to create a portal and launch the Portal Designer. It also describes the different components of the Portal Designer interface.
Creating a Portal
|
How to: |
You can create a portal in one of the following ways:
- From the Legacy Home Page, under the Portals node, using the New Portal option.
- From the Legacy Home Page, by adding a portal to a domain template when you create a new domain.
- From the Legacy Home Page, under the Domains node, using the Collaborative Portal option, when you select a domain folder.
- From the WebFOCUS Home Page, when you select a domain or folder, and click Portal on the actions bar.
Procedure: How to Create a Basic Portal
- Sign in to WebFOCUS.
- On the Legacy Home Page, in the Resources tree, right-click the
Portals node, and then click
New Portal.
The New Portal dialog box opens.
- Supply the
requested information on the dialog box, as follows.
- Title. Value displayed in the tree that users use to identify the portal.
- Name. Type a descriptive name for your portal. The name will be used throughout the WebFOCUS application.
- URL. The URL is generated based on the portal name. Another user can enter this URL to access your portal without going to the WebFOCUS Home page.
- Security. Select the Give others access check box to bring up the security dialog box when the Portal Designer opens.
- Once you
have completed the fields, click
Create.
The portal generates, and is now available under the Portals node. If you did not select the Give others access check box, the Portal Designer opens.
If you did select the Give others access check box, the Security Rules dialog box opens. Use it to set the access rules for the portal. For more information, see Security.
Procedure: How to Create a Basic Portal While Creating a Domain
- Sign in to WebFOCUS.
- On the Legacy Home Page, in the Resources tree, right-click the
Domains node, point to
New, and then click
Enterprise Domain or
Tenant Domain, depending on which type of domain you
want to create.
The New Domain dialog box opens.
- Type the
title of the domain in the Title field.
The Name field is filled automatically to match the value in the Title field. You can edit it.
- Select the
Create Portal check box, as shown in the following
image.
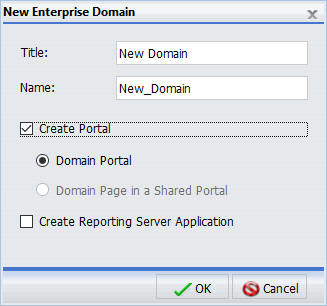
Note: If you cannot create basic portals in your environment, the Create Portal check box is cleared and disabled, by default.
- Click
OK.
A message appears and confirms that the template processing is complete.
- Click
OK.
A new domain and a portal with the same name appear in the Resources tree.
- To
customize your new portal, under the Portals node, right-click the portal and
click
Edit.
The Portal Designer opens.
When you create a portal as part of a domain, it comes with the following pre-configured pages:
- Workbench
- My Page
The Workbench page can be used to work with domain content. It displays the Resources tree and report output area. When you run a content item, it appears in the report output area. Multiple content items appear as tabs.
My Page presents you with series of empty containers that you can fill with the content of your choice. You can maximize any of these containers to get a better view of your content.
For more information about domain templates, see the WebFOCUS Security and Administration technical content.
Procedure: How to Create a Collaborative Portal
- Sign in to WebFOCUS.
- Select the domain or folder, where you want to create the collaborative portal.
- From the Legacy Home Page, point to New, and then click Collaborative Portal. The New Collaborative Portal dialog box opens.
- From the WebFOCUS Home Page, on the actions bar, click Collaborative Portal. The New Portal dialog box opens.
- Supply
the requested information on the dialog box, as follows.
- Title. Value displayed in the tree that users use to identify the portal.
- Name. Type a descriptive name for your portal. The name will be used throughout the WebFOCUS application.
- Path. The path of the portal in the WebFOCUS repository.
- URL. The URL is generated based on the portal name. Another user can enter this URL to access your portal without going to a home page.
- Once you
have completed the fields, click
Create.
The portal is created for you, the Resources folder for the collaborative portal is added to the repository, and the Portal Designer opens.
Reference: Resources Folder
You can also reference pages in a portal from other locations.
Note: Do not delete the Resources folder for a portal that is in use. If you attempt to open a portal with a missing Resources folder, warnings will occur.
Portal Designer Interface
The following image shows the Portal Designer.
The Portal Designer has the following components:
- Page Templates
- Application menu
- Quick Access Toolbar
- Ribbon
- Canvas
- Properties panel
- Breadcrumb trail
These components are described in subsequent topics.
Note: The Portal Designer uses the Neutral theme, by default. You can change this to another theme of your choice from the Administration Console.
Page Templates
|
How to: |
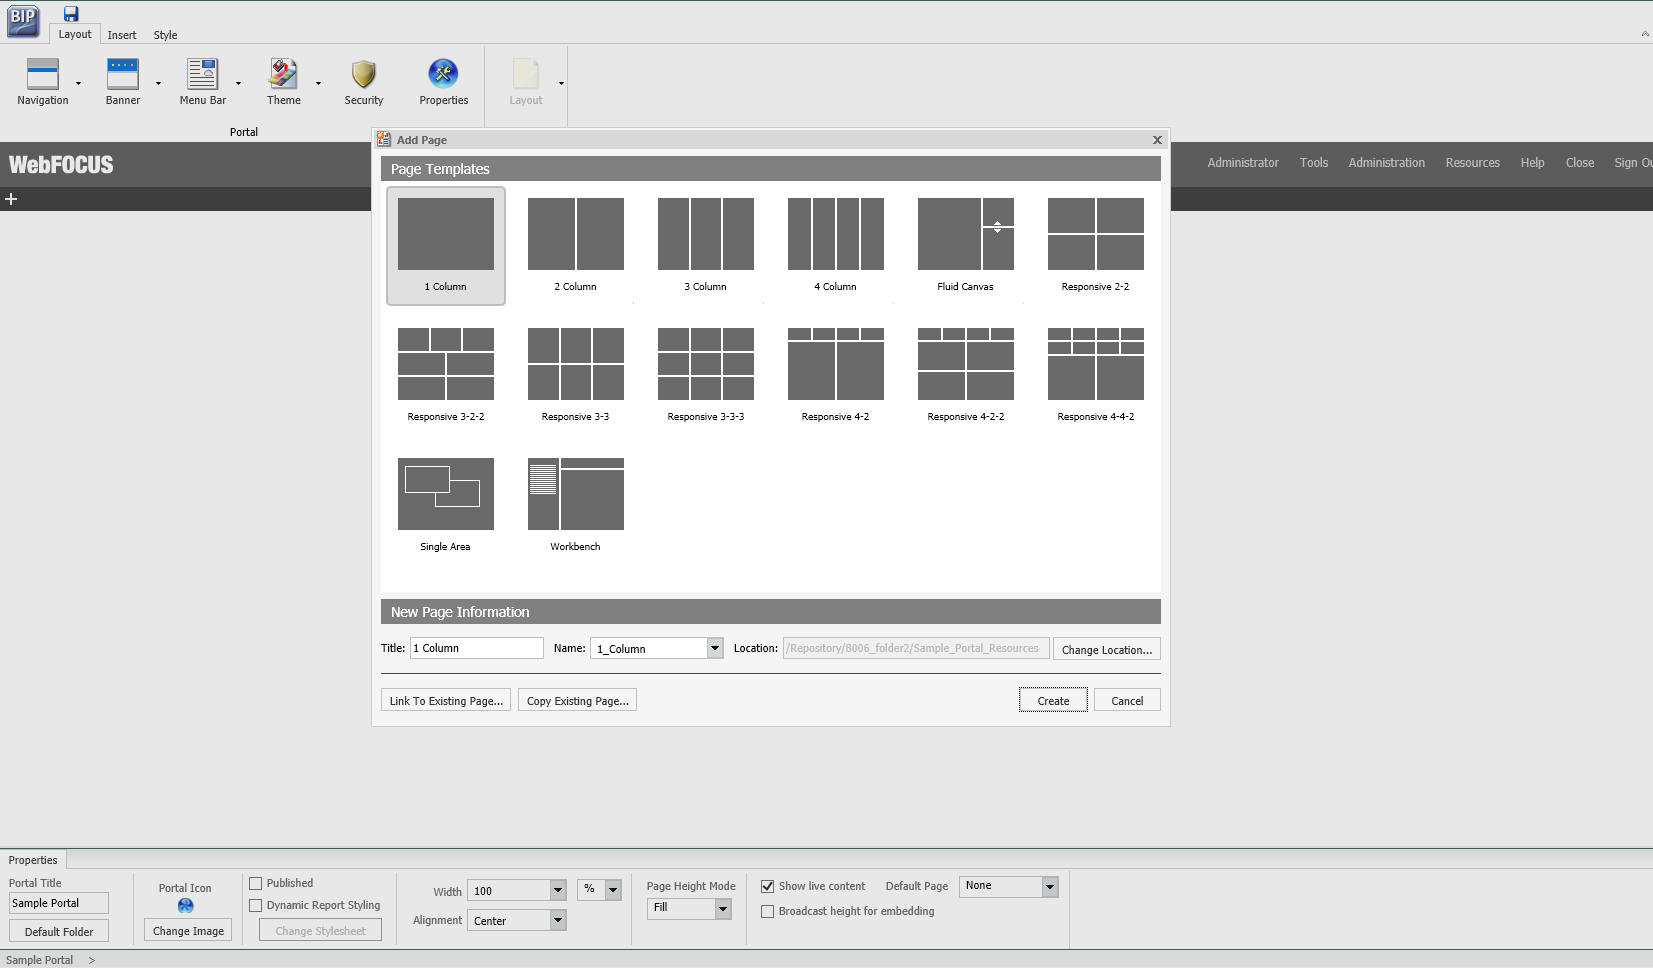
Page templates provide a quick way of creating page layouts. When you create a new collaborative portal or portal page, the Add Page dialog box opens and provides layout presets that you can choose from before adding any content. If you have custom templates, they are also shown in this dialog box.
Note: These page templates are only available when you create collaborative portals.
The Add Page dialog box is shown in the following image, and contains the following options:

- Page Templates. Contains custom and default page templates. Each template is accompanied
by a thumbnail, which allows you to preview the layout. The default templates
are:
- 1 Column
- 2 Column
- 3 Column
- 4 Column
- Fluid Canvas
- Responsive 2-2
- Responsive 3-2-2
- Responsive 3-3
- Responsive 3-3-3
- Responsive 4-2
- Responsive 4-2-2
- Responsive 4-4-2
- Single Area
- Workbench
- New Page Information.
Provides access to the following options:
- Title. Identifies the title of the portal page. The default title matches the name of the selected page template.
- Name. Identifies the name of the portal page. The default name matches the name of the selected page template.
- Location. The location of the page in the repository. The default location is the Resources folder of the portal. To change the location, click Change Location and navigate to a different domain or folder.
- Link to Existing Page. Changes the location of the portal page in the repository. To change the location, click Change Location and navigate to a different domain or folder.
- Copy Existing Page. Creates a copy of an existing portal page in the repository, and adds it to a portal.
Procedure: How to Create a Custom Portal Page Template
Note: You can only create a custom portal page template from the Legacy Home Page.
- Sign in to WebFOCUS as a developer or administrator.
- On the Legacy Home Page, in the Resources tree, expand the Global Resources folder, and then expand the Page Templates folder.
- Right-click the Custom folder, point to New, and then click Portal Page.
The Page Designer and Add Page opens.
- Select a template that you want to use as a base for your custom template, update the Name field, and then click Create.
- Modify your layout.
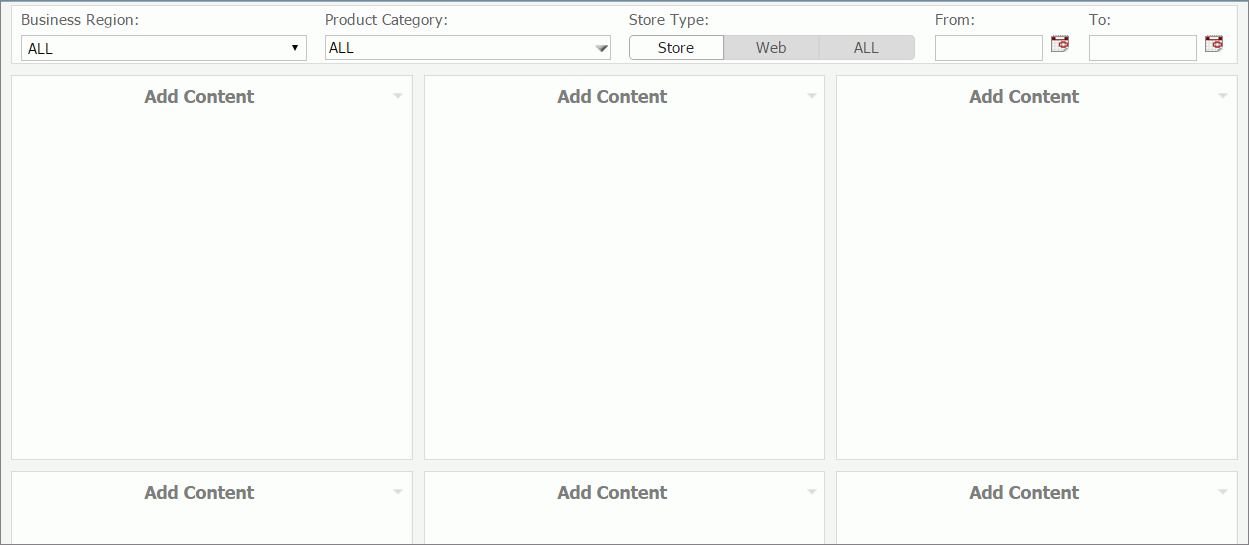
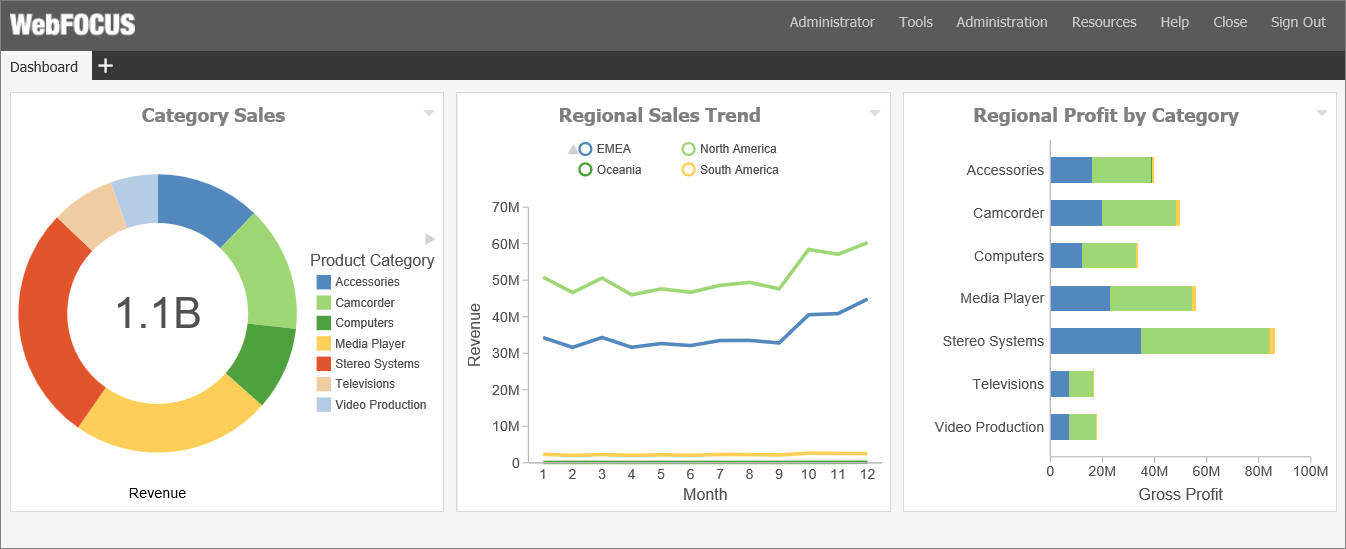
In this example, we used the Responsive_3-3 template and added a filter panel to it, as shown in the following image.
- Click Save, and close the Page Designer.
- In the Resources tree, right-click your newly created custom page template and click Properties.
The Properties window opens.
- Locate the Properties value and make a note of the thumbnail image name, as shown in the following image.
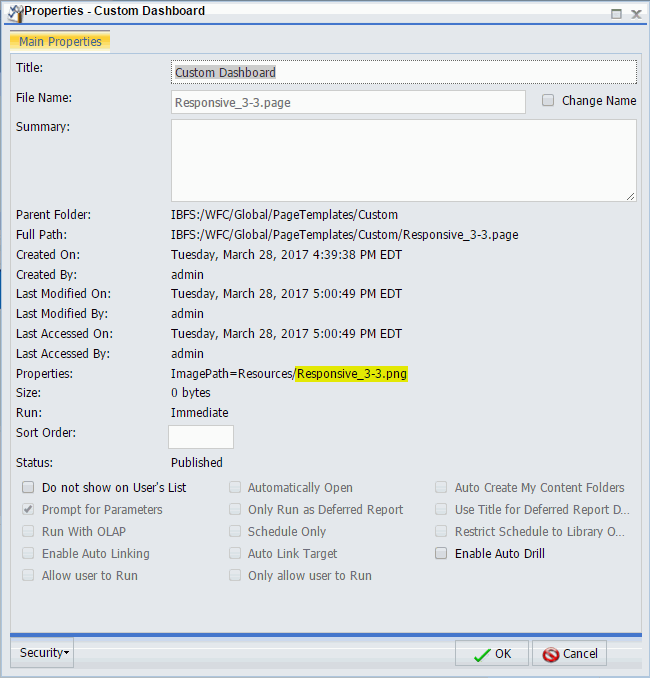
- Create a custom thumbnail image, resize it to 96 x 72 pixels, and save it with the same name and file extension as the one in the custom template Properties value.
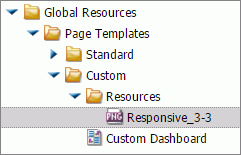
- In the Resources tree, under the Page Templates folder, right-click the Custom folder, point to New, and then click Folder.
The New Folder dialog box opens.
- In the Title field, type Resources, and click OK.
- Right-click the folder that you just created, point to Upload, and then click Image.
The Image Upload dialog box opens.
- Upload your custom thumbnail image and exit the Image Upload dialog box.
The correct folder structure, under Global Resources, is shown in the following image.
- In the Resources tree, under the Domains node, right-click a domain or folder, point to New, and then click Page or Collaborative Portal.
The Designer tool opens and Add Page dialog box opens with the new custom template added to the list, as shown in the following image.
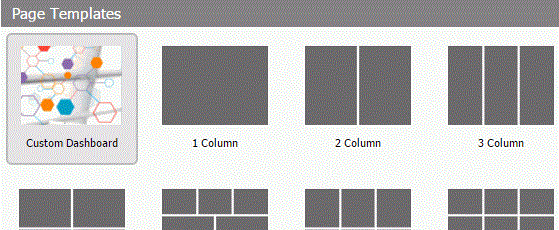
- With the Custom Template selected, click Create.
The custom template layout displays on the page.
Application Menu
You can access the Application menu through the BIP icon at the upper-left corner of the Portal Designer window.
The menu contains options to:
- Create a portal.
- Open an existing portal in the Portal Designer.
- Save the current portal.
- Save the current portal as specified. This option is only available for basic portals.
- Exit.
Quick Access Toolbar
The Quick Access Toolbar allows you to save your changes to the current portal.
Ribbon
|
Topics: |
In the Portal Designer, you can use the ribbon to access commands to edit your portals and add content. You can also hide the ribbon to maximize space or launch the online Help content.
The ribbon contains the following three tabs:
- Layout. Specifies the portal-level settings and the page and banner layouts.
- Insert. Inserts an item from a page to a report.
- Style. Applies styles to common properties such as, background, border, and font.
Layout Tab
|
Topics: |
The Layout tab for a collaborative portal contains two groups, Portal and Page & Banner. You can use the options in these groups to modify your portal.
Portal Group
|
Topics: |
The following topics describe the options that are available in the Portal group.
Navigation
- None. Displays no navigation menu.
- Top. Positions the navigation menu beneath the banner, at the top of the window. This is the default layout.
- Left. Positions the navigation menu on the left side of the screen, in the left banner.
- Right. Positions the navigation menu on the right side of the screen, in the right banner.
Banner
You can expand the Choose Banner Areas option and choose among:
- Top. Positions the banner at the top of the window. This is the default area.
- Bottom. Positions the banner at the bottom of the window.
- Left. Positions the banner at the left of the window.
- Right. Positions the banner at the right of the window.
Click each menu option to turn the associated banner on or off.
Menu Bar
The Menu Bar button allows you to use a visual interface to change the location of the links. You can choose from three main locations:
- Top Bar. Displays the links above the top banner.
- Top Banner. Displays the links within the top banner. This is the default location, with a right alignment of the links.
- Bottom Bar. Displays the links below the bottom banner.
The bar options are thin strips, either at the top or bottom of the window. They are always visible, no matter how far down or up you scroll.
In each of the locations, you can choose alignment options. For example, you can align the links to the left, in the center, or to the right.
Theme
Theme launches a menu from which you can customize the theme of your portal. This includes the following:
- Portal Theme Files Browser. Configures CSS files, by applying a predefined theme. You can also create a custom theme. The default theme is Neutral.
- CSS Editor. Enables you to edit specific components of the existing CSS theme.
Security
The Security button launches the Security Rules dialog box, where you can specify an audience for the portal and add other designers.
There are four permission sets for portals:
- BIPCreatePortal. Allows you to create a portal.
- BIPFullControl. Gives you design access and personalization features on a portal.
- BIPViewAndCustomize. Provides access to run-time mode only. It saves the position of any content that you rearrange and lets you add new content to your copy of the portal.
- BIPViewOnly. Does not save anything that you do in run-time mode. One use for this operation is anonymous access.
Properties
The Properties button makes the current portal the selected object. It also sets the Properties panel at the bottom of the Portal Designer window so that it applies to the current portal.
Page & Banner Group
The Page & Banner group has a single Layout option that launches a menu from which you can customize the layout of your canvas or portal. For example, you can choose between a column-based layout or to a fluid layout. In a column-based layout, dragging a panel results in a drop indicator, showing where the panel goes. In a fluid layout, the content automatically fills the page area in equal proportions. You can manually rearrange and nest these elements on the page. The display area changes its size depending on your browser dimensions.
The Page & Banner Group includes the following options:
- Single Area. Creates a free-flowing area, where there is no grid. This is the default.
- Fluid Canvas. Arranges content evenly, and redistributes space as more items are added.
- One Column. Stretches content to fill the entire page area.
Note: This layout is always used to create a responsive portal page. For more information, see Building a Responsive Portal.
- Two Columns. Divides the page evenly into two columns.
- Three Columns. Divides the page evenly into three columns.
- Four Columns. Divides the page evenly into four columns.
When you select any option other than Single Area, any items that you add to the page automatically snap to place in the layout.
Insert Tab
You can use the Insert tab to add containers or content to your portal.
The Insert tab the following:
- Pages. Adds a new portal page to the portal.
- Containers. Adds a panel, accordion, tabbed, responsive, or easy selector container.
- Content. Inserts content, for example, reports, charts, visualizations, documents, and URLs. You can also add images, a Resources tree, a Portal List, and text.
Style Tab
|
Topics: |
You can use the Style tab to configure the styling of objects, options for the background and borders, as well as fonts and colors of the text.
The Style tab contains the following groups:
- State
- Background
- Border
- Font
State
- Normal. This is the default state of an object in which an event, such as a hover, is not occurring, or if styling for that event is not defined.
- Active. This is the state in which the object is currently in use. An example is the background color of the current page tab.
- Hover. This is the state in which the mouse cursor is resting on the object.
Background
|
Topics: |
You can use an image, a color, or a combination of options when styling the background of an object.
Image
To add a new image, use the Resources tree, and right-click the folder that you wish to place the new image in. Point to Upload and click Image.
Note: The background image is not visible when the Width option is set to Responsive.
Repeat
- None. Displays the background image only once.
- Everywhere. Repeats the background image horizontally and vertically. This is the default value.
- Horizontally. Repeats the background image horizontally.
- Vertically. Repeats the background image vertically.
Position
The default background position is upper-left.
Background Color
The
Background Color icon
![]() launches the color selection dialog box for setting a page background color.
The same icon is used in the Border and Font groups to set the border and font
colors, respectively.
launches the color selection dialog box for setting a page background color.
The same icon is used in the Border and Font groups to set the border and font
colors, respectively.
Reset Background
The Reset
Background icon
![]() in the Background group resets the background styling to the theme settings for
the currently selected state. The same icon is used in the Border and Font
groups to reset those groups.
in the Background group resets the background styling to the theme settings for
the currently selected state. The same icon is used in the Border and Font
groups to reset those groups.
Border
Style
When you click the Style menu, the Select Border Style menu opens. From this menu, you can choose from nine border styles. This includes None, solid border, dotted border, dashed border, groove border, and more. As you hover over each option, the canvas refreshes with a preview to show the border style.
Width
You can use the Width controls to set the border thickness in pixels (px). If the style is set to none, which is the default for most objects, the Width control has no effect.
Color
The Border
Color icon
![]() launches the color selection dialog box for setting the Border color.
launches the color selection dialog box for setting the Border color.
Reset Border
The Reset
Border icon
![]() in the Border group resets the border styling to the theme settings for the
currently selected state.
in the Border group resets the border styling to the theme settings for the
currently selected state.
Font
|
Topics: |
You can use the Font group to choose the Font family, modify the size of the font, and apply bold, italic, or underlined formatting.
In addition, the Font group contains:
Color
The Font
Color icon
 launches the color selection dialog box for setting the font color.
Reset Font
The Reset
Font icon
![]() in the Font group resets the font styling to the theme settings for the
currently selected state.
in the Font group resets the font styling to the theme settings for the
currently selected state.
Canvas
The following image shows the canvas of the Portal Designer.
The canvas is the design area, including the banners and pages of your portal. When the portal itself is the selected object, a red outline appears around the entire canvas.
Properties Panel
Breadcrumb Trail
- It indicates the currently selected item.
- You can use it to change the currently selected item.
Click any portion of the breadcrumb trail to change the currently selected item. This feature is another way to select an item, in addition to selecting it through the canvas. This feature is especially useful when you are working with hidden or layered content.
| WebFOCUS | |
|
Feedback |